Introduction of Jenkins pipeline
Jenkins Pipeline is a suite of plugins which supports implementing and integrating continuous delivery pipelines into Jenkins.

On this page (4)
Continuous Integration is the most important part of DevOps that is used to integrate various DevOps stages. Jenkins is the most famous Continuous Integration tool. Have you ever wondered why Jenkins has gained so much popularity, especially over the recent years? One of the major factors that contribute to its popularity is the Jenkins pipeline. Moreover, we have already understood what is Jenkins? And how we may use it in our previous articles.
Now we will go a step ahead and understand what Jenkins pipeline is? Subsequently, we will dive through its concepts and learn to about a Jenkins Pipeline in this article.
What is Jenkins pipeline? #
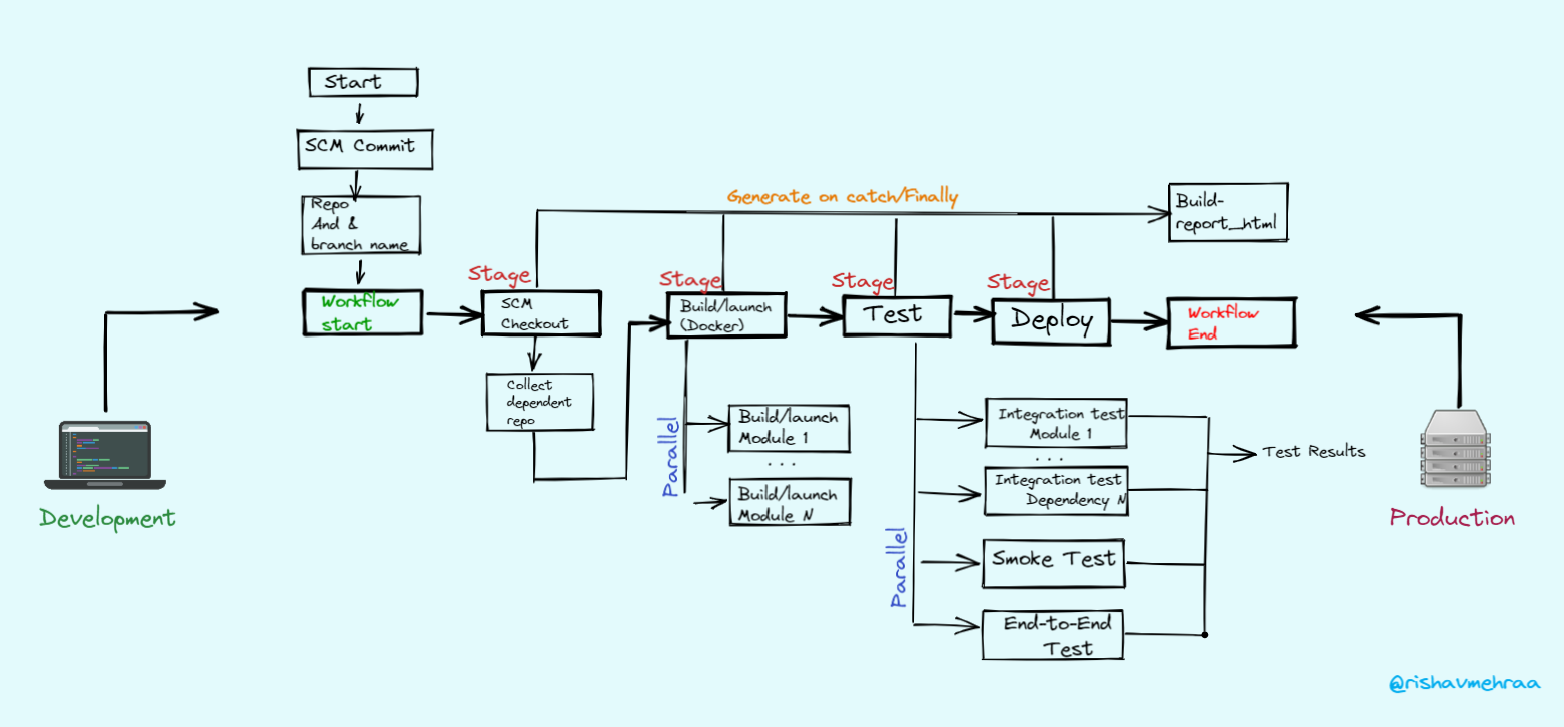
The Jenkins pipeline in CI/CD automates many tasks and makes the CI/CD pipeline tasks reliable, efficient, repeatable, and high in quality. It defines a complete list of events that happen in the code lifecycle. Starting from the build, to testing and deployment.
Instead, you were creating and configuring jobs on the Jenkins users interface you would write a file or script that build, and it's configuration in a Jenkinsfile. So, Jenkinsfile is pipeline as a code it's a scripted pipeline. A Jenkinsfile that stores the entire workflow as code, and it can be checked into a Source Code Management (SCM) on your local system.
Some vocabulary related to pipeline #
Jenkinsfile
Jenkins Pipeline is defined using a text file called the Jenkinsfile. Additionally, the pipeline implements as code using Groovy Domain-specific language(DSL); it is stored into an SCM like GitHub for example and can be updated by many ways as using Jenkins master UI or directly from the SCM with a text editor. As it is centralized, it allows developers an easy to access it to edit update and check it.
SCM
Source code management, tracks changes of your code stored in a source code repository, example git or mercurial, it allows you to store a Jenkinsfile and your code on it and to update it from one single point.
Why should you use Jenkins pipeline? #
- Jenkins Pipelines supports big projects. You can run multiple jobs and even use pipelines in a loop.
- Pipelines are robust. So if your server undergoes an unforeseen restart, the pipeline will be automatically resumed.
- Whenever the new code is committed to git, a pipeline can automatically integrate that code and start building pipelines again itself.
- The Jenkins pipeline can be stopped for the inputs from the user.
- It supports larger projects that may involve a high CPU job, provided the Jenkins infrastructure is scalable enough to support it.
Pipeline structure components #
- Pipeline is structured in sections, called stages
- Each stage includes steps
- steps include the actual tests/commands to run
- An agent defines where the programs and scripts execute
Pipeline
This is a user-defined block that contains all the processes such as building, testing, deploying, etc. It is a collection of all the stages in a Jenkinsfile. All the stages and steps are defined within this block. It is the key block for a declarative pipeline syntax.
pipeline {
}
Node
A node is a machine which is part of the Jenkins environment and is capable of executing a Pipeline.
Also, a node block is a key part of Scripted Pipeline syntax.
node {
}
Agent
It instructs Jenkins to allocate an executor for the builds. It is defined as an entire pipeline or a specific stage.
It has the following parameters:
Any: Runs pipeline/ stage on any available agent
None: applied at the root of the pipeline, it indicates that there is no global agent for the entire pipeline & each stage must specify its own agent
Label: Executes the pipeline/stage on the labelled agent
Docker: Uses docker container as an execution environment for the pipeline or a specific stage
pipeline {
   agent {
   	docker {
   		image 'ubuntu'
   	}
   }
}
Stage
A stage block defines a conceptually distinct subset of tasks performed through the entire pipeline (e.g. "Build", "Test", and "Deploy" stages), which is used by many plugins to visualize or present Jenkins Pipeline status or progress.
pipeline{
	agent any
	stages {
		stage ('Build'){

		}
		stage ('test'){

		}
		stage ('Deploy'){

		}
	}
}
Step
A single task. Fundamentally, a step tells Jenkins what to do at a particular point in time (or "step" in the process). For example, to execute the shell command make, use the sh step: sh "make". When a plugin extends the Pipeline DSL, that typically means the plugin has implemented a new step.
pipeline{
	agent any
	stages {
		stage ('Build'){
			steps {
			echo 'building the code application...'
			}
		}
	}
}
Two types of pipelines #
- **Scripted pipeline: **Sequential execution, using Groovy expressions for flow control
- **Declarative pipeline: **It uses a framework to control execution (pre-defined commands to ease pipeline creation)
Scripted pipeline #
In the early days of the Jenkins Pipeline, there was only one way to define the pipeline, which we now call a Scripted pipeline
The Jenkins scripted pipeline uses domain-specific language (like Groovy) that simplifies numerous tasks while creating a pipeline. In a scripted pipeline, users can inject groovy code during declaring. One of the major advantages of scripted pipelines is that they are very flexible and expressive.
Syntax of Jenkins Scripted Pipeline The Jenkins Scripted Pipeline generally starts with one or more node blocks.
node {
     stage (' Build')
}
Although defining a Scripted Pipeline with the node is not a mandatory requirement, confining your pipeline inside a node block provides various advantages, like
- Queue the stage and run the stages as soon as the executor is free.
- Creates a workspace where work can be done
**Quick example using Scripted pipeline **
Here are the steps you need to take to setup a Jenkins Pipeline.
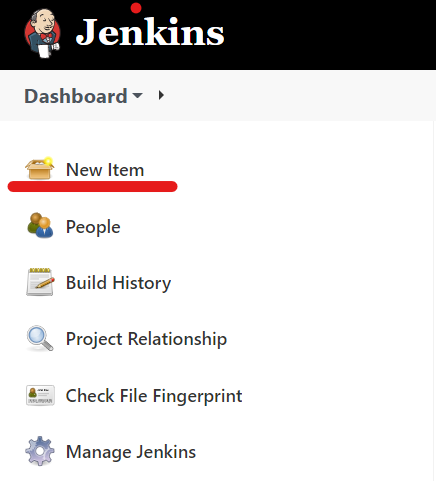
- First, log on to your Jenkins server and select “New Item” from the left panel:
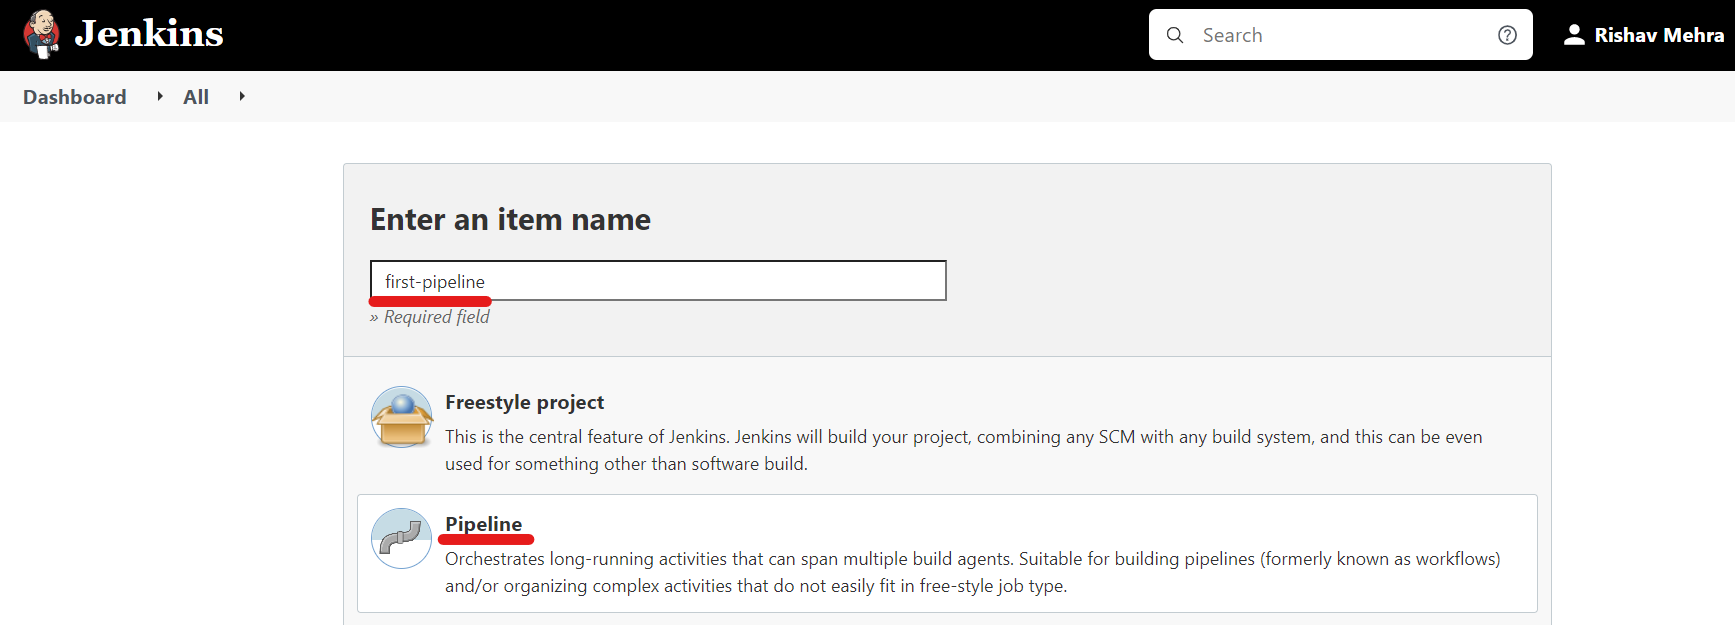
- Next, enter a name for your pipeline and select “Pipeline” from the options. Click “Ok” to proceed to the next step:
- Now, let's start working your Pipeline script
node {  (1)
    stage('Build') { (2)
        echo 'building the application...' (3)
    }
    stage('Test') { (4)
        echo 'testing the application...'  (5)
    }
    stage('Deploy') { (6)
        echo 'deploying the application...' (7)
    }
}
Code Explanation: (1) Execute this Pipeline or any of its stages, on any available agent. (2) Defines the "Build" stage. stage blocks are optional in Scripted Pipeline syntax. However, implementing stage blocks in a Scripted Pipeline provides clearer visualization of each `stage’s subset of tasks/steps in the Jenkins UI. (3) Perform some steps related to the "Build" stage. (4) Defines the "Test" stage. (5) Perform some steps related to the "Test" stage. (6) Defines the "Deploy" stage. (7) Perform some steps related to the "Deploy" stage.
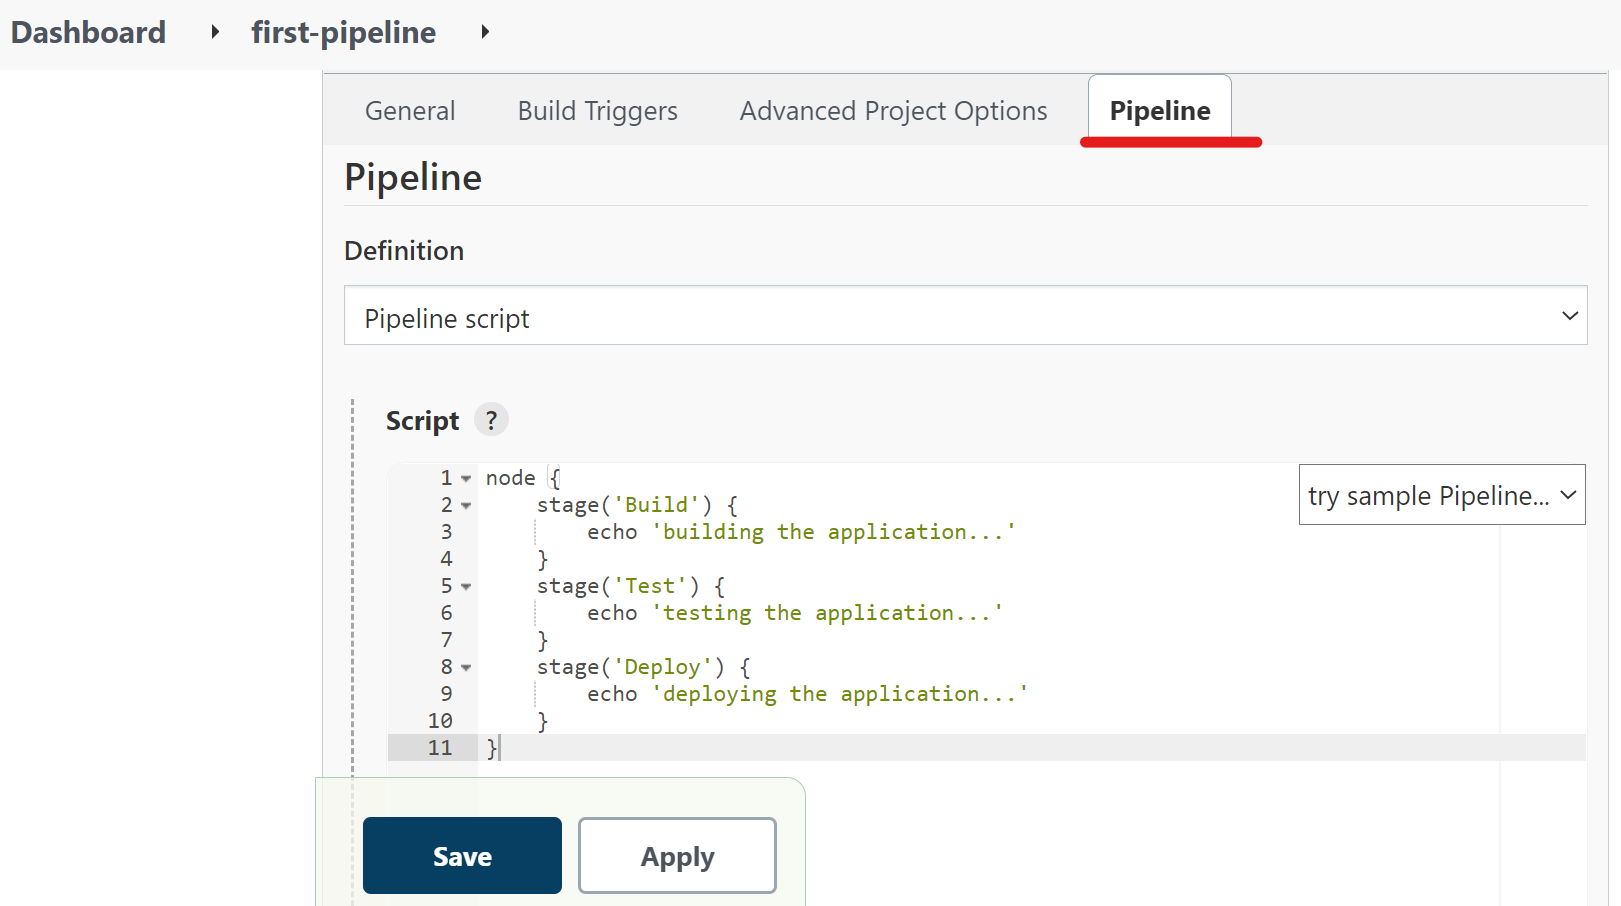
Save it!
- Start Building the pipeline by clicking on the "Build Now"
Once the job is successful, you will get the below window.
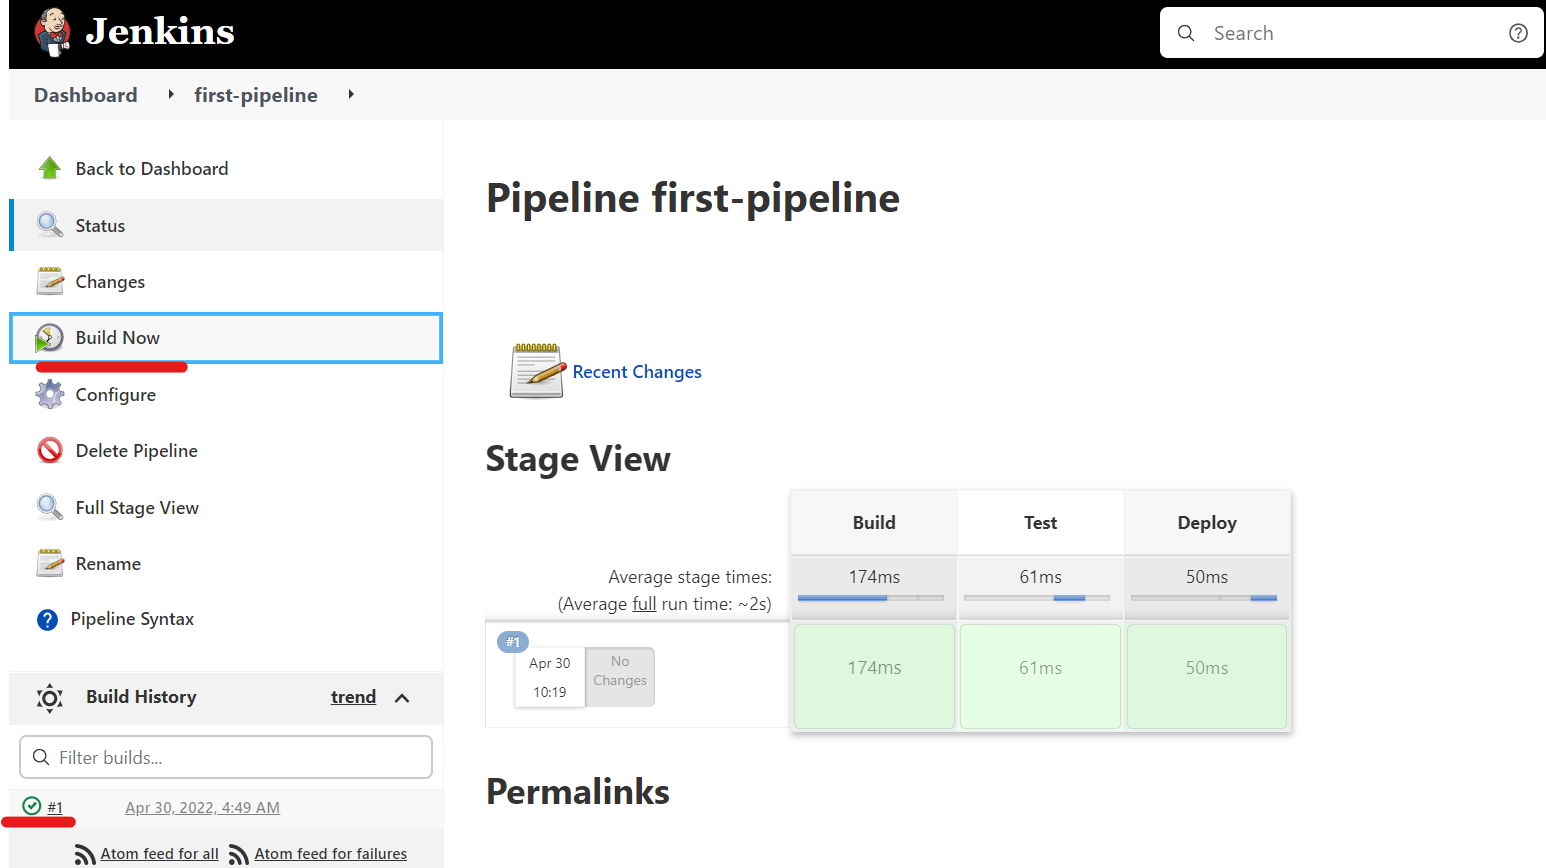
Click on #1 to check the log execution on the pipeline
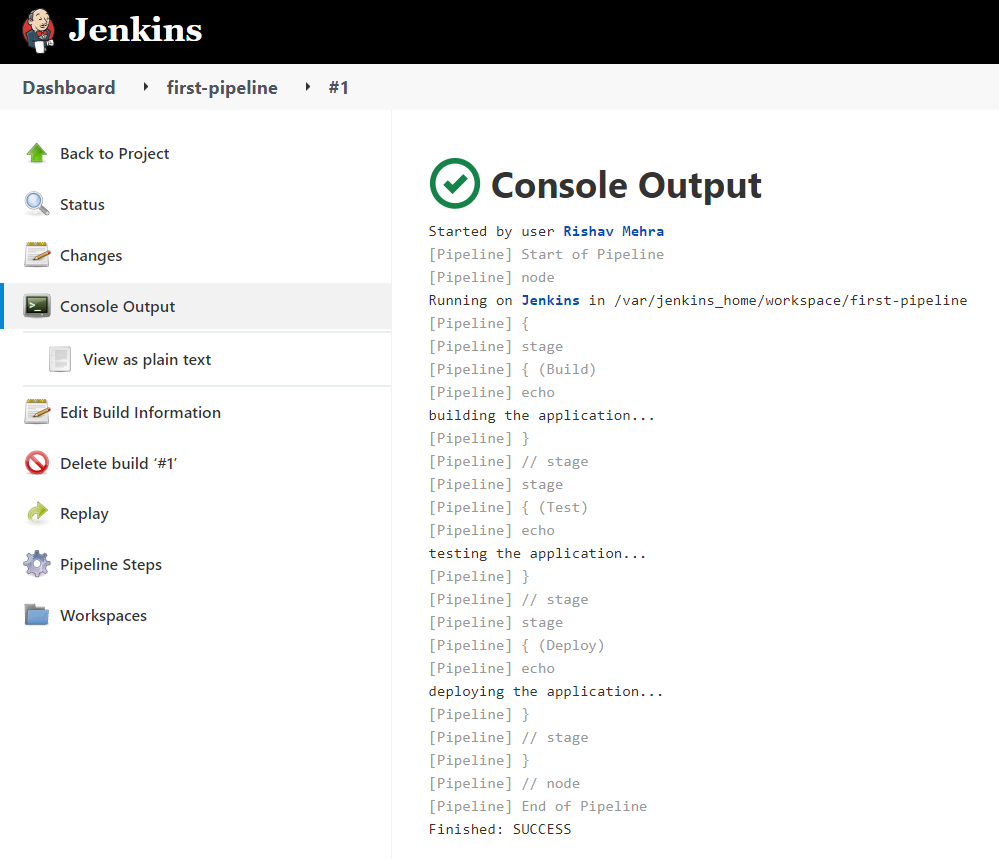 From the above output, it is clear that the job ran successfully
Awesome, you have successfully understood and run your first Jenkins Scripted Pipeline.
Declarative pipeline #
The Declarative pipeline is a new feature that is added to create the pipeline. The workflow is written in a Jenkinsfile, which can be stored in a source code management system such as Git. Declarative pipelines role is to help developers create simple and quick continuous delivery pipelines using a set of pre-defined commands.
Declarative pipeline syntax
Note that the syntax of declarative pipeline is beginning by a “pipeline” block
pipeline {
    agent any
    stages {
        stage('Build') {
            steps {
                //
            }
        }
        stage('Test') {
            steps {
                //
            }
        }
        stage('Deploy') {
            steps {
                //
            }
        }
    }
}
To create a declarative pipeline, you need to have a Jenkinsfile in place. Since I will be using the project from my Github account, I have already placed the Jenkinsfile in my project.
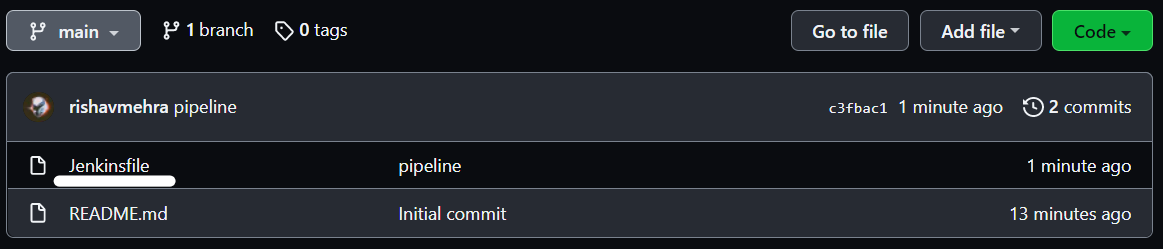 GitHub repo link: https://github.com/rishavmehra/JenkinsPipeline
Here are the steps you need to take to setup the Jenkins Declarative pipeline
- First, log on to your Jenkins server and select “New Item” from the left panel:

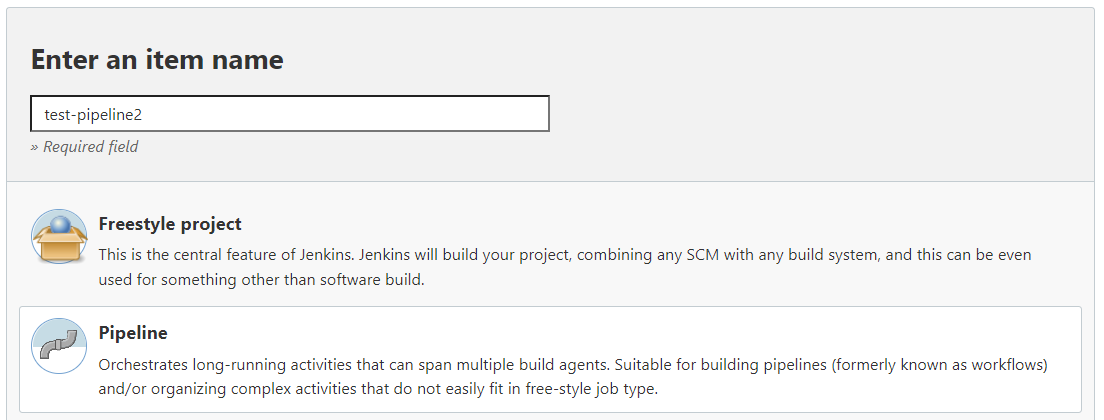
- Next, enter a name for your pipeline and select “Pipeline” from the options. Click “Ok” to proceed to the next step
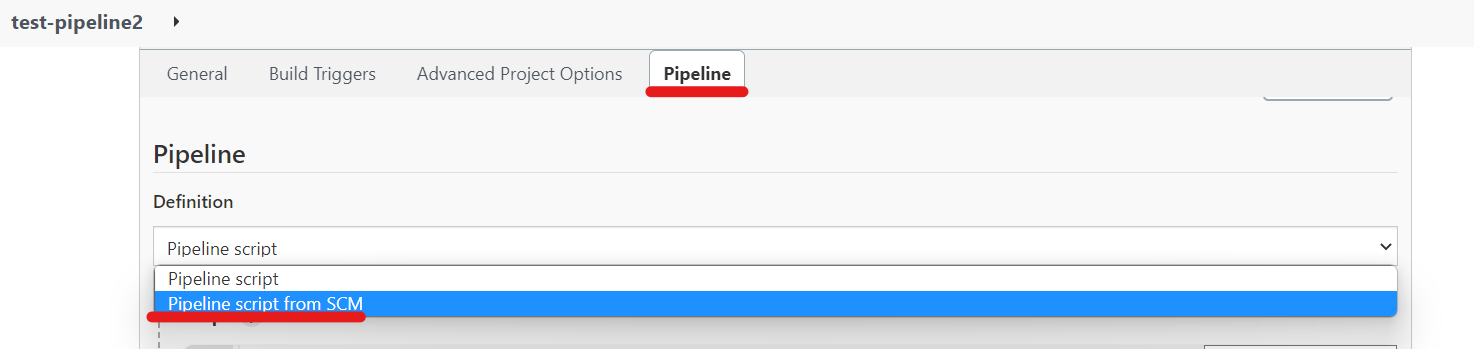
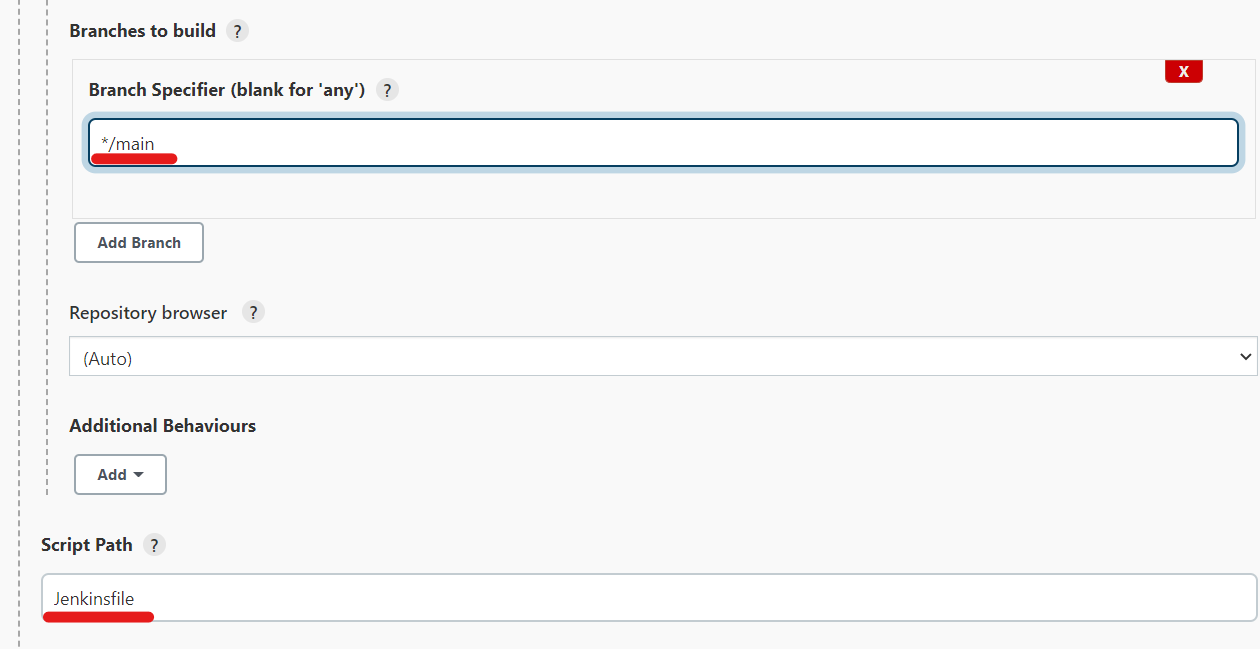
- Go to the Pipeline tab, and from the Definition, the dropdown selects the 'Pipeline script from SCM'
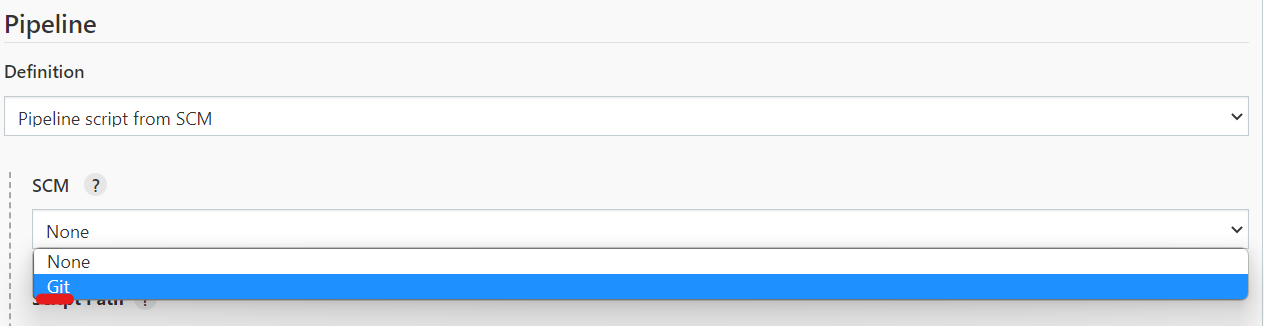
- You need to select Git from the SCM dropdown now.
- Now, you will get an option to input your Repository URL and credentials(if private).
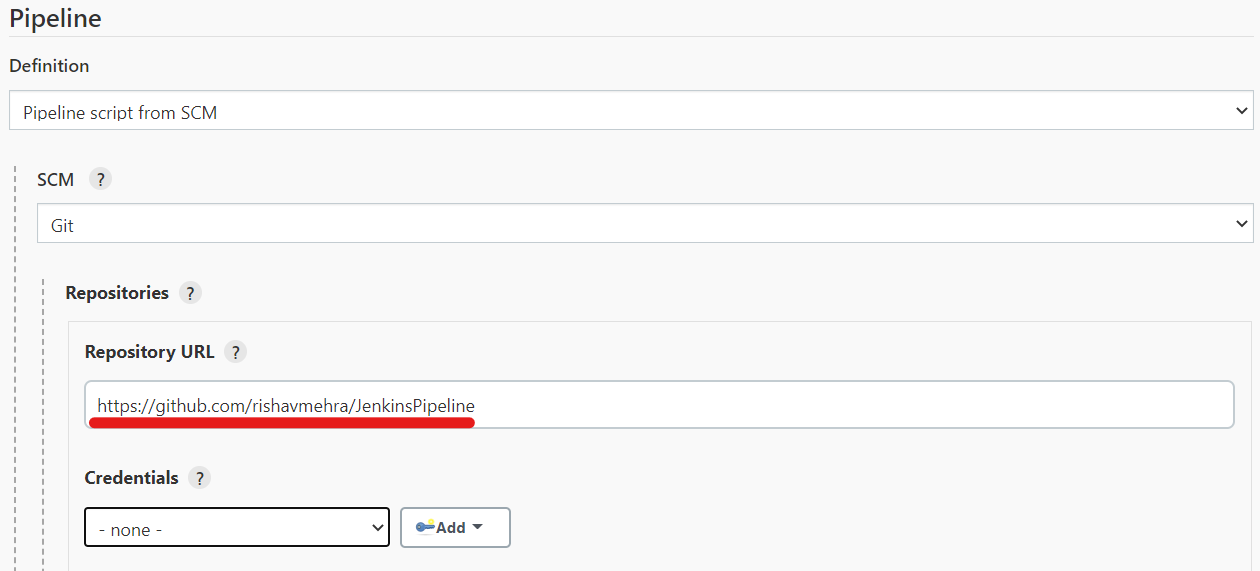
- Next, you may set the branch. In the script path, you need to write the Jenkinsfile name that exists in your repository. Click Save, and your declarative pipeline is now ready to use.
Now that you are all set with your pipelines, you can execute the same from your Jenkins UI. All you need to do is select your pipeline and click on 'Build Now' link on the left panel.
Once you run the pipeline, you will see the results displayed on the stage view as shown below-

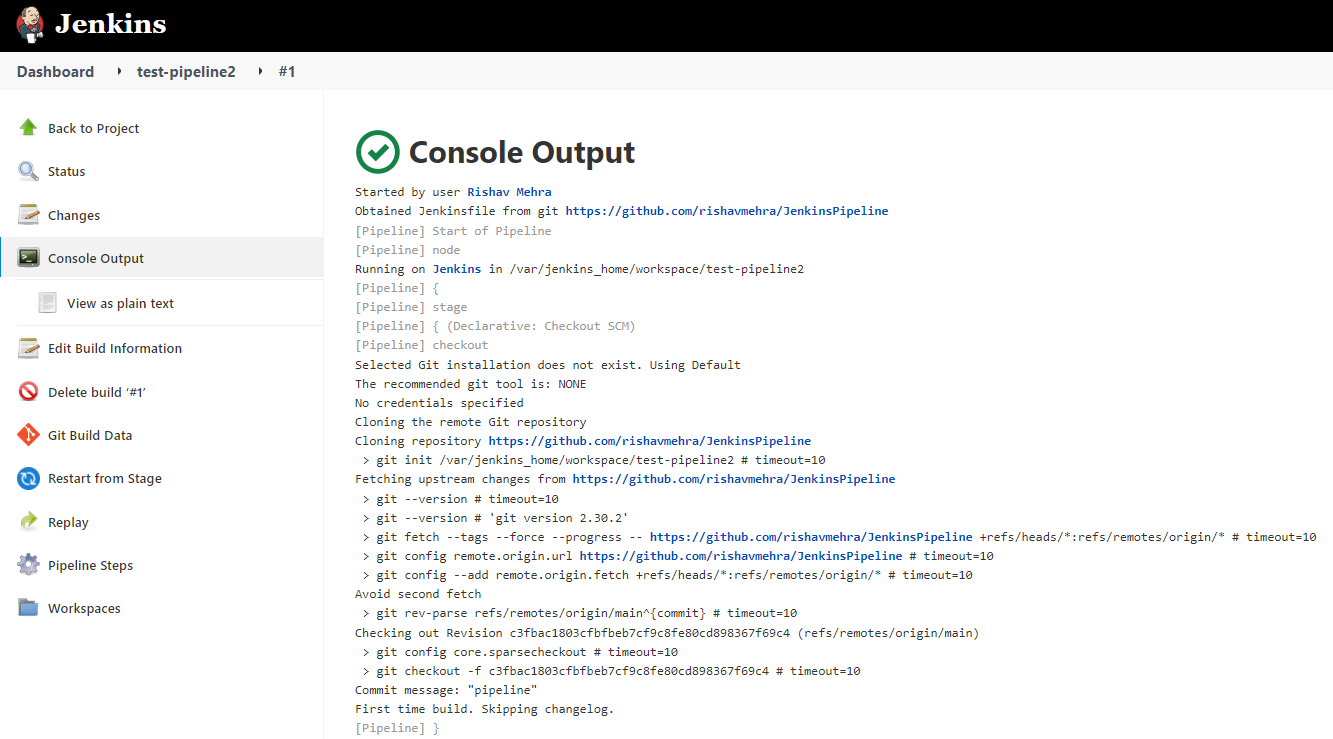
You can view the console output for the build as well, which would display the print statements and errors(if any) that will be helpful for your debugging.
Conclusion #
Now we know the pipeline concept and the two types of pipeline that can be used , one requiring more scripting skills and the other with pre-defined commands to ease the conception. I hope you have got some basic idea of the Jenkins pipeline. Here's the link to their official page, so do check it out! Jenkins
If you liked the blog, don't forget to like, share, and follow it for more such tech blogs. Also, feel free to connect with me on Twitter.
THANKS FOR READING !!
Join the awesome kubesimplify community for more such blogs!🤩
Get new posts in your inbox.
Spotted a typo or want to improve this post? Edit on GitHub →