Introduction to Helm!
Kubernetes is awesome at managing complexities and we humans often tend to struggle while dealing with complexities. An application deployed on a…

On this page (7)
Why Helm? #
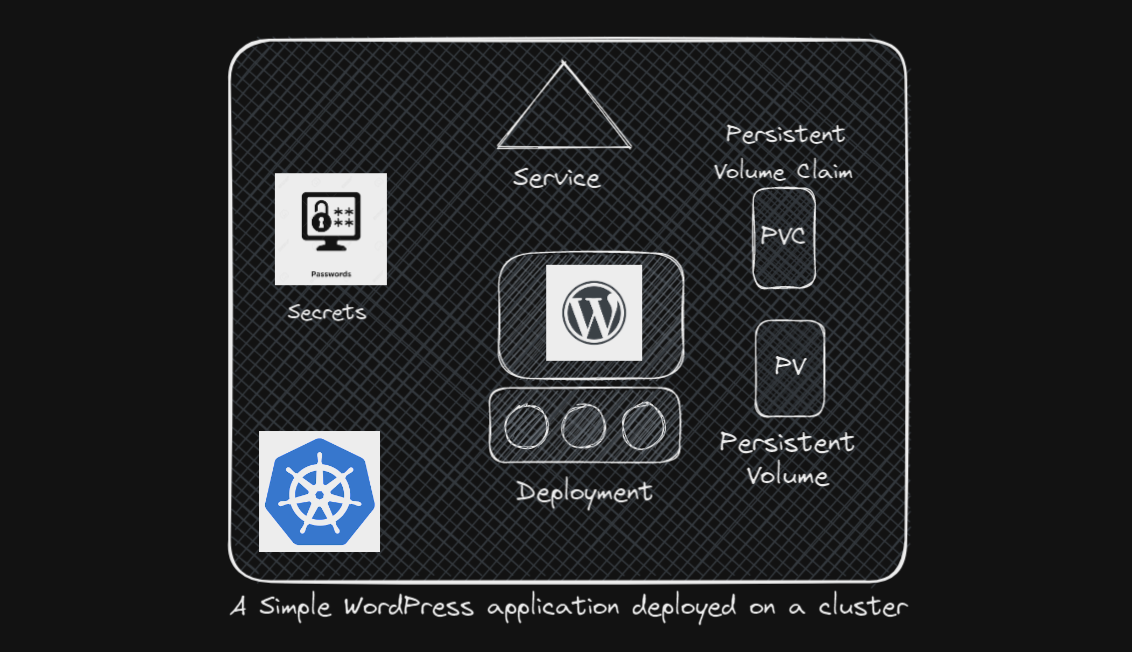
Kubernetes is awesome at managing complexities and we humans often tend to struggle while dealing with complexities. An application deployed on a Kubernetes cluster can be very complex to handle. A typical application made up of a collection of objects needs to be interconnected to work. Let us take an example of a simple WordPress site that might need deployment to deploy the pods that you want to run such as MySQL web servers, a persistent volume(PV) to store the database, PersistentVolumeClaim(PVC), a Service to expose the web server running in a pod to the internet and a Secret to store admin credentials & maybe other things like periodic backups, jobs and so on.
For every Object, we might need a separate YAML file, and then we apply kubectl apply to get these objects created which can be a tedious task and this even not might be the end of it if we download these YAML files from a remote repository and we might want to change its default settings. Assuming months went by and we might want to upgrade some components in our application, we'll have to edit all those YAML files with great care again! Sometimes, if we might want to delete the application, we'll need to remember each object that belongs to our application and delete them one by one. Isn't it such a tedious task? Some of you might think, It will be better if we combine all YAMLs into a single YAML and be done with it. Well, that's true but it will become even harder for us to look for the editing purpose in future changes which could be up to, for instance,25-30 pages of a YAML file. In separate YAML files at least we'll be able to easily categorize them into different categories.
Enters Helm!! #
Helm changes the entire scenario! Kubernetes doesn't care about our application as a whole. All it knows is that we have created different objects in its cluster. It treats each component of the WordPress application as a separate individual entity and doesn't know that these are the components of the WordPress application! However, Helm is built from the ground to know about such stuff. That's why it's sometimes called Packet Manager for Kubernetes. It looks at those objects as a part of a big package as a group. Whenever we want to perform an action, we don't tell Helm the objects it should look after rather we tell Helm it belongs to the WordPress package, and then on the package name, it then knows what object it should edit even if 100s of objects belong to that package!
We all have played games such as FIFA, GTA, etc which contained different types of files such as audio, saved, visuals, etc. Fortunately, we didn't have to go through the horrors of installing each different component individually instead we execute the game installer and specify the directory where we want to install it and it does the rest. Helm does a similar thing, more of the YAML files and the Kubernetes objects that make our application.
$ helm install wordpressUsing Helm, we install our whole application using a single command even if it needs hundreds of objects. Helm proceeds to automatically add every necessary object to Kubernetes without bothering us about the details. We can customize the settings for our application or package by specifying desired values at the install time but instead of having to edit multiple values in multiple YAML files, we have a single location where we can declare every custom setting. In a file like values.yaml, we can change the size of persistent volumes, choose the name of our WordPress website, admin password, settings for the database engine, and so on. We can upgrade our application with a single command.
$ helm upgrade wordpress
$ helm rollback wordpress
$ helm uninstall wordpress
Helm will know what individual objects need to change to make the desired changes happen. Helm also keeps track of all the changes made to the app files and that allows us to roll back to the previous so-called revision. We use a single command to uninstall our app and it keeps track of all the objects used by each app so it knows what to remove. We don't need to remember each object that belongs to one of our apps anymore or use ten separate commands to remove everything. Helm does all the work.
Installing and configuring Helm! #
Before installing helm, we must have a functional Kubernetes cluster and kubectl installed and configured on your local computer with the right login details set up in the kubeconfig file to work with the intended Kubernetes cluster. You can also try setting up Helm on an already set-up Kubernetes cluster on Killercoda or setting up Minikube which is a lightweight Kubernetes implementation that creates a VM(virtual machine on your local machine and deploys a simple cluster containing a single node).
https://killercoda.com/playgrounds
Helm can be installed on Linux, Windows, or Mac OS systems. We will go over the instructions for installing Helm on Linux systems in this blog.
- Systems with snap can install helm using the snap install helm command. Use the classic option to install a more relaxed sandbox that gives the app a bit more access to the host system rather than strictly isolating it to its separate environment. This way Helm can easily access the kubeconfig file in your home directory so it knows how to connect to your Kubernetes cluster
$ sudo snap install helm --classic- For APT-based systems such as Debian or Ubuntu, Follow the instructions to add the key and sources list before installing Helm.
$ curl https://baltocdn.com/helm/signing.asc | gpg --dearmor | sudo tee /usr/share/keyrings/helm.gpg > /dev/null

$ sudo apt-get install apt-transport-https --yes

$ echo "deb [arch=$(dpkg --print-architecture) signed-by=/usr/share/keyrings/helm.gpg] https://baltocdn.com/helm/stable/debian/ all main" | sudo tee /etc/apt/sources.list.d/helm-stable-debian.list

$ sudo apt-get update
$ sudo apt-get install helm- And for PKG, run the package install helm command
$ pkg install helm- For installing Helm on Windows and Mac OS Refer to the Official Helm documentation
Helm 2 vs 3 #
Helm 1.0 was released in Feb 2016, 2.0 in Nov 2016, and 3.0 in Nov 2019. Since the project was launched, Helm has gone on to better as Kubernetes itself was improving. So during these things, There have been significant changes in Helm 2.0 and 3.0
Helm 2 #
Helm has a CLI client installed on your local machine that helps to perform Helm-specific actions against your Kubernetes cluster. When Helm 2 was launched, Kubernetes lacked features like RBAC(Role Based Access Control) and Custom Resource Definitions. To allow Helm to perform its actions, an extra component Tiller is installed in the K8s cluster. So, Whenever a user wanted to perform some Helm-specific action, It communicates with the tiller that is running on some server which in turn communicates with the K8s cluster and proceeds to take the action requested by the user. So, Tiller being the middleman adds complexities to the cluster and gives rise to security concerns. By default, Tiller has the privilege to do whatever it wanted. This is good as it allows us to make all necessary changes in a K8s cluster to install charts (Discussed Later). But this was also bad since anybody with Tiller access can do whatever they want.
After the introduction of Role Based Access Control (RBAC) and Custom Resource Definitions in Kubernetes, The need for Tiller decreased, so It was removed entirely in Helm 3. Now, nothing was sitting between the Cluster and Helm CLI, and security improved with RBAC as users can be limited with what they do with Helm. Before RBAC, we had to set these limits in Tiller which was not the best option but with RBAC built from the ground up to fine-tune permissions in K8s, it is pretty straightforward to do. As far as K8s is concerned, It doesn't matter if you are trying to make changes by accessing the cluster with kubectl or with helm commands, The user requesting the changes has the same RBAC allowed permissions whatever tool they use. That's a big difference between Helm 2 and 3 where Helm 2 uses Tiller while Helm 3 simplifies it by removing Tiller & integrating it with Kubernetes.
3-Way Strategic Merge Patch #
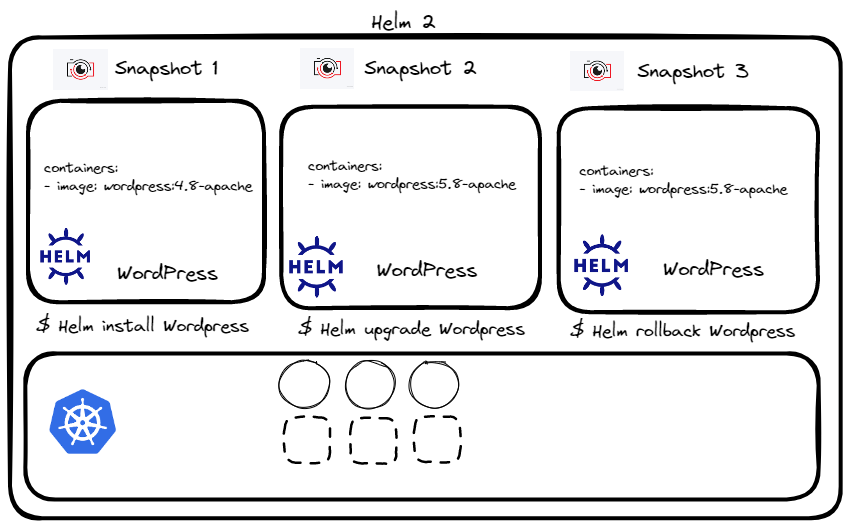
Helm has a very cool snapshot feature. Let's take an example of installing a WordPress website using Helm. It'll create revision number 1 for this install. Then you upgrade your site to an updated version by changing the image, Helm will take us to snapshot number 2 which will be the exact state of the Kubernetes cluster at that moment in time. If there is a need you can return to snapshot 1 by creating a new snapshot 3 which will be in the same state as snapshot 1 which was at the start of the installation of the WordPress website. Helm 2 was less sophisticated when it came to how we did such rollbacks. When a rollback command is issued, Helm compares the current chart which is the chart that has the current WordPress website image 5.8 in it with the previous chart, which is the chart that has WordPress 4.8 image in it, and concludes that they are different so it applies the original chart to revert the image to 4.8
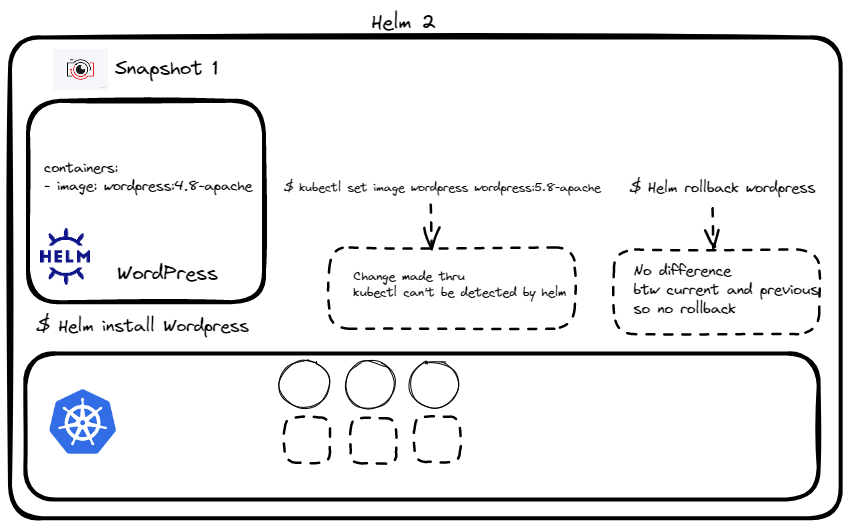
Let's consider a situation where we create Snapshot 1 just like above but for upgrading to a newer image with the kubectl set image command, so the application gets updated and this is done without using Helm and this does not create a Snapshot in Helm because the change was not made using Helm. When we know rollback, Helm compares the current version with the previous version. Since there is only one revision, Helm does not detect any changes, so it does not roll back or make any changes to the deployment. In this case, this didn't help us as the user change made through kubectl is still active.
On the other hand, Helm 3 is more intelligent. It compares the chart currently in use if we had created a revision that is which we didn't, the chart we want to revert and also the Life state, how our Kubernetes objects look like, and their declarations in the YAML form. This is where the fancy name 3-way Strategic Merge Patch comes from. By also looking at the live state, it notices the image version is 5.8 but the image in Snapshot 1 that we want to revert to is 4.8. So, it makes necessary changes to come back to the original state.
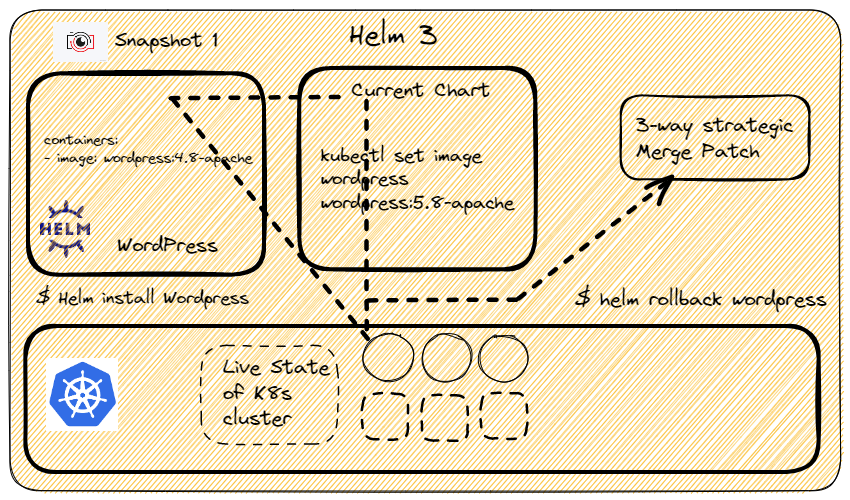
Besides rollbacks, there are things like upgrades where Helm2 was also lacking. For example, you want to install a chart but then you make some changes to some of the Kubernetes objects installed. It all works nicely until you want to perform an upgrade. Helm 2 looks at the old chart and the new chart you want to upgrade to and all your changes will be lost since they don't exist in the new chart whereas Helm 3 looks at the chart as well as the Live State of the cluster and notices the changes made by the user and make changes preserving the additional tweaks made by the user.
Helm Components #
Let's get familiar with the components in Helm, their general structure, and the concepts that we are going to be working with it. We have the Helm Command line Utility (Helm CLI) that we'll be using to perform Helm actions such as installing charts etc. Charts are collections of files and they contain all the instructions to be known to create a collection of objects that you need in a Kubernetes Cluster. By using charts and adding the objects according to the specific instructions in the chart, Helm installs the application in your Kubernetes Cluster. When a Chart is applied to your cluster, a Release is created. A Release is a single installation of an application using a Helm Chart. Within each release, You can have multiple revisions (snapshots of an application).
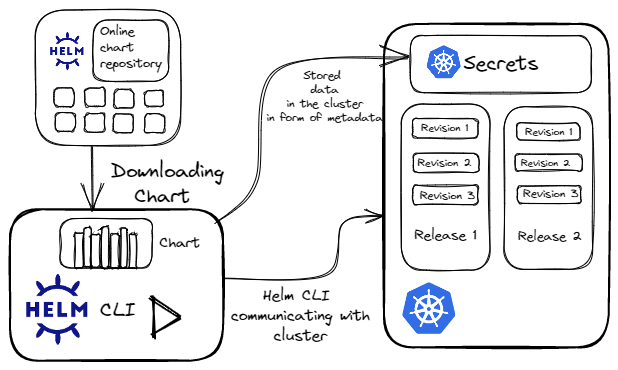
Every time a change is made to the application such as an upgrade of the image or change of replicas or configuration objects, a new revision is created. Just like how we can find all Docker Images at Docker Hub, In the same manner, we can find Helm Charts in a public repository. We can easily download publicly available charts which are readily available and we can use them to Deploy Applications on our cluster. And finally, to keep track of what it did to our cluster such as the releases that it installed, charts used, revision state, etc. Helm needs a place to save this data. This data is known as Metadata (data about data). It wouldn't be too useful if Helm saves this on our Local Computer. If another person needs to work with our Helm Releases through Helm, he would need to have a copy of this data. Helm does the smart thing by storing this data in our Kubernetes cluster as Kubernetes Secrets. This way data survives as long as the Kubernetes cluster survives, and everyone from a team can access it. They can perform different Helm actions to it. The punchline is that Helm will know about everything you did to cluster and will be able to keep track of every step you do since it has its metadata always available
Charts #
Charts are collections of files. They contain all the instructions that Helm needs to be able to create the collection of objects that you need in your Kubernetes cluster. By using these Charts and adding the objects according to the User's modification, Helm installs the application in your Kubernetes cluster.
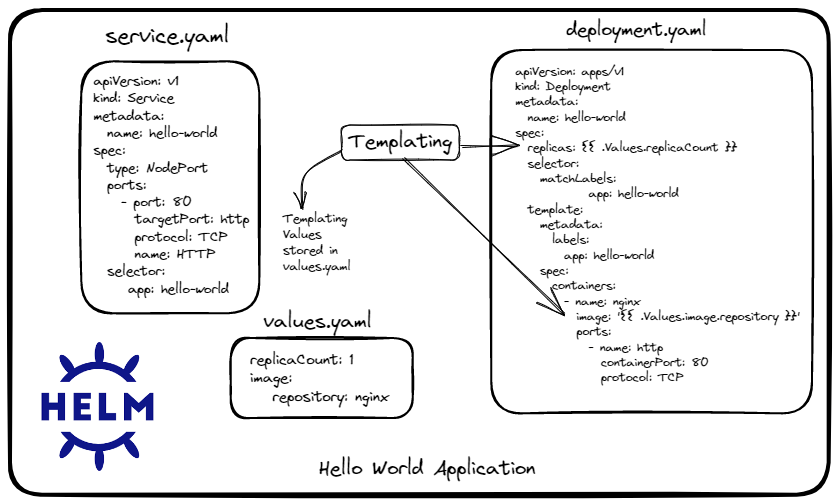
Let's take an example of a simple Hello World application which is a simple Nginx based web-server and a service to expose it. In this, we have two objects, a Deployment, and a Service. In the Deployment YAML file, you'll notice that images and replicas are specified in a different format. This is known as templating. The values that go here a part of another file called values.yaml file.
In helm Chart, we'll be often interacting with this special file(values.yaml). Most of the time, we won't have to build a chart ourselves. We simply have to download it from an online public repository. We'll just have to configure the package that we installed through that chart. The values.yaml is the place where the configurable values are stored. Most of the time, this will be the only file you'll have to modify to customize the deployment of the application for your needs! This is like the setting file for Helm Chart.
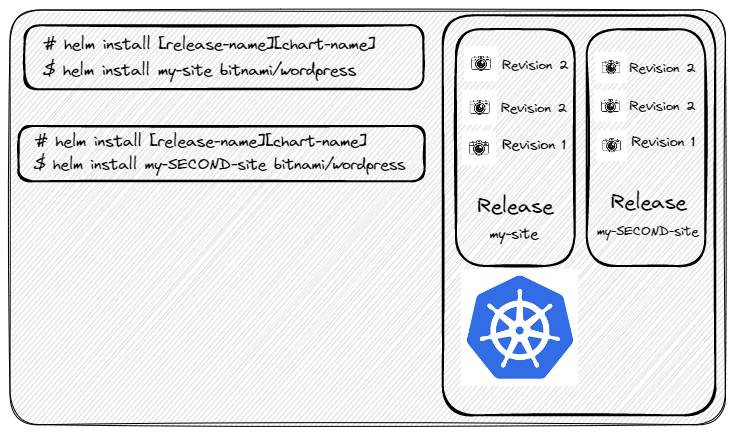
When a Chart is applied to your cluster, a release is created. One question might arise! Why the need for an additional item? Why can't we say we just say we installed a chart to Kubernetes? One simple reason why it makes more sense to have releases based on charts is that we can install multiple releases on the same chart so we can launch, for example, a second WordPress site with a command such as a helm install my-second-site bitnami/wordpress. Since they are two different releases, they can be tracked separately! Even though they are based on the same chart as releases, they are two entirely different entities. Now, this can come in handy in a lot of situations. Let's take an example of a WordPress website that can have a release for customers' use and another release for developers who can internally add features without breaking the main website. Since the two releases are based on the same chart, once they successfully integrate it into the development side, they can transfer it to the main website since it should work exactly in the same way as both the websites are clones and built the same way!
Thousands of charts are readily available at different Helm repositories across the world. Different providers are hosting Helm repositories such as Appscode, Community Operators, True Charts, Bitnami, etc. All of these repositories have listed their charts in a single location known as Helm Hub or Artifact Hub.
Working with Helm: Basics #
$ helm --help
> This command will list helpful information on how to execute a particular command in a summarized manner.

$ helm restore --help
>  We can also use this to look for subcommands
Launching a WordPress website in a Kubernetes Cluster #
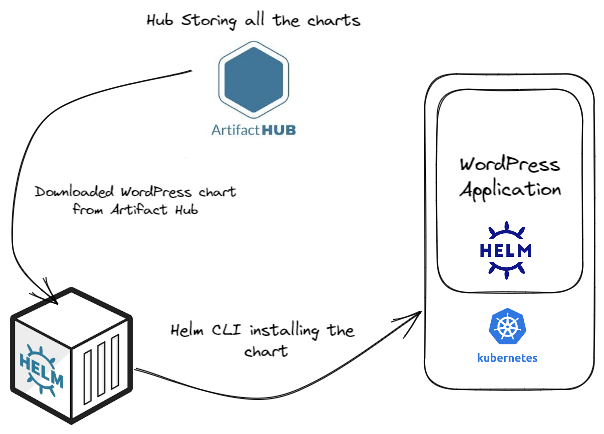
Downloading the WordPress chart from Artifact Hub which has official mentioned before it as it would be by the official developers of that website!
- We can search for the WordPress chart through Helm CLI also
$ helm search wordpress --search_where
> In search_where we have to mention where we have to look for this. Specify the hub or repo. This will list all the charts listed at artifacthub.io
$ helm search hub wordpress- Once Chart is Identified, we can deploy the application in two commands which are listed on the README file of that chart!
$ helm repo add bitnami https://charts.bitnami.com/bitnami
$ helm install my-release bitnami/wordpress
Now once the chart has been deployed successfully! It is deployed as a release
- To list, all existing releases, Run the following command! This is very useful not only to see what is being installed but also which hasn't been updated in a long time.
$ helm list- To delete all traces of this app. Imagine doing this by removing every file one by one which will be a tedious task to get rid of all WordPress elements! But with Helm can be done by a single-line command. We can see the power of Helm as a Package Manager for Kubernetes
$ helm uninstall my-release- Some Other commands while working with the helm
$ helm repo
> This command consists of multiple subcommands to interact with chart repositories. It can be used to add, list, remove, and index chart repositories

$ helm repo list
> Will list all the existing repositories

$ helm repo update
> This command is somewhat equivalent to what a: sudo apt-get update : command does on a Linux OS
There is much more in Helm to explore! but keeping this blog a little short and quite explanatory for beginners to get a taste of helm as a Packet Manager for Kubernetes
For more exploration in Helm: Checkout the official documentation of Helm
Credits for creating this Blog
-
KodeKloud's Helm for Beginners Course By Mumshad Mannambeth
-
Helm's official documentation.
Follow Kubesimplify on Hashnode, Twitter and Linkedin. Join our Discord server to learn with us.
Get new posts in your inbox.
Spotted a typo or want to improve this post? Edit on GitHub →