✨ Introduction to Kubernetes ✨
Let's assume an application. It has multiple services running inside containers. Now, each container have to be scaled as per requirements, the code has…

On this page (7)
💥 Challenges without Container Orchestration 🤔 #
Let's assume an application. It has multiple services running inside containers. Now, each container have to be scaled as per requirements, the code has to be managed.
As containers are scalable so, we can scale it up to a definite number. But this is going to take lots of manual effort. In real world scenarios where you want to scale it up to like 50-100 containers then in that case what happens is that after you scale up these containers manually then you have to manage containers means you have to check whether all are working or not, they are active or not, they are talking to each other or not. So. it's a big task to handle so many containers manually. So, to scale up these containers, we need something so that you don't have to worry about the track of these containers. Here, the Orchestration comes into the picture.
💥 What is container orchestration? #
Container orchestration automates the provisioning, deployment, networking, scaling, availability, and lifecycle management of containers.
Container orchestration tools:
- Kubernetes
- Docker Swarm
- Apache Mesos
- Azure Kubernetes Service (AKS)
- Amazon Elastic Container Service (EKS)
- Google Kubernetes Engine (GKE)
Today, Kubernetes is the most popular container orchestration platform.
💥 What is Kubernetes #
“Kubernetes” is a Greek word, which means helmsman or pilot. “K8s” is an abbreviation derived by replacing the eight letters “ubernete” with “8”.
Kubernetes project was started by Google in 2014, and now it is maintained by the Cloud Native Computing Foundation (CNCF) — an open source software foundation dedicated to making cloud-native computing universal and sustainable.
Kubernetes is an open source containerization orchestration platform for automating deployment, scaling and management of containerized application, i.e. it automates container operations by eliminating the manual processes involved in deploying and scaling containerized applications. It basically groups the containers that make up an application into simple logical units for management.
K8s gives the freedom to take full advantage of on-premises, hybrid or public cloud infrastructures and lets us effortlessly move work close to where it matters to us.
💥 Features of Kubernetes #
Self-Healing - Kubernetes can automatically restart containers that fail during execution and if nodes itself die, then it replaces and reschedules those failed containers on other available nodes.
Automatic Rollbacks & Rollouts - Kubernetes progressively rolls out changes to your application or its configuration, while monitoring application health to ensure it doesn't kill all your instances at the same time and if something goes wrong, Kubernetes will rollback the change for you.
Automated discovery and load balancing - Kubernetes can expose a container with an IP address or domain name and distribute network traffic across containers as needed to maintain performance.
Horizontal Scaling - K8s can scale up and scale down the application as per requirements with a simple command, with a UI, or automatically based on CPU usage.
Storage orchestration - Automatically mount the storage system of your choice, whether from local storage, a public cloud provider such as GCP or AWS, or a network storage system such as NFS, iSCSI, Gluster, etc.
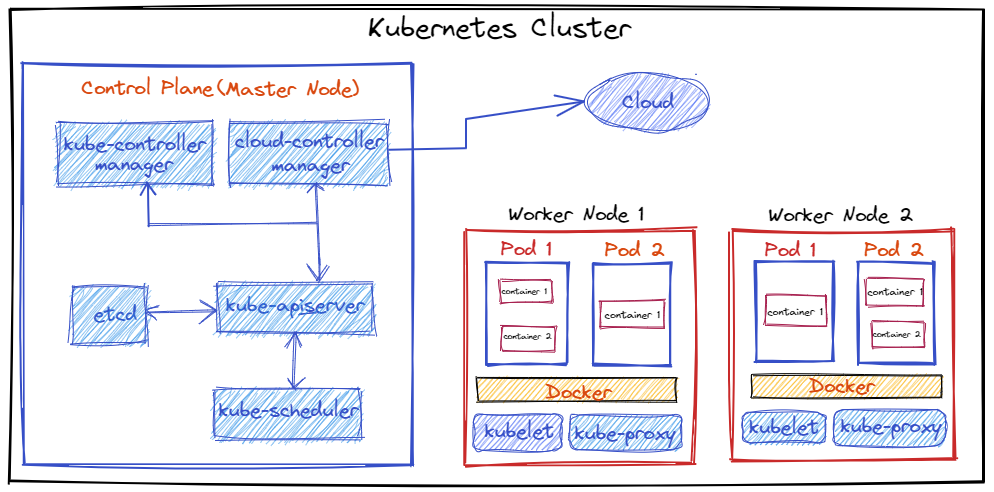
💥 Kubernetes Architecture #
A Kubernetes cluster consists of at least one main (control) plane or master node, and one or more worker machines or nodes. Both the control planes and nodes instances can be physical devices, virtual machines, or instances in the cloud.
🔆 Node
-
A node is the smallest unit of computing hardware in Kubernetes.
-
It is a representation of a single machine in your cluster.
-
Each Node is managed by the control plane.
-
A Node can have multiple pods, and the control plane automatically handles scheduling the pods across the Nodes in the cluster. 🔆 **Pod **
-
Pods are the smallest deployable unit in a Kubernetes cluster.
-
A group of one or more containers, but not necessarily, a Pod usually contains one container.
-
All applications in a pod share the same resources and local network, easing communications between applications in a pod.
🔆 Control Plane
- The control plane is also known as a master node or head node.
- Responsible for managing the k8s cluster.
- It is the entry point for all administrative tasks.
- There can be more than one master node in the cluster, only one of them will be leader.
- The control plane receives input from a CLI or UI via an API.
Control Plane Components
👉 kube-apiserver
- API server is a component of the Kubernetes control plane that exposes a REST interface to the Kubernetes cluster.
- It is the front end for the Kubernetes control plane.
- It tracks the state of all cluster components and manages the interaction between them.
👉 **Etcd **
- Etcd is a consistent, distributed, and highly-available key-value store.
- A persistent storage that stores all of Kubernetes cluster data (cluster state and config).
- It can be part of the control plane, or, it can be configured externally.
👉 **kube-Scheduler **
- Responsible for assigning work to the various nodes.
- It schedules pods to worker nodes.
- It watches api-server for newly created Pods with no assigned node, and selects a healthy node for them to run on. If there are no suitable nodes, the pods are put in a pending state until such a healthy node appears.
👉 kube-controller-manager
- It is a controller of controllers.
- It watches the desired state of the objects it manages and watches their current state through the API server and always make sure that the current state is the same as the desired state.
Some types of controllers are:
- Node controller: Responsible for noticing and responding when nodes go down.
- Job controller: Watches for Job objects that represent one-off tasks, then creates Pods to run those tasks to completion.
- Endpoints controller: Populates the Endpoints object (that is, joins Services & Pods).
- Service Account & Token controllers: Create default accounts and API access tokens for new namespaces.
👉 Cloud Controller Manager
- The cloud controller manager integrates with the underlying cloud technologies in your cluster when the cluster is running in a cloud environment.
The following controllers can have cloud provider dependencies:
- Node controller: For checking the cloud provider to determine if a node has been deleted in the cloud after it stops responding.
- Route controller: For setting up routes in the underlying cloud infrastructure.
- Service controller: For creating, updating, and deleting cloud provider load balancers.
🔆 Worker Node(s)
- The worker node is known as data plane or compute node.
- A virtual or physical machine that contains the services necessary to run containerized applications.
- A Kubernetes cluster needs at least one worker node, but normally has many.
- The worker node(s) host the pods that are the components of the application workload.
- Pods are scheduled and orchestrated to run on nodes.
- Cluster can be scaled up and down by adding and removing nodes.
Worker Nodes Components
👉** kubelet**
- It runs as an agent on each node in the cluster.
- A Kubelet tracks the state of a pod to ensure that all the containers are running and healthy, and provides a message every few seconds to the control plane.
- It watches API Server for work tasks.
- Gets instructions from master and reports back to Masters.
👉 kube-proxy
- Kube-proxy is a networking component that routes traffic coming into a node from the service to the correct containers.
- It is a network proxy that runs on each node in a cluster and manages IP translation and routing.
- It maintains network rules on nodes. These network rules allow network communication to Pods from inside or outside the cluster.
- It ensures each pod gets a unique IP address and makes possible that all containers in a pod share a single IP.
👉 Container runtime
- Container runtime is responsible for running containers (in Pods).
- To run the containers, each worker node has a container runtime engine.
- It pulls images from a container image registry and starts and stops containers.
- Kubernetes supports several container runtimes like Docker, contained, CRI-O.
Installation #
👉 Click on Link for Kubernetes installation according to your requirements.
💥 In this blog, I will show step-by-step guide on how to install minikube on AWS EC2 instance and run K8s command.
Prerequisites
-
An AWS account, if you don’t have one, you can register here
🎯 Launch an Amazon EC2 instance
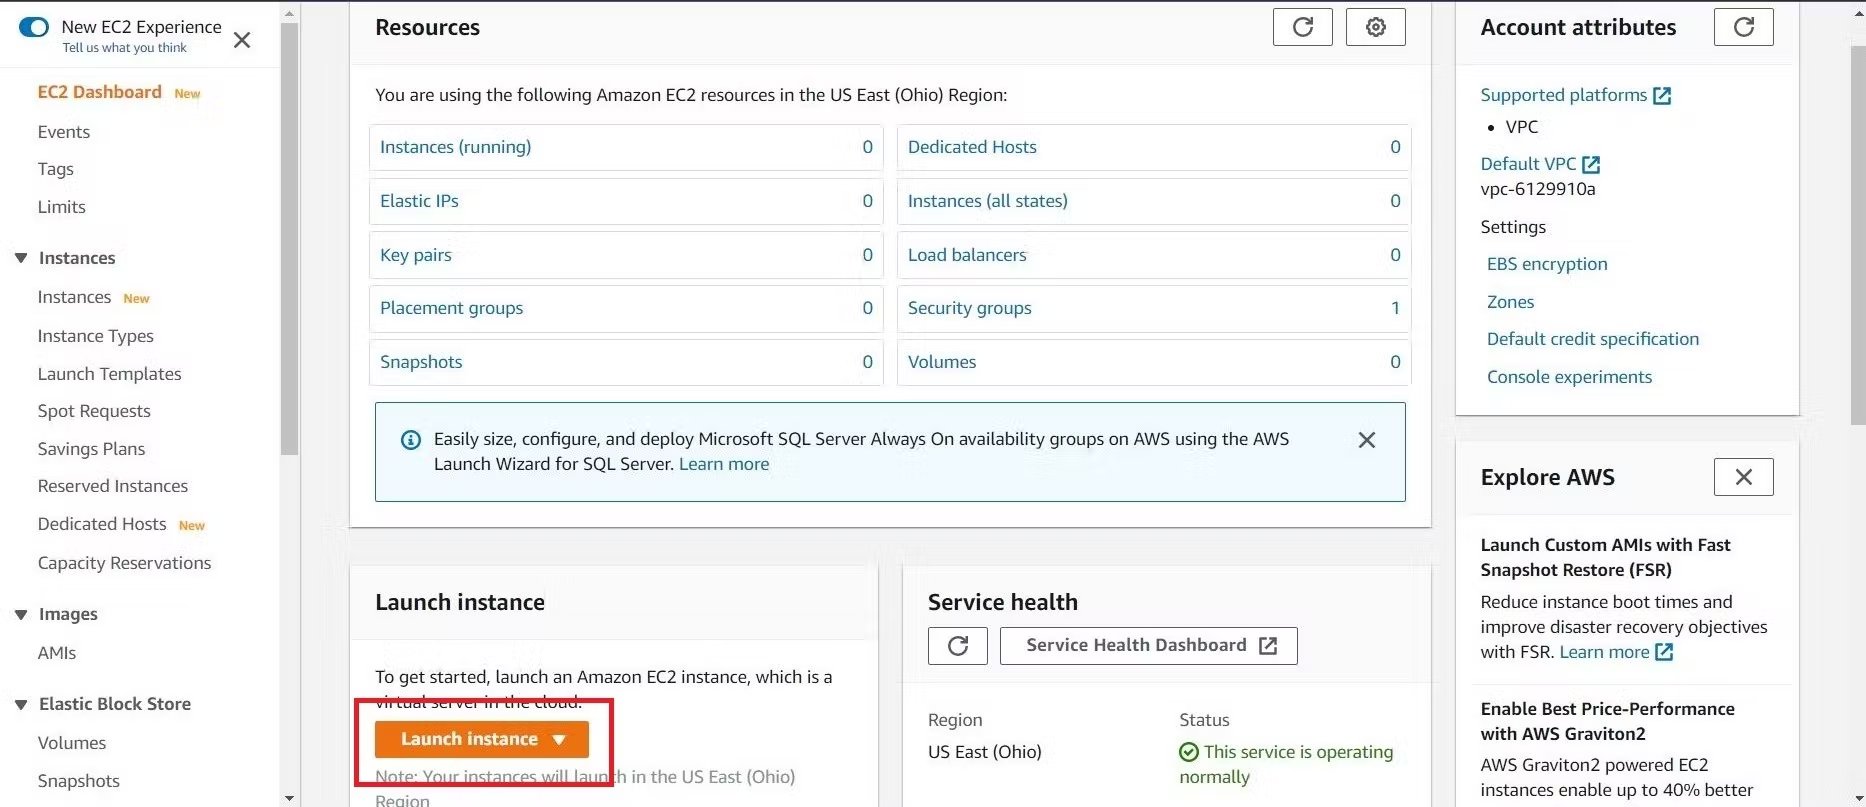
👉 Open the Amazon EC2 console by choosing EC2 under Compute.
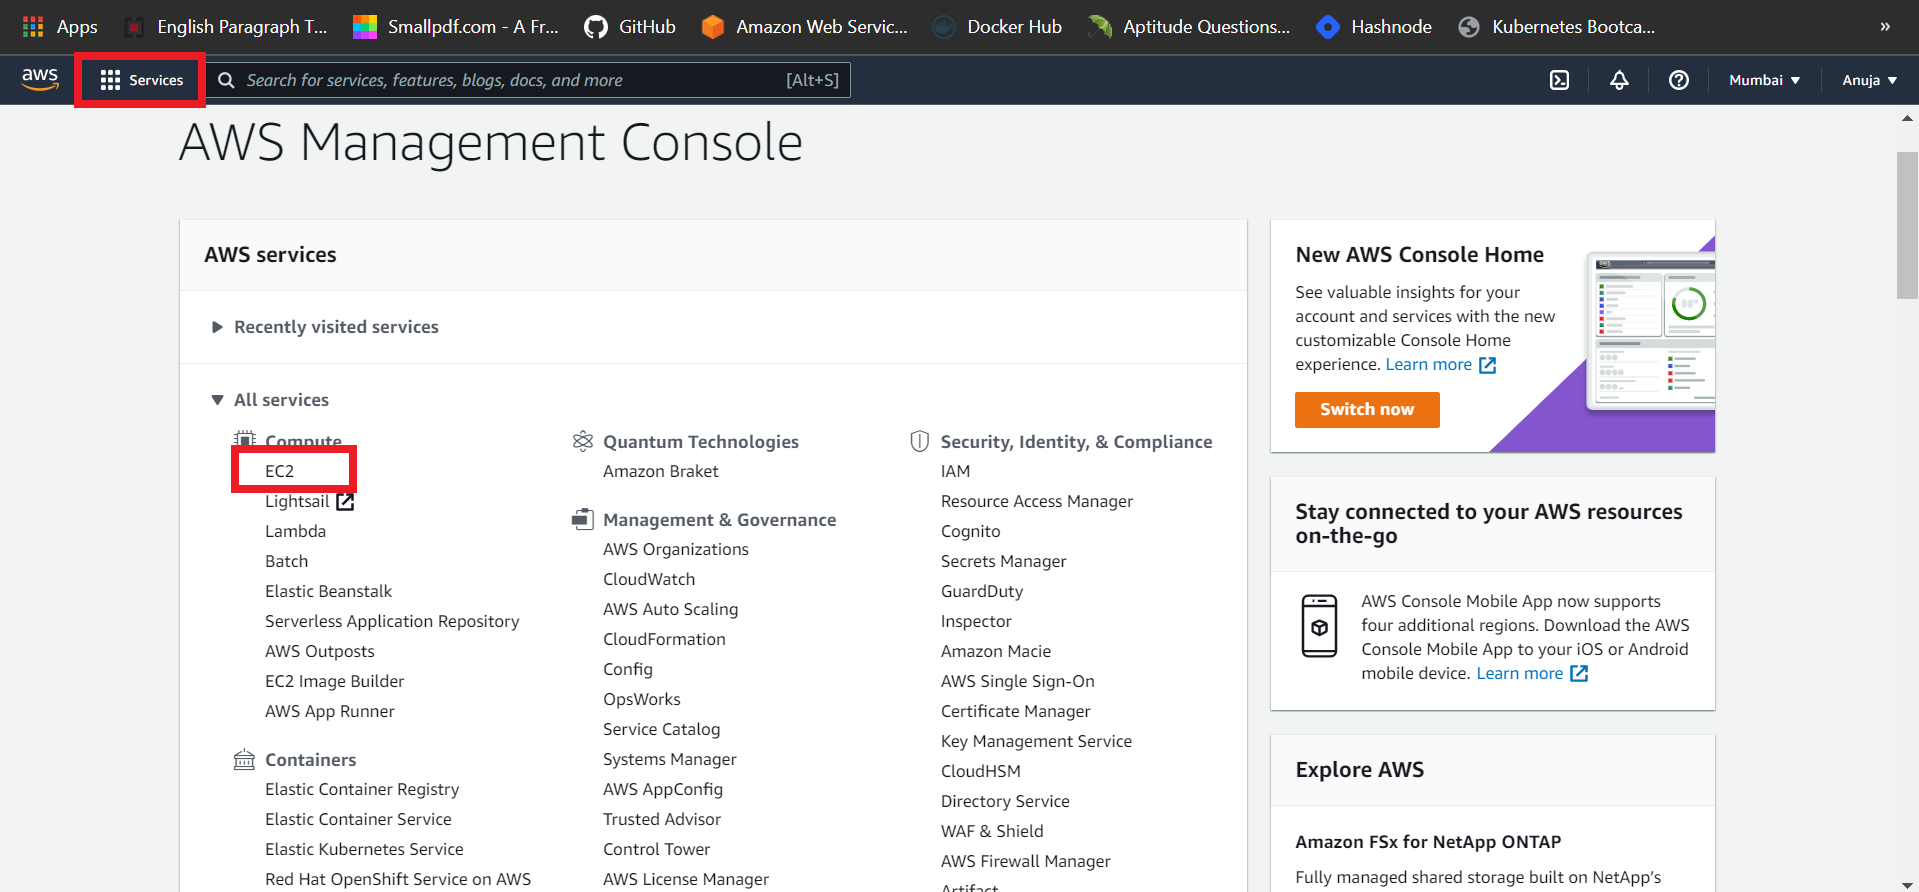
👉 From the Amazon EC2 dashboard, choose Launch Instance.
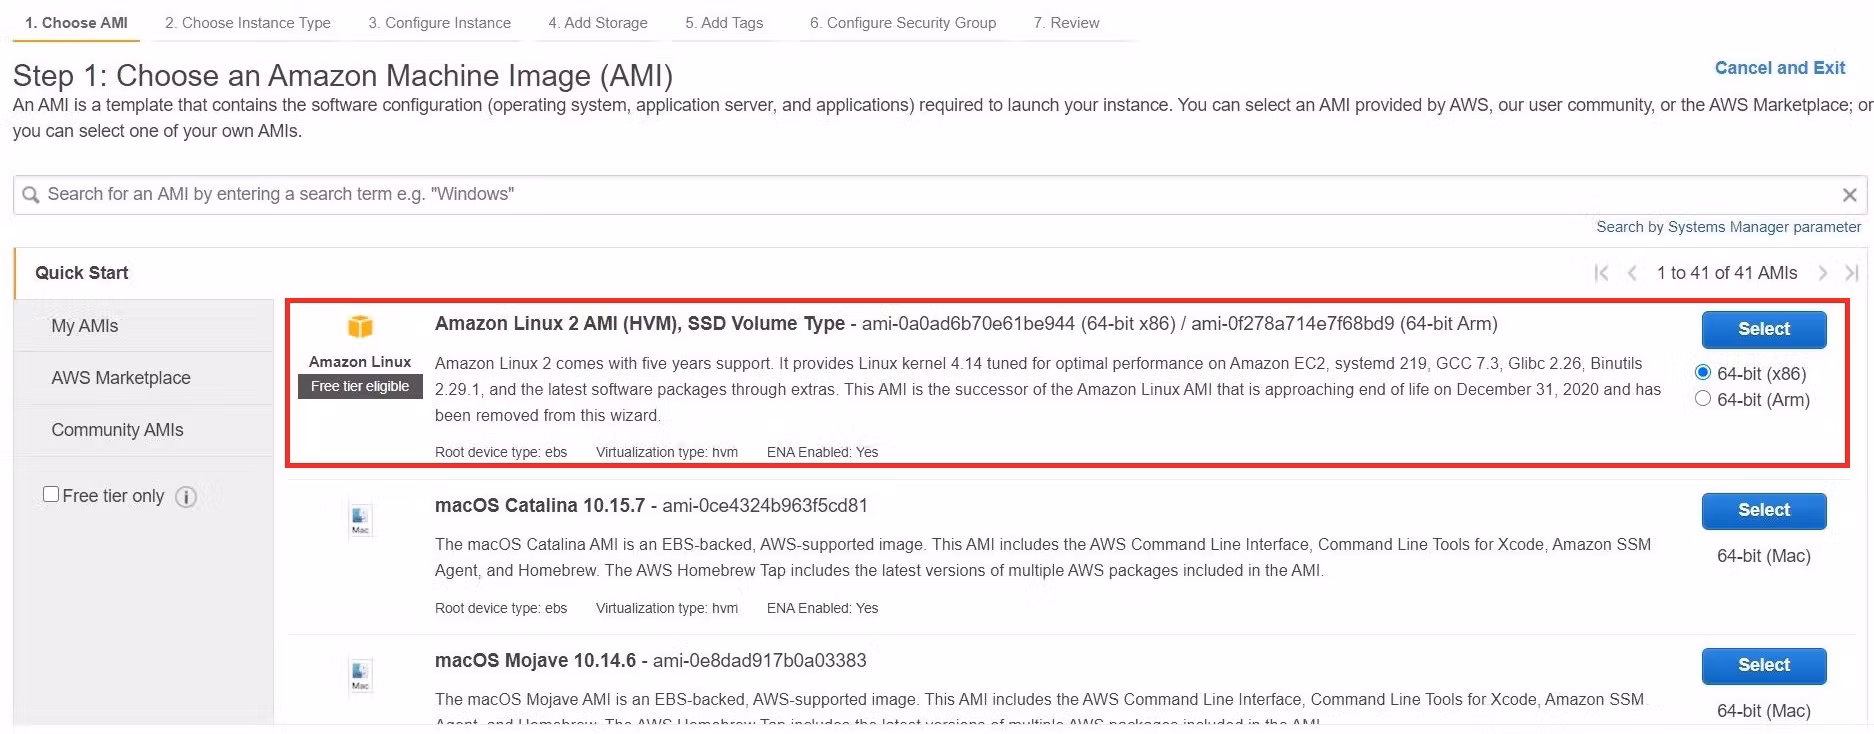
👉 Then Choose an Amazon Machine Image (AMI). Select the HVM edition of the Amazon Linux AMI. Notice that this configuration is marked Free tier eligible.
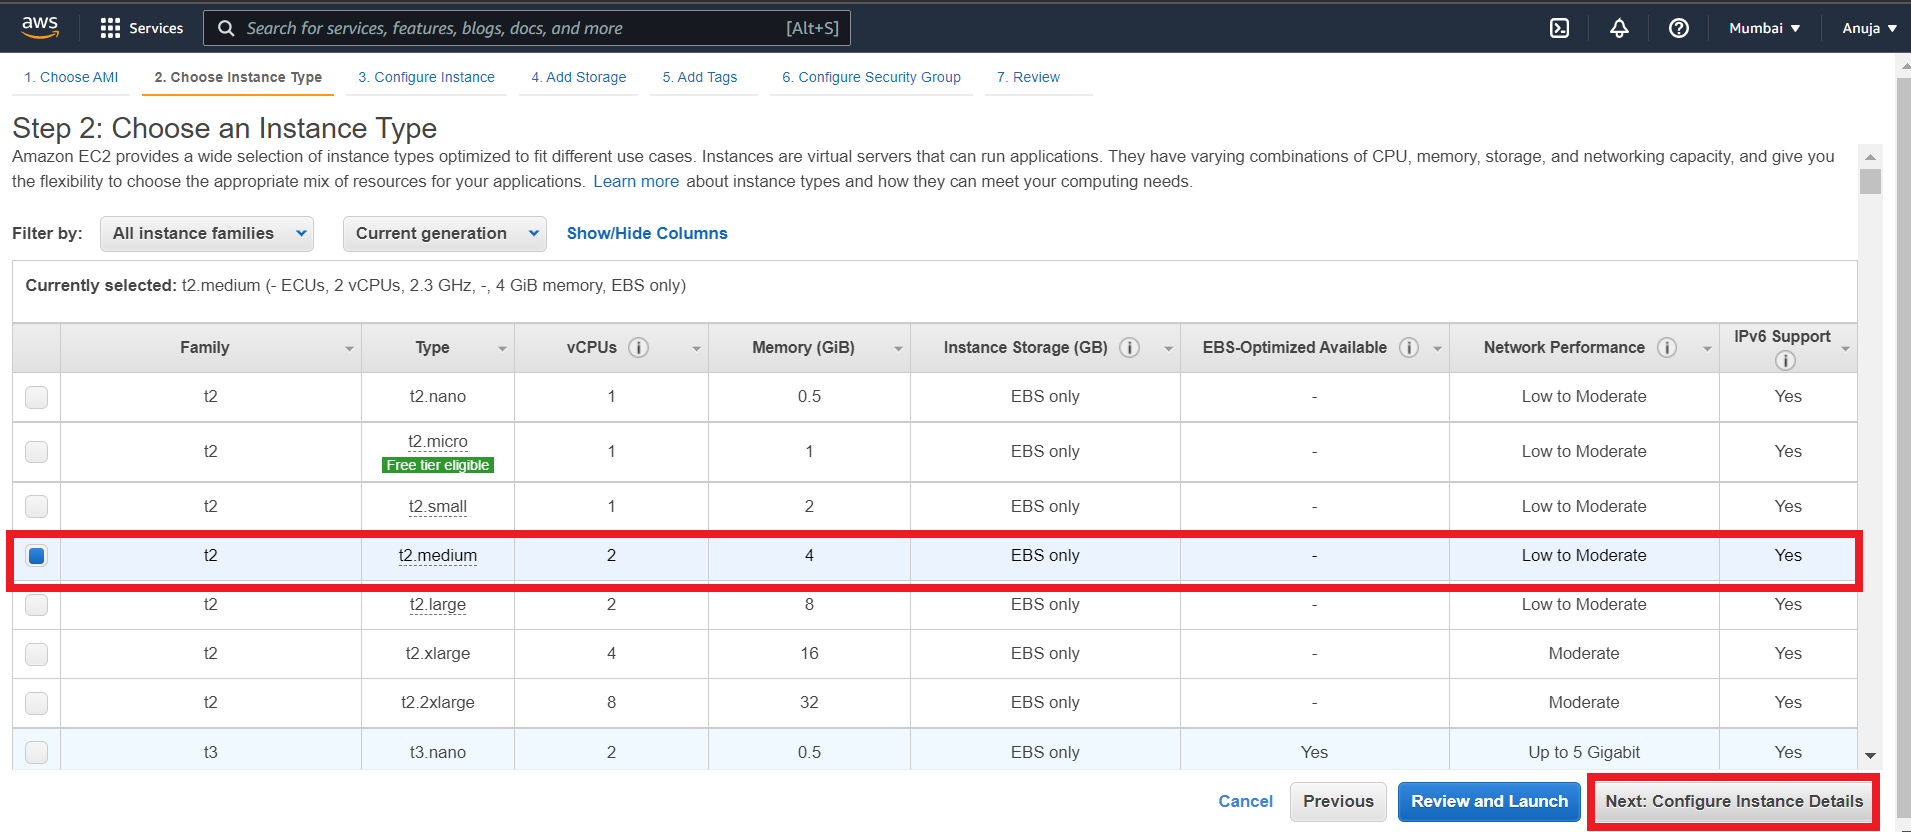
👉 Now, Choose an Instance Type page, the t2.medium (2 vCPU). Minikube requires a minimum of 2 vCPUs. There will be an error if you will select t2.micro.
Note: t2.medium is no longer in the Free Tier, make sure to stop or terminate the instance after you are done testing to avoid a huge AWS bill.
👉 Leave Configure Instance Details, Add Storage and Add Tags steps as default.
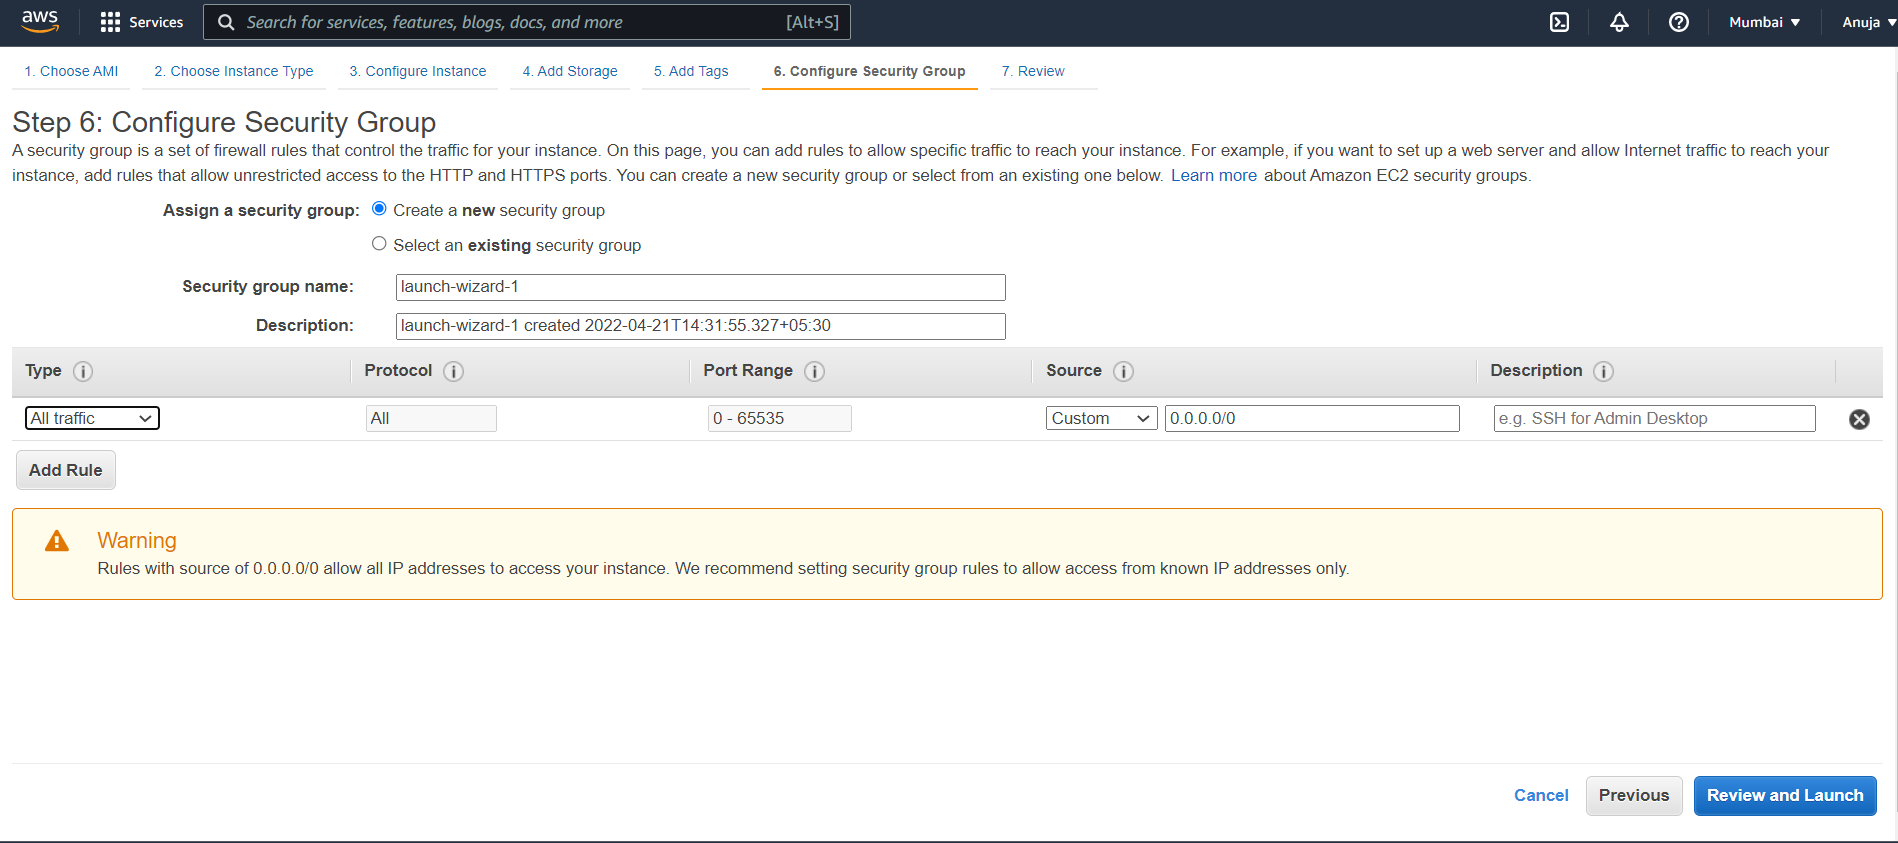
👉 Configure Security Group
Click Add Rule, and then choose All Traffic from the Type list. Under Source, select Custom and in the text box enter public IP address range enter 0.0.0.0/0.
Note: only for testing servers, allow all traffic. Not recommended for Production Servers.
👉 Click Review and Launch.
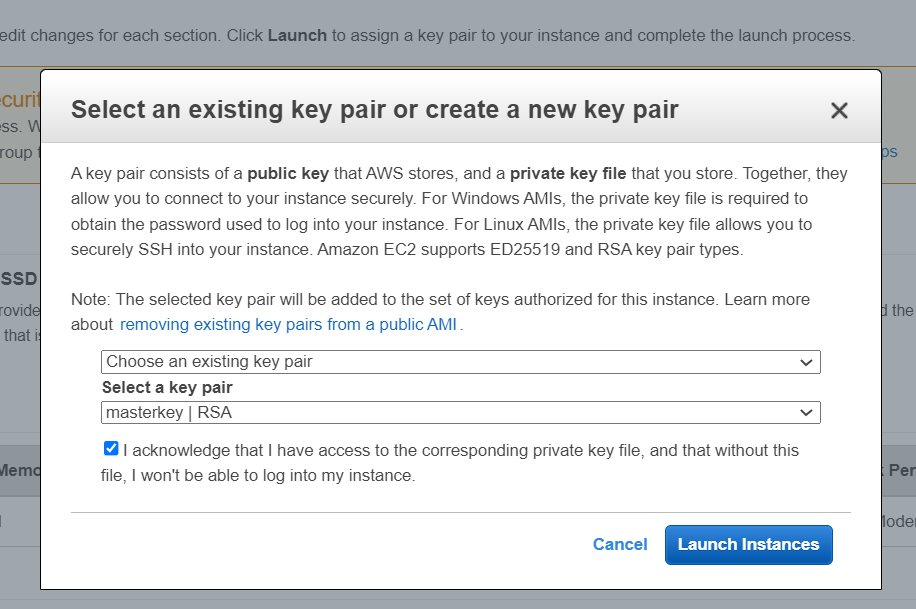
👉 In the Select an existing key pair or create a new key pair dialog box, select Choose an existing key pair, and then select the key pair you created or any existing key pair you intend to use.
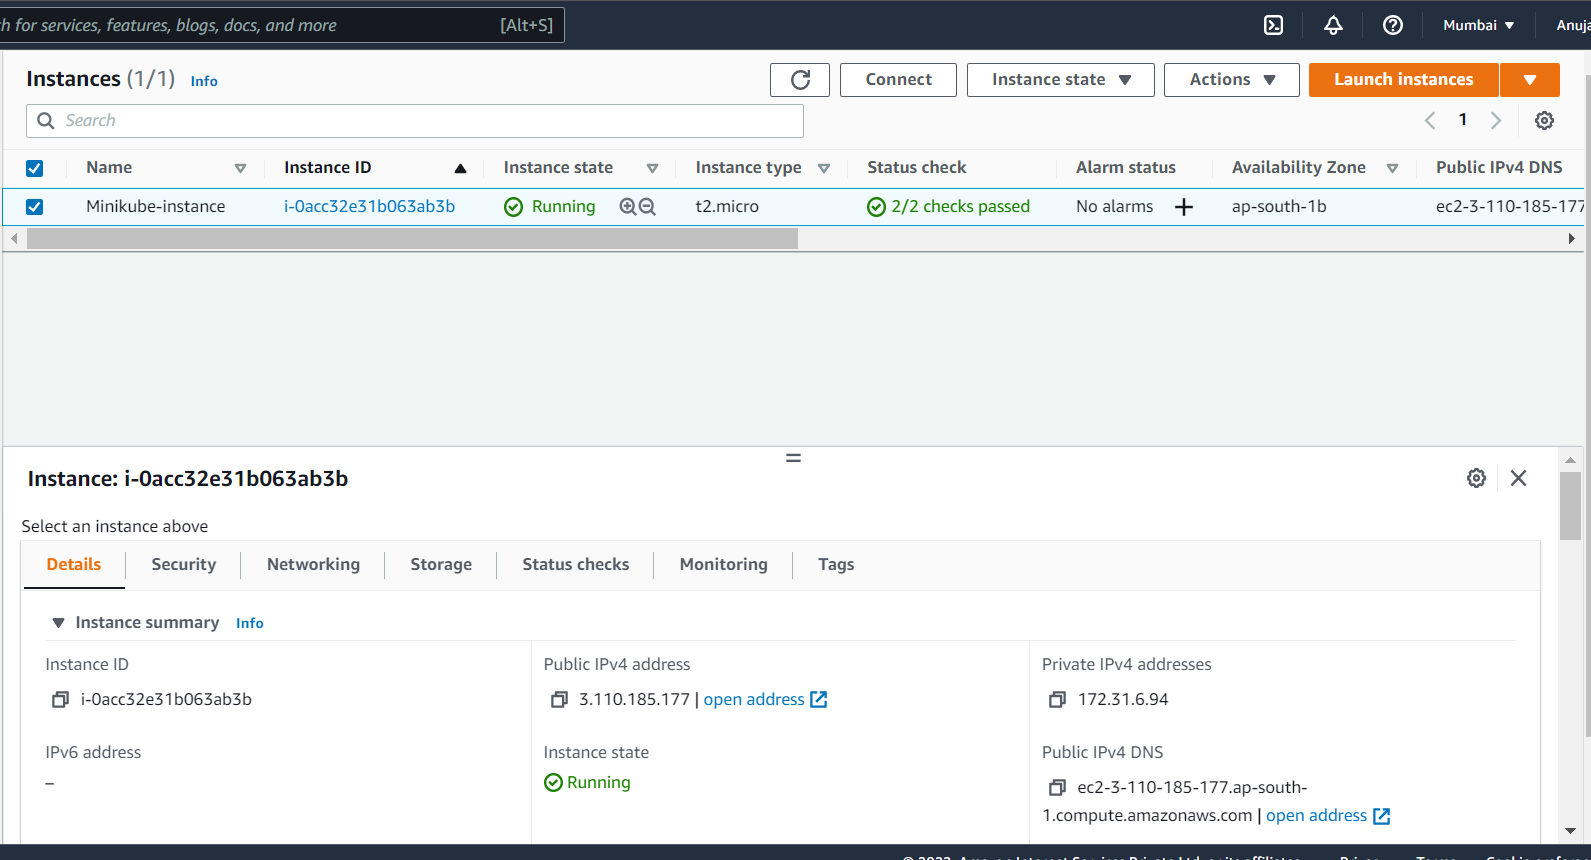
⏩ In the left-hand navigation bar, choose instances to see the status of your instance. Initially, the status of our instance is pending. After the status changes to running, the instance is ready for use 🥳
Connect to your Linux instance
⚜ Here, I am using Putty to connect to instance.
You can download it from here
Let's start 🤩
✍ Give root power.
sudo su - root✅ Install kubectl
kubectl is a command-line tool, allows us to run commands against Kubernetes clusters to deploy applications, inspect and manage cluster resources, and view logs.
👉 Download the latest release with the command:
curl -LO https://storage.googleapis.com/kubernetes-release/release/`curl -s https://storage.googleapis.com/kubernetes-release/release/stable.txt`/bin/linux/amd64/kubectl👉 Make the kubectl binary executable.
chmod +x ./kubectl👉 Move the binary in to your PATH
mv ./kubectl /usr/local/bin/kubectl
👉 Check the version you installed.
kubectl version --client
✅ Install Docker
yum install -y docker
👉 Enable docker service:
systemctl enable docker.service👉 Start the Docker service:
systemctl start docker.service👉 Check the Docker version:
docker version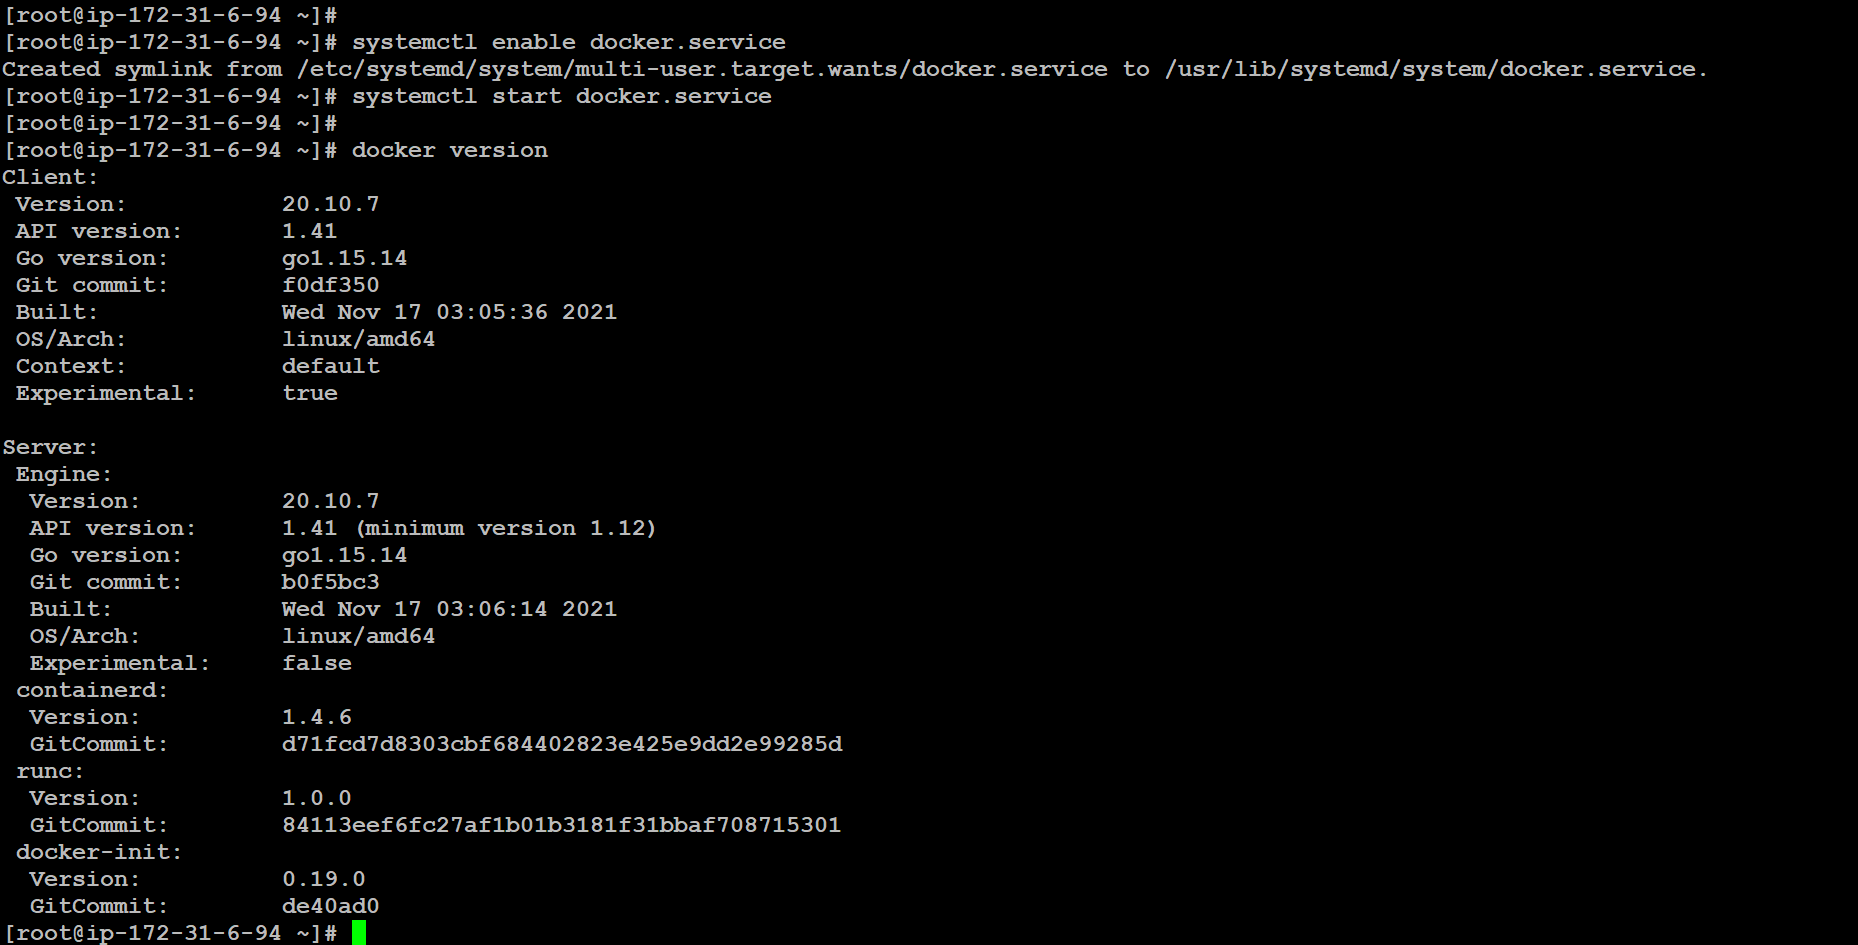
✅ Install Minikube
curl -Lo minikube https://storage.googleapis.com/minikube/releases/latest/minikube-linux-amd64👉 Make the minikube binary executable.
chmod +x minikube👉 Move the binary in to your PATH
mv minikube /usr/local/bin/
👉 Check Minikube Version
minikube version
👉 Start minikube
minikube start --driver=none
But, Kubernetes v1.23.3 requires conntrack to be installed in root’s path.
👉 Install conntrack
yum install conntrack -y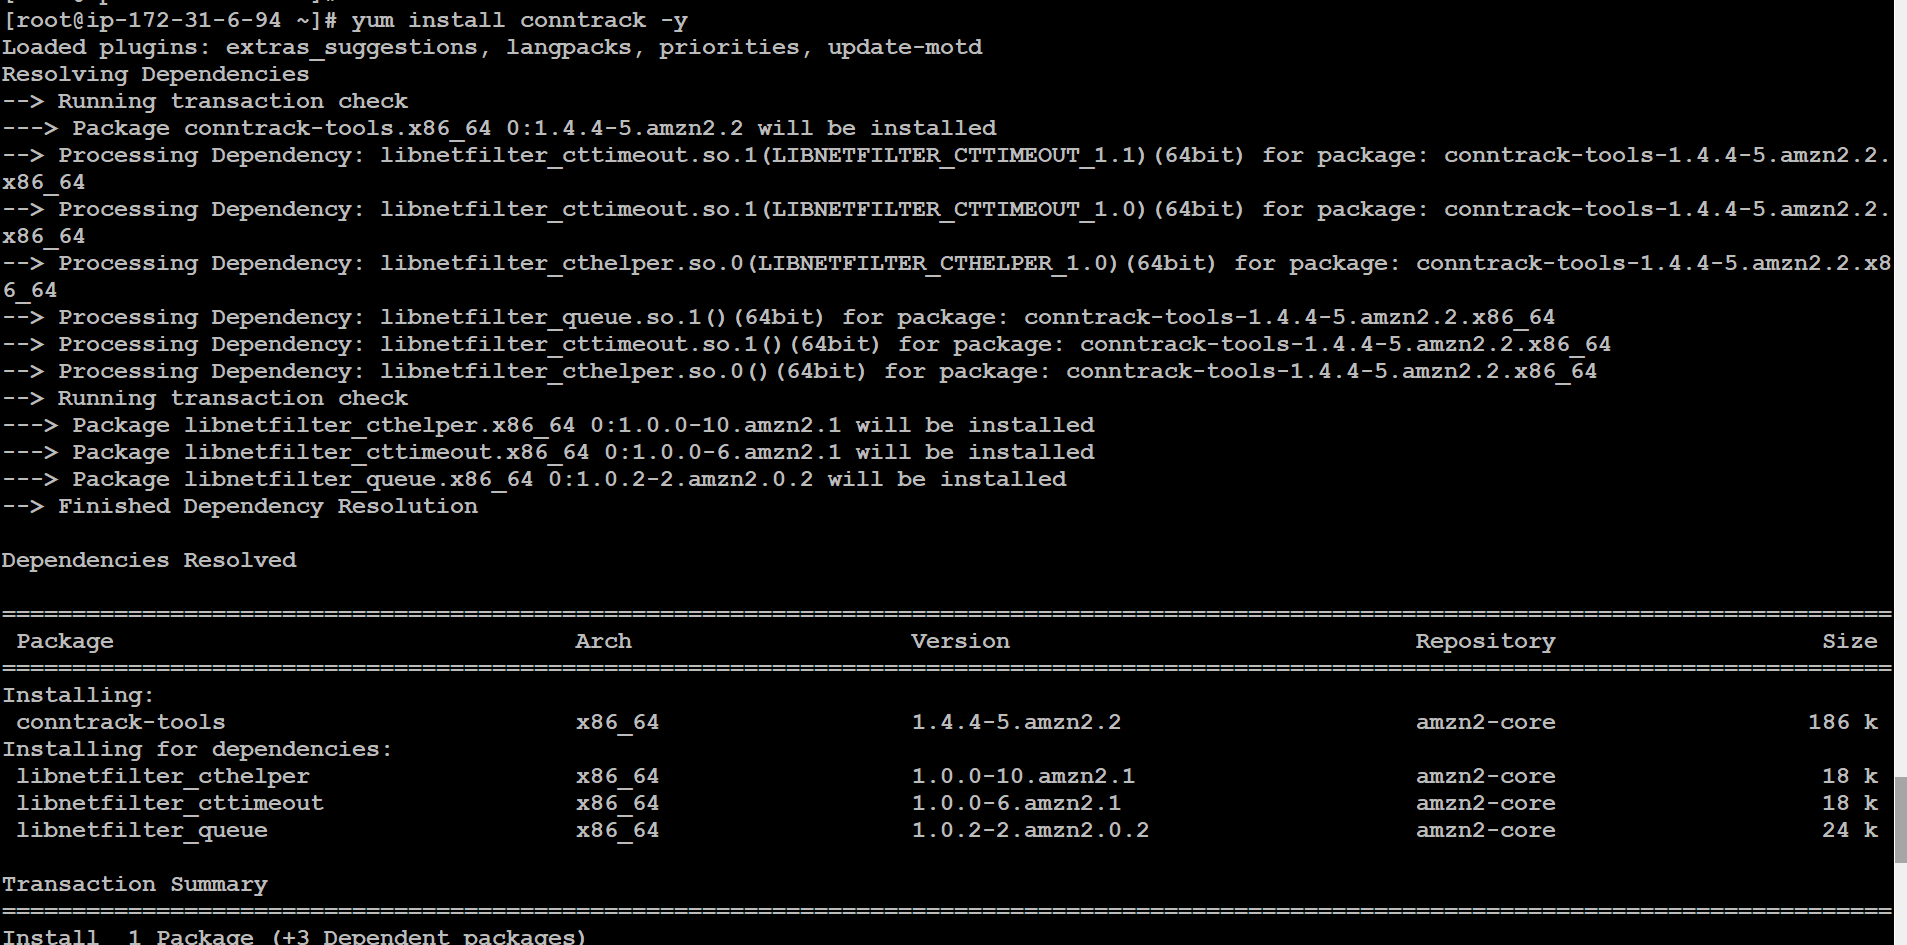
👉 Now, start minikube again.
minikube start --driver=none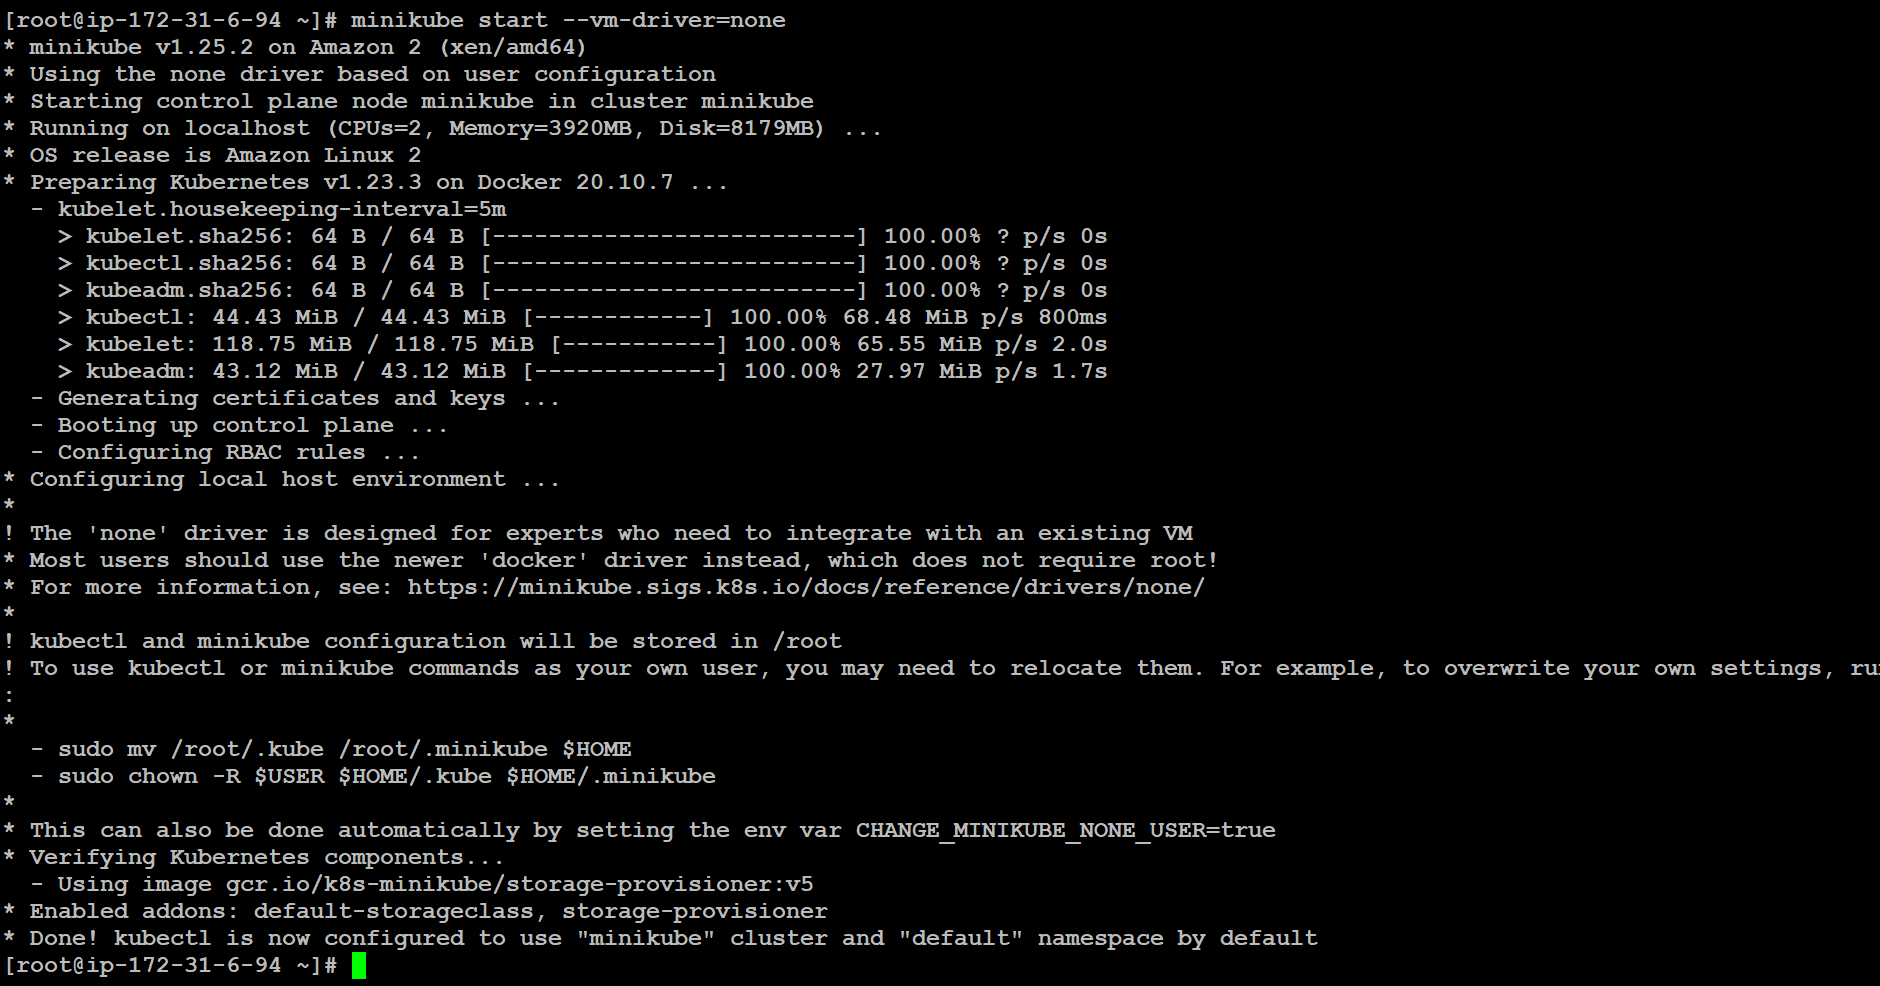
👉 Check the status of minikube:
minikube status
So, we successfully installed minikube on AWS Linux Instance 🤩
💥 Let's Create a Pod 🚀 #
** By using kubectl command:**
kubectl run [pod-name] --image=[image-name from registry]
📌 Or we can also create using YAML file.
** By using YAML file **
apiVersion: v1
kind: Pod
metadata:
  name: nginx-pod
spec:
  containers:
  - name: nginx
    image: nginx
    ports:
- containerPort: 80- apiVersion: This refers to the version of Kubernetes.
- kind: This is the type of Kubernetes object. In this case (the example above), we’re creating a pod.
- metadata: The metadata contains information that describes the object briefly, usually contains the name you want to give the object (pod in our case), the labels, etc.
- spec: The spec section is where you define the desired state of your object.
- Container: Here we specify the name of the container that you’ll run in your pod, the image of the application you want to run in your pods.
- ports: containerPort is the port on which your application in container is listening to.
Once the above YAML file is created, save the file with the name of [file-name].yml and run the create command to run the document.
kubectl apply -f [file-name].yaml👉 Check the status of pod
kubectl get pods
👉 View the entire configuration of the pod
kubectl describe pod [pod-name]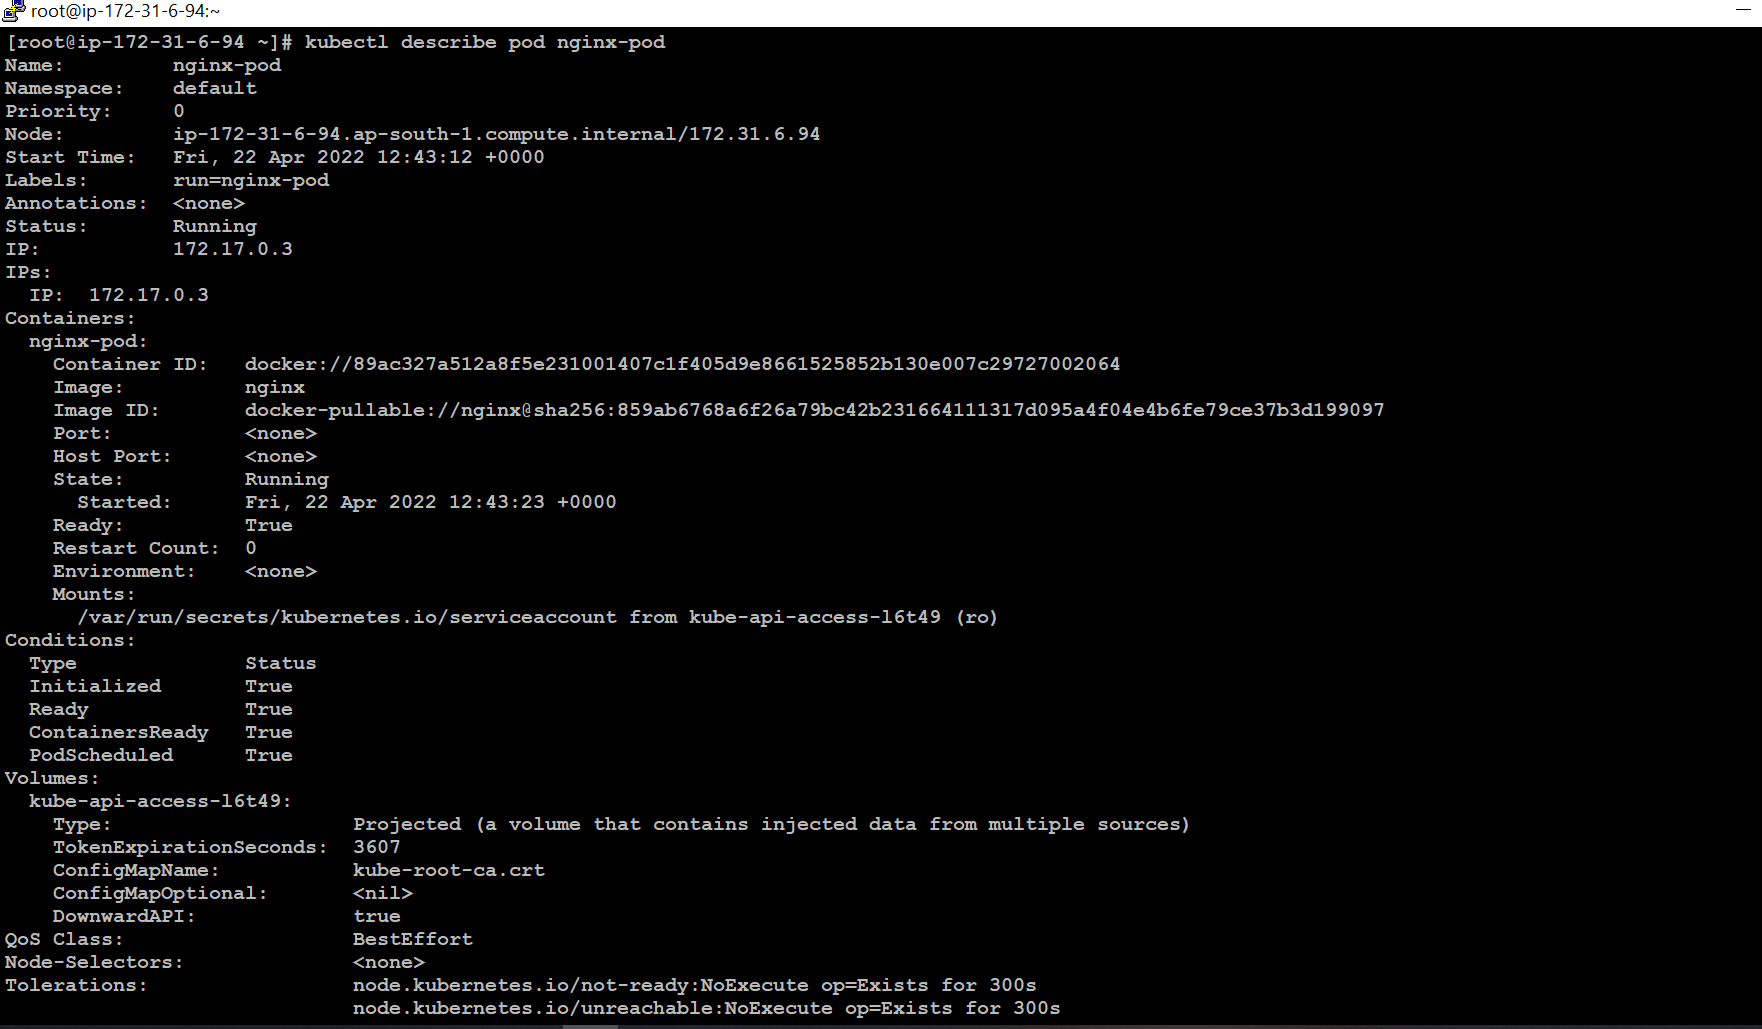
👉 Delete the pod
kubectl delete [pod-name]
I hope this blog will help you all in understanding Kubernetes.
THANKS FOR READING !!
🔰 KEEP LEARNING !! KEEP SHARING 🧾🔰
🚀 Feel free to connect with me :
I am a junior pursuing my bachelor's in Computer Science and Engineering. I'm a Cloud and Devops enthusiast.
Get new posts in your inbox.
Spotted a typo or want to improve this post? Edit on GitHub →