


Machine learning is a very iterative process with a ton of experimentation you might need to do. In this article, I introduce you to Kubeflow Notebooks, a way to run development environments inside your Kubernetes cluster, as well as how you could extend the default capabilities of Kubeflow Notebooks for your own use cases and how it works under the hood.
Previous articles in the series
In the last article, we already took a look at the basics of Kubeflow and the central dashboard. This time around we will be building on top of that by talking about Kubeflow Notebooks.
Kubeflow Notebooks
Kubeflow Notebooks provides a way to run web-based development environments inside your Kubernetes cluster by running them inside Pods.
There are multiple advantages to such a setting:
- You can create Notebook containers and run them directly in the cluster, rather than doing so locally
- You can use pre-configured or custom images to create the environment, which would allow you to focus on the task at hand and not on the environment or installation issues
- You could easily leverage the power of extensions with Kubeflow Notebooks and in this article, and in later articles we will also take a look at Kubeflow fairing among others
- Out-of-the-box support for JupyterLab, RStudio, and VS Code however you could use any other IDEs
- Finally, Kubeflow’s role-based access control capabilities make it sufficiently easier to allow easy and secure notebook sharing
Create a Notebook Server
Before talking more about any particular components of Kubeflow Notebooks, let us first take a high-level look at creating a Kubeflow Notebook server and running some sample code in your Notebook server. A single Kubeflow Notebook server can contain multiple notebooks and you would probably like to have multiple Notebook servers for different stages in your Machine Learning lifecycle according to your needs.
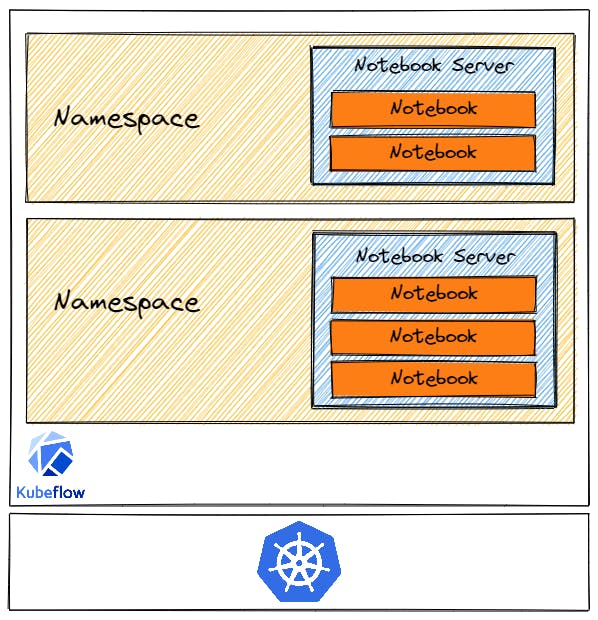 How a Notebook Server is structured
It is pretty straightforward to create a Kubeflow Notebook server using the UI and you have the ability to specify:
- A name for the notebook and the workspace it belongs to.
- A docker image for your Notebook Server, this is the image our container would run, and you can understand it as a way to specify what you want the environment to contain. This is also customizable according to your needs, and we will see more about that in a dedicated section in this article.
- The CPU and RAM the notebook server tries to request.
- Specify if you need GPUs in your Notebook pods, Kubeflwo achieves this with limits as shown in the Kubernetes documentation.
- A workspace volume to be mounted as a PVC Volume on your home folder.
- One or more data volumes to be mounted as PVC Volumes. We will also talk about this in greater detail.
- Configurations is a way to inject common data (env vars, volumes) into notebooks. Kubeflow created the PodDefault controller based on Kubernetes PodPreset (now deprecated) which you can use to achieve this. You can create PodDefault manifests which describe additional runtime requirements (i.e., volume, volumeMounts, environment variables) to be injected into a Pod at creation time.
- As you might have guessed, you can also specify affinity and taint config for Notebook servers.
- Notebooks also allow you to enable shared memory. If you use something like
torch.multiprocessingortorch.Tensor.share_memory_(), these heavily rely on the usage of shared memory.
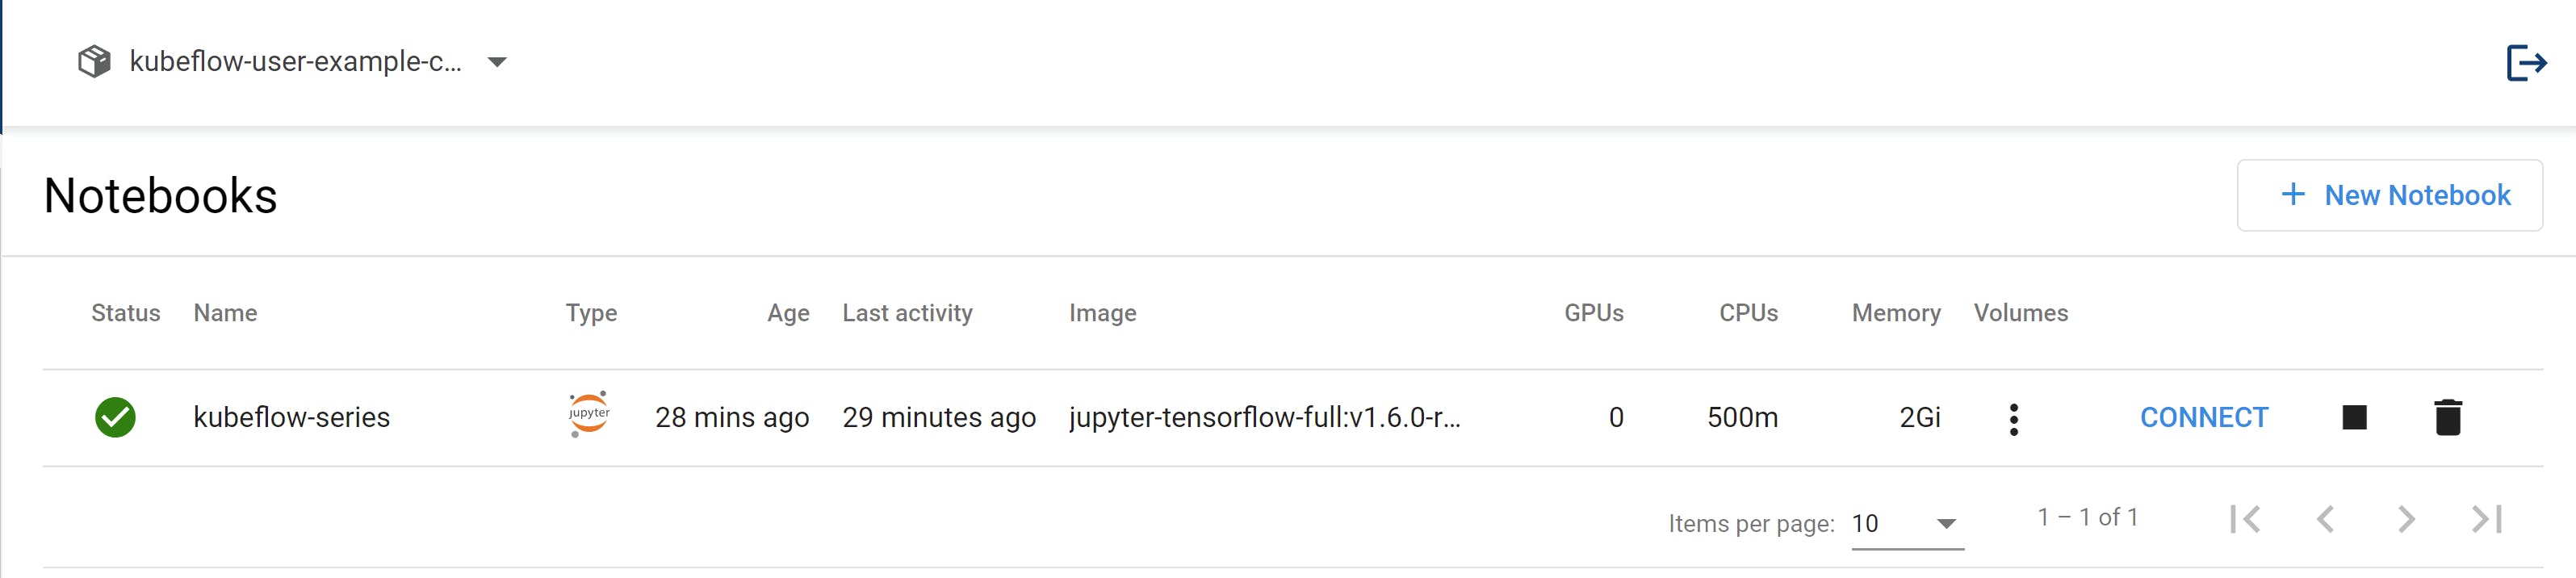
Let us now create a notebook server setting the image to kubeflownotebookswg/jupyter-tensorflow-full:v1.6.0-rc.1 which contains TensorFlow 2.5.3 and some other commonly used libraries, we will later see how you can customize these images too. Clicking "Launch" creates a new Notebook CRD with these settings and you should soon see a prompt allowing you to connect to your notebooks server.
 Connect to a Notebook Server
Run an example notebook
Let us first try tunning a simple TensorFlow example in the Notebook server, you can of course run any notebook you want.
git clone https://github.com/kubesimplify/kubeflow-series
cd kubeflow-series/2
If you are wondering why does a new machine have Git installed, that is because the default Kubeflow images contain a lot of utilities you would require pre-installed. Now you can try tunning the tensorflow-example.ipynb which contains some simple model training code for TensorFlow 2 using Keras.
You could in fact also make use of Jupyter Lab Extensions and we will talk about extensions like KALE and Elyra in later articles.
Using Tensorboard
In machine learning, to improve something you often need to be able to measure it. TensorBoard is a tool for providing the measurements and visualizations needed during the machine learning workflow. It enables tracking experiment metrics like loss and accuracy, visualizing the model graph, projecting embeddings to a lower dimensional space, and much more.
Let us see an example of using TensorBoard with Kubeflow.
You should now run the tensorboard.ipynb, this is a TensorFlow example but as you might have already guessed you could use TensorBoard with any other framework too. If you notice while running this example we created a logs directory where our TensorBoard logs are stored.
You can now create a TensorBoard instance and use the PVC we had for our Notebook instance to get the TensorBoard logs, in my case, this looks like this:
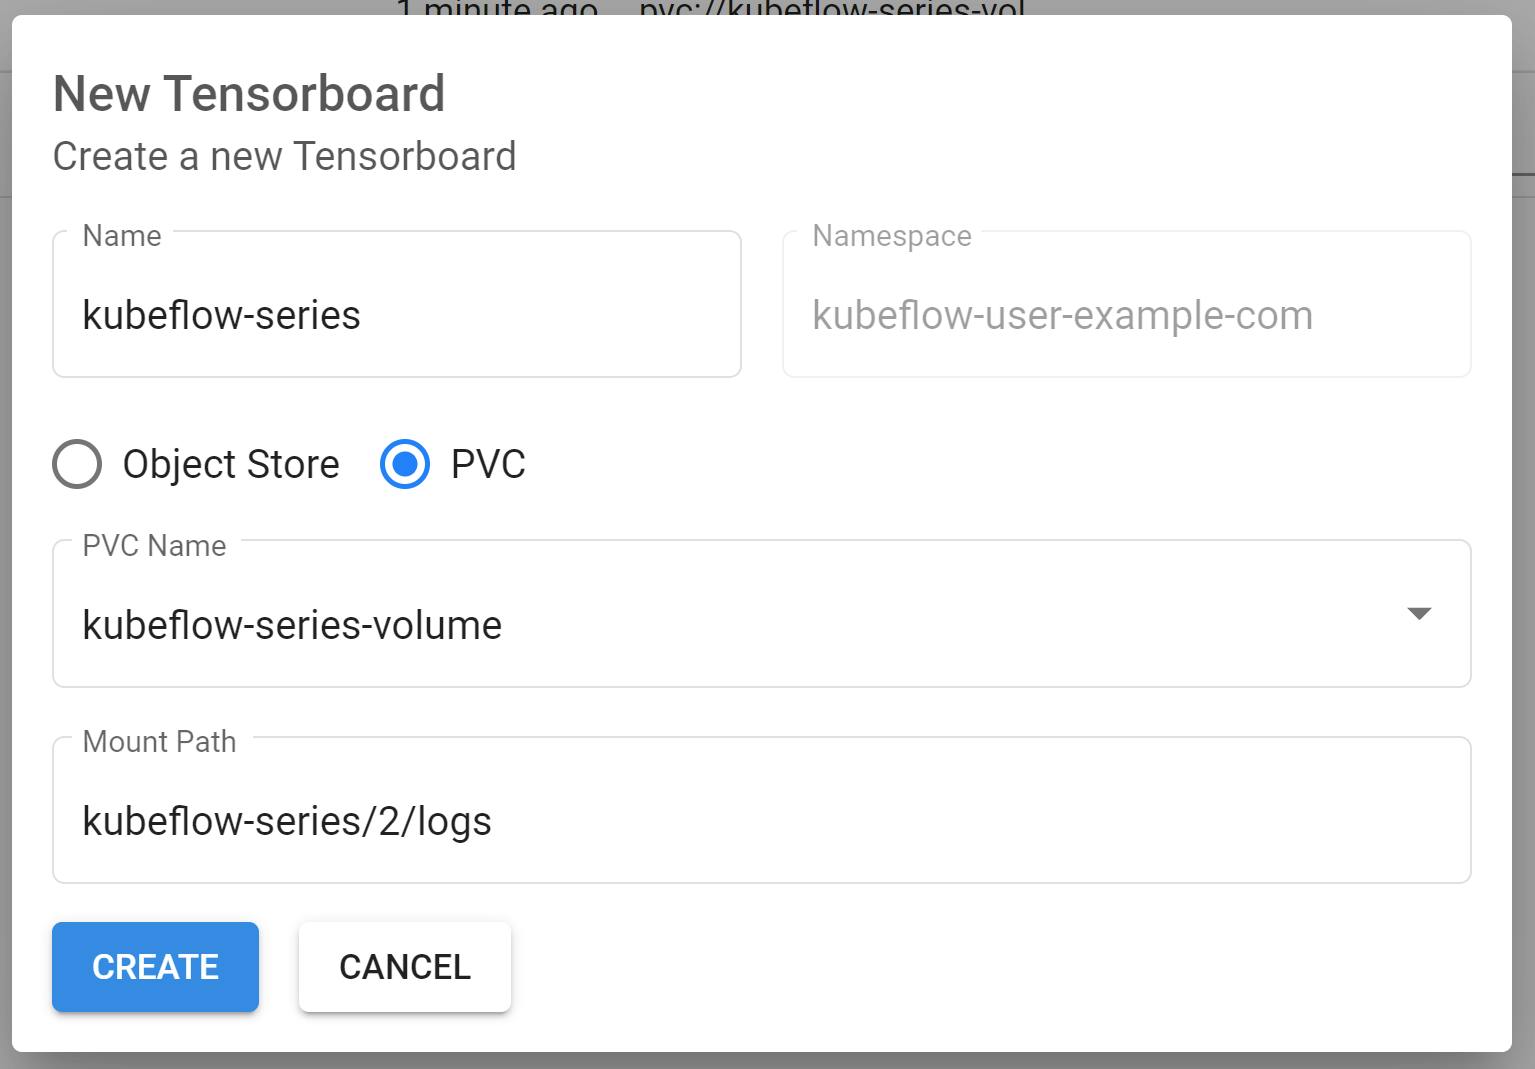 Create TensorBoard
And voila, there you have it, TensorBoard up and running that automatically reloads from your training logs too.
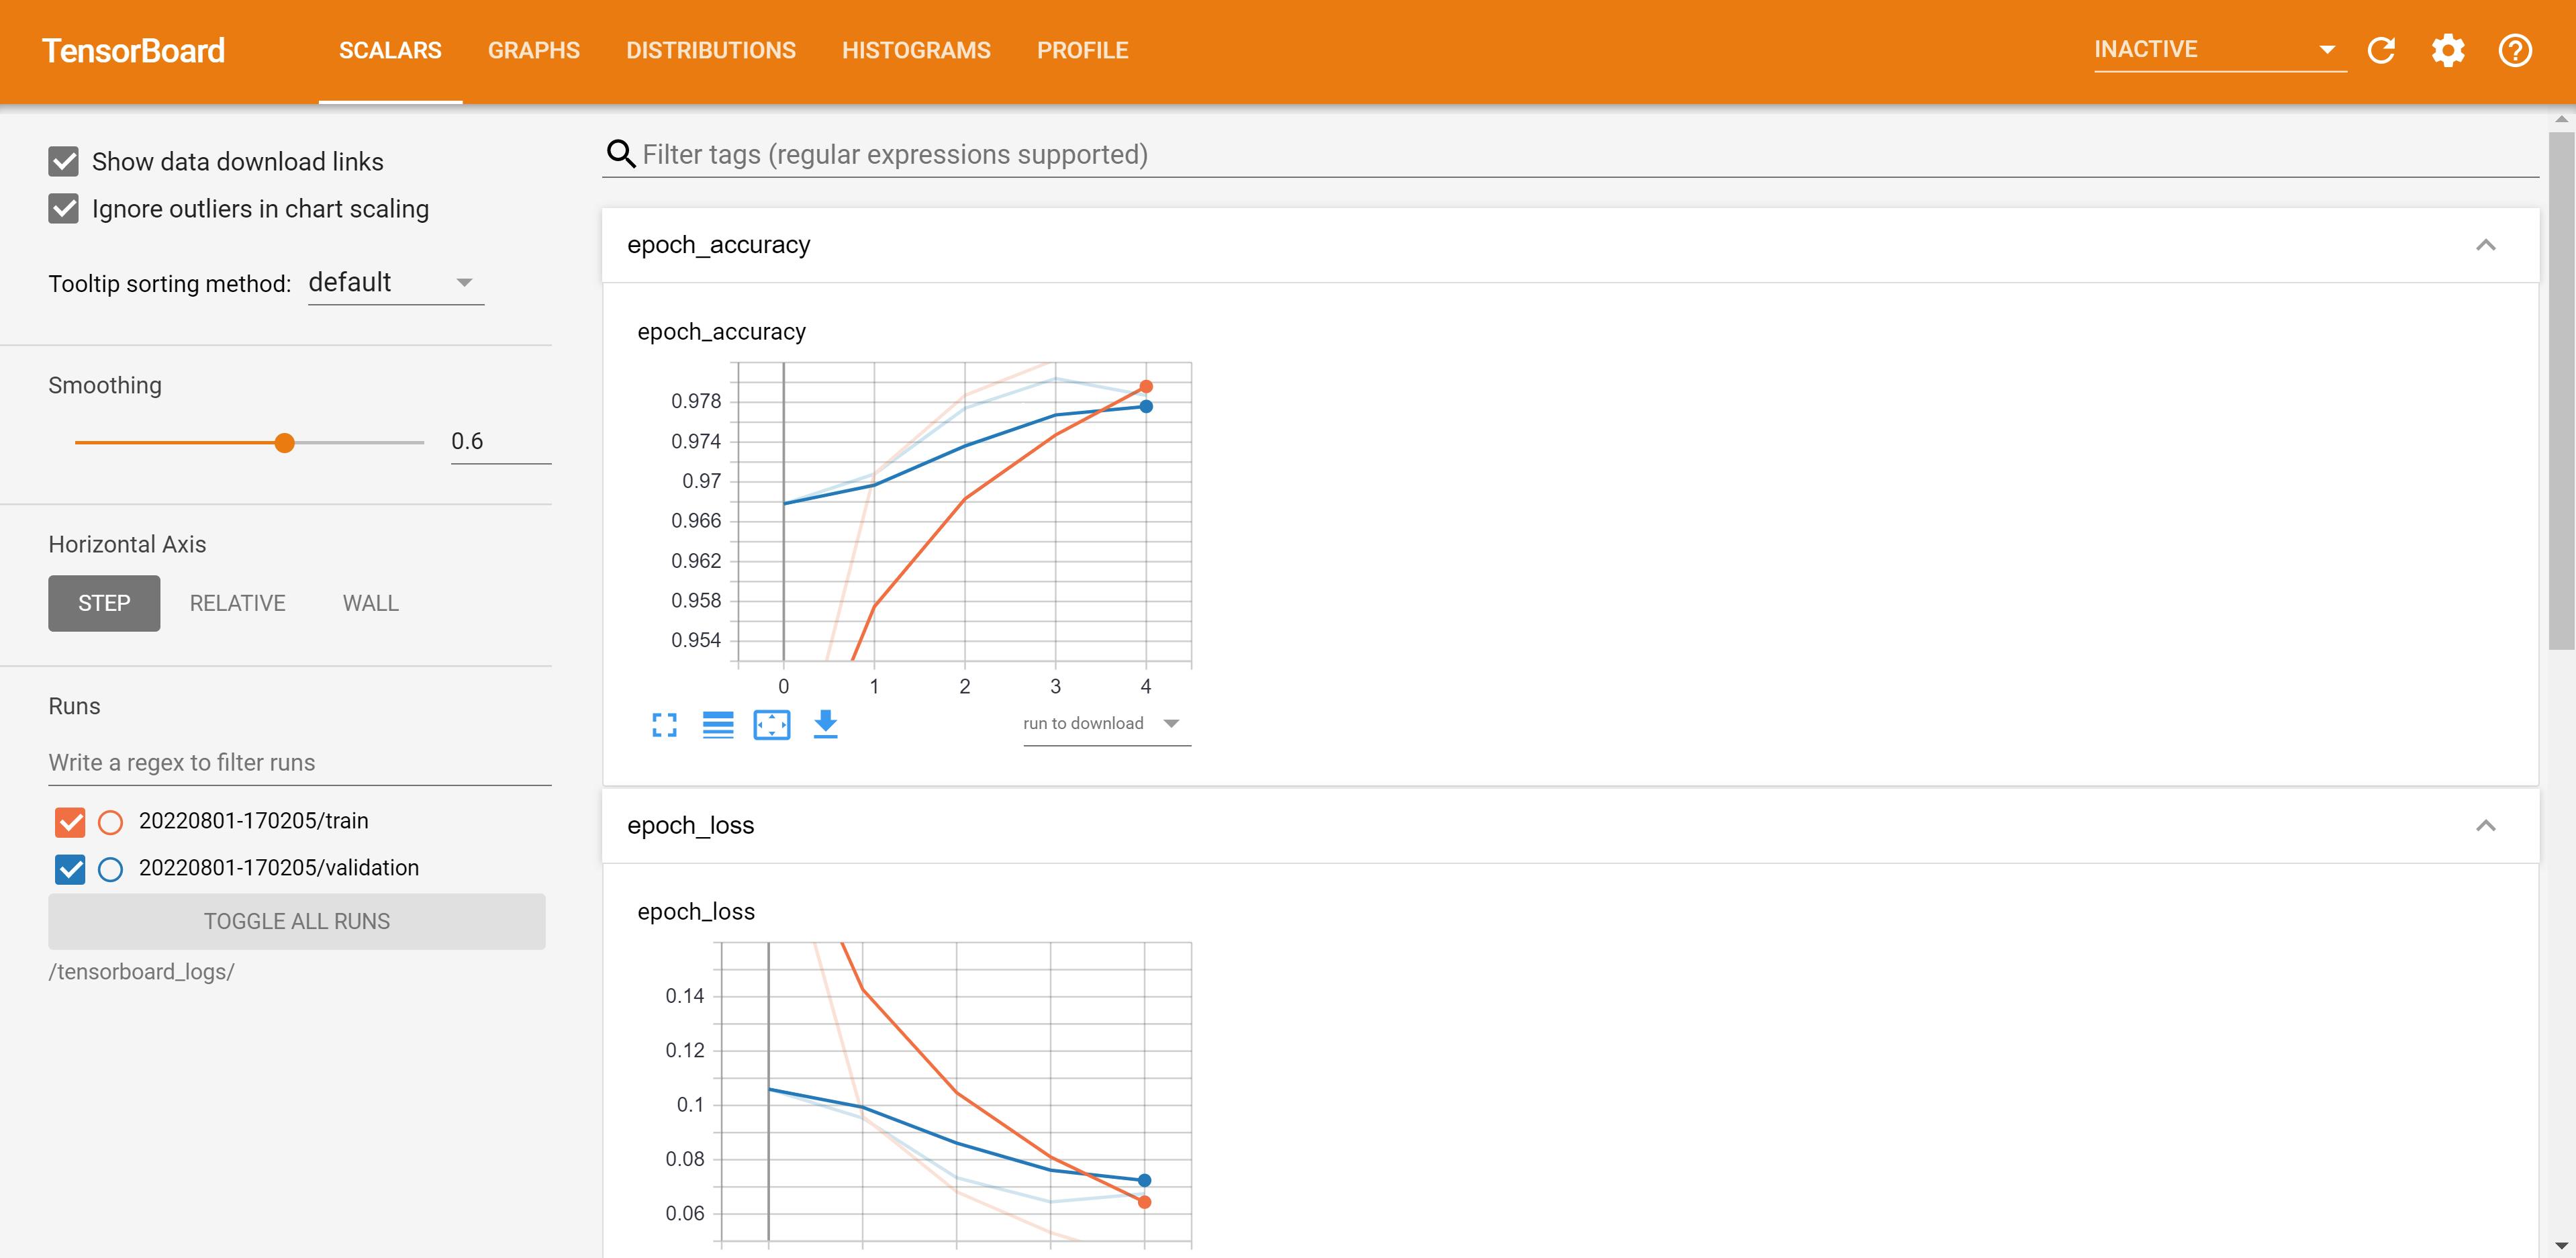 TensorBoard Homepage
What happens when you create a Notebook Server?
We already created a Notebook Server, as a next step it would be really helpful to know how Kubeflow manages to create a new Notebook Server.
Whenever you create a new Kubeflow Notebook server you are essentially creating a Kubernetes StatefulSet. And any code you run in the Notebook server run son Kubernetes pods.
Simply put, a StatefulSet is a controller that helps you deploy and scale groups of Kubernetes pods. The StatefulSet controller also instantiates and manages PersistentVolumeClaims for each Pod instance which we will take a better look at in the next section. A StatefulSet is commonly used when you want to run several pods of the same type in parallel, but each of the pods is required to have a specific identity.
 A Notebook Server in Kubeflow
I thought it would be an interesting exercise to see the Kubernetes event logs when you create a notebook which should now make a lot more sense that you already know how it works under the hood. Here is a snippet of the events taking place when you create a notebook:
statefulset/kubeflow-series-part2                       create Pod kubeflow-series-part2-0 in StatefulSet kubeflow-series-part2successful
notebook/kubeflow-series-part2                          Reissued from statefulset/kubeflow-series-part2: create Pod kubeflow-series-part2-0in StatefulSet kubeflow-series-part2 successful
persistentvolumeclaim/kubeflow-series-part2-volume      External provisioner is provisioning volume for claim "kubeflow-user-example-com/kubeflow-series-part2-volume"
persistentvolumeclaim/kubeflow-series-part2-volume      waiting for a volume to be created, either by external provisioner "csi.civo.com" or manually created by system administrator
persistentvolumeclaim/kubeflow-series-part2-volume      Successfully provisioned volume pvc-a75855d7-4c2d-4479-a61c-e071e3cb8eaa
pod/kubeflow-series-part2-0                             Successfully assigned kubeflow-user-example-com/kubeflow-series-part2-0 to k3s-kubeflow-e183-917191-node-pool-7e46-n66x1
notebook/kubeflow-series-part2                          Reissued from pod/kubeflow-series-part2-0: Successfully assigned kubeflow-user-example-com/kubeflow-series-part2-0 to k3s-kubeflow-e183-917191-node-pool-7e46-n66x1
pod/kubeflow-series-part2-0                             AttachVolume.Attach succeeded for volume "pvc-a75855d7-4c2d-4479-a61c-e071e3cb8eaa"
notebook/kubeflow-series-part2                          Reissued from pod/kubeflow-series-part2-0: AttachVolume.Attach succeeded for volume "pvc-a75855d7-4c2d-4479-a61c-e071e3cb8eaa"
pod/kubeflow-series-part2-0                             Container image "docker.io/istio/proxyv2:1.14.1" already present on machine
pod/kubeflow-series-part2-0                             Created container istio-init
notebook/kubeflow-series-part2                          Reissued from pod/kubeflow-series-part2-0: Created container istio-init
pod/kubeflow-series-part2-0                             Started container istio-init
notebook/kubeflow-series-part2                          Reissued from pod/kubeflow-series-part2-0: Started container istio-init
pod/kubeflow-series-part2-0                             Pulling image "kubeflownotebookswg/jupyter-scipy:v1.6.0-rc.1"
notebook/kubeflow-series-part2                          Reissued from pod/kubeflow-series-part2-0: Pulling image "kubeflownotebookswg/jupyter-scipy:v1.6.0-rc.1"
pod/kubeflow-series-part2-0                             Successfully pulled image "kubeflownotebookswg/jupyter-scipy:v1.6.0-rc.1" in 34.013384426s
notebook/kubeflow-series-part2                          Reissued from pod/kubeflow-series-part2-0: Successfully pulled image "kubeflownotebookswg/jupyter-scipy:v1.6.0-rc.1" in 34.013384426s
pod/kubeflow-series-part2-0                             Created container kubeflow-series-part2
notebook/kubeflow-series-part2                          Reissued from pod/kubeflow-series-part2-0: Created container kubeflow-series-part2
pod/kubeflow-series-part2-0                             Started container kubeflow-series-part2
pod/kubeflow-series-part2-0                             Container image "docker.io/istio/proxyv2:1.14.1" already present on machine
notebook/kubeflow-series-part2                          Reissued from pod/kubeflow-series-part2-0: Started container kubeflow-series-part2
notebook/kubeflow-series-part2                          Reissued from pod/kubeflow-series-part2-0: Container image "docker.io/istio/proxyv2:1.14.1" already present on machine
pod/kubeflow-series-part2-0                             Created container istio-proxy
notebook/kubeflow-series-part2                          Reissued from pod/kubeflow-series-part2-0: Created container istio-proxy
pod/kubeflow-series-part2-0                             Started container istio-proxy
notebook/kubeflow-series-part2                          Reissued from pod/kubeflow-series-part2-0: Started container istio-proxy
There are indeed quite a lot of things happening when you create a single Notebook Server but given what we already know let me draw your attention to these log lines in particular:
statefulset/kubeflow-series-part2                       create Pod kubeflow-series-part2-0 in StatefulSet kubeflow-series-part2successful
...
persistentvolumeclaim/kubeflow-series-part2-volume      Successfully provisioned volume pvc-a75855d7-4c2d-4479-a61c-e071e3cb8eaa
...
pod/kubeflow-series-part2-0                             AttachVolume.Attach succeeded for volume "pvc-a75855d7-4c2d-4479-a61c-e071e3cb8eaa"
...
pod/kubeflow-series-part2-0                             Pulling image "kubeflownotebookswg/jupyter-scipy:v1.6.0-rc.1"
...
pod/kubeflow-series-part2-0                             Successfully pulled image "kubeflownotebookswg/jupyter-scipy:v1.6.0-rc.1" in 34.013384426s
notebook/kubeflow-series-part2                          Reissued from pod/kubeflow-series-part2-0: Successfully pulled image "kubeflownotebookswg/jupyter-scipy:v1.6.0-rc.1" in 34.013384426s
pod/kubeflow-series-part2-0                             Created container kubeflow-series-part2
pod/kubeflow-series-part2-0                             Started container kubeflow-series-part2
...
This edited piece of the logs is a ton easier to interpret and here is what this tells us about the notebook server creation process:
- Kubeflow first creates a StatefulSet in which the pods for our Notebook Server is created
- A pod is created for our Notebook Server
kubeflow-series-part2-0which is where our code runs - A dedicated Persistent Volume Claim (we talk more about this soon) is attached to this pod which is where our home directory when using the notebook server resides
- Our Notebook Server uses the image we put in, in this example
kubeflownotebookswg/jupyter-scipy:v1.6.0-rc.1and starts a container in the pod
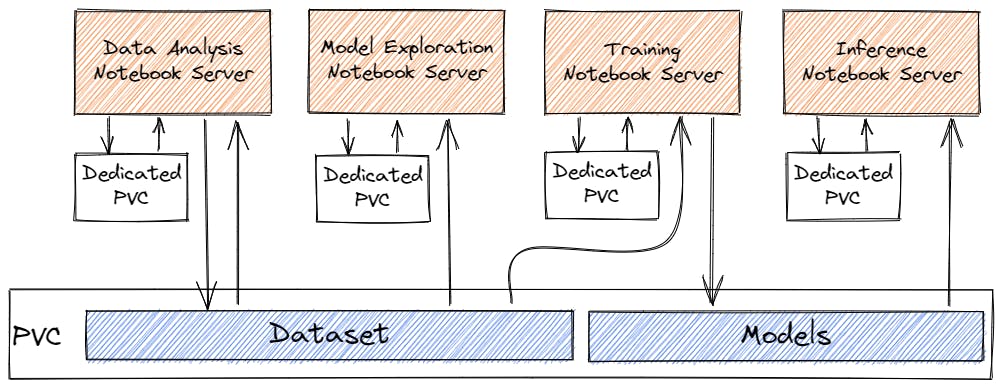
A notebook server can be attached to a dedicated persistent volume claim and a shared persistent volume claim. The dedicated persistent volume claim acts as your home directory, where you would by default run your experiments or store artifacts. Whereas the shared persistent volume claim is mounted across all notebook servers and could be used to share datasets. We will take a greater look at what exactly persistent volume claims solves in Kubernetes Notebooks in the next section.
Storage volumes for Notebook Servers
A StatefulSet assigns unique identifiers to each pod and allows you to easily store and track data in a persistent data volume, however, this is a completely separate entity and has an independent lifecycle from the pods. The persistent volume is a cluster resource like a node inside the cluster. This abstracts out a lot of details on how storage is provided from how it is consumed, it retrieves data needed for analysis from the main storage and writes back changes as needed
The persistent data volume is connected to a particular pod by a persistent volume claim, these allow a user to consume abstract storage resources. In the instance, you delete the notebook server the data still persists in the persistent data volume assigned to that pod and if a new notebook server is created, it would be able to access the same data from the same persistent data volume.
 Notebook Servers and Storage
It (Persistent Volume Claims) is similar to a Pod. Pods consume node resources and PVCs consume PV resources. Pods can request specific levels of resources (CPU and Memory). Claims can request specific size and access modes (e.g., they can be mounted ReadWriteOnce, ReadOnlyMany or ReadWriteMany
To set up a shared storage volume, we first need to create a Kubernetes StorageClass, ideally, you would want your storage class to provide dynamic provisioning. Here is a simple example of creating a Portworx Volume adapted from Kubernetes Documentation:
apiVersion: storage.k8s.io/v1
kind: StorageClass
metadata:
  name: portworx-io-priority-high
provisioner: kubernetes.io/portworx-volume
parameters:
  repl: "1"
  snap_interval:   "70"
  priority_io:  "high"
Once, a StorageClass (many clouds often provide default storage classes too which you can use just in the same manner) is created we can configure the Persistent Volume Claims while creating a Notebook Server using the "Add New Volume" option, here's an example on how you could do this with the UI:
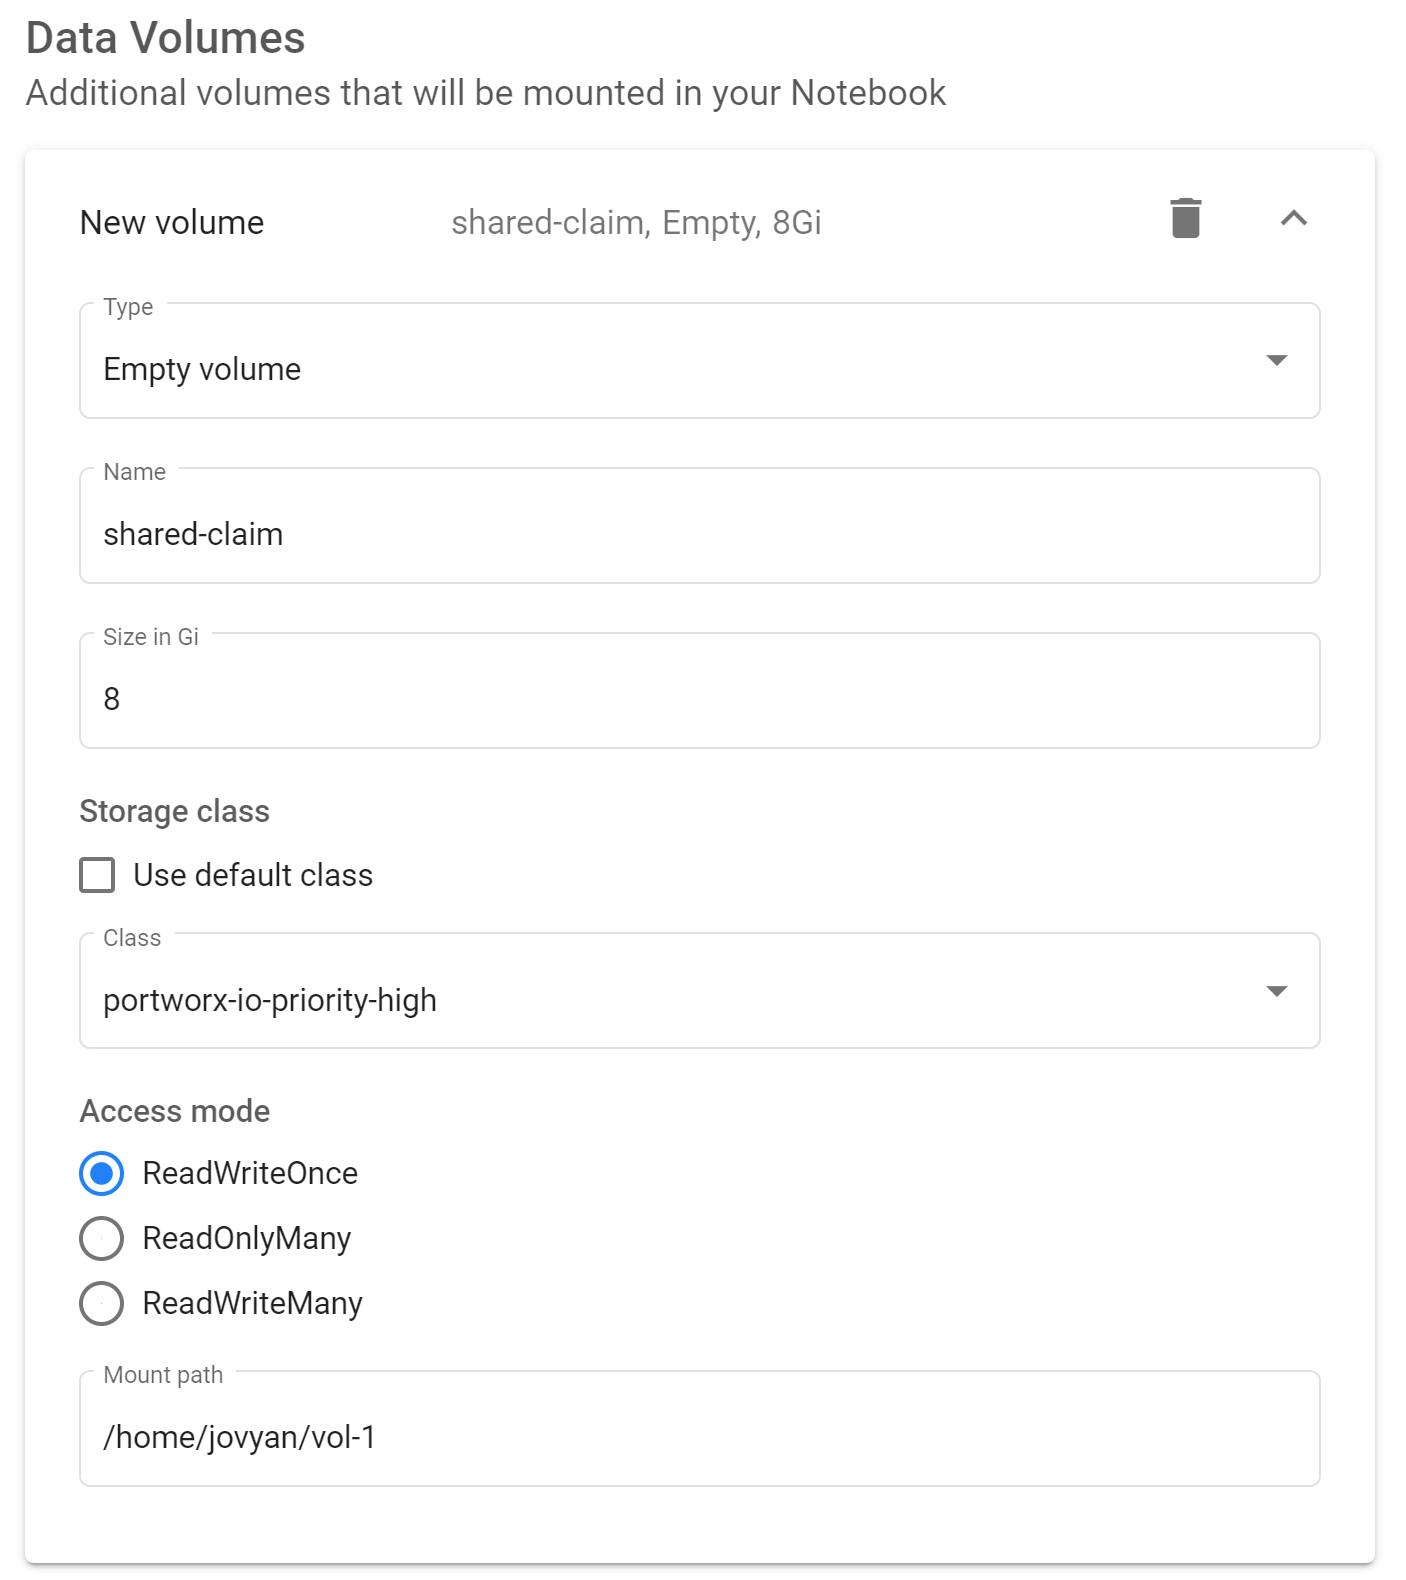 Create a new volume with the UI
Or you could also define these with a YAML specification:
apiVersion: v1
kind: PersistentVolumeClaim
metadata:
  name: shared-claim
  namespace: kubeflow-user-example-com
  annotations:
    volume.beta.kubernetes.io/storage-class: portworx-io-priority-high
spec:
  accessModes:
    - ReadWriteMany
  resources:
    requests:
      storage: 8Gi
Kubeflow allows you to easily manage volumes with the Kubeflow UI as well:
 Manage Volumes with the Kubeflow UI
As I showed earlier apart from the shared storage volumes, a notebook server would also have a dedicated volume.
Customize your Notebook Server
In the last section, we talked about creating notebook servers and how you can use pre-built images for your notebook server. However, you might have observed that you are not limited by pre-built images you could also specify your own custom image you would want to use. Let us take a look at how you can create images for Kubeflow Notebooks.
Kubeflow Notebooks natively supports three types of notebooks, JupyterLab, RStudio, and Visual Studio Code however you could use any other web-based IDE in your custom image. You can find a list of pre-built notebook images here as well as the base notebook servers one could extend on here.
The Kubeflow documentation provides a comprehensive list of what the custom images need to be able to run with Kubeflow Notebooks. For Kubeflow Notebooks to work with a container image, the image must:
- expose an HTTP interface on port
8888:- kubeflow sets an environment variable
NB_PREFIXat runtime with the URL path we expect the container be listening under - kubeflow uses IFrames, so ensure your application sets
Access-Control-Allow-Origin: *in HTTP response headers
- kubeflow sets an environment variable
- run as a user called
jovyan:- the home directory of
jovyanshould be/home/jovyan - the UID of
jovyanshould be1000
- the home directory of
- start successfully with an empty PVC mounted at
/home/jovyan:- kubeflow mounts a PVC at
/home/jovyanto keep state across Pod restarts
- kubeflow mounts a PVC at
Here is an example of building an image on top of the Jupyter base image but with 2 additional packages: tensorflow and fast-transformer:
FROM public.ecr.aws/j1r0q0g6/notebooks/notebook-servers/jupyter:v1.5.0

RUN python3 -m pip install \
tensorflow==2.5.3 \
fast-transformer==0.2.0
You can then build this image and push it with any tool, here we will use Docker:
TAG=0.1.0

docker build \
-t jupyter-tensorflow-example:${TAG} \
--f jupyter-tensorflow-example.Dockerfile .

docker push ...
It is recommended to build on top of any of the base images however you are not limited to doing so. Let us see how you can create an image without using any of the base images. Here is another example which achieves to get the same 2 packages but does not use the base images:
FROM ubuntu:22.04

RUN apt-get update && apt-get install -y \
python3 \
python3-pip

RUN python3 -m pip --no-cache-dir install --upgrade \
"pip<20.3" \
setuptools

RUN python3 -m pip install --no-cache-dir \
jupyter \
tensorflow==2.5.3 \
fast-transformer==0.2.0

RUN apt-get install -y --no-install-recommends \
git \
libgl1-mesa-glx

EXPOSE 8888

ENV NB_PREFIX /

CMD ["bash","-c", "jupyter notebook --notebook-dir=/home/jovyan --ip=0.0.0.0 --no-browser --allow-root --port=8888 --NotebookApp.token='' --NotebookApp.password='' --NotebookApp.allow_origin='*' --NotebookApp.base_url=${NB_PREFIX}"]
In the same manner, as demonstrated earlier, you can build this image and push it with any tool.
 Using your own images
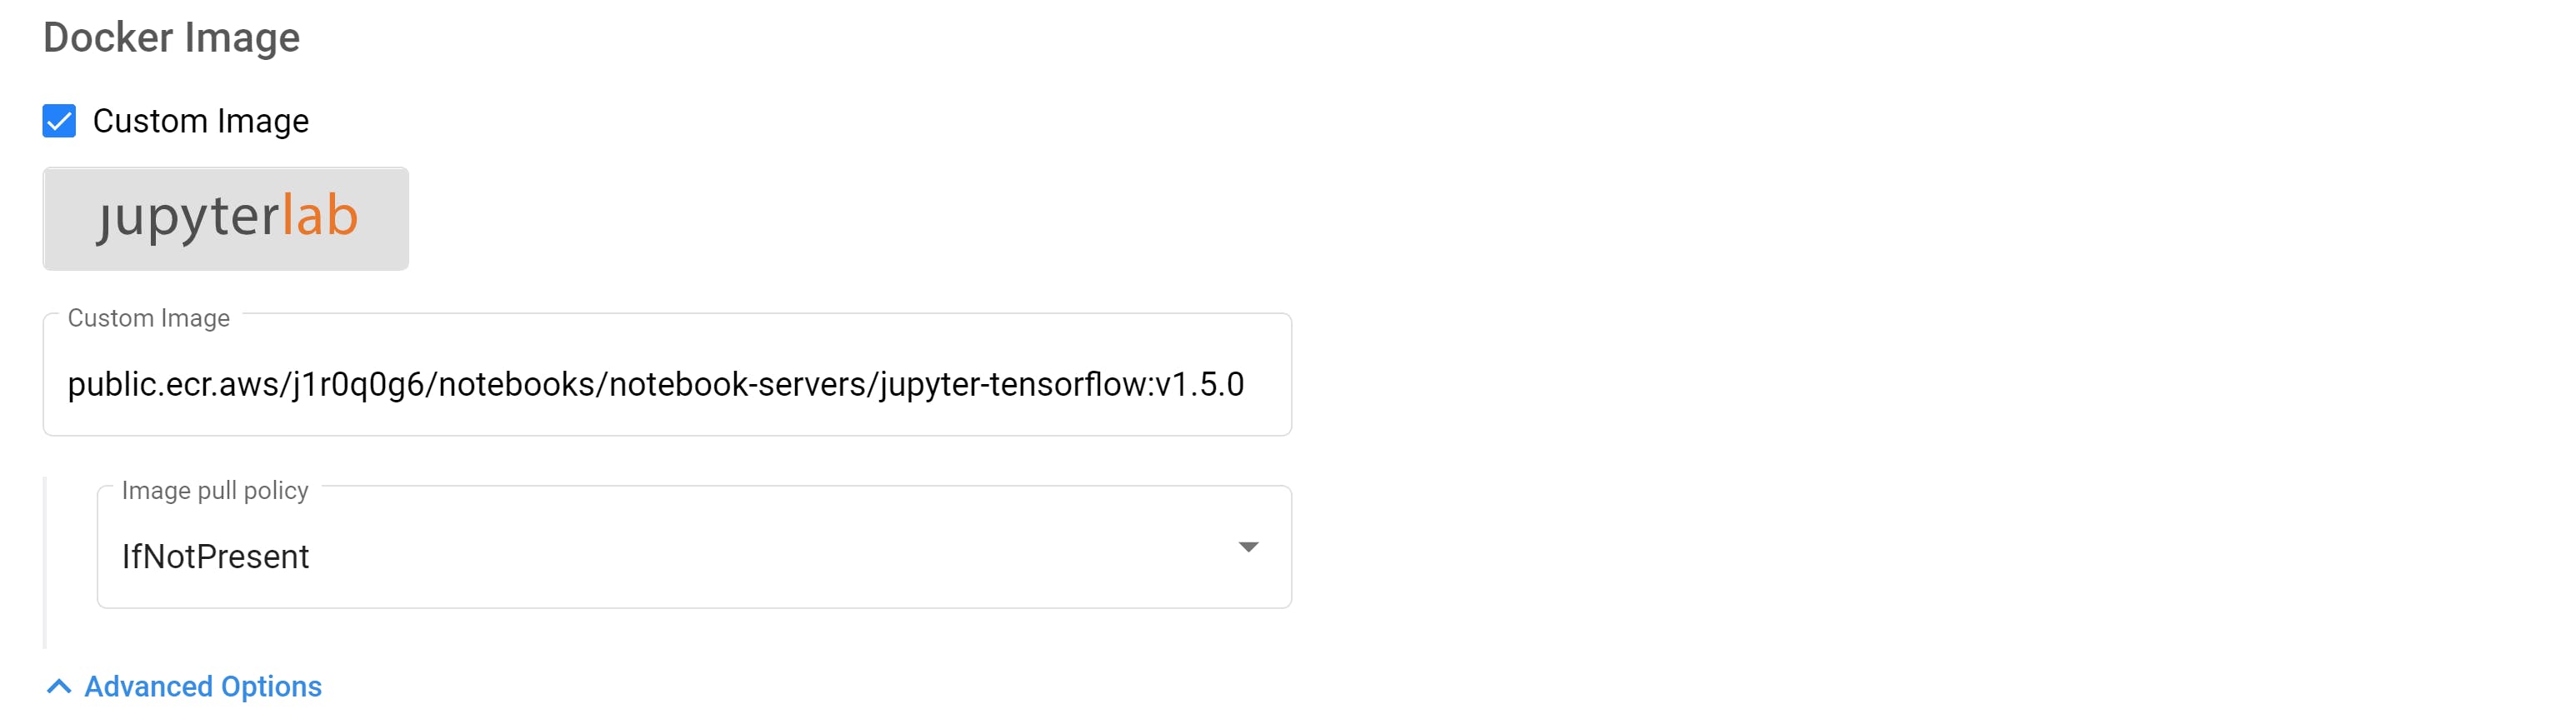
Once you do so, you can easily use this image while creating a new Notebook server as shown in this image.
How does Kubeflow support collaboration?
In the context of Kubeflow Notebooks, Kubeflow also supports role-based access control for fine-grained access to the Notebooks. A Notebook Server is a part of a Kubeflow namespace. Thus, even though Kubernetes does not have multitenancy ingrained, Kubeflow Notebooks brings multi-user isolation with namespaces and role-based access control it supports right out of the box.
Since the Kubeflow Notebook Server is based on a container image, it comes with the libraries, frameworks, and tools needed for the instance of Kubeflow Notebooks. You can easily create multiple different notebook servers according to your need for example: for training, you could have a TensorFlow GPU image while using a CPU-based image with different libraries for analyzing the dataset.
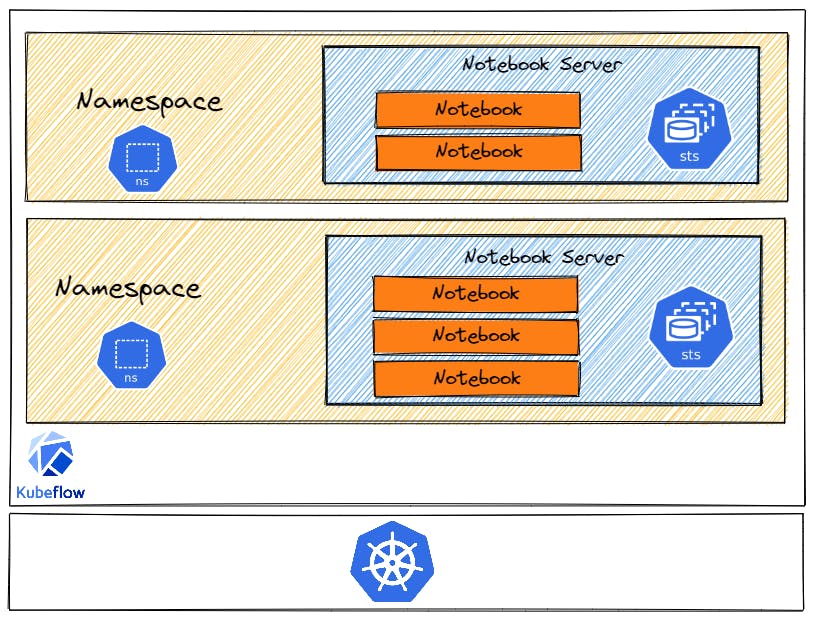
Here's a great diagram taken from kubeflow.org that shows multi-tenancy in Kubeflow:
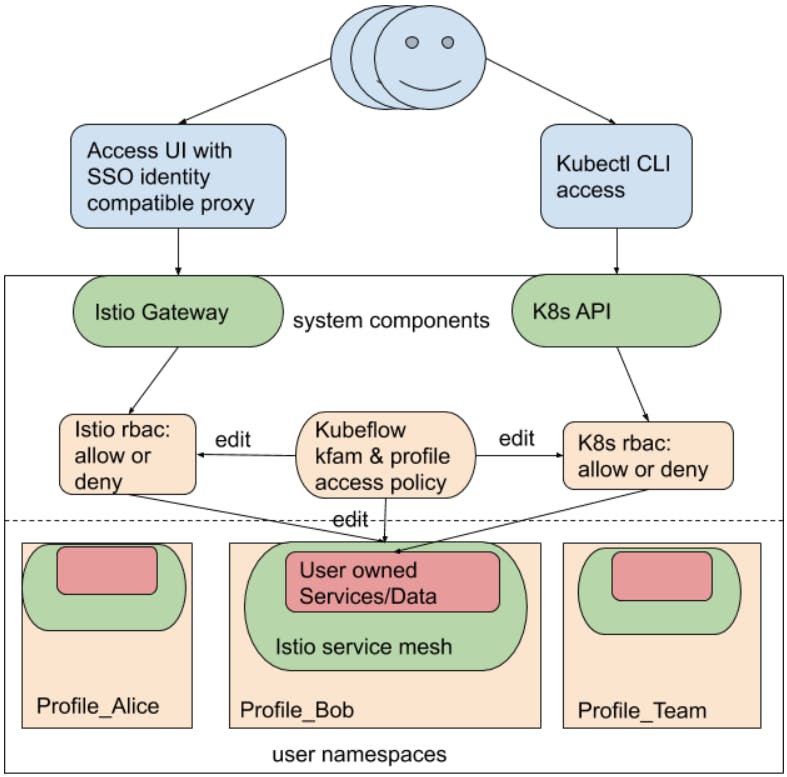
The Notebook ServiceAccount
When you create a new notebook Kubeflow by default assigns that Notebook pod the default-editor Kubernetes ServiceAccount. To better understand what this means for you as a user, you could run:
kubectl describe clusterrole kubeflow-edit
since the default-editor role is bound to the kubeflow-edit ClusterRole.
If you see the output for this command, we see that when running code in the Notebook Pod, you have the highly-privileged default-editor Kubernetes ServiceAccount bound to it and you can submit Kubernetes Resources in a notebook as well. This allows you to have great integration with the rest of the Kubeflow architecture.
Conclusion
Thank you for sticking with me until the end. I hope that you've taken away a thing or two about Kubeflow Notebooks, and how they work, and enjoyed reading this. If you learned something new or enjoyed reading this article, please share it so that others can see it. Until then, see you in the next post!
We will take forward what we talk about in this article in the next article in this series where we will take a deeper dive into Kubeflow Pipelines, until then, adieu!
You can also find me on Twitter @rishit_dagli, where I tweet about machine learning, and open-source.
Follow Kubesimplify on Hashnode, Twitter and Linkedin. Join our Discord server to learn with us.