


What is Ansible
Basically, Ansible is a configuration management tool used to configure multiple computers/servers at the same time without manual inputs to each one of them
It is Push based configuration tool thereby eliminating the need to install each server thus agentless another good feature is configuration in YAML which is very easy to write and understand
Architecture
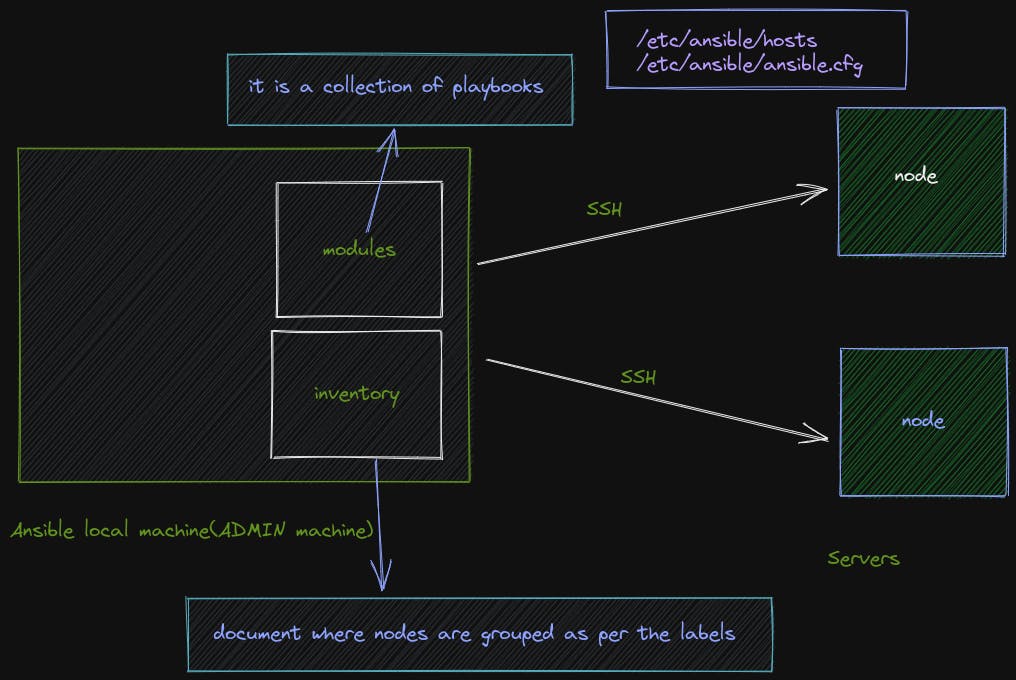
each playbook can have 1 or more plays and each play has its hosts mentioned each task has 1 or more steps with each having a name and special Ansible bulletin, etc.
---

- name: play 1
   hosts: monitor
   tasks:
    ....
- name: play 2
   hosts: application
   tasks:
    ....
so where do these hostnames come from
Here comes the part of the Inventory
Inside /etc/ansible/hosts file
it can be DNS names or simply put IP address instead
[monitor]
server01.com
server02.com

[application]
server05.com
server07.com
server08.com
Ansible in itself is a CLI, but we can also use GUI by using Ansible Tower
Configure EC2 instance using Ansible (BASIC)
💁 Used the ubuntu 22.04 as an image for EC2 and added HTTP inbound traffic to the security group and the newly created ssh key must be used in your case
Ansible.cfg (/etc/ansible/ansible.cfg)
[defaults]
private_key_file = demo-key-pair.pem # file path ssh key downloaded from AWS
Inventory (/etc/ansible/hosts)
[ec2]
<public ip of ec2 instance> ansible_ssh_user=ubuntu ansible_ssh_pass=<if any>
# but as we are using pem files we don't require the ansible ssh pass tag
To verify the connections
ansible ec2 -m ping -vvv
Playbook
---
- name: My first play
  hosts: ec2
  #  remote_user: root
  become: true
  tasks:
  - name: Ping my hosts
    ansible.builtin.ping:
  - name: Print message
    ansible.builtin.debug:
      msg: Hello from preview runner!!!
  - name: install docker
    ansible.builtin.shell: "sudo apt update -y && sudo apt install docker.io -y"

  - name: fix the permissions
    ansible.builtin.shell: "sudo usermod -aG docker ${USER}"

  - name: run container
    ansible.builtin.shell: "sudo docker network crnewly created ssh key must beeate pdf ; sudo docker run --rm -d --net pdf -p 80:80 --name pdf dipugodocker/pdf-editor:0.8-frontend && sudo docker run --rm -d --net pdf -p 8080 --name backend dipugodocker/pdf-editor:0.8-backend"

  - name: "GET docker compose file" # demonstration of how to copy files
    ansible.builtin.copy:
      src: docker-compose.yml
      dest: /home/ubuntu
      owner: ubuntu
      group: ubuntu
      mode: '0744'
EC2 playbook syntax check
ansible-playbook ec2-demo.yml --syntax-check
NOTE: if sudo privileges are asked use
--ask-become-passif we get asked for sudo passphrase during privilege escalation
ansible-playbook ec2-demo.yml
Here is a little tip for viewing the status of all EC2 instances using AWS CLI
aws ec2 describe-instances
Let's go a step further!
Lets configure terraform with Ansible to automate the infrastructure and configuration
⚠ NOTE: Comment out every line in the
/etc/ansible/hosts
Terraform file
provider "aws" {
  region  = "us-east-1"
}

# $ export AWS_ACCESS_KEY_ID="<provide the keys>"
# $ export AWS_SECRET_ACCESS_KEY="<provide the keys>"

# 1. create vpc
resource "aws_vpc" "prod-vpc" {
  cidr_block = "10.0.0.0/16"

  tags = {
    "Name" = "production"
  }
}

# 2. create internet gateway
resource "aws_internet_gateway" "gw" {
  vpc_id = aws_vpc.prod-vpc.id

  tags = {
    Name = "ig"
  }
}

# 3. create custom route table
resource "aws_route_table" "prod-route-table" {
  vpc_id = aws_vpc.prod-vpc.id

  route {
    cidr_block = "0.0.0.0/0"
    gateway_id = aws_internet_gateway.gw.id
  }

  route {
    ipv6_cidr_block        = "::/0"
    gateway_id             = aws_internet_gateway.gw.id
  }

  tags = {
    Name = "prod-rt"
  }
}

# 4. create a subnet
resource "aws_subnet" "subnet-1" {
  vpc_id     = aws_vpc.prod-vpc.id
  cidr_block = "10.0.1.0/24"
  # cidr_block = var.subnet_prefix
  availability_zone = "us-east-1a"

  tags = {
    Name = "prod-subnet"
  }
}

# 5. associate subnet with route table
resource "aws_route_table_association" "a" {
  subnet_id      = aws_subnet.subnet-1.id
  route_table_id = aws_route_table.prod-route-table.id
}

# 6. create a security group to allow ports 22, 80, 443
resource "aws_security_group" "allow_web" {
  name        = "allow_web_traffic"
  description = "Allow Web inbound traffic"
  vpc_id      = aws_vpc.prod-vpc.id

  ingress {
    description      = "HTTP"
    from_port        = 80
    to_port          = 80
    protocol         = "tcp"
    cidr_blocks      = ["0.0.0.0/0"] # so as to make anyone to reach the server
  }

  ingress {
    description      = "SSH"
    from_port        = 22
    to_port          = 22
    protocol         = "tcp"
    cidr_blocks      = ["0.0.0.0/0"] # so as to make anyone to reach the server
  }

  egress {
    from_port        = 0
    to_port          = 0
    protocol         = "-1"
    cidr_blocks      = ["0.0.0.0/0"]
  }

  tags = {
    Name = "allow_web"
  }
}

# 7. create a network interface with ip in the subnet that was created in step 4
resource "aws_network_interface" "web-server-nic" {
  subnet_id       = aws_subnet.subnet-1.id
  private_ips     = ["10.0.1.50"]
  security_groups = [aws_security_group.allow_web.id]
}

# 8. assign an elastic ip to the network interface created in step 7
resource "aws_eip" "one" {
  depends_on = [
    aws_internet_gateway.gw
  ]
  vpc                       = true
  network_interface         = aws_network_interface.web-server-nic.id
  associate_with_private_ip = "10.0.1.50"
}

output "server_public_ip" {  # it will print when terrafrom apply
  value = aws_eip.one.public_ip
}

# 9. create ubuntu server

resource "aws_instance" "web-server-ec2" {
  ami = "ami-052efd3df9dad4825"
  instance_type = "t2.micro"
  availability_zone = "us-east-1a" # it is hardcoded as aws will make different zones to subnet and ec2 creating error
  key_name = "demo-key-pair"
  network_interface {
    device_index = 0
    network_interface_id = aws_network_interface.web-server-nic.id
  }

  user_data = <<-EOF
    #!/bin/bash
    sudo apt update -y
    EOF

  tags = {
    "Name" = "web-server"
  }

# using local-exec to run Ansible
  provisioner "local-exec" {
    command = "sleep 120; ANSIBLE_HOST_KEY_CHECKING=False ansible-playbook -u ubuntu --private-key ./demo-key-pair.pem -i '${aws_instance.web-server-ec2.public_ip},' ec2-cfg.yml && curl --head ${aws_instance.web-server-ec2.public_ip}"
  }
}
here the
- -u -> user
- --private-key -> path to the ssh key
- -i -> inventory with comma separated host IPs
Ansible playbook save as (ec2-cfg.yml)
---
- name: My first play
  # hosts: ec2
  hosts: all
  #  remote_user: root
  become: true # it tells that privilege should be escalated
  tasks:
  - name: Ping my hosts
    ansible.builtin.ping:
  - name: Print message
    ansible.builtin.debug:
      msg: Hello from preview runner!!!
  - name: install docker
    shell: "sudo apt update -y && sudo apt install docker.io -y"

  - name: fix the permissions
    shell: "sudo usermod -aG docker ${USER}"

  - name: run container
    shell: "sudo docker network create pdf ; sudo docker run --rm -d --net pdf -p 80:80 --name pdf dipugodocker/pdf-editor:0.8-frontend && sudo docker run --rm -d --net pdf -p 8080 --name backend dipugodocker/pdf-editor:0.8-backend"
terraform init
terraform plan
terraform apply
Follow Kubesimplify on Hashnode, Twitter and Linkedin. Join our Discord server to learn with us.