Slicing GPUs in Kubernetes with NVIDIA Multi-Instance GPU (MIG)
GPU sharing in Kubernetes explained: time-slicing vs MPS vs MIG, every nvidia-smi command to enable and disable MIG on one GPU or eight, GPU Operator automation, pitfalls, and DCGM monitoring.

Thanks to our hardware partner


This deep dive ran on an 8x NVIDIA RTX PRO 6000 Blackwell node from Utho Cloud. If you need GPU infrastructure to run workloads like these, take a look.
Explore UthoOn this page (32)
- The Problem: Kubernetes Hands Out GPUs Whole
- The Three Ways to Share a GPU
- First: How a Process Talks to a GPU
- Time-Slicing: Take Turns, Fast
- MPS: Everyone Shares One Session
- MIG: Split the Card for Real
- Prerequisites
- The MIG Mental Model: GPU Instances and Compute Instances
- How to Read MIG Profile Names
- Hands-On Part 1: Slice One GPU, End to End
- Step 0: Check the current MIG mode
- Step 1: Stop the daemons holding the GPU
- Step 2: Enable MIG mode on GPU 0
- Step 3: See what profiles the card supports
- Step 4: Carve the slices
- Step 5: Verify the slices exist
- Step 6: Run something on a slice (no Kubernetes needed)
- Step 7: Tear it all down (disable MIG)
- Hands-On Part 2: All 8 GPUs at Once
- Bringing Kubernetes In: The GPU Operator
- Declarative MIG: One Label Instead of All Those Commands
- How the NVIDIA Runtime Injects GPUs into Containers
- Common Production Pitfalls and How to Solve Them
- Pitfall A: Non-Standard containerd Socket Configurations
- Pitfall B: MIG Manager Overriding Host Configurations
- Pitfall C: Host-Level State Drift Undetected by MIG Manager
- Pitfall D: Forcing Kubelet Discovery for Manual MIG Configurations
- How to Monitor GPU Slices with Prometheus and Grafana
- Run a Real Workload on a Slice (Blackwell, sm120)
- Prove the Isolation, From Both Sides
- The Platform Properties Compared
- Conclusion
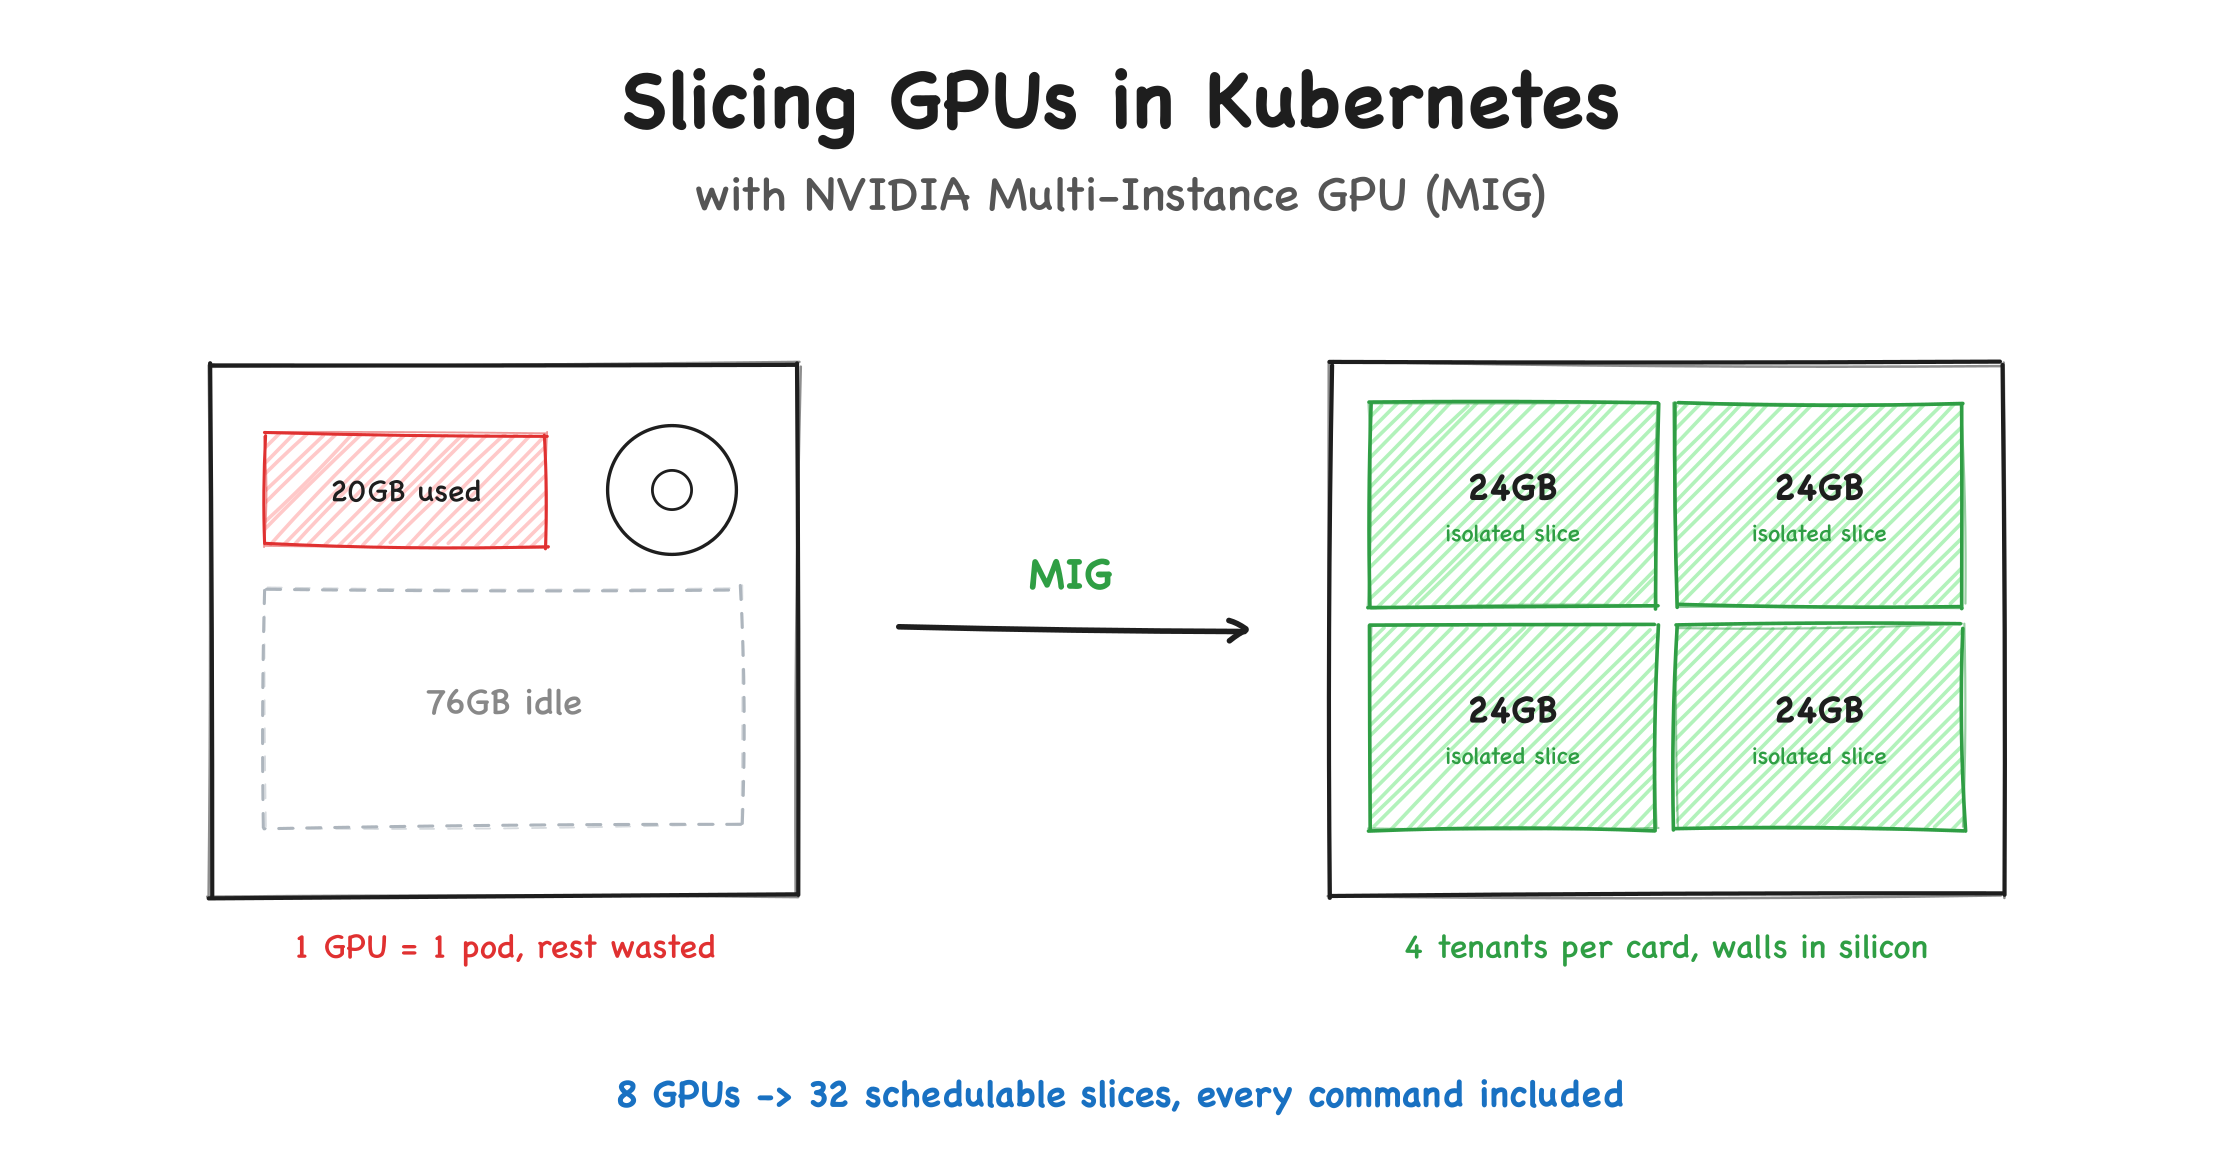
GPUs are the most expensive thing in your cluster and the worst shared. A CPU can be divided into millicores. Memory can be requested byte by byte. But ask Kubernetes for a GPU and you get the whole card, all 96GB of it, even if your model needs 20GB.
This post is the story of fixing that. We take a node with 8x NVIDIA RTX PRO 6000 Blackwell GPUs (768GB of VRAM in total) and slice it into 32 fully isolated 24GB GPU instances using Multi-Instance GPU (MIG). First by hand with nvidia-smi, one card at a time, so you see every command including how to undo everything. Then across all 8 cards at once. Then declaratively with the NVIDIA GPU Operator so it survives beyond a single SSH session.
Who this is for:
- Platform engineers and SREs who run GPU nodes in Kubernetes and are tired of watching 96GB cards sit mostly idle.
- Teams that need hardware-level tenant isolation on shared AI infrastructure while keeping finance happy about utilization.
By the end, a PyTorch workload will be running on a single hardware-isolated slice, and you will be able to prove the isolation from both inside and outside the container.
While this setup was tested on a single node, nothing here is single-node specific. It works the same regardless of how many GPU nodes you have.
The Problem: Kubernetes Hands Out GPUs Whole #
Here is a scenario that plays out on GPU clusters everywhere.
Your team provisions a node equipped with 8x NVIDIA RTX PRO 6000 Blackwell GPUs. You deploy the standard Kubernetes GPU Operator, which registers the node resources as nvidia.com/gpu: 8.
Then a developer deploys a lightweight LLM inference pod or a small PyTorch training job. Kubernetes assigns them a whole GPU. The workload claims the entire 96GB Blackwell card but only uses 20GB.
The remaining 76GB sits idle.
Because standard GPUs are scheduled as indivisible resources, eight small workloads lock down eight entire cards. Your platform is left with zero schedulable GPU capacity, artificially high queue latency, and a cluster operating at a fraction of its financial and compute potential.
Now you are stuck answering an uncomfortable question: how do you justify low cluster utilization to finance while your development teams are complaining about lack of GPU availability?
The fix is GPU sharing. But "sharing a GPU" means very different things depending on how you do it, and picking the wrong mechanism is how you end up with one tenant's memory leak crashing another tenant's training job.
The Three Ways to Share a GPU #
NVIDIA gives you three mechanisms to put more than one workload on a card. To understand why they behave so differently, you first need to know what actually happens when a process uses a GPU.
First: How a Process Talks to a GPU #
A GPU is a big box of tiny workers. Our card has 188 of them (NVIDIA calls each one a Streaming Multiprocessor, or SM), and they all crunch numbers at the same time. That parallelism is the whole reason GPUs are fast.
Your actual program runs on the CPU. When it needs the GPU, it opens a session with the card (the technical name is a CUDA context). That session is the program's private workspace on the GPU: it holds the program's data in GPU memory, plus the small GPU programs it wants to run (each of those is called a kernel). Every program gets its own session, and one session can never read another's memory.
Here is the catch that makes sharing hard: by default, the GPU runs only one session at a time. Suppose your program is light and only keeps 20 of the 188 workers busy. The other 168 do not get handed to anyone else, they just sit idle, because it is your turn and the whole card is yours until you finish. A second program cannot squeeze its work onto the free workers; it waits in line.
So a GPU, out of the box, is a single-tenant machine: one program at a time, everyone else waiting. Every method below is a different way to attack that one problem.
Time-Slicing: Take Turns, Fast #
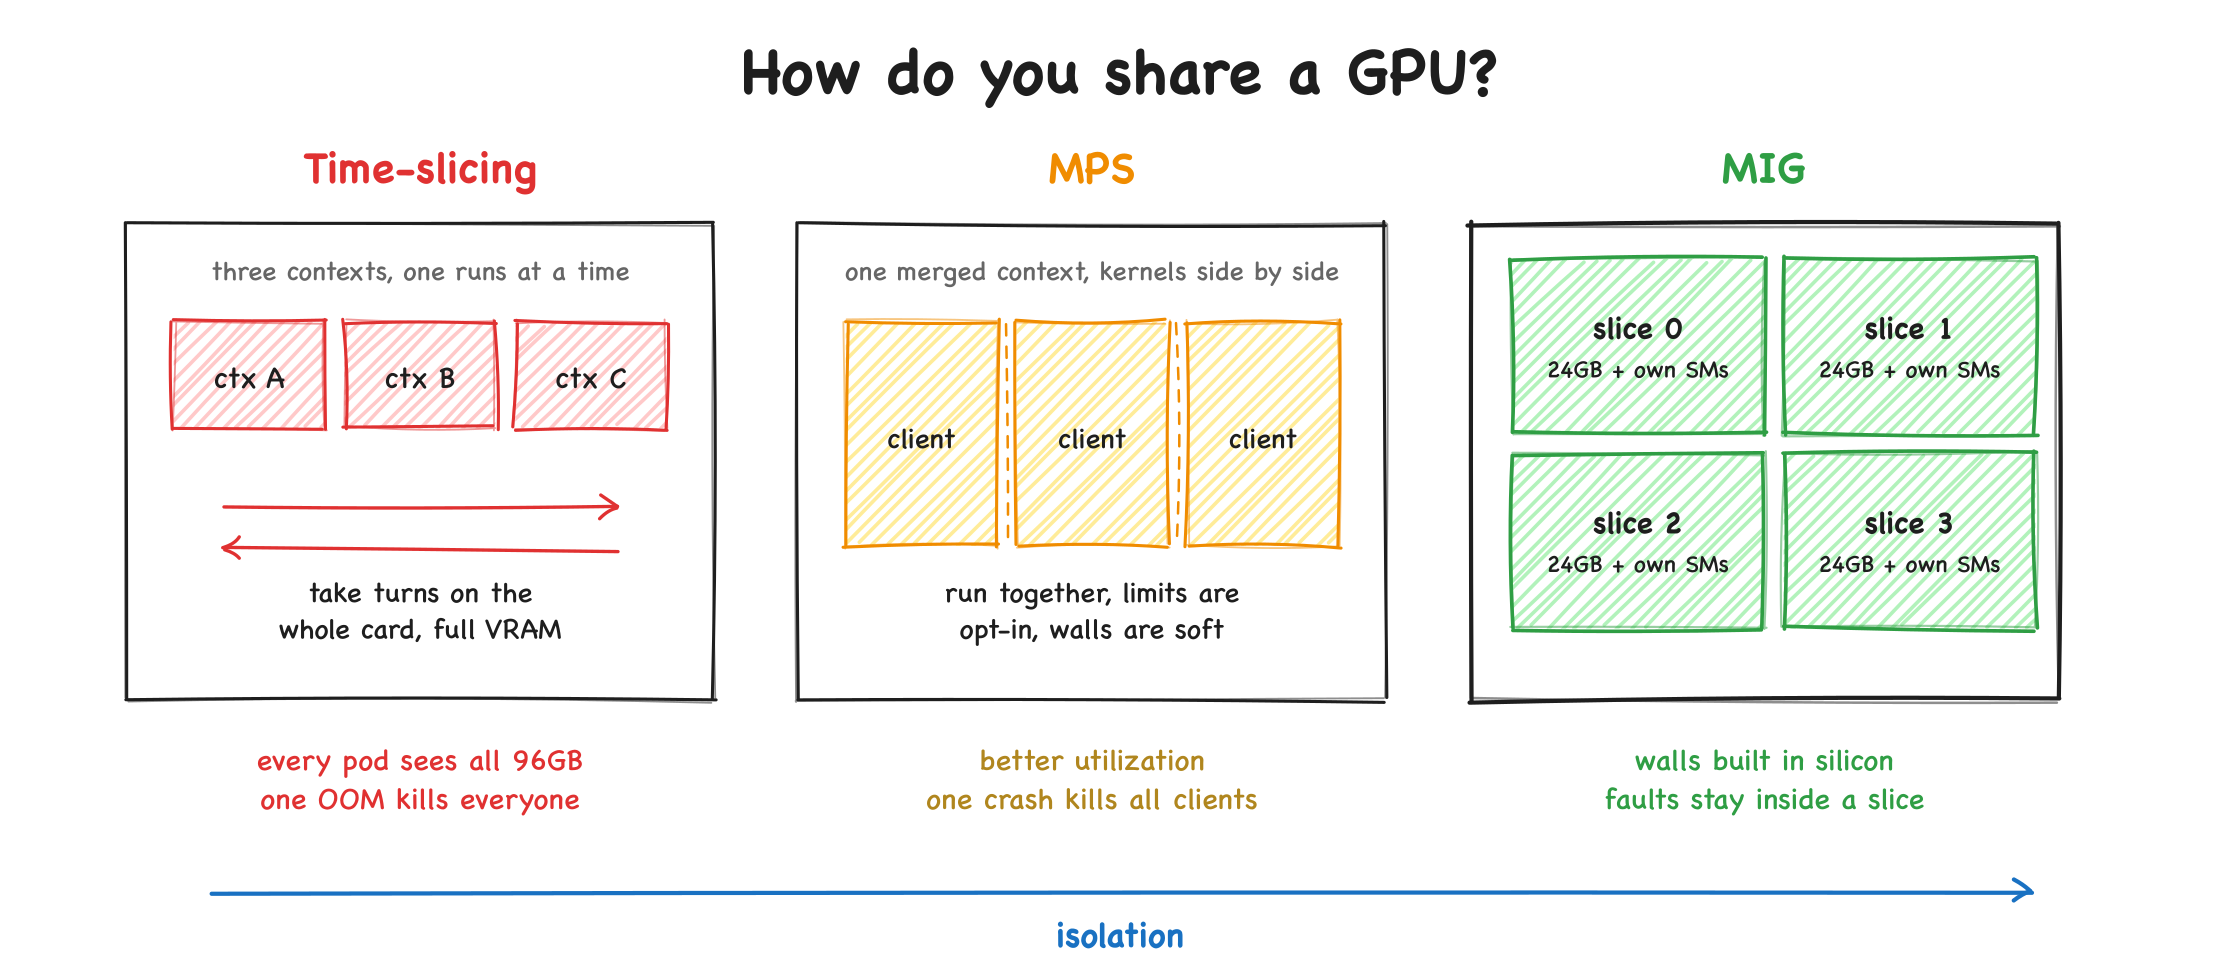
Time-slicing keeps the "one at a time" rule but makes the turns very short, so it feels like sharing. Picture one meeting room and three teams: team A uses it for a few minutes, steps out, team B goes in, then team C, and around again. A GPU does the same thing: program A gets the whole card for a moment, then it is frozen and program B gets it, then C, then back to A. They rotate. Nothing ever runs side by side.
Two things go wrong with this.
Switching costs real time. Every time the card changes hands, it has to save everything the current program was in the middle of and load in the next one's. There is a lot of that state on a GPU, so the hand-off itself burns time that could have gone to actual work.
Nobody enforces fairness. On a CPU, the operating system forces everyone to take fair turns, so no single program can hog the machine. GPU time-slicing has no such referee: no guaranteed turn length, no priorities. A program that keeps the card busy with back-to-back work simply keeps holding it, and the others starve. (Older GPUs were worse: the card could only change hands once a program finished the piece of work it had started, so one long job froze everyone until it was done. Newer GPUs can cut a long job off partway, which helps, but there is still no promise of a fair share.)
There is also a practical split worth knowing: this hurts training and inference differently. A training job runs long, heavy work that keeps the whole card busy, so forcing it to take turns just makes everyone slower. Inference usually runs in short bursts with gaps in between, which packs into shared turns much more comfortably.
This is why the Kubernetes "time-slicing" feature is a bit of a misnomer. It does not divide time fairly; it just tells Kubernetes "this one GPU is really four," lets four pods land on it, and leaves them to fight over turns. A more honest name is oversubscription: Kubernetes thinks there are four GPUs, the hardware knows there is one.
And the biggest gap is memory, which is not divided at all. Every pod draws from the same pool of GPU memory, and nothing tracks who is supposed to get how much. If one pod uses it all (or leaks), the next pod that asks the GPU for memory is refused and crashes, through no fault of its own. Time-slicing is fine for a dev box or bursty, trusted jobs. It is not real isolation.
MPS: Everyone Shares One Session #
Time-slicing leaves all those workers idle during each turn. MPS (Multi-Process Service) goes straight after that waste with a trick: if the GPU only runs one session at a time, then put everyone in the same session.
A helper process sits in front of the card. Every program hands its work to that helper, and the helper feeds all of it to the GPU as though it came from a single, well-behaved program. Because it is now one session, work from different programs really does run at the same time on different workers. Three light services that each need 20% of the card can run together and fill it, instead of taking turns and leaving most of it idle. For lots of small jobs, that is a real speed-up.
The catch is the flip side of the same trick. Once everyone is in one shared session, the natural walls between programs are gone. You can ask MPS to cap how much of the card or memory each program gets, but those caps are limits you opt into, not walls the hardware enforces. And everyone shares one fate: if a single program crashes hard, it can take down the shared helper, and when that dies, every program's GPU work dies with it. (Modern GPUs at least stop one program from reading another's data.) MPS shines when one team is packing its own jobs onto a card. It is not where you put an untrusted stranger.
MIG: Split the Card for Real #
MIG (Multi-Instance GPU) stops playing turn-taking games and physically splits the card into several smaller GPUs. Each one gets its own fixed chunk of memory and its own fixed set of workers, walled off from the rest. Each mini-GPU runs its own sessions at the same time as the others, because as far as the hardware is concerned it genuinely is a separate, smaller GPU.
That fixes all three problems at once. Run out of memory? You only exhaust your slice's memory; the neighbors never notice. Noisy neighbor hogging the card? Cannot happen, because their workers are literally different workers from yours, and their memory traffic runs on separate lanes, so your speed stays steady. A crash? It stays inside your slice. To your workload, a slice just looks like a smaller GPU that behaves predictably.
| Time-slicing | MPS | MIG | |
|---|---|---|---|
| The trick | Take turns, fast | Everyone shares one session | Split the hardware itself |
| Parallelism | None (take turns) | Real (share the workers) | Real (separate hardware) |
| Isolation | None | Software (shared session) | Hardware (silicon level) |
| Memory protection | None, one shared pool | Opt-in limits | Enforced by hardware |
| Fault blast radius | Whole card | Whole card (helper dies, all die) | One slice |
| Performance | Variable, context-switch overhead | Good for small kernels | Predictable, dedicated units |
| Best for | Dev/test, trusted bursty jobs | One team packing its own card | Shared platforms with real tenant boundaries |
If you are building a platform where different teams, customers, or environments share the same silicon, MIG is the only option of the three that gives you a hardware guarantee instead of a promise. That is the mechanism this post is about.
One caveat before you commit: MIG needs supported hardware (A100/A30 Ampere onwards, Hopper, Blackwell including the RTX PRO 6000 Server Edition we use here), and a MIG slice cannot exceed one physical card. If your model needs more than 96GB, MIG is not your problem to solve; multi-GPU is.
Prerequisites #
To follow along, you will need root access to a GPU node and admin access to a Kubernetes cluster. Here is the exact infrastructure used in this setup:
- Host OS: Enterprise Linux VM (Ubuntu-based) on Utho Cloud.
- Cloud Provider: Utho Cloud.
- Kubernetes: v1.35.6
- GPU Operator Chart: gpu-operator-v26.3.3
- Container Runtime:
containerd. - CPUs: 256 Cores.
- RAM: 1259GB.
- GPUs: 8x NVIDIA RTX PRO 6000 Blackwell Server Edition (96GB VRAM, 188 Streaming Multiprocessors / SMs per card).
- NVIDIA Host Driver:
610.43.02with CUDA:13.3.
root@gpu-rtxpro6000-8:~# nvidia-smi -L
GPU 0: NVIDIA RTX PRO 6000 Blackwell Server Edition (UUID: GPU-8b89b58e-b427-108d-ac50-06138d78fe78)
GPU 1: NVIDIA RTX PRO 6000 Blackwell Server Edition (UUID: GPU-03a041b7-8abf-360a-d1a2-dfd70188cd5f)
GPU 2: NVIDIA RTX PRO 6000 Blackwell Server Edition (UUID: GPU-ba09367f-dd50-32ca-e988-7ff66bece885)
GPU 3: NVIDIA RTX PRO 6000 Blackwell Server Edition (UUID: GPU-30512c46-708b-f374-5698-ee24be6cd626)
GPU 4: NVIDIA RTX PRO 6000 Blackwell Server Edition (UUID: GPU-4c395b7a-a7e6-d90f-1ced-d96e8dd68288)
GPU 5: NVIDIA RTX PRO 6000 Blackwell Server Edition (UUID: GPU-04dc48d7-7048-aef5-ad36-f5db716e7668)
GPU 6: NVIDIA RTX PRO 6000 Blackwell Server Edition (UUID: GPU-f4f5db98-143f-0a8d-47ce-956fab39a736)
GPU 7: NVIDIA RTX PRO 6000 Blackwell Server Edition (UUID: GPU-f4c61521-240a-da09-2787-e576034e197e)The MIG Mental Model: GPU Instances and Compute Instances #
Before slicing a GPU, it is crucial to understand what a slice actually contains.
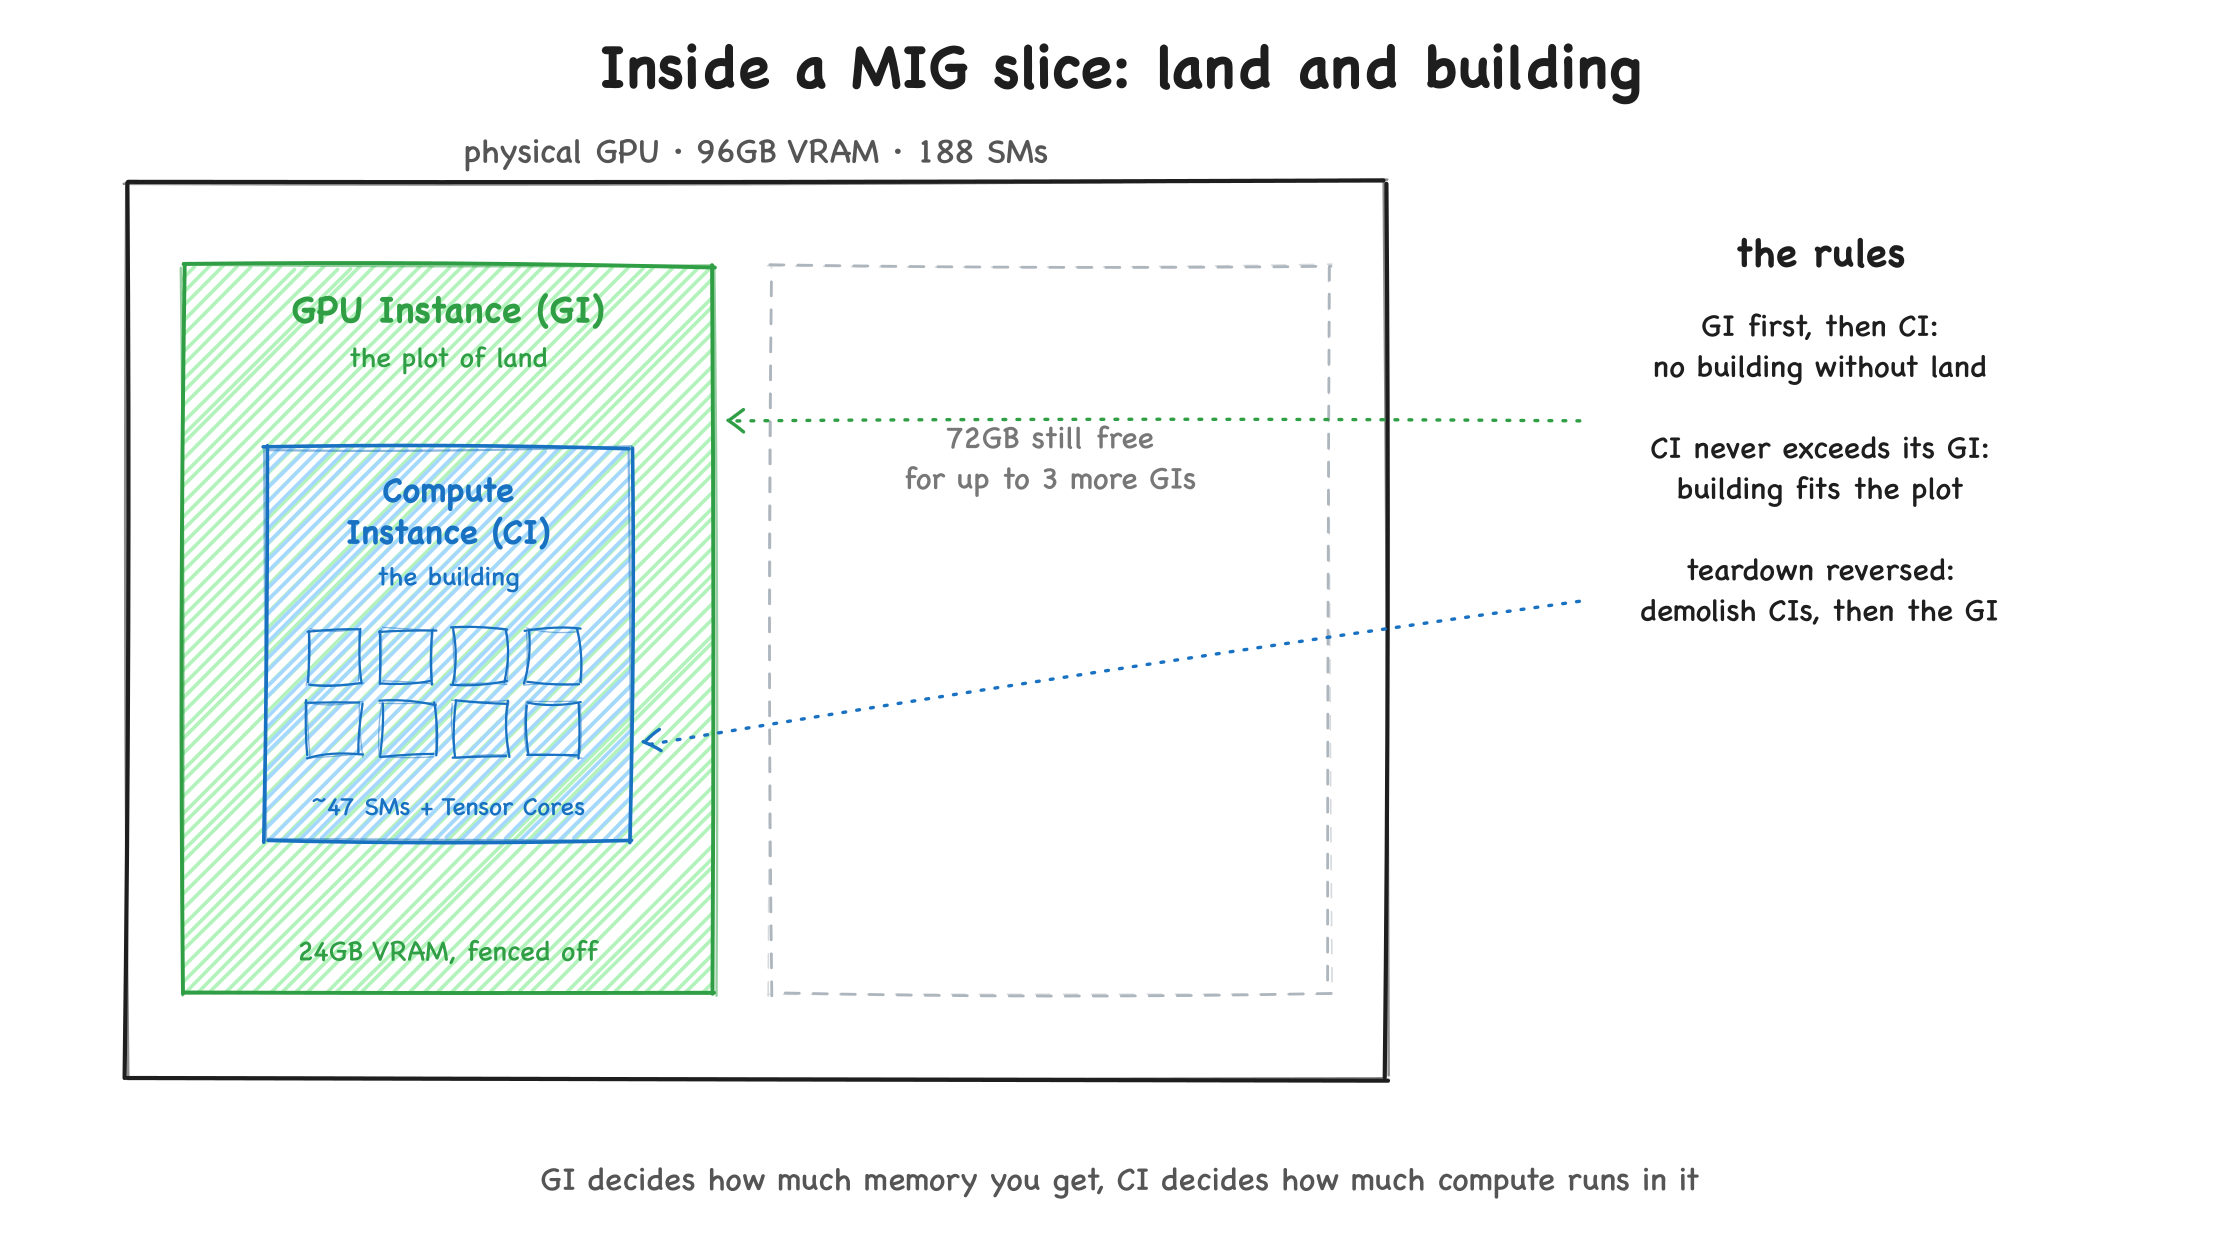
Every slice consists of a GPU Instance (GI) and a Compute Instance (CI). The easiest way to think about them:
- The GPU Instance (GI) is the plot of land. When you create a GI, you carve out a physical chunk of VRAM and its memory controllers. This land is securely fenced off at the silicon level. No other partition or process on the GPU can cross this boundary or access this memory.
- The Compute Instance (CI) is the building built on that land. The building houses the execution machinery: the Streaming Multiprocessors (SMs) and Tensor Cores that perform the actual mathematical computations.
The relationship between a GI and a CI is strictly hierarchical:
- No building without land. You cannot establish a Compute Instance without first creating a parent GPU Instance. Execution units must have a dedicated memory boundary to run in.
- Size constraints. The capacity of the building (CI) cannot exceed the size of the plot of land (GI). You cannot allocate more compute slices (SMs) than the parent VRAM slice naturally supports.
- Sub-division. You can build a single large structure (one CI matching the full GI) or divide the plot to support multiple smaller buildings (multiple smaller CIs). In the latter scenario, those compute instances run in parallel, sharing the same VRAM pool of the parent GI while keeping their execution cores strictly isolated.
- Teardown order matters. You cannot clear the plot of land (destroy the GI) while the building is still standing (the CI exists). The driver will reject the command. You must demolish the building first (destroy all CIs), then reclaim the land (destroy the parent GI). This rule shows up again below in the hands-on teardown steps.
Why split both memory and compute? If you only partitioned the memory and left the compute cores shared, you would have multiple isolated storage units but one set of hands trying to access all of them at once, causing traffic jams. If you only partitioned the compute cores but kept a shared memory pool, you would have independent workers writing on the same sheet of paper, causing conflicts and corruption. By slicing both, every tenant gets their own locked filing cabinet and their own dedicated worker.
How to Read MIG Profile Names #
NVIDIA profiles follow the naming scheme {X}g.{Y}gb:
{Y}gbis the VRAM partition (the GI layer).{X}gis the compute slice count.
The RTX PRO 6000 Blackwell has 188 SMs and divides its silicon into 4 base compute slices. So a 1g.24gb slice gets roughly 1/4th of the card: 46 SMs paired with a 24GB VRAM partition. (It is a hair under a clean quarter because the driver holds a few SMs back, so four slices use 184 of the 188.) A 2g.48gb slice gets half the card, and 4g.96gb is the full card expressed as a single MIG instance.
You will also see suffixed variants like 1g.24gb-me (a pure-compute slice with the video decode/encode engines stripped out) and 1g.24gb+me.all (one slice that grabs all of the card's media engines). We will see the full list straight from the driver in a moment.
Hands-On Part 1: Slice One GPU, End to End #
Everything in this section happens on the host, with no Kubernetes involved. We will take GPU 0 through the complete lifecycle: check, enable, inspect, carve, verify, run, and then tear it all back down. If you understand this section, the rest of the post is just automation.
Step 0: Check the current MIG mode #
root@gpu-rtxpro6000-8:~# nvidia-smi -i 0 --query-gpu=index,name,mig.mode.current --format=csv
index, name, mig.mode.current
0, NVIDIA RTX PRO 6000 Blackwell Server Edition, Disabled-i 0 targets GPU index 0. Drop the -i flag and the same query prints the state of every card in the box.
Step 1: Stop the daemons holding the GPU #
Two operations here look similar but behave very differently under load:
- Toggling MIG mode (
nvidia-smi -mig 1): on older architectures like the Ampere A100, enabling MIG forced a disruptive GPU reset. Starting with Hopper and Blackwell, this is a non-disruptive logical toggle in the driver. - Carving the slices (
nvidia-smi mig -cgi ...): this is where physical reality hits. The command forces the GPU's memory controllers to partition the memory crossbars on the silicon. If any process holds even a single megabyte of VRAM, the operation fails withDevice or resource busy.
On enterprise systems, two background services commonly hold handles on GPU device files:
nvidia-persistenced: keeps the driver loaded in kernel memory to avoid launch latency for new CUDA processes.nvidia-fabricmanager: used on multi-GPU systems connected via NVSwitches (HGX baseboards). If your GPUs are slotted directly into PCIe like ours, this service is not present.
Stop what applies to you:
root@gpu-rtxpro6000-8:~# sudo systemctl stop nvidia-persistencedAlso make sure no CUDA workload (an Ollama server, a Jupyter kernel, anything) is running on the GPU you are about to slice. nvidia-smi shows active processes at the bottom of its output.
Step 2: Enable MIG mode on GPU 0 #
root@gpu-rtxpro6000-8:~# sudo nvidia-smi -i 0 -mig 1
Enabled MIG Mode for GPU 00000000:01:00.0

Warning: persistence mode is disabled on device 00000000:01:00.0. See the Known Issues section of the nvidia-smi(1) man page for more information. Run with [--help | -h] switch to get more information on how to enable persistence mode.
All done.The warning is expected: we stopped nvidia-persistenced ourselves one step ago, and the driver is just pointing that out. If the driver cannot flip the mode because a client is still attached, it reports the GPU as being in a pending enable state instead. Kill the remaining clients (or reboot) and the mode activates.
At this point the GPU is in MIG mode but has zero slices, which means no CUDA workload can use it at all until you carve instances. An enabled-but-empty MIG GPU is effectively offline for compute. Do not stop halfway.
Step 3: See what profiles the card supports #
Ask the driver what shapes it can cut:
root@gpu-rtxpro6000-8:~# nvidia-smi mig -i 0 -lgip
+-------------------------------------------------------------------------------+
| GPU instance profiles:                                                        |
| GPU   Name               ID    Instances   Memory     P2P    SM    DEC   ENC  |
|                                Free/Total   GiB              CE    JPEG  OFA  |
|===============================================================================|
|   0  MIG 1g.24gb         14     4/4        23.62      No     46     1     1   |
|                                                               1     1     0   |
+-------------------------------------------------------------------------------+
|   0  MIG 1g.24gb+me      21     1/1        23.62      No     46     1     1   |
|                                                               1     1     1   |
+-------------------------------------------------------------------------------+
|   0  MIG 1g.24gb+gfx     47     4/4        23.62      No     46     1     1   |
|                                                               1     1     0   |
+-------------------------------------------------------------------------------+
|   0  MIG 1g.24gb+me.all  65     1/1        23.62      No     46     4     4   |
|                                                               1     4     1   |
+-------------------------------------------------------------------------------+
|   0  MIG 1g.24gb-me      67     4/4        23.62      No     46     0     0   |
|                                                               1     0     0   |
+-------------------------------------------------------------------------------+
|   0  MIG 2g.48gb          5     2/2        47.38      No     94     2     2   |
|                                                               2     2     0   |
+-------------------------------------------------------------------------------+
|   0  MIG 2g.48gb+gfx     35     2/2        47.38      No     94     2     2   |
|                                                               2     2     0   |
+-------------------------------------------------------------------------------+
|   0  MIG 2g.48gb+me.all  64     1/1        47.38      No     94     4     4   |
|                                                               2     4     1   |
+-------------------------------------------------------------------------------+
|   0  MIG 2g.48gb-me      66     2/2        47.38      No     94     0     0   |
|                                                               2     0     0   |
+-------------------------------------------------------------------------------+
|   0  MIG 4g.96gb          0     1/1        95.12      No     188    4     4   |
|                                                               4     4     1   |
+-------------------------------------------------------------------------------+
|   0  MIG 4g.96gb+gfx     32     1/1        95.12      No     188    4     4   |
|                                                               4     4     1   |
+-------------------------------------------------------------------------------+Read this table carefully, it is the source of truth for your card:
- ID is the numeric profile ID you can use in create commands (
14and the name1g.24gbare interchangeable). - Instances Free/Total tells you how many of each profile fit: four 1g.24gb slices, or two 2g.48gb, or one 4g.96gb.
- SM confirms the compute split: 46/94/188 SMs.
- The suffixed variants redistribute the media engines and graphics support. Every plain slice already gets a proportional share of the media engines (the
1g.24gbrow shows one NVDEC and one NVENC). The suffixes change that:-mestrips them out for a pure-compute slice,+me.allhands a single slice all of the card's decode/encode engines (hence it is limited to 1/1), and+gfx(new on Blackwell) enables graphics APIs inside the slice.
You can also ask where those slices physically land on the card:
root@gpu-rtxpro6000-8:~# nvidia-smi mig -i 0 -lgipp
GPU  0 Profile ID 14 Placements: {0,3,6,9}:3
GPU  0 Profile ID 21 Placements: {0,3,6,9}:3
GPU  0 Profile ID 47 Placements: {0,3,6,9}:3
GPU  0 Profile ID 65 Placements: {0,3,6,9}:3
GPU  0 Profile ID 67 Placements: {0,3,6,9}:3
GPU  0 Profile ID  5 Placements: {0,6}:6
GPU  0 Profile ID 35 Placements: {0,6}:6
GPU  0 Profile ID 64 Placements: {0,6}:6
GPU  0 Profile ID 66 Placements: {0,6}:6
GPU  0 Profile ID  0 Placement : {0}:12
GPU 0 Profile ID 32 Placement : {0}:12Think of the card's memory as a row of 12 equal parking spots. A 1g.24gb slice is a small car that takes 3 spots, a 2g.48gb is a longer car that takes 6, and the whole-card 4g.96gb takes all 12. The {0,3,6,9}:3 notation just lists where each size is allowed to park: a small slice can start at spot 0, 3, 6, or 9; a 2g.48gb needs 6 spots in a row, so it can only start at 0 or 6.
This is where fragmentation bites. Say you park one small slice starting at spot 3 and another at spot 6. You have used 6 of the 12 spots, so half the card looks free, but the free spots are 0-2 and 9-11: two separate gaps of 3. A 2g.48gb needs 6 in a row, and there is no run of 6 left, so it will not fit even though half the memory is idle. The fix is to plan the layout up front (carve the big slices first, or make every slice the same size) instead of adding slices ad hoc and painting yourself into a corner.
Step 4: Carve the slices #
Create four 1g.24gb GPU instances, each with its compute instance, in one command. -cgi creates the GPU Instances (the land), and the -C flag immediately builds the matching Compute Instance (the building) inside each one:
root@gpu-rtxpro6000-8:~# sudo nvidia-smi mig -i 0 -cgi 1g.24gb,1g.24gb,1g.24gb,1g.24gb -C
Successfully created GPU instance ID  3 on GPU  0 using profile MIG 1g.24gb (ID 14)
Successfully created compute instance ID  0 on GPU  0 GPU instance ID  3 using profile MIG 1g.24gb (ID  0)
Successfully created GPU instance ID  4 on GPU  0 using profile MIG 1g.24gb (ID 14)
Successfully created compute instance ID  0 on GPU  0 GPU instance ID  4 using profile MIG 1g.24gb (ID  0)
Successfully created GPU instance ID  5 on GPU  0 using profile MIG 1g.24gb (ID 14)
Successfully created compute instance ID  0 on GPU  0 GPU instance ID  5 using profile MIG 1g.24gb (ID  0)
Successfully created GPU instance ID  6 on GPU  0 using profile MIG 1g.24gb (ID 14)
Successfully created compute instance ID 0 on GPU 0 GPU instance ID 6 using profile MIG 1g.24gb (ID 0)sudo nvidia-smi mig -i 0 -cgi 14,14,14,14 -C does exactly the same thing using the profile IDs from the table above.
You do not have to make them all the same size. Want one big tenant and two small ones on the same card? Mix profiles:
root@gpu-rtxpro6000-8:~# sudo nvidia-smi mig -i 0 -cgi 2g.48gb,1g.24gb,1g.24gb -C
Successfully created GPU instance ID  1 on GPU  0 using profile MIG 2g.48gb (ID  5)
Successfully created compute instance ID  0 on GPU  0 GPU instance ID  1 using profile MIG 2g.48gb (ID  1)
Successfully created GPU instance ID  5 on GPU  0 using profile MIG 1g.24gb (ID 14)
Successfully created compute instance ID  0 on GPU  0 GPU instance ID  5 using profile MIG 1g.24gb (ID  0)
Successfully created GPU instance ID  6 on GPU  0 using profile MIG 1g.24gb (ID 14)
Successfully created compute instance ID  0 on GPU  0 GPU instance ID  6 using profile MIG 1g.24gb (ID  0)

root@gpu-rtxpro6000-8:~# nvidia-smi mig -i 0 -lgi
+---------------------------------------------------------+
| GPU instances:                                          |
| GPU   Name               Profile  Instance   Placement  |
|                            ID       ID       Start:Size |
|=========================================================|
|   0  MIG 1g.24gb           14        5          6:3     |
+---------------------------------------------------------+
|   0  MIG 1g.24gb           14        6          9:3     |
+---------------------------------------------------------+
|   0  MIG 2g.48gb            5        1          0:6     |
+---------------------------------------------------------+One 48GB half-card slice (placement 0:6) plus two 24GB quarter-card slices (6:3 and 9:3), and the placement grid adds up to exactly 12. This is how you serve a large LLM and two small inference services from a single physical GPU with hard boundaries between them. For the rest of this walkthrough we stick with the uniform four-slice layout, so tear the mixed one down (-dci, then -dgi) and recreate the four 1g.24gb slices if you followed along.
Step 5: Verify the slices exist #
Three views of the same truth. The device list:
root@gpu-rtxpro6000-8:~# nvidia-smi -L
GPU 0: NVIDIA RTX PRO 6000 Blackwell Server Edition (UUID: GPU-8b89b58e-b427-108d-ac50-06138d78fe78)
  MIG 1g.24gb     Device  0: (UUID: MIG-445da789-865d-5fd1-b2b6-32a48bf66c39)
  MIG 1g.24gb     Device  1: (UUID: MIG-e78fd5d2-f2de-5632-8961-9a368cec8080)
  MIG 1g.24gb     Device  2: (UUID: MIG-b8861912-6285-56a1-99ca-297ac0f38ddb)
  MIG 1g.24gb     Device  3: (UUID: MIG-f46c5ab9-40ef-54a2-b796-a2101a6ed56d)
GPU 1: NVIDIA RTX PRO 6000 Blackwell Server Edition (UUID: GPU-03a041b7-8abf-360a-d1a2-dfd70188cd5f)
...Every MIG device has its own UUID. This is exactly how the Kubernetes device plugin will identify and schedule the slices later.
The GPU instances (the land plots) with their physical placements:
root@gpu-rtxpro6000-8:~# nvidia-smi mig -i 0 -lgi
+---------------------------------------------------------+
| GPU instances:                                          |
| GPU   Name               Profile  Instance   Placement  |
|                            ID       ID       Start:Size |
|=========================================================|
|   0  MIG 1g.24gb           14        3          0:3     |
+---------------------------------------------------------+
|   0  MIG 1g.24gb           14        4          3:3     |
+---------------------------------------------------------+
|   0  MIG 1g.24gb           14        5          6:3     |
+---------------------------------------------------------+
|   0  MIG 1g.24gb           14        6          9:3     |
+---------------------------------------------------------+Each instance occupies 3 units of the 12-unit placement grid, exactly as -lgipp promised. And the compute instances (the buildings) inside them:
root@gpu-rtxpro6000-8:~# nvidia-smi mig -i 0 -lci
+--------------------------------------------------------------------+
| Compute instances:                                                 |
| GPU     GPU       Name             Profile   Instance   Placement  |
|       Instance                       ID        ID       Start:Size |
|         ID                                                         |
|====================================================================|
|   0      3       MIG 1g.24gb          0         0          0:1     |
+--------------------------------------------------------------------+
|   0      4       MIG 1g.24gb          0         0          0:1     |
+--------------------------------------------------------------------+
|   0      5       MIG 1g.24gb          0         0          0:1     |
+--------------------------------------------------------------------+
|   0      6       MIG 1g.24gb          0         0          0:1     |
+--------------------------------------------------------------------+Step 6: Run something on a slice (no Kubernetes needed) #
MIG slices are addressable directly from the host via their UUID. This is handy for smoke-testing before the cluster ever gets involved. With PyTorch available on the host (a quick python3 -m venv plus pip install torch --index-url https://download.pytorch.org/whl/cu130 is enough), pin a process to the first slice's UUID from nvidia-smi -L:
root@gpu-rtxpro6000-8:~# CUDA_VISIBLE_DEVICES=MIG-445da789-865d-5fd1-b2b6-32a48bf66c39 python3 -c "
import torch
print('device count:', torch.cuda.device_count())
print('device name :', torch.cuda.get_device_name(0))
print('total memory:', torch.cuda.get_device_properties(0).total_memory // 2**20, 'MiB')"
device count: 1
device name : NVIDIA RTX PRO 6000 Blackwell Server Edition MIG 1g.24gb
total memory: 24192 MiBThe process sees exactly one device, it identifies itself as a 1g.24gb slice, and it has 24192 MiB, not the 97887 MiB of the full card. Isolation is already in force at the host level, no Kubernetes required.
Step 7: Tear it all down (disable MIG) #
You will reconfigure slices far more often than you think: profile sizes change, tenants come and go, and sometimes you just want the whole card back for one big training run. Remember the hierarchy rule: buildings before land. Compute instances first, then GPU instances, then the mode itself.
Destroy the compute instances on GPU 0:
root@gpu-rtxpro6000-8:~# sudo nvidia-smi mig -i 0 -dci
Successfully destroyed compute instance ID  0 from GPU  0 GPU instance ID  3
Successfully destroyed compute instance ID  0 from GPU  0 GPU instance ID  4
Successfully destroyed compute instance ID  0 from GPU  0 GPU instance ID  5
Successfully destroyed compute instance ID 0 from GPU 0 GPU instance ID 6Then the GPU instances:
root@gpu-rtxpro6000-8:~# sudo nvidia-smi mig -i 0 -dgi
Successfully destroyed GPU instance ID  3 from GPU  0
Successfully destroyed GPU instance ID  4 from GPU  0
Successfully destroyed GPU instance ID  5 from GPU  0
Successfully destroyed GPU instance ID 6 from GPU 0If you run -dgi before -dci, the driver rejects it. This is what actually happens if you try:
root@gpu-rtxpro6000-8:~# sudo nvidia-smi mig -i 0 -dgi
Unable to destroy GPU instance ID  3 from GPU  0: In use by another client
Failed to destroy GPU instances: In use by another clientThat is the land-and-building rule enforced in silicon: the CI still standing on GI 3 is the "another client".
Also note: a slice with a running workload cannot be destroyed. Stop the pods or processes using it first, otherwise -dci fails with the same In use by another client error.
Now disable MIG mode:
root@gpu-rtxpro6000-8:~# sudo nvidia-smi -i 0 -mig 0
Disabled MIG Mode for GPU 00000000:01:00.0

Warning: persistence mode is disabled on device 00000000:01:00.0. See the Known Issues section of the nvidia-smi(1) man page for more information. Run with [--help | -h] switch to get more information on how to enable persistence mode.
All done.And confirm the card is whole again, then bring back the persistence daemon we stopped in Step 1:
root@gpu-rtxpro6000-8:~# nvidia-smi -i 0 --query-gpu=index,mig.mode.current --format=csv
index, mig.mode.current
0, Disabled

root@gpu-rtxpro6000-8:~# nvidia-smi -L | head -1
GPU 0: NVIDIA RTX PRO 6000 Blackwell Server Edition (UUID: GPU-8b89b58e-b427-108d-ac50-06138d78fe78)

root@gpu-rtxpro6000-8:~# sudo systemctl start nvidia-persistencedOne GPU, full lifecycle, both directions. That is the entire mechanical core of MIG.
Hands-On Part 2: All 8 GPUs at Once #
Everything above used -i 0 to target one card. The scaling trick is almost embarrassing: drop the -i flag and every command applies to all GPUs.
Enable MIG everywhere:
root@gpu-rtxpro6000-8:~# sudo systemctl stop nvidia-persistenced
root@gpu-rtxpro6000-8:~# sudo nvidia-smi -mig 1
Enabled MIG Mode for GPU 00000000:01:00.0
Enabled MIG Mode for GPU 00000000:21:00.0
Enabled MIG Mode for GPU 00000000:41:00.0
Enabled MIG Mode for GPU 00000000:61:00.0
Enabled MIG Mode for GPU 00000000:81:00.0
Enabled MIG Mode for GPU 00000000:A1:00.0
Enabled MIG Mode for GPU 00000000:C1:00.0
Enabled MIG Mode for GPU 00000000:E1:00.0
All done.(The per-GPU persistence-mode warnings are trimmed here; they are the same one we saw in Part 1.)
Carve four slices on every MIG-enabled card in one command. The same GI IDs 3 through 6 appear on each of the 8 GPUs:
root@gpu-rtxpro6000-8:~# sudo nvidia-smi mig -cgi 1g.24gb,1g.24gb,1g.24gb,1g.24gb -C
Successfully created GPU instance ID  3 on GPU  0 using profile MIG 1g.24gb (ID 14)
Successfully created compute instance ID  0 on GPU  0 GPU instance ID  3 using profile MIG 1g.24gb (ID  0)
Successfully created GPU instance ID  4 on GPU  0 using profile MIG 1g.24gb (ID 14)
Successfully created compute instance ID  0 on GPU  0 GPU instance ID  4 using profile MIG 1g.24gb (ID  0)
Successfully created GPU instance ID  5 on GPU  0 using profile MIG 1g.24gb (ID 14)
Successfully created compute instance ID  0 on GPU  0 GPU instance ID  5 using profile MIG 1g.24gb (ID  0)
Successfully created GPU instance ID  6 on GPU  0 using profile MIG 1g.24gb (ID 14)
Successfully created compute instance ID  0 on GPU  0 GPU instance ID  6 using profile MIG 1g.24gb (ID  0)
... (identical output repeats for GPU 1 through GPU 7) ...

root@gpu-rtxpro6000-8:~# sudo systemctl start nvidia-persistencedAnd verify. This is the money shot, 8 physical cards now presenting as 32 isolated devices:
root@gpu-rtxpro6000-8:~# nvidia-smi -L

GPU 0: NVIDIA RTX PRO 6000 Blackwell Server Edition (UUID: GPU-8b89b58e-b427-108d-ac50-06138d78fe78)
  MIG 1g.24gb     Device  0: (UUID: MIG-445da789-865d-5fd1-b2b6-32a48bf66c39)
  MIG 1g.24gb     Device  1: (UUID: MIG-e78fd5d2-f2de-5632-8961-9a368cec8080)
  MIG 1g.24gb     Device  2: (UUID: MIG-b8861912-6285-56a1-99ca-297ac0f38ddb)
  MIG 1g.24gb     Device  3: (UUID: MIG-f46c5ab9-40ef-54a2-b796-a2101a6ed56d)
GPU 1: NVIDIA RTX PRO 6000 Blackwell Server Edition (UUID: GPU-03a041b7-8abf-360a-d1a2-dfd70188cd5f)
  MIG 1g.24gb     Device  0: (UUID: MIG-c614986b-8ca6-5114-b292-f7fdf532b32e)
  MIG 1g.24gb     Device  1: (UUID: MIG-ba182ecc-31c1-5a67-92f1-b6f14f39cc2f)
  MIG 1g.24gb     Device  2: (UUID: MIG-5976103f-bae0-5bd9-8de2-efcb0651ae5d)
  MIG 1g.24gb     Device  3: (UUID: MIG-09aa478f-191b-55ce-a012-235285f56a44)
GPU 2: NVIDIA RTX PRO 6000 Blackwell Server Edition (UUID: GPU-ba09367f-dd50-32ca-e988-7ff66bece885)
  MIG 1g.24gb     Device  0: (UUID: MIG-07cdcefa-6330-5da7-9f25-0686ef5e6e7d)
  MIG 1g.24gb     Device  1: (UUID: MIG-91b206d2-cfbb-57d3-9ffb-00151f932469)
  MIG 1g.24gb     Device  2: (UUID: MIG-83bf707a-b369-5de9-a22a-e882e2a15f23)
  MIG 1g.24gb     Device  3: (UUID: MIG-db98d829-38c6-5490-ab37-54b3c1911690)
GPU 3: NVIDIA RTX PRO 6000 Blackwell Server Edition (UUID: GPU-30512c46-708b-f374-5698-ee24be6cd626)
  MIG 1g.24gb     Device  0: (UUID: MIG-2d5513c3-03f4-54f0-9c70-688f7472c927)
  MIG 1g.24gb     Device  1: (UUID: MIG-471a3e25-40ba-5794-9d7b-2dfa7aa0a0ab)
  MIG 1g.24gb     Device  2: (UUID: MIG-f8584627-55b2-52be-ac92-0b4708e7dad6)
  MIG 1g.24gb     Device  3: (UUID: MIG-6e4f5dfc-7e1f-59dc-9fec-a13642abcd08)
GPU 4: NVIDIA RTX PRO 6000 Blackwell Server Edition (UUID: GPU-4c395b7a-a7e6-d90f-1ced-d96e8dd68288)
  MIG 1g.24gb     Device  0: (UUID: MIG-0b090ecd-97b3-5022-b410-353a54064db3)
  MIG 1g.24gb     Device  1: (UUID: MIG-12e12a0a-56aa-5258-9cce-fb652a6d60ca)
  MIG 1g.24gb     Device  2: (UUID: MIG-e80daae6-94df-5114-b105-f4b8e14fe00c)
  MIG 1g.24gb     Device  3: (UUID: MIG-c652619d-ef73-5243-8313-163ba19341ce)
GPU 5: NVIDIA RTX PRO 6000 Blackwell Server Edition (UUID: GPU-04dc48d7-7048-aef5-ad36-f5db716e7668)
  MIG 1g.24gb     Device  0: (UUID: MIG-ac982967-d17f-5636-8641-078e3f7ee88a)
  MIG 1g.24gb     Device  1: (UUID: MIG-9a6a33e8-352c-5b71-8523-7918f07f19d3)
  MIG 1g.24gb     Device  2: (UUID: MIG-dcdb7566-7372-56e3-ac66-29bbc7332280)
  MIG 1g.24gb     Device  3: (UUID: MIG-61f3820e-e817-5ae1-ac70-7d4ccc6752bd)
GPU 6: NVIDIA RTX PRO 6000 Blackwell Server Edition (UUID: GPU-f4f5db98-143f-0a8d-47ce-956fab39a736)
  MIG 1g.24gb     Device  0: (UUID: MIG-fdae208b-7b6b-5360-b14d-7943f835591d)
  MIG 1g.24gb     Device  1: (UUID: MIG-bd87ccf3-dd60-556b-8fae-dd76a00f9f32)
  MIG 1g.24gb     Device  2: (UUID: MIG-4eb83867-7a48-50ec-98e4-590ca4a34bdb)
  MIG 1g.24gb     Device  3: (UUID: MIG-aa39a320-78fe-54f3-a33f-4e14a69a34fc)
GPU 7: NVIDIA RTX PRO 6000 Blackwell Server Edition (UUID: GPU-f4c61521-240a-da09-2787-e576034e197e)
  MIG 1g.24gb     Device  0: (UUID: MIG-83e26b2c-d325-5f9e-b6ab-1dd76bf49ee0)
  MIG 1g.24gb     Device  1: (UUID: MIG-769267a5-61cf-5391-815c-df1af5592f2f)
  MIG 1g.24gb     Device  2: (UUID: MIG-bd09eec4-b779-57ff-b2e9-0c5dd4db132d)
MIG 1g.24gb Device 3: (UUID: MIG-0f8a469f-1116-5095-9e94-65e7809b554d)Each physical card can now serve 4 tenants independently, each with a hardware-isolated slice. Across 8 cards, that is 32 schedulable GPUs where you previously had 8, and you did not buy a single new card.
The fleet-wide teardown is the same story without -i, in the same strict order. First all compute instances, then all GPU instances (32 "Successfully destroyed" lines each, trimmed to the last GPU here), then the mode itself:
root@gpu-rtxpro6000-8:~# sudo nvidia-smi mig -dci
...
Successfully destroyed compute instance ID  0 from GPU  7 GPU instance ID  3
Successfully destroyed compute instance ID  0 from GPU  7 GPU instance ID  4
Successfully destroyed compute instance ID  0 from GPU  7 GPU instance ID  5
Successfully destroyed compute instance ID  0 from GPU  7 GPU instance ID  6

root@gpu-rtxpro6000-8:~# sudo nvidia-smi mig -dgi
...
Successfully destroyed GPU instance ID  3 from GPU  7
Successfully destroyed GPU instance ID  4 from GPU  7
Successfully destroyed GPU instance ID  5 from GPU  7
Successfully destroyed GPU instance ID  6 from GPU  7

root@gpu-rtxpro6000-8:~# sudo nvidia-smi -mig 0
Disabled MIG Mode for GPU 00000000:01:00.0
Disabled MIG Mode for GPU 00000000:21:00.0
Disabled MIG Mode for GPU 00000000:41:00.0
Disabled MIG Mode for GPU 00000000:61:00.0
Disabled MIG Mode for GPU 00000000:81:00.0
Disabled MIG Mode for GPU 00000000:A1:00.0
Disabled MIG Mode for GPU 00000000:C1:00.0
Disabled MIG Mode for GPU 00000000:E1:00.0
All done.

root@gpu-rtxpro6000-8:~# nvidia-smi --query-gpu=index,mig.mode.current --format=csv
index, mig.mode.current
0, Disabled
1, Disabled
2, Disabled
3, Disabled
4, Disabled
5, Disabled
6, Disabled
7, DisabledEight whole GPUs again, as if nothing happened.
Bringing Kubernetes In: The GPU Operator #
Everything we just did by hand works. It also does not scale. There is no way to GitOps a series of nvidia-smi commands and maintain them across a fleet. And the host slices are invisible to Kubernetes until something advertises them to the Kubelet.
To run GPU workloads inside containers, three distinct layers have to cooperate, and the NVIDIA GPU Operator manages all of them for you:
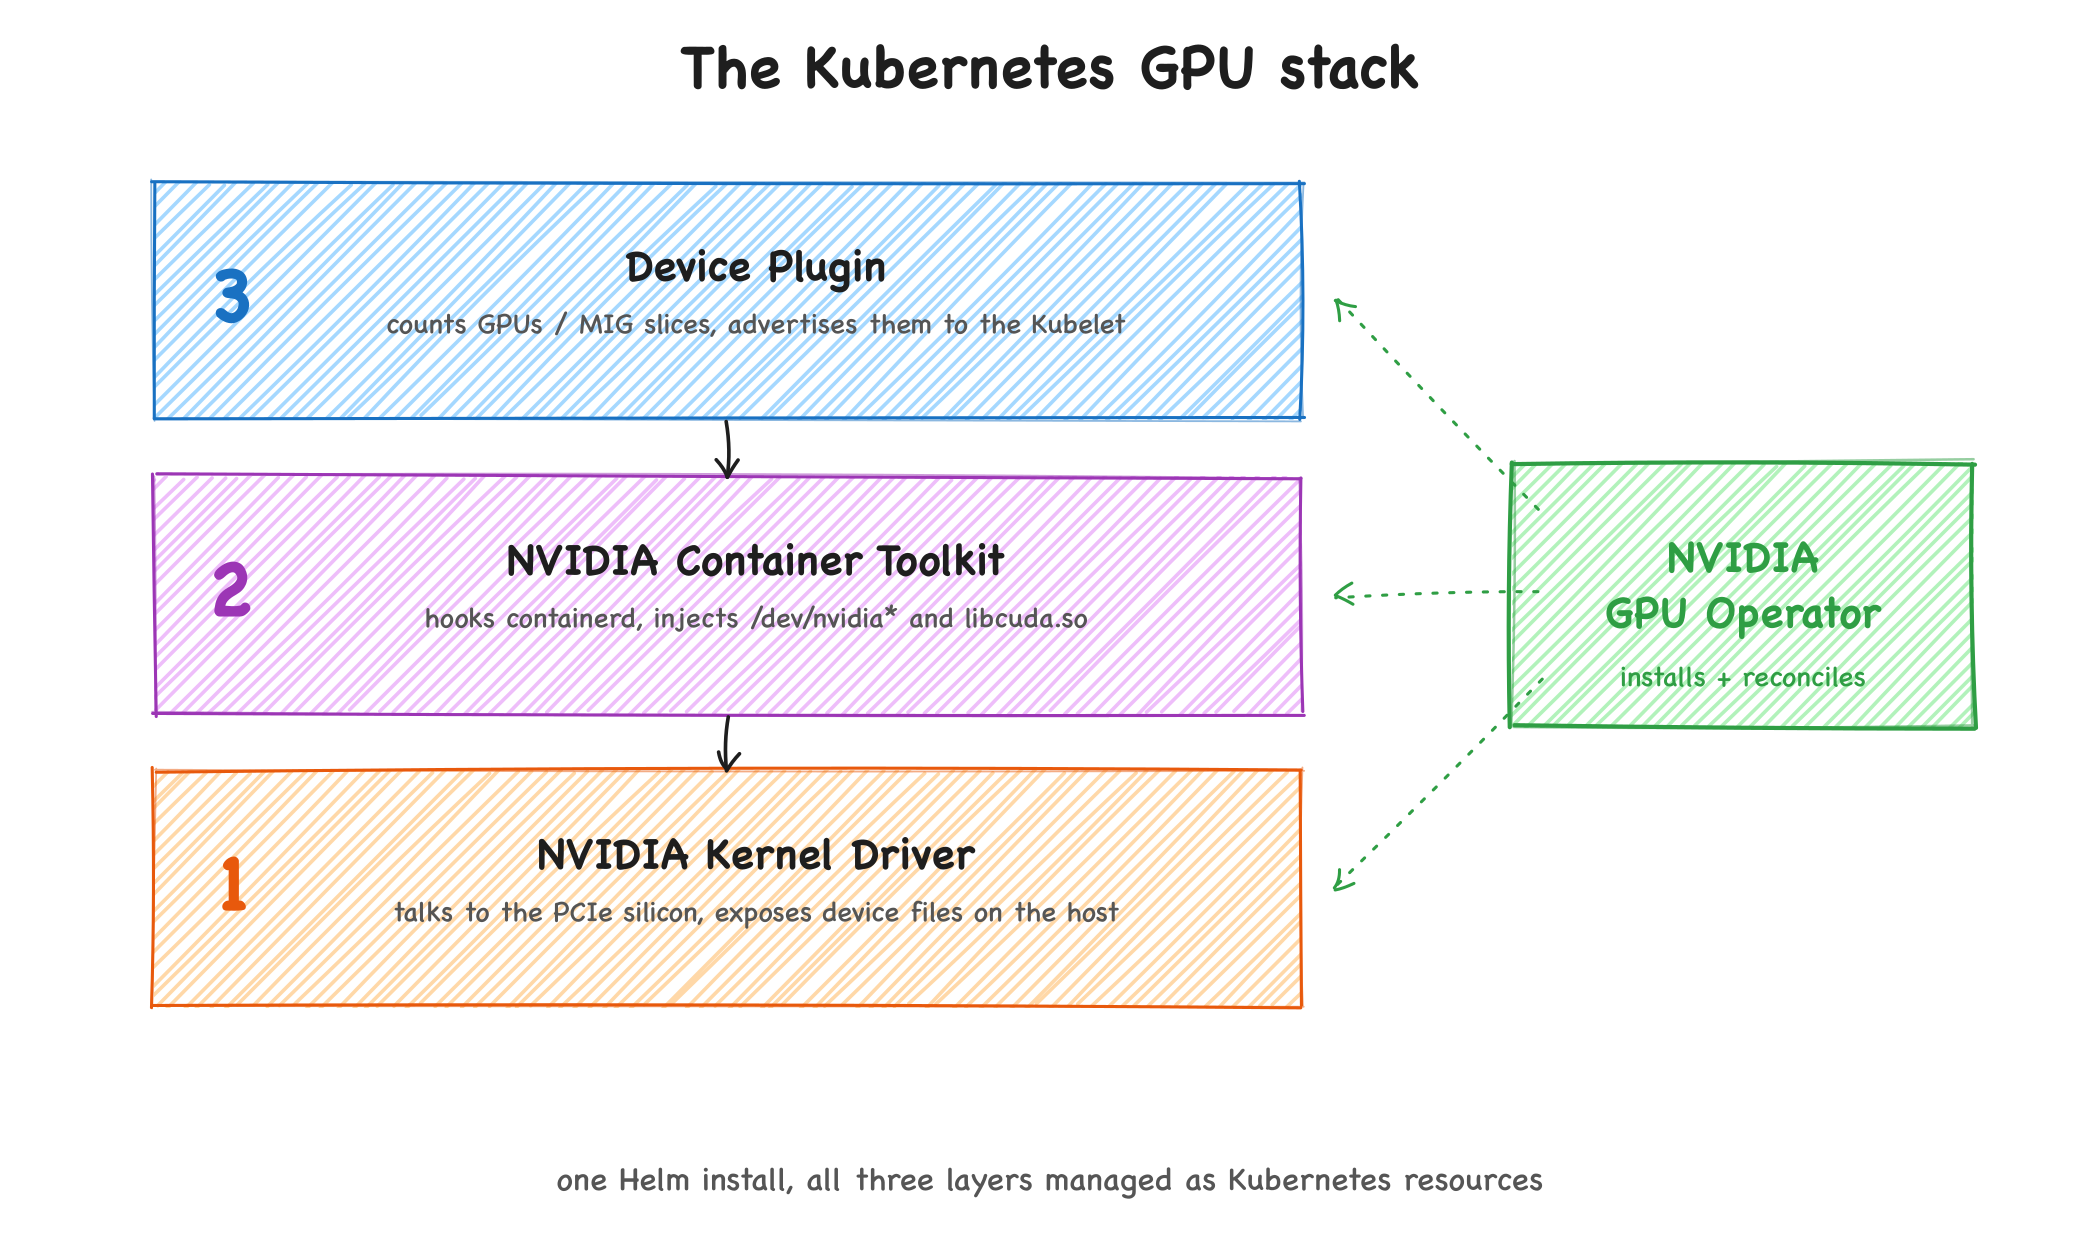
Layer 1: The Host Kernel Driver. Installed directly on the host OS. It interfaces with the physical PCIe silicon and exposes character device files such as /dev/nvidia0 and /dev/nvidiactl. It does not know or care that Kubernetes exists.
Layer 2: The Container Toolkit (the OCI integration). Container runtimes like containerd can partition CPU and memory, but they cannot natively manage GPUs. The NVIDIA Container Toolkit hooks into containerd: when a container requests a GPU, it mounts the driver files (/dev/nvidia*, libcuda.so) into the container's namespace.
Layer 3: The Kubernetes Device Plugin. A DaemonSet that queries the host driver, counts the available GPUs or MIG slices, and advertises them to the Kubelet as schedulable capacity.
Install the operator with Helm:
root@gpu-rtxpro6000-8:~# helm repo add nvidia https://helm.ngc.nvidia.com/nvidia
root@gpu-rtxpro6000-8:~# helm repo update
root@gpu-rtxpro6000-8:~# helm install gpu-operator nvidia/gpu-operator \
  -n gpu-operator --create-namespace \
--set mig.strategy=mixedAbout that mig.strategy flag, it controls how slices show up as Kubernetes resources:
single(the default): all GPUs on the node carry one uniform profile, and slices are advertised as plainnvidia.com/gpu. Workloads do not even know MIG is involved.mixed: each profile is advertised as its own resource, likenvidia.com/mig-1g.24gbornvidia.com/mig-2g.48gb. This is what you want when different cards carry different geometries, or when workloads should explicitly pick a slice size.
We use mixed in this post so the slice type is visible end to end.
The operator deploys these components in the gpu-operator namespace:
gpu-operator(controller): watchesClusterPolicycustom resources and reconciles all the DaemonSets below on every GPU node.node-feature-discovery (NFD): scans host hardware and labels nodes (for example,nvidia.com/gpu.present=true).gpu-feature-discovery (GFD): adds fine-grained GPU labels such as memory size, model, and active MIG profiles (for example,nvidia.com/mig.config=all-1g.24gb).nvidia-container-toolkit: registers thenvidiaruntime class in/etc/containerd/config.toml:
[plugins.'io.containerd.cri.v1.runtime'.containerd.runtimes.'nvidia']
  runtime_type = "io.containerd.runc.v2"

[plugins.'io.containerd.cri.v1.runtime'.containerd.runtimes.'nvidia'.options]
  BinaryName = "/usr/local/nvidia/toolkit/nvidia-container-runtime"
SystemdCgroup = truenvidia-device-plugin: queries the driver's NVML library for MIG slice UUIDs and advertises them to the Kubelet (for example,nvidia.com/mig-1g.24gb: 32).nvidia-mig-manager: watches thenvidia.com/mig.confignode label and reconfigures MIG geometry declaratively. More on this next.nvidia-dcgm-exporter: exposes per-slice hardware telemetry on a Prometheus/metricsendpoint.nvidia-operator-validator: runs a one-shot CUDA job to verify the whole software-to-hardware pipeline before user pods land.
Declarative MIG: One Label Instead of All Those Commands #
With the operator in place, the entire hands-on section above compresses into a single node label:
root@gpu-rtxpro6000-8:~# kubectl label node <node-name> nvidia.com/mig.config=all-1g.24gb --overwriteThe MIG Manager notices the label and orchestrates the full lifecycle through a structured loop:
- Evicts GPU workloads: sets the node's GPU allocatable to
0and drains GPU pods to release device locks. - Stops telemetry daemons: pauses the device plugin and DCGM exporter so NVML has no clients.
- Resets state: clears VRAM and any existing MIG geometry.
- Applies the new geometry: enables MIG mode and carves GIs and CIs exactly like our manual commands did.
- Regenerates CDI specs: writes new Container Device Interface configs so the runtime can inject the new devices.
- Restores the stack: restarts the device plugin and exporter, which advertise the 32 new slices to the Kubelet.
Verify from the cluster side:
root@gpu-rtxpro6000-8:~# kubectl describe node <node-name> | grep mig-1g.24gb
nvidia.com/mig-1g.24gb: 32To go back to whole GPUs, the disable path is also just a label. all-disabled destroys every slice and turns MIG mode off, and the node advertises nvidia.com/gpu: 8 again:
root@gpu-rtxpro6000-8:~# kubectl label node <node-name> nvidia.com/mig.config=all-disabled --overwriteMixed geometries are possible too: built-in profiles like all-balanced, or a custom layout in the mig-parted ConfigMap that gives different cards different shapes. Everything we did with -cgi 2g.48gb,1g.24gb,1g.24gb has a declarative equivalent.
How the NVIDIA Runtime Injects GPUs into Containers #
To understand why those containerd configuration blocks are necessary, here is the flow when a pod actually starts:
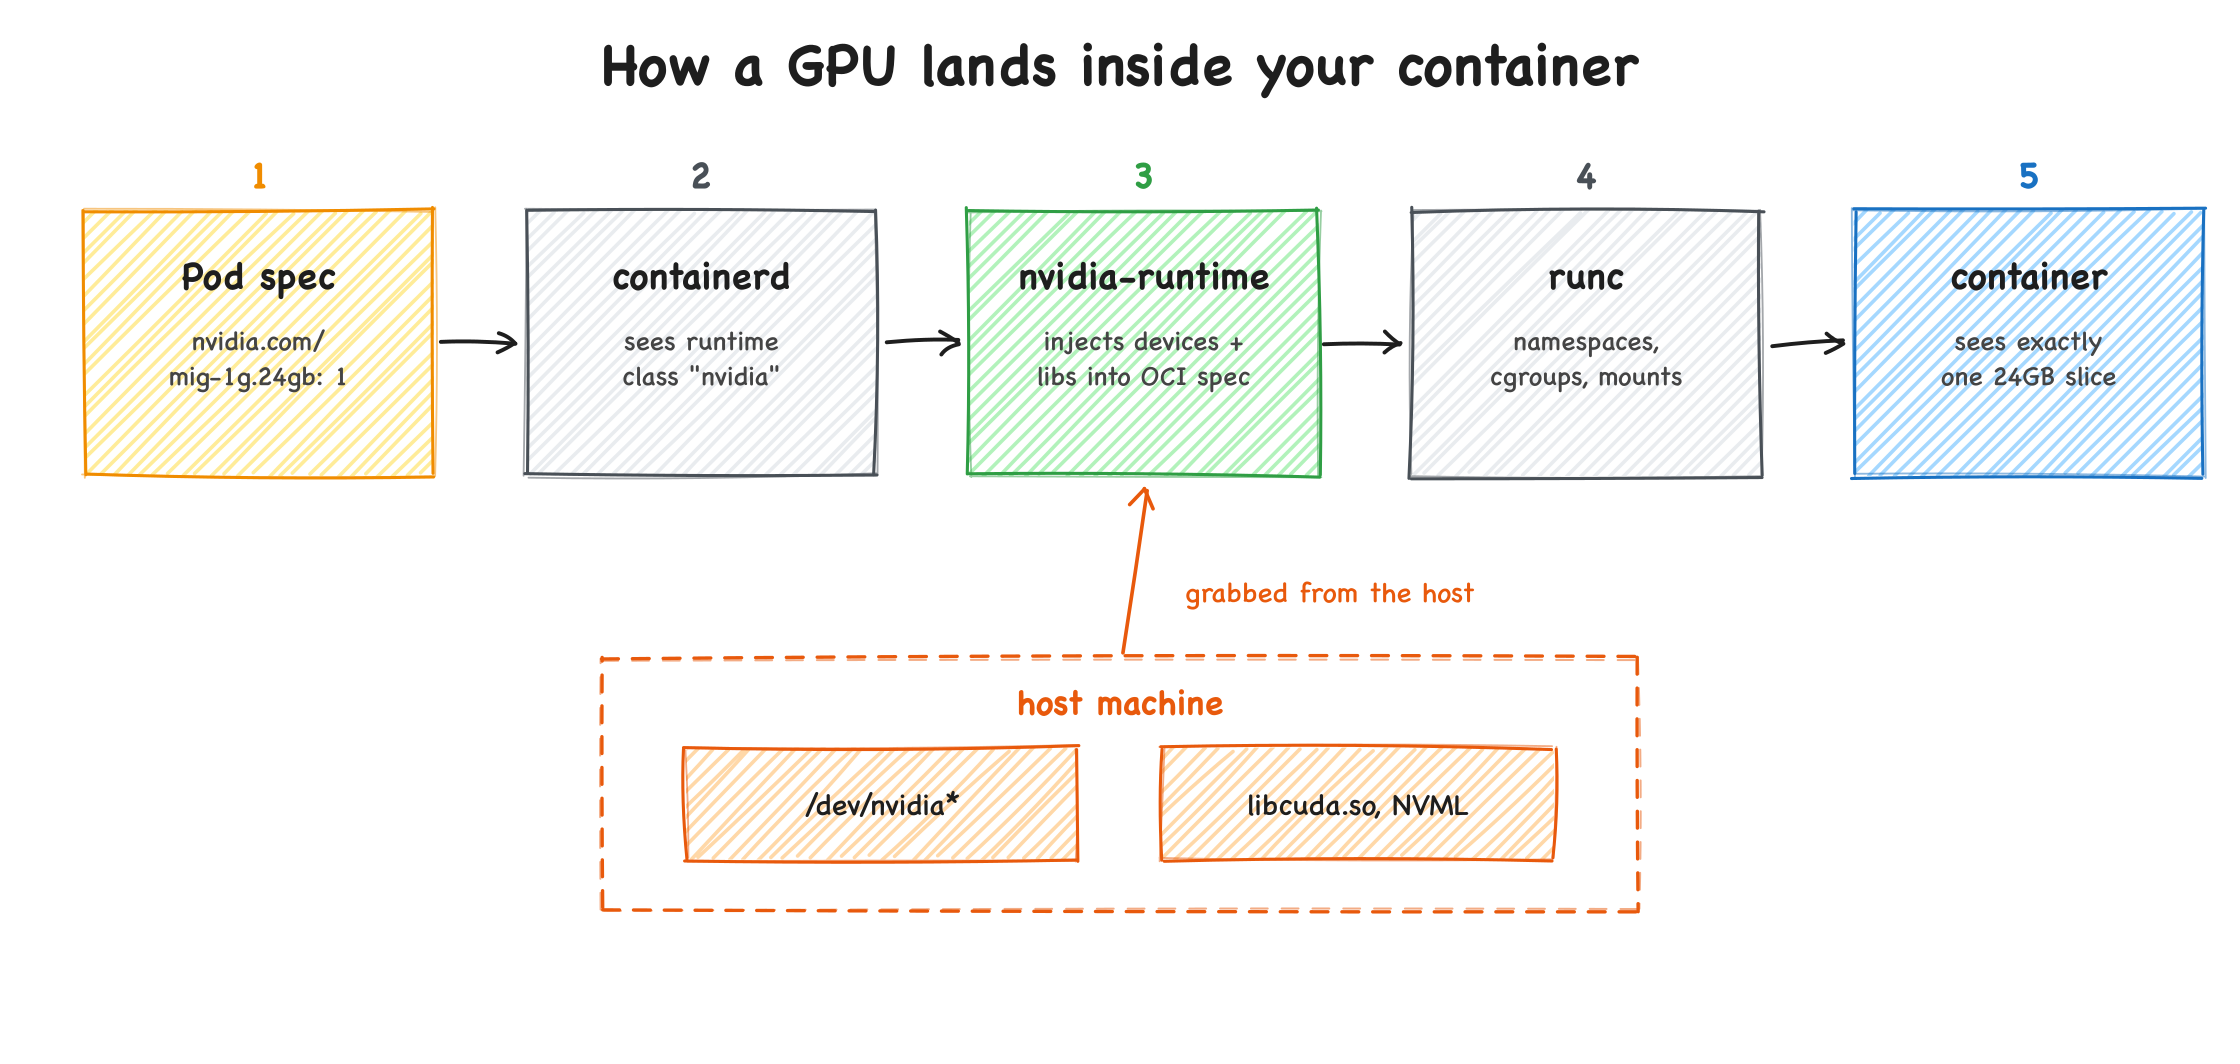
- Pod submission: a developer submits a Pod requesting a GPU (
nvidia.com/gpu: 1or a specific MIG resource). - containerd interception: containerd sees the pod uses the
nvidiaruntime class and prepares the container. - nvidia-container-runtime (the middleman): reads the container's environment (such as
NVIDIA_VISIBLE_DEVICEScarrying the MIG UUID), locates the matching device files under/dev/nvidia*and driver libraries likelibcuda.soon the host, and injects them into the container's OCI spec. - runc execution: the modified spec goes to
runc, which sets up namespaces, cgroups, and mounts, then starts the container. - Workload runs: PyTorch or TensorFlow inside the container talks to its GPU slice natively, because the devices and libraries were injected during the handshake.
Common Production Pitfalls and How to Solve Them #
Here is the quick-reference version, the way you will hit these at 2 AM:
| Symptom | Likely cause | Fix |
|---|---|---|
| Toolkit cannot find containerd, or runtime class never appears | Non-standard containerd paths (RKE2/K3s) | Point the toolkit at the right socket and config via Helm env overrides (Pitfall A) |
| Your manual slices vanish after installing the Operator | MIG Manager defaults to all-disabled when no node label exists | Label the node with the matching nvidia.com/mig.config profile (Pitfall B) |
| You changed slices on the host but Kubernetes shows the old layout, Operator logs frozen | MIG Manager only reacts to node label events, it never polls the hardware | Restart the MIG Manager pod or toggle the label to force reconciliation (Pitfall C) |
| Manual MIG mode: Kubelet never discovers new slices | Nothing tells the device plugin the hardware changed | Disable migManager in Helm and restart the device plugin daemonset (Pitfall D) |
Now the details.
Pitfall A: Non-Standard containerd Socket Configurations #
The GPU Operator assumes default paths for the containerd socket and config files. If your setup runs containerd through RKE2, you must explicitly point the toolkit to the non-standard paths during Helm installation:
toolkit:
  env:
    - name: CONTAINERD_CONFIG
      value: /var/lib/rancher/rke2/agent/etc/containerd/config.toml
    - name: CONTAINERD_SOCKET
      value: /run/k3s/containerd/containerd.sock
    - name: CONTAINERD_RUNTIME_CLASS
      value: nvidia
    - name: CONTAINERD_SET_AS_DEFAULT
value: "true"Pitfall B: MIG Manager Overriding Host Configurations #
If the nvidia-mig-manager pod is active and detects no configuration label on a node, it defaults to the all-disabled profile, wiping out any manual host-level slicing you performed. All that careful nvidia-smi work, gone.
The fix: apply the appropriate label to your node so it aligns with the operator's config:
root@gpu-rtxpro6000-8:~# kubectl label node <node-name> nvidia.com/mig.config=all-1g.24gb --overwritePitfall C: Host-Level State Drift Undetected by MIG Manager #
If you manually delete or modify MIG profiles directly on the host using the nvidia-smi CLI, the changes will not be reflected in Kubernetes, and the operator will appear completely silent about it.
The root cause: the nvidia-mig-manager watches for Kubernetes node label events. It does not poll the host's physical GPU registers continuously. Because your manual host modifications do not trigger Kubernetes events, the manager remains idle, thinking the old state is still successfully applied (its logs will remain frozen).
The fix (for operator-managed MIG): trigger a reconciliation event. Either restart the MIG Manager pod (which forces a full check on boot) or toggle the node label back and forth:
# Option 1: Restart the MIG Manager daemonset
root@gpu-rtxpro6000-8:~# kubectl rollout restart daemonset -n gpu-operator nvidia-mig-manager

# Option 2: Toggle the node label to trigger the watch loop
root@gpu-rtxpro6000-8:~# kubectl label node <node-name> nvidia.com/mig.config=all-disabled --overwrite
# Wait 10 seconds, then re-apply:
root@gpu-rtxpro6000-8:~# kubectl label node <node-name> nvidia.com/mig.config=all-1g.24gb --overwritePitfall D: Forcing Kubelet Discovery for Manual MIG Configurations #
Maybe you want the opposite arrangement: manage MIG slices manually on the host with the exact commands from the hands-on sections, prevent the GPU Operator from ever overwriting them, but still have Kubernetes discover and schedule workloads on those manual slices.
The root cause: when the automatic nvidia-mig-manager is disabled to allow manual slicing, there is no automated trigger to notify the Kubelet when the host-level MIG configuration changes.
The fix (force Kubelet discovery):
- Disable the MIG Manager in Helm so the operator never wipes your manual settings:
root@gpu-rtxpro6000-8:~# helm upgrade --install gpu-operator nvidia/gpu-operator \
  -n gpu-operator \
  --set migManager.enabled=false \
--set mig.strategy=mixed-
Provision host slices manually with the
nvidia-smi mig -cgi ... -Ccommands from Part 1 and Part 2. -
Force Kubelet discovery by restarting the device plugin daemonset:
root@gpu-rtxpro6000-8:~# kubectl rollout restart daemonset -n gpu-operator nvidia-device-plugin-daemonsetHow to Monitor GPU Slices with Prometheus and Grafana #
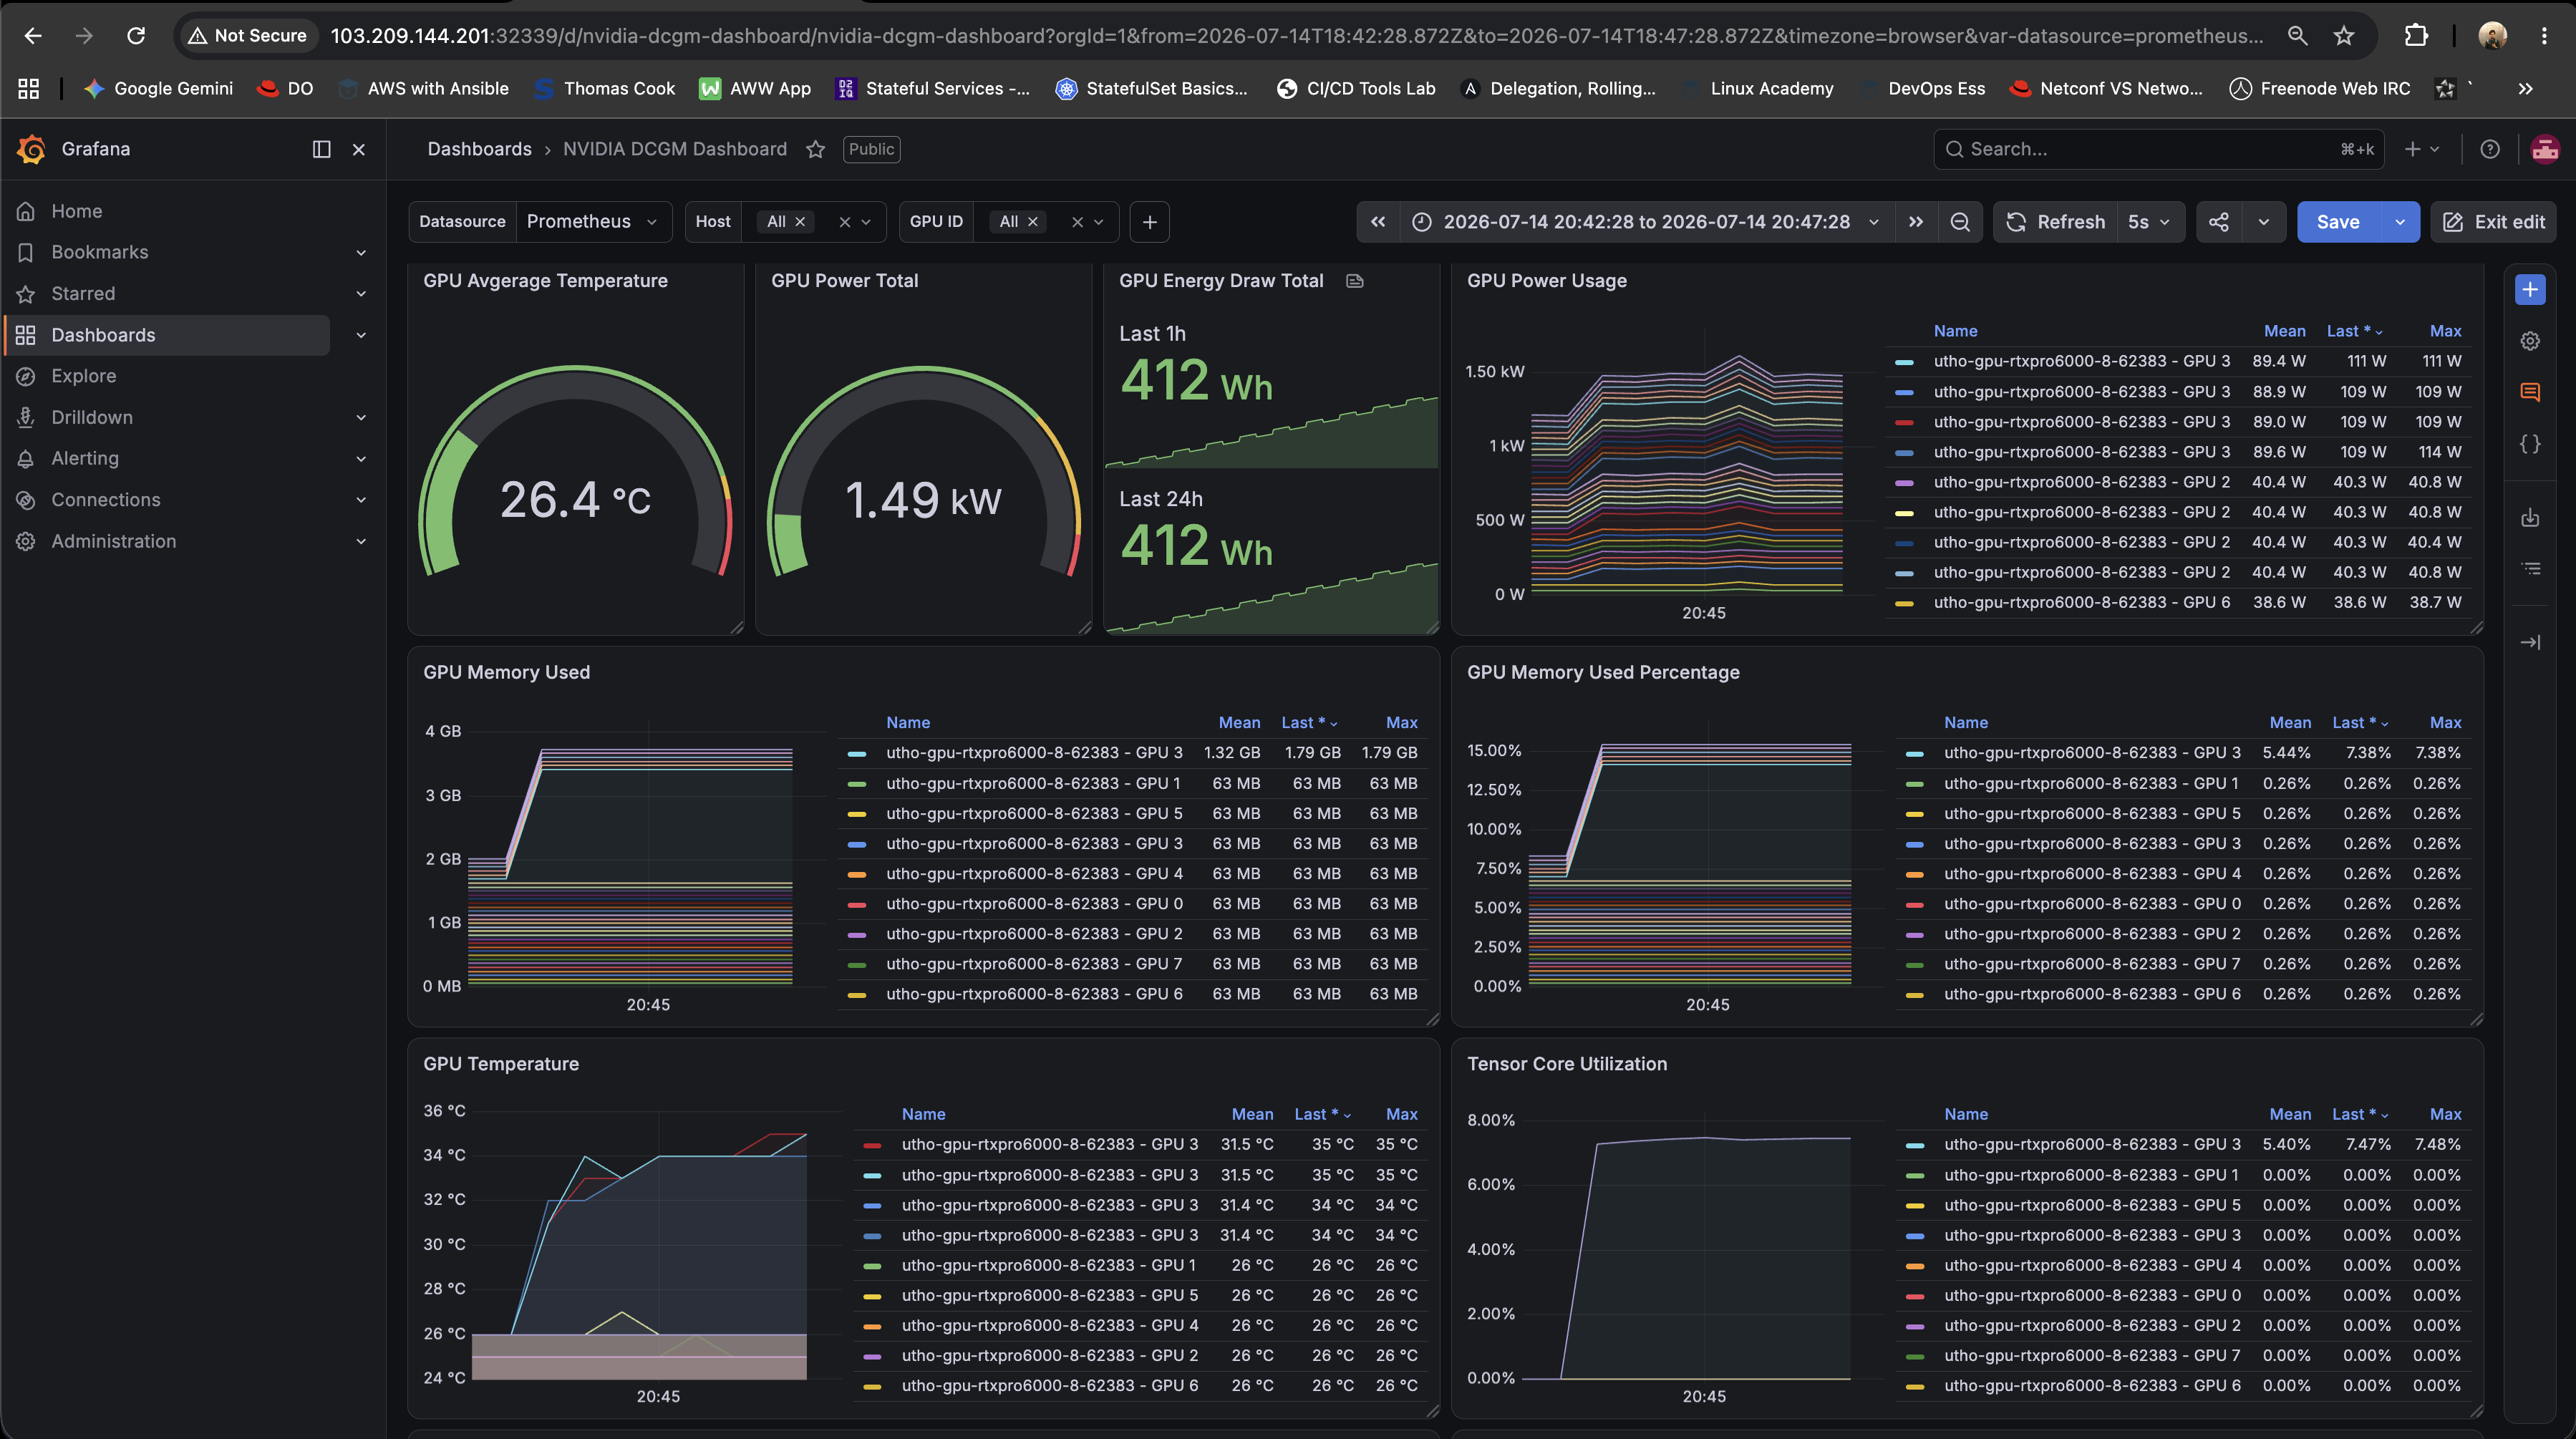
A platform is only as good as its observability. Once your 32 GPU slices are registered, you need a centralized dashboard to monitor metrics like VRAM usage, temperature, and Tensor Core utilization.
To achieve this, deploy the Prometheus community stack and hook it into the telemetry streams of the nvidia-dcgm-exporter.
Step 1: Install the kube-prometheus-stack.
root@gpu-rtxpro6000-8:~# helm repo add prometheus-community https://prometheus-community.github.io/helm-charts
root@gpu-rtxpro6000-8:~# helm repo update

root@gpu-rtxpro6000-8:~# helm install prometheus prometheus-community/kube-prometheus-stack \
-n monitoring --create-namespaceStep 2: Apply the ServiceMonitor. By default, Prometheus only scans its own namespace. This manifest uses a namespaceSelector to target the nvidia-dcgm-exporter Service inside the gpu-operator namespace:
apiVersion: monitoring.coreos.com/v1
kind: ServiceMonitor
metadata:
  name: nvidia-dcgm-exporter
  # Deploy in the 'monitoring' namespace where Prometheus runs
  namespace: monitoring
  labels:
    release: prometheus
    app.kubernetes.io/instance: prometheus
    app.kubernetes.io/managed-by: Helm
spec:
  # Scrapes the service in the gpu-operator namespace
  namespaceSelector:
    matchNames:
    - gpu-operator
  selector:
    matchLabels:
      # Matches the exact standard label created by the NVIDIA GPU Operator Helm chart
      app: nvidia-dcgm-exporter
  endpoints:
  - port: gpu-metrics
    interval: 15s
path: /metricsApply it:
root@gpu-rtxpro6000-8:~# kubectl apply -f nvidia-servicemonitor.yamlStep 3: Configure the Grafana dashboard. NVIDIA maintains an official dashboard for DCGM exporter metrics:
- Log into your Grafana UI.
- Navigate to Dashboards -> Import.
- Import Dashboard ID:
22515. - Select your Prometheus data source and click Import.
This loads an interactive panel showing real-time health and performance across all 32 partitions:
Run a Real Workload on a Slice (Blackwell, sm_120) #
There is one final trap waiting at the workload layer.
The NVIDIA Blackwell architecture uses a new compute capability version: Compute Capability 12.0 (sm_120). If you use older container images (such as pytorch:2.1.2-cuda12.1), execution crashes with:
RuntimeError: CUDA error: no kernel image is available for execution on the deviceOlder PyTorch binaries simply do not contain compiled kernels for sm_120. Use a modern PyTorch image compiled with CUDA 12.8+ or the official NVIDIA NGC PyTorch containers (version 25.01-py3 or later), which natively support Blackwell.
Here is the verified Deployment manifest that runs a matrix multiplication load on a single 24GB Blackwell MIG slice. Note the resource request: nvidia.com/mig-1g.24gb, the mixed-strategy resource name our device plugin advertises:
apiVersion: apps/v1
kind: Deployment
metadata:
  name: pytorch-mig-demo
  labels:
    app: pytorch-mig-demo
spec:
  replicas: 1
  selector:
    matchLabels:
      app: pytorch-mig-demo
  template:
    metadata:
      labels:
        app: pytorch-mig-demo
    spec:
      runtimeClassName: nvidia
      containers:
      - name: pytorch
        # NVIDIA's official PyTorch NGC container (25.01 or later)
        # compiled to support the Blackwell architecture (sm_120)
        image: nvcr.io/nvidia/pytorch:25.01-py3
        command: ["python3", "-c"]
        args:
        - |
          import torch
          import time

          print("=== CUDA MIG Slice Diagnostics ===")
          print("CUDA Available:", torch.cuda.is_available())
          if torch.cuda.is_available():
              print("Device Name:", torch.cuda.get_device_name(0))
              print("Device Capability:", torch.cuda.get_device_capability(0))
              print("CUDA Device Count:", torch.cuda.device_count())

              # Allocate memory and perform matrix multiplication to generate GPU load
              print("Allocating tensors on GPU and starting matrix math load...")
              device = torch.device("cuda")
              x = torch.randn(10000, 10000, device=device)
              y = torch.randn(10000, 10000, device=device)

              # Keep running matrix multiplications to hold the CUDA context and load
              while True:
                  z = torch.matmul(x, y)
                  time.sleep(0.5)
          else:
              print("ERROR: CUDA is not available inside the container!")
              time.sleep(3600)
        resources:
          limits:
            nvidia.com/mig-1g.24gb: 1
          requests:
nvidia.com/mig-1g.24gb: 1Prove the Isolation, From Both Sides #
Once the pod is running, exec into the container and run nvidia-smi. You will observe exactly one GPU with 24GB VRAM. The container cannot see the other 7 physical cards or the other 31 slices:
root@gpu-rtxpro6000-8:~# kubectl exec -it pytorch-mig-demo-c9f7c8b49-sl5qh -- bash
root@pytorch-mig-demo-c9f7c8b49-sl5qh:/workspace# nvidia-smi
Tue Jul 14 19:44:18 2026
+-----------------------------------------------------------------------------------------+
| NVIDIA-SMI 610.43.02              KMD Version: 610.43.02     CUDA UMD Version: 13.3     |
+-----------------------------------------+------------------------+----------------------+
| GPU  Name                 Persistence-M | Bus-Id          Disp.A | Volatile Uncorr. ECC |
| Fan  Temp   Perf          Pwr:Usage/Cap |           Memory-Usage | GPU-Util  Compute M. |
|                                         |                        |               MIG M. |
|=========================================+========================+======================|
|   0  NVIDIA RTX PRO 6000 Blac...    On  |   00000000:61:00.0 Off |                   On |
| N/A   34C    P0            108W /  600W |                  N/A   |     N/A      Default |
|                                         |                        |              Enabled |
+-----------------------------------------+------------------------+----------------------+

+-----------------------------------------------------------------------------------------+
| MIG devices:                                                                            |
+------------------+----------------------------------+-----------+-----------------------+
| GPU  GI  CI  MIG |              Shared Memory-Usage |        Vol|        Shared         |
|      ID  ID  Dev |                Shared BAR1-Usage | SM     Unc| CE ENC  DEC  OFA  JPG |
|                  |                                  |        ECC|                       |
|==================+==================================+===========+=======================|
|  0    6   0   0  |            1786MiB / 24192MiB    | 46      0 |  1   1    1    0    1 |
|                  |               0MiB /  8317MiB    |           |                       |
+------------------+----------------------------------+-----------+-----------------------+

+-----------------------------------------------------------------------------------------+
| Processes:                                                                              |
|  GPU   GI   CI              PID   Type   Process name                        GPU Memory |
|        ID   ID                                                               Usage      |
|=========================================================================================|
|    0    6    0                1      C   python3                                1714MiB |
+-----------------------------------------------------------------------------------------+The pod only sees the 1g.24gb slice that has been given to it and nothing else, with its 24GiB of memory shown under the MIG devices section.
Now look at the same moment from the host. The host sees everything: all cards, all slices, and the exact same python3 process burning memory on one specific slice (output trimmed to two GPUs to keep it readable):
root@gpu-rtxpro6000-8:~# nvidia-smi

Tue Jul 14 19:52:39 2026
+-----------------------------------------------------------------------------------------+
| NVIDIA-SMI 610.43.02              KMD Version: 610.43.02     CUDA UMD Version: 13.3     |
+-----------------------------------------+------------------------+----------------------+
| GPU  Name                 Persistence-M | Bus-Id          Disp.A | Volatile Uncorr. ECC |
| Fan  Temp   Perf          Pwr:Usage/Cap |           Memory-Usage | GPU-Util  Compute M. |
|                                         |                        |               MIG M. |
|=========================================+========================+======================|
|   2  NVIDIA RTX PRO 6000 Blac...    On  |   00000000:41:00.0 Off |                   On |
| N/A   26C    P8             40W /  600W |     256MiB /  97887MiB |     N/A      Default |
|                                         |                        |              Enabled |
+-----------------------------------------+------------------------+----------------------+
|   3  NVIDIA RTX PRO 6000 Blac...    On  |   00000000:61:00.0 Off |                   On |
| N/A   36C    P0            108W /  600W |    1977MiB /  97887MiB |     N/A      Default |
|                                         |                        |              Enabled |
+-----------------------------------------+------------------------+----------------------+
+-----------------------------------------------------------------------------------------+
| MIG devices:                                                                            |
+------------------+----------------------------------+-----------+-----------------------+
| GPU  GI  CI  MIG |              Shared Memory-Usage |        Vol|        Shared         |
|      ID  ID  Dev |                Shared BAR1-Usage | SM     Unc| CE ENC  DEC  OFA  JPG |
|                  |                                  |        ECC|                       |
|==================+==================================+===========+=======================|
|  2    3   0   0  |              64MiB / 24192MiB    | 46      0 |  1   1    1    0    1 |
|                  |               0MiB /  8317MiB    |           |                       |
+------------------+----------------------------------+-----------+-----------------------+
|  2    4   0   1  |              64MiB / 24192MiB    | 46      0 |  1   1    1    0    1 |
|                  |               0MiB /  8317MiB    |           |                       |
+------------------+----------------------------------+-----------+-----------------------+
|  2    5   0   2  |              64MiB / 24192MiB    | 46      0 |  1   1    1    0    1 |
|                  |               0MiB /  8317MiB    |           |                       |
+------------------+----------------------------------+-----------+-----------------------+
|  2    6   0   3  |              64MiB / 24192MiB    | 46      0 |  1   1    1    0    1 |
|                  |               0MiB /  8317MiB    |           |                       |
+------------------+----------------------------------+-----------+-----------------------+
|  3    3   0   0  |              64MiB / 24192MiB    | 46      0 |  1   1    1    0    1 |
|                  |               0MiB /  8317MiB    |           |                       |
+------------------+----------------------------------+-----------+-----------------------+
|  3    4   0   1  |              64MiB / 24192MiB    | 46      0 |  1   1    1    0    1 |
|                  |               0MiB /  8317MiB    |           |                       |
+------------------+----------------------------------+-----------+-----------------------+
|  3    5   0   2  |              64MiB / 24192MiB    | 46      0 |  1   1    1    0    1 |
|                  |               0MiB /  8317MiB    |           |                       |
+------------------+----------------------------------+-----------+-----------------------+
|  3    6   0   3  |            1786MiB / 24192MiB    | 46      0 |  1   1    1    0    1 |
|                  |               0MiB /  8317MiB    |           |                       |
+------------------+----------------------------------+-----------+-----------------------+
+-----------------------------------------------------------------------------------------+
| Processes:                                                                              |
|  GPU   GI   CI              PID   Type   Process name                        GPU Memory |
|        ID   ID                                                               Usage      |
|=========================================================================================|
|    3    6    0           698976      C   python3                                1714MiB |
+-----------------------------------------------------------------------------------------+Same python3 process, same 1714MiB, visible in both views because both are looking at the same hardware-isolated MIG slice. The other slices on that card show 64MiB of idle overhead each, completely untouched by the running workload. This is the beauty of MIG.
The Platform Properties Compared #
Here is the before-and-after, the way your finance and platform teams will evaluate it:
| Property | 8 whole GPUs | 32 MIG slices |
|---|---|---|
| Schedulable GPU resources | 8 | 32 |
| Small workload claims | Entire 96GB card | One 24GB hardware-isolated slice |
| Isolation model | Software-level (container boundaries) | Silicon-level (memory crossbars + SM channels) |
| OOM blast radius | Can destabilize the whole card | Contained within the 24GB slice |
| Developer wait times | Queue behind 8 indivisible cards | Immediate self-service on 32 slices |
| Configuration | Ad-hoc nvidia-smi scripts | Declarative node labels via the GPU Operator |
Conclusion #
GPU sharing is a spectrum. Time-slicing shares by taking turns, MPS shares by trusting neighbors, and MIG shares by building walls in silicon. When the tenants are real (different teams, different customers, different blast radii), MIG is the one that lets you sleep.
Here is what you accomplished in this walkthrough:
- Understood the three GPU sharing mechanisms and why only MIG gives hardware-enforced tenant isolation.
- Learned the GPU Instance / Compute Instance hierarchy and why MIG must partition both memory and compute.
- Took a single GPU through the full MIG lifecycle by hand: enable, inspect profiles, carve slices, verify, run a workload, and tear everything back down to a whole card.
- Scaled the same commands to all 8 GPUs by dropping one flag, producing 32 hardware-isolated
1g.24gbinstances. - Deployed the NVIDIA GPU Operator to make the whole configuration declarative and GitOps-friendly, with a single node label replacing the manual command sequence.
- Diagnosed and fixed four real production pitfalls: non-standard containerd paths, MIG Manager overwrites, host-level state drift, and manual-mode Kubelet discovery.
- Wired DCGM telemetry into a Prometheus + Grafana dashboard for slice-level observability.
- Verified the isolation from both sides by running a PyTorch workload on a single
sm_120slice.
Building a high-efficiency GPU platform is not just about having the fastest silicon. It is about managing and distributing that compute pool effectively. Slicing the Blackwell architecture with MIG gives you the balance of strict isolation, cost optimization, and developer self-service that makes the platform actually work.
If this was useful, the NVIDIA GPU Operator lives at docs.nvidia.com and on GitHub, and the full MIG user guide is at docs.nvidia.com/datacenter/tesla/mig-user-guide.
Thanks to our hardware partner
This deep dive ran on an 8x NVIDIA RTX PRO 6000 Blackwell node from Utho Cloud. If you need GPU infrastructure to run workloads like these, take a look.
Explore UthoBuilding Hybrid K8s Platforms @trivago | Tech Author & Speaker (freeCodeCamp, SREDays) | vCluster Ambassador | RHCA & GCP DevOps Professional
Saiyam is working as Head of DevRel at vCluster Labs. He is the founder of Kubesimplify, focusing on simplifying cloud-native & AI infrastructure. He is KubeCon Co-chair and has worked on many facets of Kubernetes, including machine learning platforms, scaling, multi-cloud, & managed Kubernetes services. When not coding, Saiyam contributes to the community by writing blogs and organizing local meetups for Kubernetes and CNCF. He is also a CNCF TAG OpsRes Chair & can be reached on Twitter @saiyampathak.
Get new posts in your inbox.
Spotted a typo or want to improve this post? Edit on GitHub →