The secret gems behind building container images, Enter: BuildKit & Docker Buildx
In this post, we discussed various things about Buildkit, its internals, how to interact with BuildKit and its benefits in container image building. Feel fr

On this page (3)
Abstract #
Containers are a part of our life right now, and until recent years our knowledge is only limited to Docker itself. Because it handles everything for us, it provides a high-level language, Dockerfile, where you construct your image, and it can quickly run the given container image with a single line of command. However, after its first release, there was a need for an open-source community, so Docker initiated an umbrella project named Moby. Under that project, Docker separated itself into many parts, such as containerd for the container runtime and the BuildKit project as an alternative to Docker build engine.
In this post, we will be outlining what BuildKit history. Then, in the following parts, we will show the internal components of BuildKit. Next, we will demonstrate how a user can interact with BuildKit, and we will discuss the benefits of using BuildKit in container image building.
History #
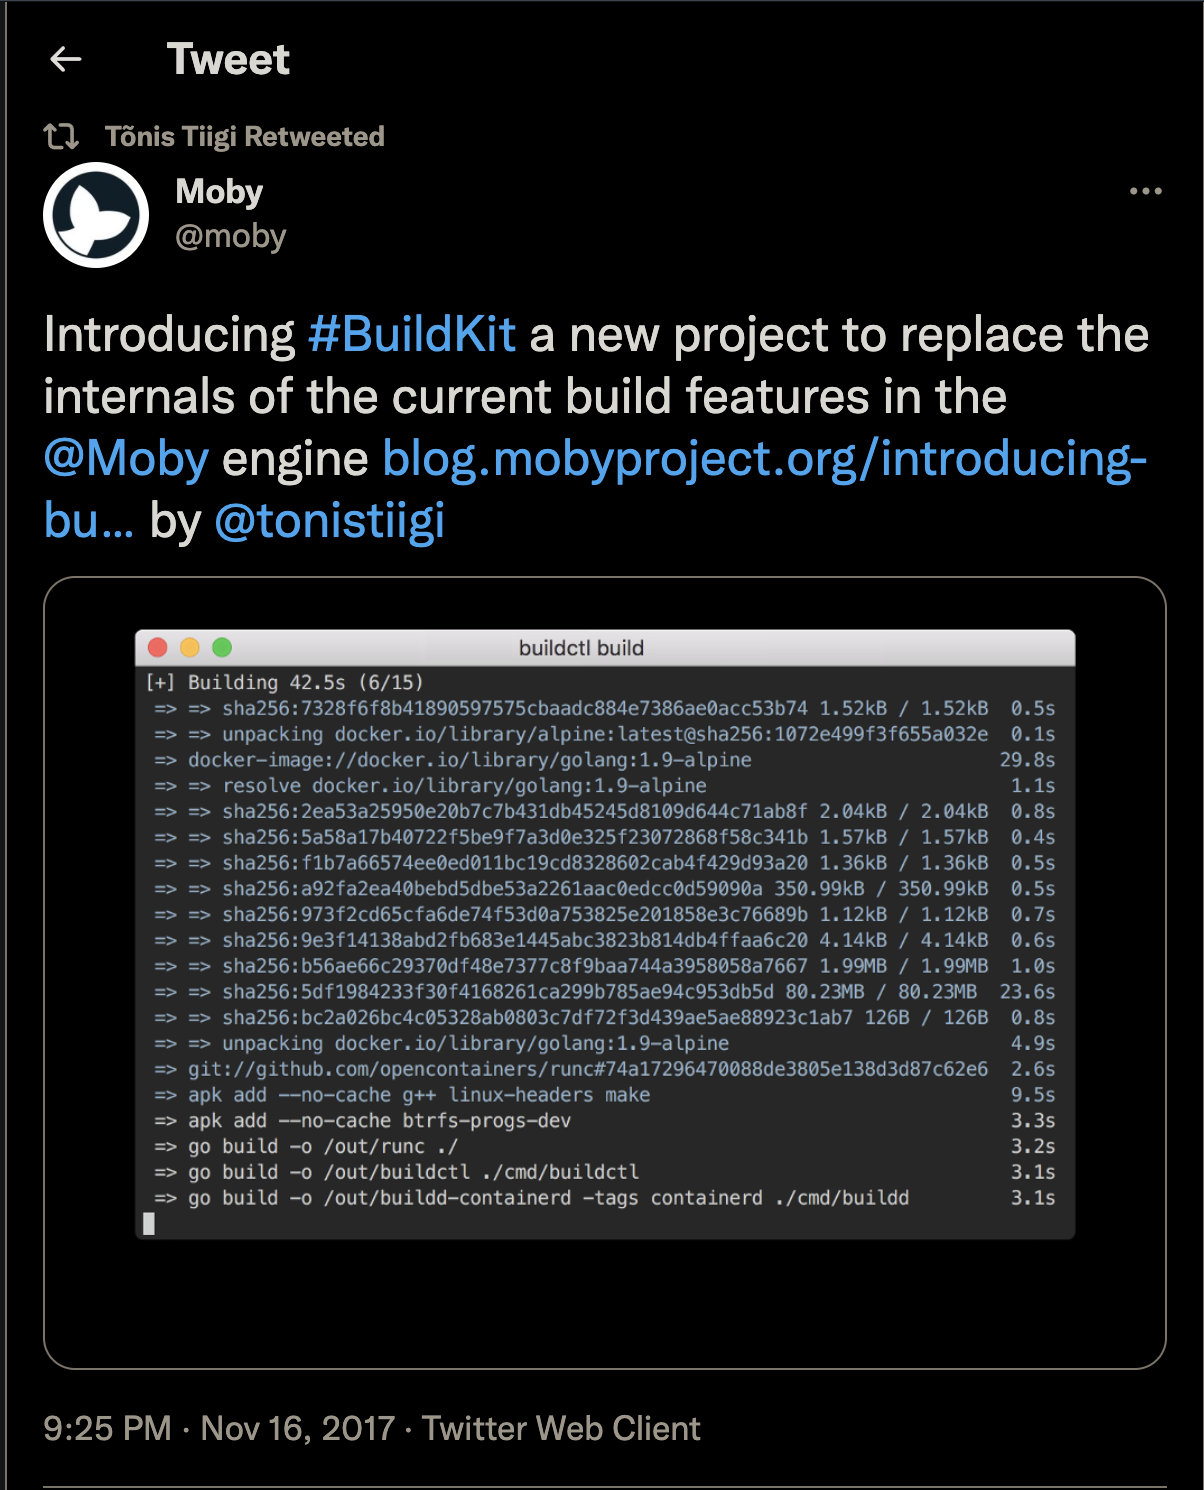
Long story short, it all started with the tweet above. We’ll be explaining what we need to know about the history of the BuildKit project through this tweet.
First and foremost, we should talk about the Moby Project, the hidden gem behind Docker’s success.
The Moby Project is a new open-source project to advance the software containerization movement and help the ecosystem take containers mainstream. - Introducing Moby Project
Docker was born as a monolithic application. The Docker engine was responsible for doing all of the containerization work, such as creating and running containers, pulling images from registries, managing data, etc. With the release of Docker engine v1.11, the monolith has been decoupled into independent components, which caused Moby to be spun out. More basically, you can think Moby project as an R&D lab as Solomon Hykes said to experiment, develop new components, and collaborate with the ecosystem on the future of container technology by providing a comprehensive library to the contributors.
The next important thing we should mention is the person who is the primary developer of the BuildKit project, and it is safe to say that he is the person who made it all happen, basically, Tõnis Tiigi. So I highly recommend following him to keep up-to-date with the recent changes and updates about the BuildKit and Buildx projects. He is also writing excellent blog posts on his Medium account.
Last but not least, we should also talk about the BuildKit project itself. It will be a quick introduction to the project because we’ll discuss it in more detail in the following section. The two most important things we should know about the BuildKit project are that it is a new project under the Moby umbrella for building and packaging software using containers and the latter, it is a new codebase meant to replace the internals of the current build features in the Moby Engine, which means that Docker will use BuildKit as a default build engine in the future.
Enter BuildKit #
Buildkit’s first proposal was to separate the docker build engine from the docker monolith structure to be the next generation of the docker build engine. It offers many key features, mainly focusing on performance, storage management, and extensibility. Let’s start by explaining the performance part. First, BuildKit announces a new concurrent graph build solver. That means it can run the build steps in parallel if possible, and it also removes the unnecessary commands that do not affect the overall build process. For instance, if we have the following Dockerfile:
https://gist.github.com/gokcesurenkok/c0450dfa8ee503da36cc23bcc9d73c32
Docker build engine will execute it sequentially``` ( stage-0 → stage-1 → stage-2)
BuildKit also introduced LLB, which means a new low-level build definition format.LLB is where the dependency graph is generated. Yet, it also provides features like direct data mounting, so basically, everything about the execution of the build is defined in LLB.LLB and it can be generated directly utilizing a [golang client package](https://godoc.org/github.com/moby/buildkit/client/llb) that defines the connections between your build procedures using Go language primitives.
The caching mechanism of BuildKit differs from the docker build engine as well. It tracks the checksum graphs of builds and can be exported to remote locations such as a registry. Therefore it is much faster. BuildKit also provides a frontend which is a component that takes a human-readable build format and converts it to LLB so BuildKit can execute it. Frontends can be broadcasted as images, and the user can target a specific version of a frontend that is ensured to function for the features used by their intention.BuildKit supports loading frontends dynamically from container images. To use the external frontend, the first line of your Dockerfile needs to be #syntax=docker/dockerfile:1.4.0 indicating the exact image you want to operate.
Let’s see some examples of building your container image using the LLB golang client. First, you can programmatically create your image as in the following example.
[https://gist.github.com/developer-guy/373d393a36ab5fc3ff164710aafe3a08](https://gist.github.com/developer-guy/373d393a36ab5fc3ff164710aafe3a08)
Second, you can also use a high-level language apart from Dockerfile, such as [Mockerfile](https://github.com/r2d4/mockerfile), [Gockerfile](https://github.com/po3rin/gockerfile), Buildpacks, Earthly, etc.
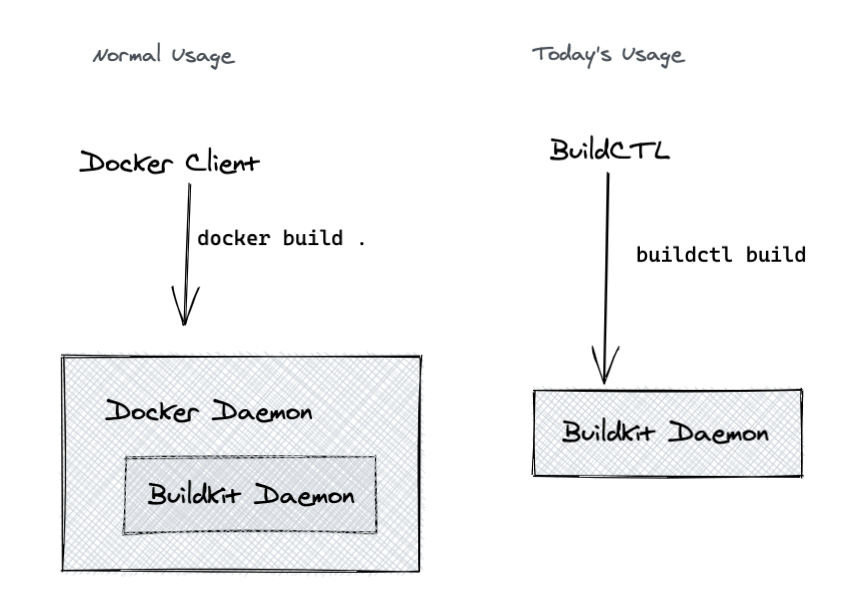
There are two ways to build your image with BuildKit.
If you want to use the docker client in your working environment, you can enable it by simply setting an environment variable **DOCKER_BUILDKIT** to **1** and using the Docker build command, or you
can put{ “features”: { “buildkit”: true } }
line to your **/etc/docker/daemon.json **file
The second way is to install buildctl and buildkitd, but it is not easy to use. Thus, Docker Buildx is a CLI plugin that expands the docker command with the complete support of the features provided in BuildKit.
## Enter Docker Buildx
Even though we have a client tool for BuildKit called **buildctl**, buildctl was not developed to be part of our toolset that we use daily. Instead, it is similar to BuildKit’s intent which is meant to become a low-level build engine that handles building/pushing and running container images for the higher-level tools such as Docker Buildx, kim, img, etc. You can access the complete list from [here](https://github.com/moby/buildkit#used-by). This is where Docker Buildx comes into play.
Docker Buildx is built on BuildKit technology and a CLI plugin that extends the docker command with the full support of the features provided by the Moby BuildKit builder toolkit because, as we mentioned earlier, you can enable the BuildKit engine while using docker CLI itself. Still, it limits to use of all the features supported by BuildKit. It provides the same user experience as docker build with many new features like creating scoped builder instances and building against multiple nodes concurrently. - [Working with Buildx](https://docs.docker.com/buildx/working-with-buildx/)
If you wonder what the CLI plugin means, you can extend docker CLI with new sub-commands by simply putting an executable whose name starts with the **“docker-”** prefix into a folder in **~/.docker/cli-plugins**.
## Demo
Today, we’ll show you how to use Docker Buildx to enhance your build process for the Go applications. We’ll use the external cache support to improve the build process by simply adding a couple of flags which will drastically reduce build time, cache mounts, thanks to docker/dockerfile:v1.4.0 frontend, which will help us to cache packages, build outputs, etc., and the multi-architecture support which is the most valuable (IMHO) feature which skips all the tedious manual steps and [creates a single multi-arch image for you.](https://www.docker.com/blog/multi-arch-build-and-images-the-simple-way/)
Let’s start by using the registry cache type, an external cache type supported by Docker Buildx, and you can access the complete list of external cache types from [here](https://docs.docker.com/engine/reference/commandline/buildx_build/#cache-to). It exports the build cache to a cache manifest in the registry. So, for example, if you are using GitLab as a CI/CD solution in your organization, you might be using stateless runners, which will run as Pods in Kubernetes. In that case, pulling and pushing the image layer cache from the registry might be a good option for you. To enable registry cache, the only thing that you need to do is simply add –cache-to and –cache-from flags to your command with type registry as shown below:
[https://gist.github.com/developer-guy/e1067651c23f23d61ccf04fdfa17f025](https://gist.github.com/developer-guy/e1067651c23f23d61ccf04fdfa17f025)
The next important thing worth mentioning is “[Build Mounts](https://github.com/moby/buildkit/blob/master/frontend/dockerfile/docs/syntax.md#build-mounts-run---mount).” Different types of Build Mounts options exist, but today, we’ll be talking about the specific one called “[cache](https://github.com/moby/buildkit/blob/master/frontend/dockerfile/docs/syntax.md#run---mounttypecache).” This mount type allows the build container to cache directories for compilers and package managers, which is a perfect feature for caching Go packages, and build outputs between builder invocations while building multi-architecture images.
In addition, the **go** command caches build outputs for reuse in future builds. The default location for cache data is a subdirectory named **go-build** in the standard user cache directory for the current operating system. Setting the **GOCACHE** environment variable overrides this default, and running **'go env GOCACHE'** prints the current cache directory. - [Build and test caching](https://pkg.go.dev/cmd/go#hdr-Build_and_test_caching)
Another important cache directory for Go applications is the module cache, and the module cache is the directory where the go command stores downloaded module files. The module cache is distinct from the build cache, which contains compiled packages and other build artifacts. The default location of the module cache is **$GOPATH/pkg/mod**. To use a different location, set the **GOMODCACHE** [environment variable](https://go.dev/ref/mod#environment-variables). - [Module Cache](https://go.dev/ref/mod#module-cache)
[https://gist.github.com/developer-guy/34d6d7aae831965b3365ea801b2291b0](https://gist.github.com/developer-guy/34d6d7aae831965b3365ea801b2291b0)
Last but not least, we’ll build multi-architecture images, to do that, we’ll be able to cross-compile our Go application. Docker BuildX provides the three options for building multi-arch images:
1. QEMU mode (easy, slow)
2. Cross-compilation mode (complicated, fast)
3. Remote mode (easy, fast, but needs an extra machine)
We’ll be looking at the cross-compilation mode in today’s demo because cross-compiling Go applications for different types of architectures has never been so easy. Programs written in Go can easily be compiled for the various target operating systems such as Windows, macOS, and Linux by using the **GOARCH** and **GOOS** environmental variables. These represent the compilation architecture and the name of the target operating system, respectively, and are set to your host compilation architecture (**GOHOSTARCH**) and operating system (**GOHOSTOS**) by default. - [Cross Compile Go Programs](https://freshman.tech/snippets/go/cross-compile-go-programs/)
Cross-compilation can be achieved in Dockerfiles in many ways. One way is simply using [automatic platform ARGs](https://docs.docker.com/engine/reference/builder/#automatic-platform-args-in-the-global-scope), which requires a list of arguments to be added to the Dockerfile, such as **BUILDPLATFORM**, **TARGETPLATFORM**, etc. **TARGETPLATFORM** and this variable correspond to the platform you specified in the –platform argument when you run the build. The format of this variable is [os]/[architecture]/[variant]. Instead of parsing the target platform string and passing **GOOS**, **GOARCH**, and **GOARM** explicitly into your build command, you can rely on the TARGETPLATFORM variable kindly provided by Docker. Moreover, you don’t even need to translate TARGETPLATFORM to GOOS, GOARCH, and GOARM by yourself. - [Quick build for Golang cross-platform images](https://sanisimov.com/2019/03/quick-build-for-golang-cross-platform-images/)
Luckily, we have some projects to simplify this process, such as [qdm12/xcputranslate](https://github.com/qdm12/xcputranslate) or [tonistiigi/xx](https://github.com/tonistiigi/xx). So, today, we’ll continue with the xx project. xx provides tools to support cross-compilation from Dockerfiles that understand the --platform flag passed in from docker build or docker buildx build. These helpers allow you to build multi-platform images from any architecture into any architecture supported by your compiler with native performance.
[https://gist.github.com/developer-guy/25f88d4d07fd1c4800e4e5be4ae379b8](https://gist.github.com/developer-guy/25f88d4d07fd1c4800e4e5be4ae379b8)
Once we combine all the samples in one single Dockerfile, it should look like the following:
[https://gist.github.com/developer-guy/84be081a6c476f4e6e5e81e5f2f62cc2](https://gist.github.com/developer-guy/84be081a6c476f4e6e5e81e5f2f62cc2)
> You can access all the codes of the demo from [here](https://github.com/developer-guy/go-multi-arch-buildx).
Now, we are ready to build a multi-architecture container image with Docker Buildx. To do that, we should download the buildx binary first from [here](https://github.com/docker/buildx#manual-download). But if you are on macOS or Windows platform and installed Docker via Docker Desktop, you should already have buildx installed because Docker Buildx is included in [Docker Desktop](https://docs.docker.com/desktop/).
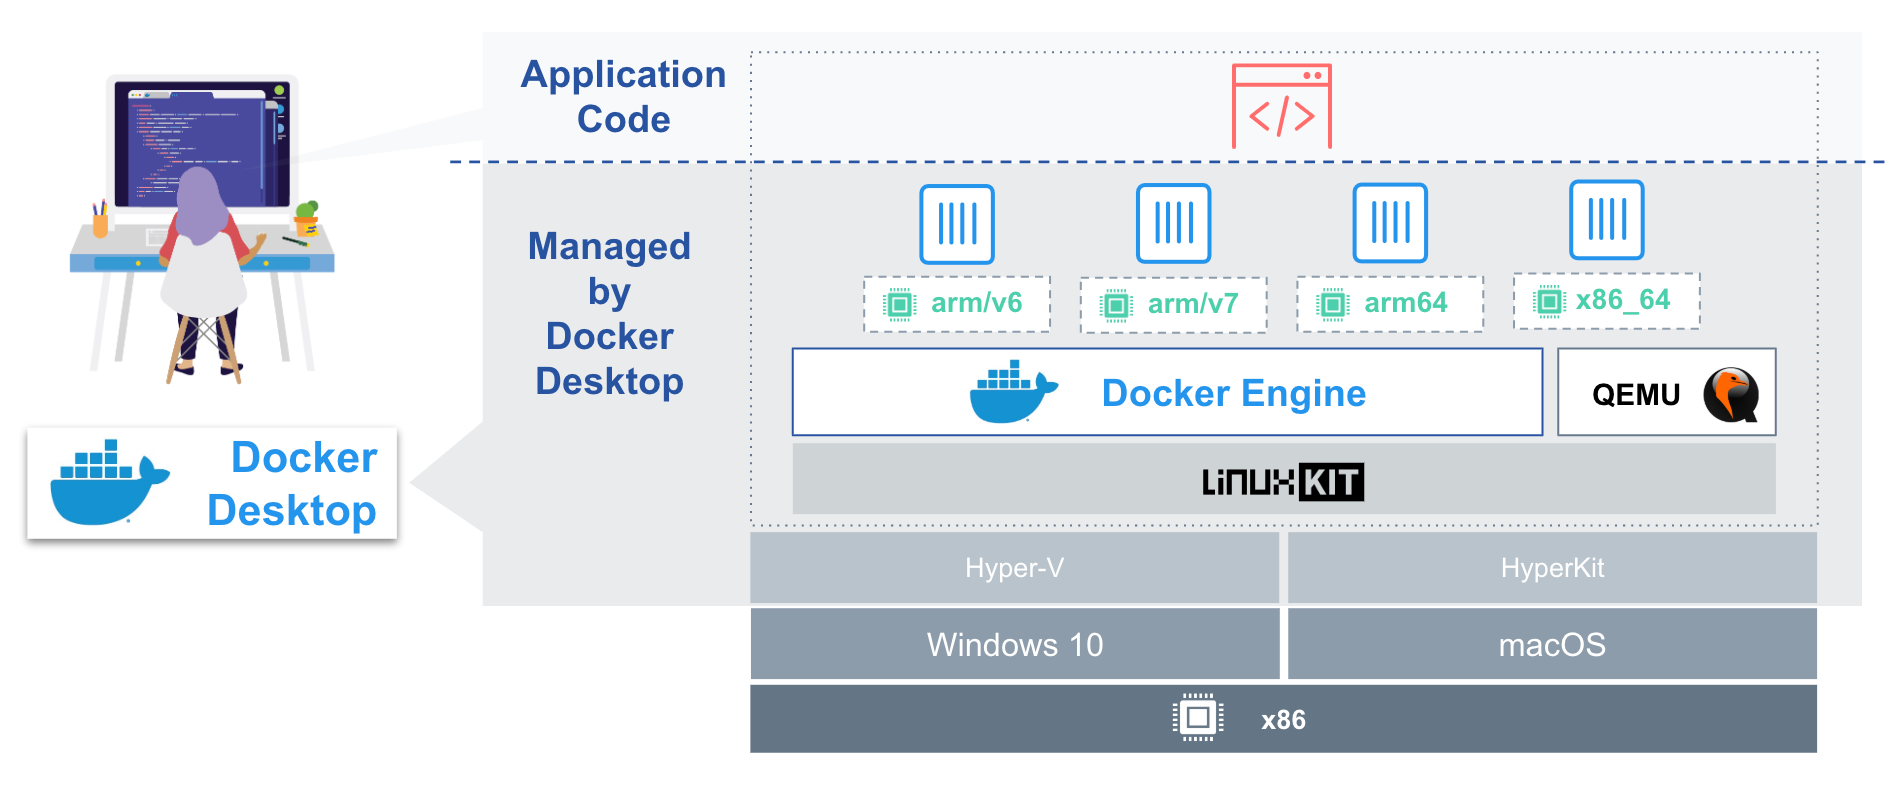
Docker Desktop ships with hypervisors for the host OS. The hypervisor is responsible for running a lightweight Linux kernel ([LinuxKit](https://github.com/linuxkit/linuxkit) ), included in Docker Desktop. This fast and lightweight container OS comes packaged with the QEMU emulator and pre-configured with [binfmt_misc](https://lwn.net/Articles/630727/) to run binaries of any supported architecture. **binfmt_misc** is a kernel feature that allows invoking almost every program by simply typing its name in the shell. It recognizes the binary type by matching some bytes at the beginning of the file with a magic byte sequence (masking out specified bits) you have supplied. The diagram above shows QEMU emulation for the arm/v6, arm/v7, and arm64 Docker images. As an alternative to installing the QEMU and binfmt-support packages on your host system, you can use a docker image to satisfy the corresponding requirements. Several docker images do the job, including [multiarch/qemu-user-static](https://github.com/multiarch/qemu-user-static) and [tonistiigi/binfmt](https://github.com/tonistiigi/binfmt). - [Building Multi-Arch Images for Arm and x86 with Docker Desktop](https://www.docker.com/blog/multi-arch-images/)
> When you ask the Linux kernel to run some executable file, it needs to know, how to load this specific file, and whether this file is compatible with the current machine, or not. By default, the ELF binary compiled for, say, arm64v8 is rejected by the kernel, running on amd64 hardware.
> However, the [binfmt_misc](https://en.wikipedia.org/wiki/Binfmt_misc) feature of the kernel allows you to tell it, how to handle the executables it cannot usually handle on its own - this includes the cases when the kernel does not know the binary format or considers it incompatible with current machine.
> What the container started from the image multiarch/qemu-user-static:register does? It registers new handlers for ELF binaries built for alternative architectures
> https://stackoverflow.com/questions/57178788/docker-build-fails-for-arm-images
The first command we should run to decide whether buildx is working is “ls.” ls command will display all the builder instances available to run image builds. But, of course, we can create the builder instances in addition to default ones, and we’re going to create one because the default builder instance Docker Daemon itself does not currently support exporting cache features. So, you should see an error like the following if you run your build with the default builder instance with cache enabled:
Error: cache export feature is currently not supported for the docker driver. Please switch to a different driver (e.g., "docker buildx create --use")
If you list your builder instances, you should see something similar to this:
[https://gist.github.com/developer-guy/da064da3eb135d814b3c7ece165eed33](https://gist.github.com/developer-guy/da064da3eb135d814b3c7ece165eed33)
Now, let’s create a new builder instance to facilitate exporting cache feature. To do that, the only thing we need to do is:
[https://gist.github.com/developer-guy/ce5f594e1352d26a05e0d2ebb7b8da43](https://gist.github.com/developer-guy/ce5f594e1352d26a05e0d2ebb7b8da43)
Finally, let’s build a multi-arch container image with a single command like the following:
[https://gist.github.com/developer-guy/0a990bfc2c695e2a334765f7489d89fa](https://gist.github.com/developer-guy/0a990bfc2c695e2a334765f7489d89fa)
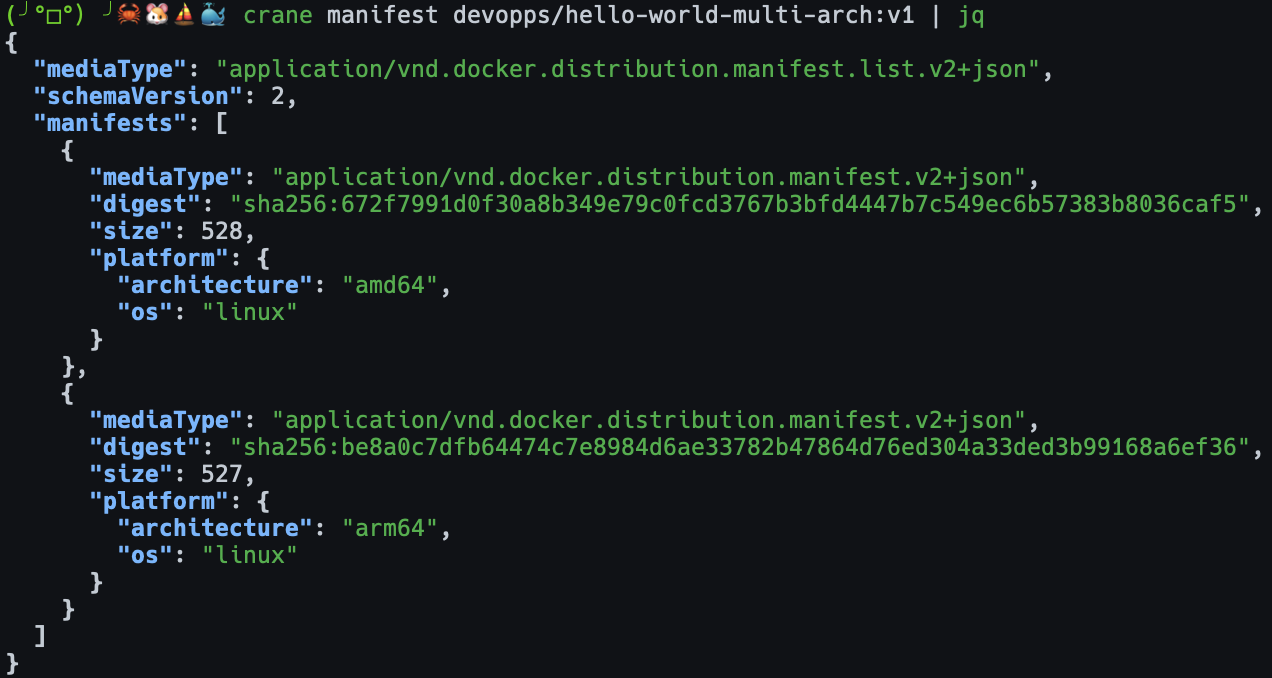
Once we have the image, we can check whether the image was built multi-arch by simply running the “crane manifest” command to display its variants:
> To install crane utility: https://github.com/google/go-containerregistry/blob/master/cmd/crane/
## Conclusion
In this post, we discussed various things about Buildkit, its internals, how to interact with BuildKit and its benefits in container image building. Feel free to try out the examples and let us know if you find this post interesting or have any questions.
## Authors
This post is a combined effort of [Batuhan Apaydın](https://twitter.com/developerguyba) and [Gökçe Sürenkök](https://twitter.com/gokcesurenkok)
Follow kubesimplify for such amazing blog posts!
Get new posts in your inbox.
Spotted a typo or want to improve this post? Edit on GitHub →