Day 3: Stop Writing Dockerfiles From Scratch
Stop writing Dockerfiles from scratch. A Docker Captain walks through docker init, layer caching, multi-stage builds, and docker debug for 2026.


On this page (12)
- Table of Contents
- 1\. docker init: The 2026 Way
- 2\. Tearing Apart a Dockerfile
- 3\. The Cache Trick That Changes Everything
- 4\. Multi-Stage Builds: It's Not About Size
- 5\. docker debug: Your New Best Friend
- 6\. What Nobody Tells You
- 7\. Quick Reference
- Core Dockerfile Instructions
- Build Commands You'll Actually Use
- The Cache Rule
- What's Next: Day 4
7 Days of Docker (2026), by Saloni Narang, Docker Captain & CNCF Ambassador
I'm a Docker Captain. I've reviewed many Dockerfiles, and I can tell you that every single Dockerfile tutorial on the internet starts the same way: FROM, RUN, COPY, CMD. Memorize four keywords. Congratulations, you know nothing.
Knowing the instructions is like knowing how to spell. It doesn't make you a writer. Today I'm not tell you syntax. Today I'm going to tell you to think about Dockerfiles: why each line exists, what order they go in, and what happens to your build time and image size when you get it wrong.
If you followed Day 2, you already understand that images are stacked layers. Now you're going to create those layers yourself, and you're going to do it right the first time.
Table of Contents #
1. docker init: The 2026 Way #
Here's my first controversial opinion of the day: stop writing Dockerfiles from scratch.
docker init exists. It asks you five questions and generates a very good Dockerfile, .dockerignore, compose.yaml, and a README.Docker.md. Here's what it actually looks like when you run it on a Node.js project:
$ docker init

Welcome to the Docker Init CLI!

This utility will walk you through creating the following files with sensible defaults for your project:
  - .dockerignore
  - Dockerfile
  - compose.yaml
  - README.Docker.md

Let's get started!

? What application platform does your project use? Node
? What version of Node do you want to use? 20.17.0
? Which package manager do you want to use? npm
? What command do you want to use to start the app? node server.js
? What port does your server listen on? 3000

✔ Created → .dockerignore
✔ Created → Dockerfile
✔ Created → compose.yaml
✔ Created → README.Docker.md

→ Your Docker files are ready!
  Review your Docker files and tailor them to your application.
  Consult README.Docker.md for information about using the generated files.

! Warning → The following files required to run your application were not found.
  Create them before running your application:
  - package.json
  - package-lock.json
Five questions. Four files. And a warning that keeps you honest: it noticed package.json and package-lock.json don't exist yet. That warning matters, as you'll see in a moment.
So why am I writing a blog post about Dockerfiles if a tool generates them?
Because you need to understand what it generates. You need to be the person who can look at a generated Dockerfile and say "this is correct" or "this needs to change for our use case." docker init is where you start. Understanding is where you become dangerous.
Let's dissect what it actually produced, line by line.
2. Tearing Apart a Dockerfile #
This is the Dockerfile docker init actually generated. Not simplified. Not cleaned up. The real thing.
# syntax=docker/dockerfile:1

ARG NODE_VERSION=20.17.0

FROM node:${NODE_VERSION}-alpine

ENV NODE_ENV production

WORKDIR /usr/src/app

RUN --mount=type=bind,source=package.json,target=package.json \
    --mount=type=bind,source=package-lock.json,target=package-lock.json \
    --mount=type=cache,target=/root/.npm \
    npm ci --omit=dev

USER node

COPY . .

EXPOSE 3000

CMD node server.js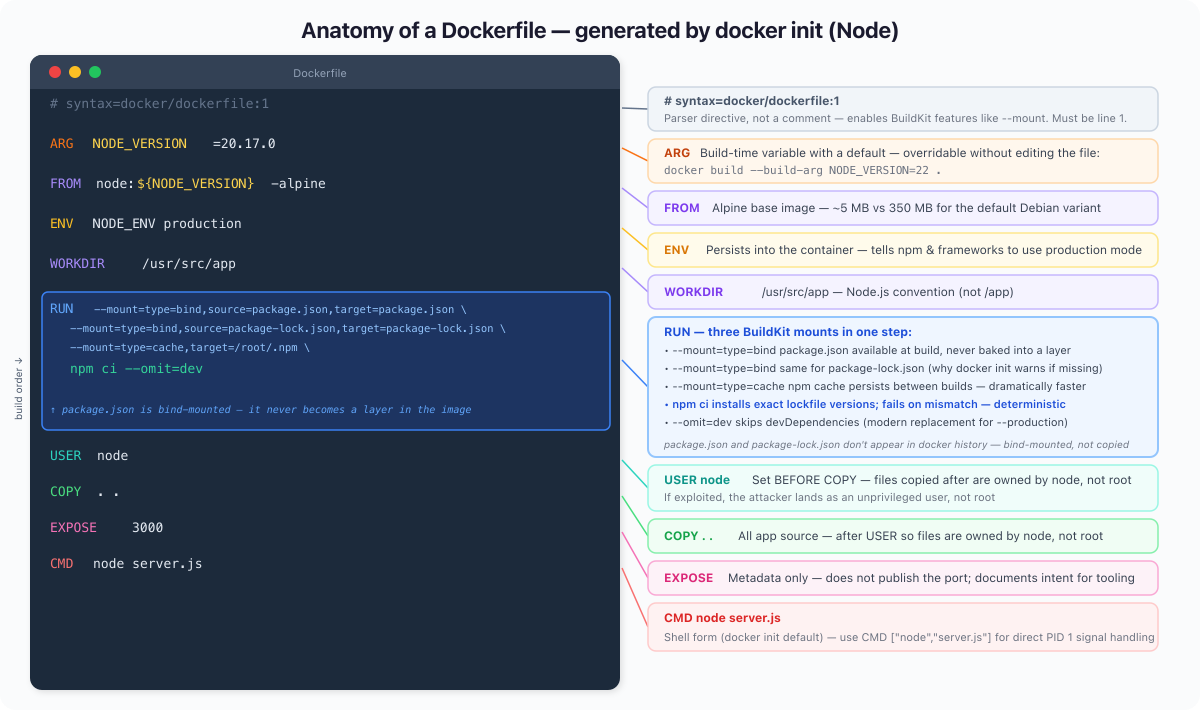
Every decision in here is intentional. Let's go line by line.
# syntax=docker/dockerfile:1: This is a parser directive, not a comment. It must be the very first line. It pins the Dockerfile to the latest stable 1.x BuildKit syntax, ensuring consistent behaviour across different Docker versions, CI systems, and remote builders. In Docker 23.0+ BuildKit is on by default so --mount works without it, but on older installs or CI environments it may not. Keep it for portability.
ARG NODE_VERSION=20.17.0: A build-time variable with a default. This means you can override it without touching the Dockerfile: docker build --build-arg NODE_VERSION=22.0.0 .. Pin to a specific version in production; override in CI when testing upgrades.
FROM node:${NODE_VERSION}-alpine: Uses the ARG from above. Alpine is significantly smaller than Debian-based images, often reducing image size by several hundred MB. This is not "use Node." It's "start with this entire filesystem and runtime." Every line after this is built on top of Alpine + Node 20.17.0.
ENV NODE_ENV production: Sets an environment variable that persists into the running container. At runtime, this tells Node frameworks like Express and Next.js to enable production-mode optimizations. Note: for npm ci, NODE_ENV=production alone does not skip devDependencies. The --omit=dev flag in the RUN step handles that explicitly.
WORKDIR /usr/src/app: Sets the working directory for every subsequent instruction. Note it's /usr/src/app, not /app. This is the conventional location for Node apps per the Node Docker Best Practices guide. Docker creates it if it doesn't exist.
RUN --mount=type=bind ... npm ci --omit=dev: This is the line that makes this Dockerfile different from what you'd write by hand. Three things happening at once:
-
--mount=type=bind,source=package.json,target=package.json: Binds yourpackage.jsoninto the container only for this RUN step. It is not persisted in the final image layer, but it still influences build cache. The file is available at build time, gone from the image afterward. -
--mount=type=bind,source=package-lock.json,target=package-lock.json: Same for the lockfile. This is whydocker initwarned us both files need to exist; it's reading them directly from your filesystem, not copying them. -
--mount=type=cache,target=/root/.npm: Mounts a persistent build cache at the npm cache directory. On the next build, npm reuses packages from this cache even if the image layer is rebuilt. Dramatically faster on repeated builds. -
npm ciinstead ofnpm install:ciinstalls exactly what's in the lockfile, fails if there's a mismatch, and never modifiespackage-lock.json. Deterministic. Right for production builds. -
--omit=devinstead of--production: The modern flag name. Same effect: skips devDependencies.
USER node: Switches to the non-root node user before copying application code. This matters: files copied after this instruction are owned by node, not root. If an attacker compromises your app process, they land as an unprivileged user. Root in a container is not the same as root on the host, but it's still a risk you don't need to take.
COPY . .: Copies your entire application source into the image. Comes after USER node so the files are owned correctly, and after npm ci so a source code change doesn't invalidate the dependency install step. The .dockerignore file (also generated by docker init) controls what gets excluded.
EXPOSE 3000: Metadata only. It does not open a port by itself, but acts as metadata used by tools like Docker run -p, Compose, and Kubernetes. It documents what port the application listens on so that docker run -P, Compose, and orchestrators can wire it up automatically.
CMD node server.js: The default command. Shell form, which means the shell (/bin/sh -c) wraps the process. The generated Dockerfile uses shell form here, which is simpler for a starter template. In production you may want exec form (CMD ["node", "server.js"]) so the Node process receives signals directly as PID 1. In short, shell form does not handle signals correctly. Exec form is preferred in production for proper shutdown handling.
Once you have your package.json, package-lock.json, and server.js in place, build and run with:
docker build -t d3-app .
docker run -d --name d3 -p 3000:3000 d3-app
Then run docker history d3-app and pay attention to what is not there. package.json and package-lock.json will not appear as layers at all. They were bind-mounted during the RUN step, available to npm ci, but never copied into the image. The npm cache mount is the same story: it lives outside the image entirely. The only real weight your image carries is the npm ci layer and whatever your COPY . . step brings in.
3. The Cache Trick That Changes Everything #
This is where most tutorials fail you. They show the correct Dockerfile but never explain why the order matters. Let me fix that.

Docker's build cache works on one brutal rule: the moment a layer changes, every layer after it is rebuilt from scratch. Cache invalidation cascades downward. Always.
Here's what a bad Dockerfile looks like:
FROM node:20-alpine
WORKDIR /app
COPY . .                          # copies EVERYTHING
RUN npm install --production      # runs every time ANY file changes
CMD ["node", "server.js"]
You change one line in server.js. Docker sees that COPY . . has different input files. Cache busted. Which means npm install also reruns, even though your dependencies haven't changed. You wait 15 seconds for a zero-dependency-change build. Multiply that by 50 developers and 20 builds a day and you've burned hours.
Now the good version:
FROM node:20-alpine
WORKDIR /app
COPY package.json .               # dependencies change rarely
RUN npm install --production      # cached unless package.json changed
COPY server.js .                  # app code changes often, goes LAST
CMD ["node", "server.js"]
You change server.js. Docker checks: did package.json change? No. Cached. Did npm install inputs change? No. Cached. Only COPY server.js . reruns. Build time: sub-second.
This is not a micro-optimization. This is a 10x difference in build time. I have seen real CI pipelines go from 4-minute builds to 25-second builds by fixing instruction order alone. No new hardware. No fancy caching service. Just understanding how layers work.
The rule is simple: things that change rarely go at the top. Things that change often go at the bottom. Dependency manifests before source code. System packages before application packages. Always.
4. Multi-Stage Builds: It's Not About Size #
Everyone explains multi-stage builds as "make your image smaller." That's true but it's the wrong framing. Multi-stage builds are about separation of concerns.
Your build environment needs compilers, package managers, build tools, debug symbols. Your production environment needs none of that. Every tool in your production image is a tool an attacker can use. Every extra binary is attack surface. Multi-stage builds let you use a full workshop to build, then ship only the finished product.
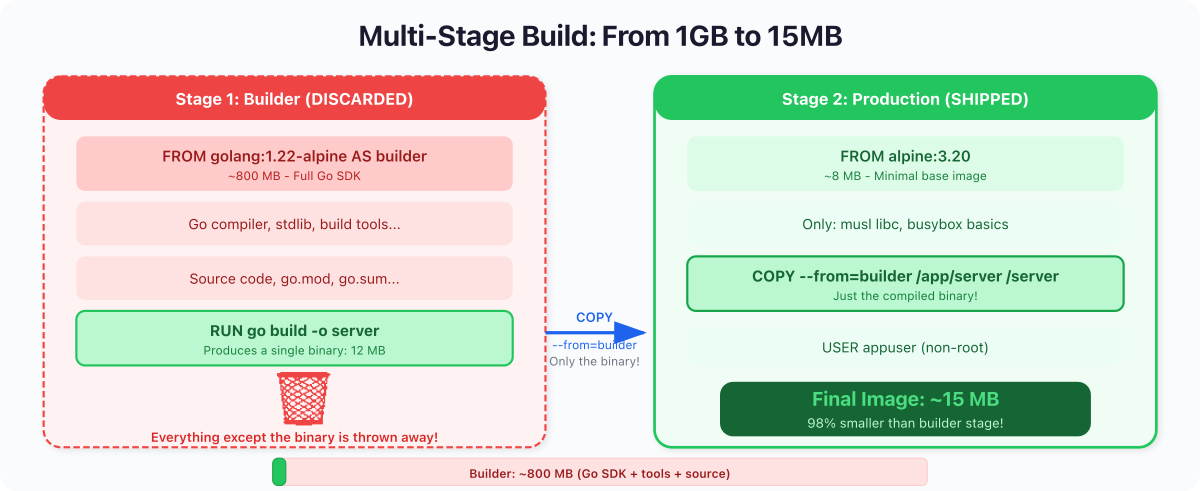
Here's a Go application using a multi-stage build:
FROM golang:1.22-alpine AS builder
WORKDIR /app
COPY go.mod go.sum ./
RUN go mod download
COPY . .
RUN CGO_ENABLED=0 GOOS=linux go build -o server

FROM alpine:3.20
RUN adduser -D appuser
COPY --from=builder /app/server /server
USER appuser
CMD ["/server"]
Stage 1 (builder): Uses golang:1.22-alpine, which includes the full Go compiler, linker, and standard library. go.mod and go.sum are copied first so go mod download can be cached independently of source changes (the same caching logic as Node's dependency layer). CGO_ENABLED=0 produces a fully static binary with no dynamic library dependencies, so the binary runs on any Linux-based image. If your project has no external modules, drop the go.sum copy and go mod download line, but you still need go.mod (Go 1.17+ refuses to build outside a module).
Stage 2 (production): Starts fresh from alpine:3.20. Creates a non-root user. Copies only the compiled binary from stage 1. The Go compiler, source code, intermediate objects, all left behind. They never make it into the final image.
You can verify the size difference with docker images after building both. In practice, a static Go binary on top of Alpine typically weighs in around 10 to 20 MB, while a Node image carrying the full runtime and node_modules is usually well over 100 MB. The exact numbers depend on your dependencies, but the order-of-magnitude gap is consistent.
The more important win is attack surface. A Node image carries npm, a shell, a package manager, and dozens of utilities. If someone exploits a vulnerability in your app and gets code execution, they have tools to work with. A Go image on Alpine is far more restricted: running as a non-root user means no ability to install packages even though apk is present, and far fewer pre-installed utilities to abuse. For maximum restriction, use a distroless or scratch base in stage 2 and your production image won't even have a shell.
Smaller images aren't just faster to pull. They have less attack surface.
For compiled languages (Go, Rust, C, C++), multi-stage builds are non-negotiable. For interpreted languages (Node, Python, Ruby), you can't eliminate the runtime, but you can still use multi-stage to install build-time-only dependencies in a separate stage and copy only production artifacts forward.
5. docker debug: Your New Best Friend #
Note:
docker debugis a Docker Desktop feature and requires a paid Docker subscription (Pro, Team, or Business). It is not included in open-source Docker Engine / Docker CE. Minimum Docker Desktop version is 4.33. Check withdocker debug --helpbefore relying on it.
Here's a scenario: your multi-stage build produces a final image based on alpine:3.20 or even scratch (a completely empty image). Something's wrong at runtime. You want to shell in and look around. But there's no shell in the image. docker exec -it mycontainer sh fails.
Enter docker debug:
docker debug d3-godocker debug attaches a debug shell to any container or image, even distroless, even scratch-based, even stopped containers. It injects a temporary toolbox with a shell, common utilities, and diagnostic tools without modifying the target image.
This is a game-changer for production debugging. You built a minimal, secure image. Now you can still inspect it when things go sideways without compromising your security posture by shipping a shell in production.
You can also use it to inspect any image directly:
docker debug myapp:latestThis drops you into the filesystem of that image. You can poke around, check what files exist, verify environment variables, and understand the exact state of what you shipped. No more adding RUN ls -la to your Dockerfile and rebuilding 14 times.
6. What Nobody Tells You #
Every
RUN,COPY, andADDinstruction creates a filesystem snapshot. That's not a metaphor. Docker literally takes a diff of the filesystem before and after each instruction and stores it as a compressed tar layer. Metadata instructions (ENV,EXPOSE,CMD,USER,LABEL) don't touch the filesystem; they just attach metadata to the image and appear as zero-byte entries indocker history.This means the order of your instructions isn't just a style preference. It's an architecture decision. Reorder your instructions and build time changes by 10x. Put your
COPY . .in the wrong place and you invalidate your entire cache on every single commit. Put aRUN rm -rf /tmp/buildafter aRUN make installand the deleted files still exist in the previous layer (they're just marked as deleted in the new one, and the image doesn't shrink).Once you internalize that a Dockerfile is a sequence of filesystem snapshots, not a shell script, everything about Docker image optimization clicks into place. Layer ordering, cache invalidation, multi-stage builds,
.dockerignore: they're all consequences of this one mental model.
7. Quick Reference #
Core Dockerfile Instructions #
| Instruction | What It Actually Does |
|---|---|
FROM | Chooses the starting filesystem |
WORKDIR | Sets (and creates) the working directory |
COPY | Adds files; order determines cache strategy |
RUN | Executes a command, snapshots the result |
EXPOSE | Metadata only, documents the port |
USER | Switches to non-root; set this before COPY so files get the right ownership |
CMD | Default process; shell form is simpler, exec form ["..."] gives direct signal handling |
ENTRYPOINT | Fixed executable; CMD becomes its arguments |
ENV | Sets env vars that persist to runtime |
HEALTHCHECK | Tells Docker how to verify the app is alive |
Build Commands You'll Actually Use #
docker build -t myapp .                     # standard build
docker build --no-cache -t myapp .          # force full rebuild
docker build -f Dockerfile.prod -t myapp .  # use a specific Dockerfile
docker init                                 # generate a production Dockerfile
docker history myapp                        # inspect layer sizes
docker debug mycontainer                    # shell into anything (Docker Desktop, paid sub)
The Cache Rule #
Things that change RARELY   ->  top of Dockerfile    ->  cached forever
Things that change SOMETIMES ->  middle               ->  cached usually
Things that change OFTEN     ->  bottom               ->  rebuilt quickly
What's Next: Day 4 #
You can now build production images that are small, secure, and fast to rebuild. But containers are ephemeral. When they stop, their writable layer vanishes. Your database, your uploads, your logs: gone.
On Day 4: Docker Volumes & Persistent Storage, we tackle the hard problem: making data survive container death. Volumes, bind mounts, named volumes, and the patterns that keep your data safe when everything else is disposable.
See you tomorrow.
Get new posts in your inbox.
Spotted a typo or want to improve this post? Edit on GitHub →