


Nowadays, Kubernetes is the most popular orchestration tool. So, have you ever wanted to become acquainted with its components, commands, or other related information?
Simply you just need a platform to play around with Kubernetes.
There are numerous platforms for playing around with Kubernetes clusters. Kubeadm, Kops (Kubernetes Operations), Minikube, and Killercoda are a few examples. However, as far as I can tell, those options have limitations. These clusters/environments are either temporary (killercoda) or you can only create a single control-plane node with a single etcd database running on it (kubeadm) or you get only a single node cluster (minikube) or you must pay for what you consume.
What if we could create a highly available k8s cluster locally for development and testing? Which is permanent and does not require payment. That's fantastic, isn't it? Furthermore, if the cluster configuration procedure is simple?

Yes, we are talking about KinD (Kubernetes in Docker). It is a tool for running local Kubernetes clusters using Docker container “nodes”. Kind was primarily designed for testing Kubernetes itself but may be used for local development or CI.
We discuss more about KinD in detail in this article, including how to use it to create single-node, multi-node, and multiple nodes clusters, as well as how to deploy an application to your kind cluster.
What is KinD?
KinD (Kubernetes in Docker) is a simple tool with several powerful and unique features that make it easier to run local Kubernetes clusters. Kind is a Kubernetes SIGs project that is quite distinct from minikube. It encapsulates the cluster in Docker containers. This results in a substantially faster starting time as compared to running a VM.
With Kind, it is easy to spin up a local Kubernetes cluster within Docker Desktop. The Kind runs as a container by itself.
Kind documentation is easy and straightforward to understand, for more details and understanding refer this.
Installation of KinD
Pre-Requisites
- Install Docker - You must have docker installed and running in your system. If not, you can get it from here as per your OS.
Install Kubectl (optional) - kind does not require kubectl, but you will not be able to perform some of the examples without it.
Follow this documentation to install and set up kubectl.
Install KinD
On macOS
Via Homebrew:
brew install kindVia MacPorts:
sudo port selfupdate && sudo port install kindFrom Release Binaries:
  # for Intel Macs
  [ $(uname -m) = x86_64 ]&& curl -Lo ./kind https://kind.sigs.k8s.io/dl/v0.17.0/kind-darwin-amd64
  # for M1 / ARM Macs
  [ $(uname -m) = arm64 ] && curl -Lo ./kind https://kind.sigs.k8s.io/dl/v0.17.0/kind-darwin-arm64
  chmod +x ./kind
  mv ./kind /some-dir-in-your-PATH/kind
On Linux
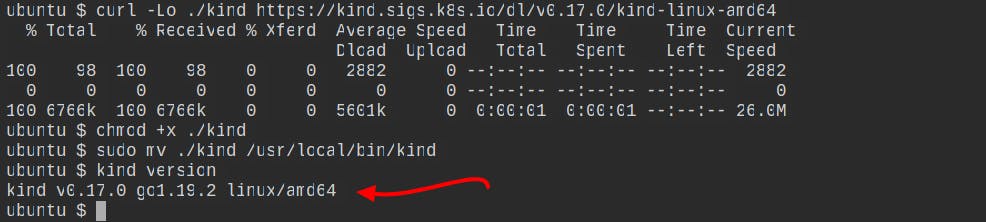
 curl -Lo ./kind https://kind.sigs.k8s.io/dl/v0.17.0/kind-linux-amd64
 chmod +x ./kind
 sudo mv ./kind /usr/local/bin/kind
On Windows
Via Chocolatey:
choco install kindFrom Release Binaries:
  curl.exe -Lo kind-windows-amd64.exe https://kind.sigs.k8s.io/dl/v0.17.0/kind-windows-amd64
  Move-Item .\kind-windows-amd64.exe c:\some-dir-in-your-PATH\kind.exe
To see if KIND is installed on your system, you can use the command
kind versionto see what version of KIND is installed.
Creating Cluster
Creating Single-node Cluster
Create a single-node cluster without any config file. Just use the below command:
kind create cluster
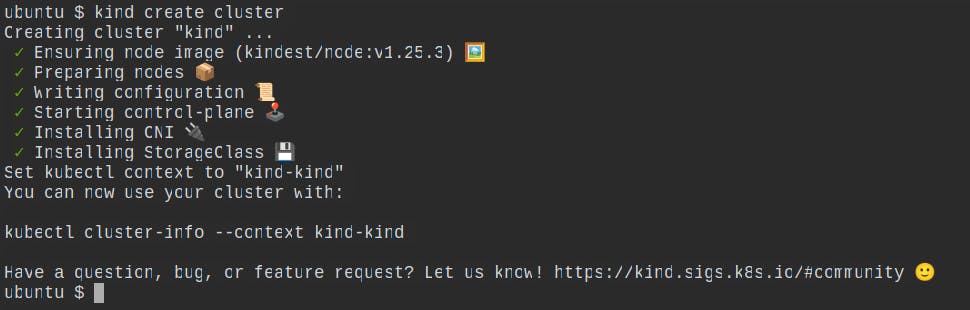
This will use a pre-built node image to bootstrap a Kubernetes cluster. Prebuilt images are hosted atkindest/node.
You can use the command
kubectl get nodesto vaidate that your single-node cluster is running correctly.

Cluster Configurations
By default, the cluster access configuration is stored in ${HOME}/.kube/config if $KUBECONFIG environment variable is not set.
You can access the config file by using the command
less ~/.kube/config
To get the api server to which we are going to interact for connecting to our kubernetes cluster, we can use the command
grep server ~/.kube/config


Changing node image:
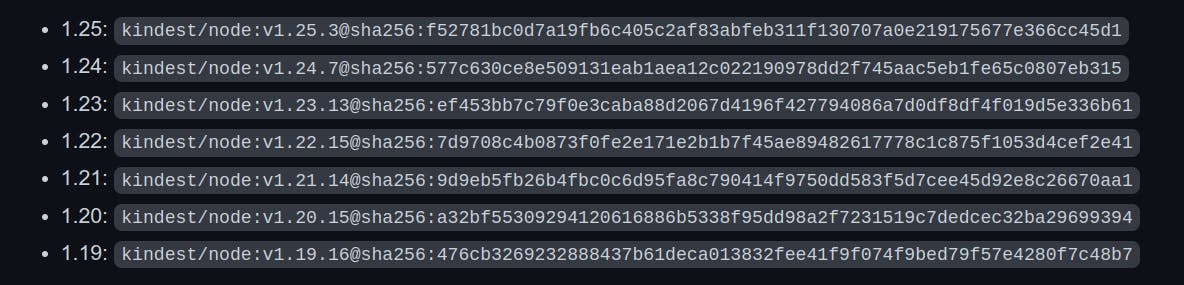
To specify another image use the --image flag – kind create cluster --image=....
kind create cluster --image kindest/node:v1.24.7@sha256:577c630ce8e509131eab1aea12c022190978dd2f745aac5eb1fe65c0807eb315
Using a different image allows you to change the Kubernetes version of the created cluster. Every version of kind supports the specific list of versions of Kubernetes, you can see the list of supported versions of Kubernetes from the release page.
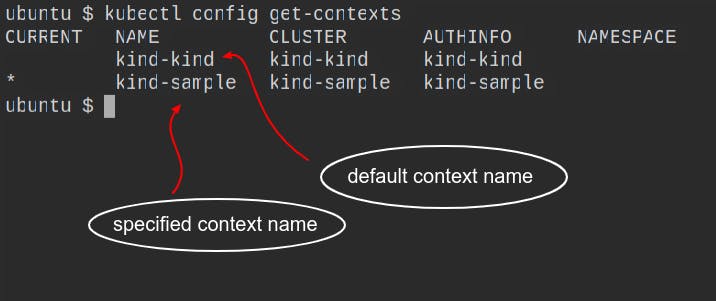
Changing cluster context name:
By default, the cluster will be given the name kind. Use the --name flag to assign the cluster a different context name.
kind create cluster --name sample
You can use the command kubectl config get-contexts to list the currently active clusters.
To switch between different cluster, you can use
kubectl config use-context <cluster-name>
Interacting with the cluster:
After creating a cluster, you can use kubectl to interact with the cluster created by kind.
#for default
kubectl cluster-info

#for cluster having specified context name
kubectl cluster-info --context <context-name>

You can list all the active clusters by using the command
kind get clusters.
Creating Multi-node Cluster
To create a multi-node kind-cluster environment use the config file given below.
# this config file contains all config fields with comments
# NOTE: this is not a particularly useful config file
kind: Cluster
apiVersion: kind.x-k8s.io/v1alpha4
# patch the generated kubeadm config with some extra settings
kubeadmConfigPatches:
- |
  apiVersion: kubelet.config.k8s.io/v1beta1
  kind: KubeletConfiguration
  evictionHard:
    nodefs.available: "0%"
# patch it further using a JSON 6902 patch
kubeadmConfigPatchesJSON6902:
- group: kubeadm.k8s.io
  version: v1beta3
  kind: ClusterConfiguration
  patch: |
    - op: add
      path: /apiServer/certSANs/-
      value: my-hostname
# 2 control plane node and 2 workers
nodes:
# the control plane node config
- role: control-plane
- role: control-plane
# the two workers
- role: worker
- role: worker
In this config file, we are creating a multi-node cluster with two control planes and 2 worker nodes, you can create more according to your requirements.
Save the above config file as
example-config.yaml.
You can create a cluster using a pre-defined config file by using the command kind create cluster --config <file name> .
kind create cluster --config example-config.yaml
You can validate the multi-node clusters created by running the command kubectl get nodes to ensure that all nodes are running correctly.

To list all the running containers you can run docker ps .

By running the command
grep server ~/.kube/config, we can see that this server is the same askind-external-load-balanceri.e. we are connecting withkind-external-load-balancer, which will directly communicate with other master nodes.

Deleting Cluster
You can delete the cluster by using the command given below:
#for default clusters
kind delete cluster

#for cluster having different context name
kind delete cluster --name <context-name>
Dynamic Volume Provisioning
Dynamic Volume Provisioning in Kubernetes is a mechanism that allows storage volumes to be created on demand. To accomplish this, Kubernetes Cluster employs the Storage class concept, which abstracts the details of the underlying storage. Cluster administrators must manually call their cloud or storage provider and then create Persistent Volume objects in Kubernetes without dynamic provisioning.
Kind comes with a pre-configured default Storage Class when you create the kind cluster. To see the list of available storage classes, use the command
kubectl get sc.
WaitforFirstConsumer indicates that pvc(persistent volume claim) will not be bound until it is attached to a pod.

Now, create a PVC file by using the given below code.
# local path provisioner only supports readwriteonce
apiVersion: v1
kind: PersistentVolumeClaim
metadata:
  name: pvc-test
spec:
  storageClassName: standard
  accessModes:
    - ReadWriteOnce
  resources:
    requests:
      storage: 500Mi
Save this file as
pvc.yamland run the following command to create a persistent volume claim from this pvc. yaml file:kubectl create -f pvc.yaml
Create another yaml file for the busybox pod by using the given below code and save it as busybox.yaml.
apiVersion: v1
kind: Pod
metadata:
  name: busybox
spec:
  volumes:
  - name: host-volume
    persistentVolumeClaim:
      claimName: pvc-test
  containers:
  - image: busybox
    name: busybox
    command: ["/bin/sh"]
    args: ["-c", "sleep 600"]
    volumeMounts:
    - name: host-volume
      mountPath: /mydata
Run the following command to create a pod:
kubectl create-f busybox.yaml
Run the following commands to validate the persistent volume or persistent volume claim created, and to check whether the pod is running or not:
kubectl get pv,pvc

kubectl get pods


Now we've actually built a multi-node pvc-backed cluster and mounted it on busybox.
You must expose your service after it has been deployed to Kubernetes so that your users can access it. The cluster can be accessed from outside in three ways: ingress, load balancer, and node port.
Exporting Cluster Logs
kind has the ability to export all kind related logs for you to explore.
#To export all logs from the default cluster (context name kind):
kind export logs

#Like all other commands, if you want to perform the action on a cluster with a different context name use the --name flag.
kind export logs --name <context-name>

As you can see, kind put all of the cluster logs in a temporary directory. If you want to specify a location, simply follow the command with the path to the directory:

The structure of the logs will look more or less like this:
├── docker-info.txt
├── kind-version.txt
├── kind-worker
    ├── containers
    ├── alternatives.log
    ├── containerd.log
    ├── images.log
    ├── serial.log
    ├── docker.log
    ├── inspect.json
    ├── journal.log
    ├── kubelet.log
    ├── kubernetes-version.txt
    └── pods/
├── kind-worker2
├── kind-control-plane
└── kind-control-plane2/
    ├── containers
    ├── alternatives.log
    ├── containerd.log
    ├── images.log
    ├── serial.log
    ├── docker.log
    ├── inspect.json
    ├── journal.log
    ├── kubelet.log
    ├── kubernetes-version.txt
    └── pods/
Deploying an Application
You can use the kubectl command-line tool to deploy an application to your KinD cluster. Create a deployment definition file that contains the specifics of your application. An example deployment definition file for a simple Nginx web server is provided below:
apiVersion: apps/v1
kind: Deployment
metadata:
  name: nginx-deployment
spec:
  replicas: 3
  selector:
    matchLabels:
      app: nginx
  template:
    metadata:
      labels:
        app: nginx
    spec:
      containers:
      - name: nginx
        image: nginx:1.19
        ports:
        - containerPort: 80
Save this file as nginx-deployment.yaml and then run the following command to create the deployment:
kubectl apply -f nginx-deployment.yaml
This command will create a deployment with three Nginx web server replicas.
To connect to the web server, you must first create a service that exposes the deployment. The following service definition file can be used to create a service:
apiVersion: v1
kind: Service
metadata:
  name: nginx-service
spec:
  selector:
    app: nginx
  ports:
  - name: http
    port: 80
    targetPort: 80
  type: ClusterIP
Save this file as nginx-service.yaml and then run the following command to create the service:
kubectl apply -f nginx-service.yaml
This command will create a ClusterIP service, which will expose the Nginx web server deployment.
To obtain the IP address of the service, use the kubectl get services command. You can access the Nginx web server once you have the IP address by opening a web browser and navigating to http://<service-ip>:80.
Conclusion
There we are at the end, this blog covered how to set up a multi-node KinD cluster, including how to install KinD, configure the cluster, and deploy an application to the cluster. KinD is a useful tool for testing and development because it allows you to set up and manage a local Kubernetes cluster. KinD allows you to experiment with various configurations and deploy a wide range of applications, making it a valuable tool for any Kubernetes developer.
Don't forget to like and share this blog if you liked it. Connect with me on Twitter for getting updates on more such blogs.
THANKS FOR READING !!😁✌️
Follow Kubesimplify on Hashnode, Twitter and Linkedin. Join our Discord server to learn with us.