Understanding the Architecture of Kubernetes: A Beginner's Guide
Kubernetes is a powerful container orchestration system that has taken the world of cloud computing by storm. With its ability to manage and scale…

Kubernetes is a powerful container orchestration system that has taken the world of cloud computing by storm. With its ability to manage and scale containers across multiple hosts, Kubernetes has become the go-to platform for running containerized applications in production. In this blog post, we'll take a closer look at the architecture of Kubernetes and how it works to manage and scale containerized applications.
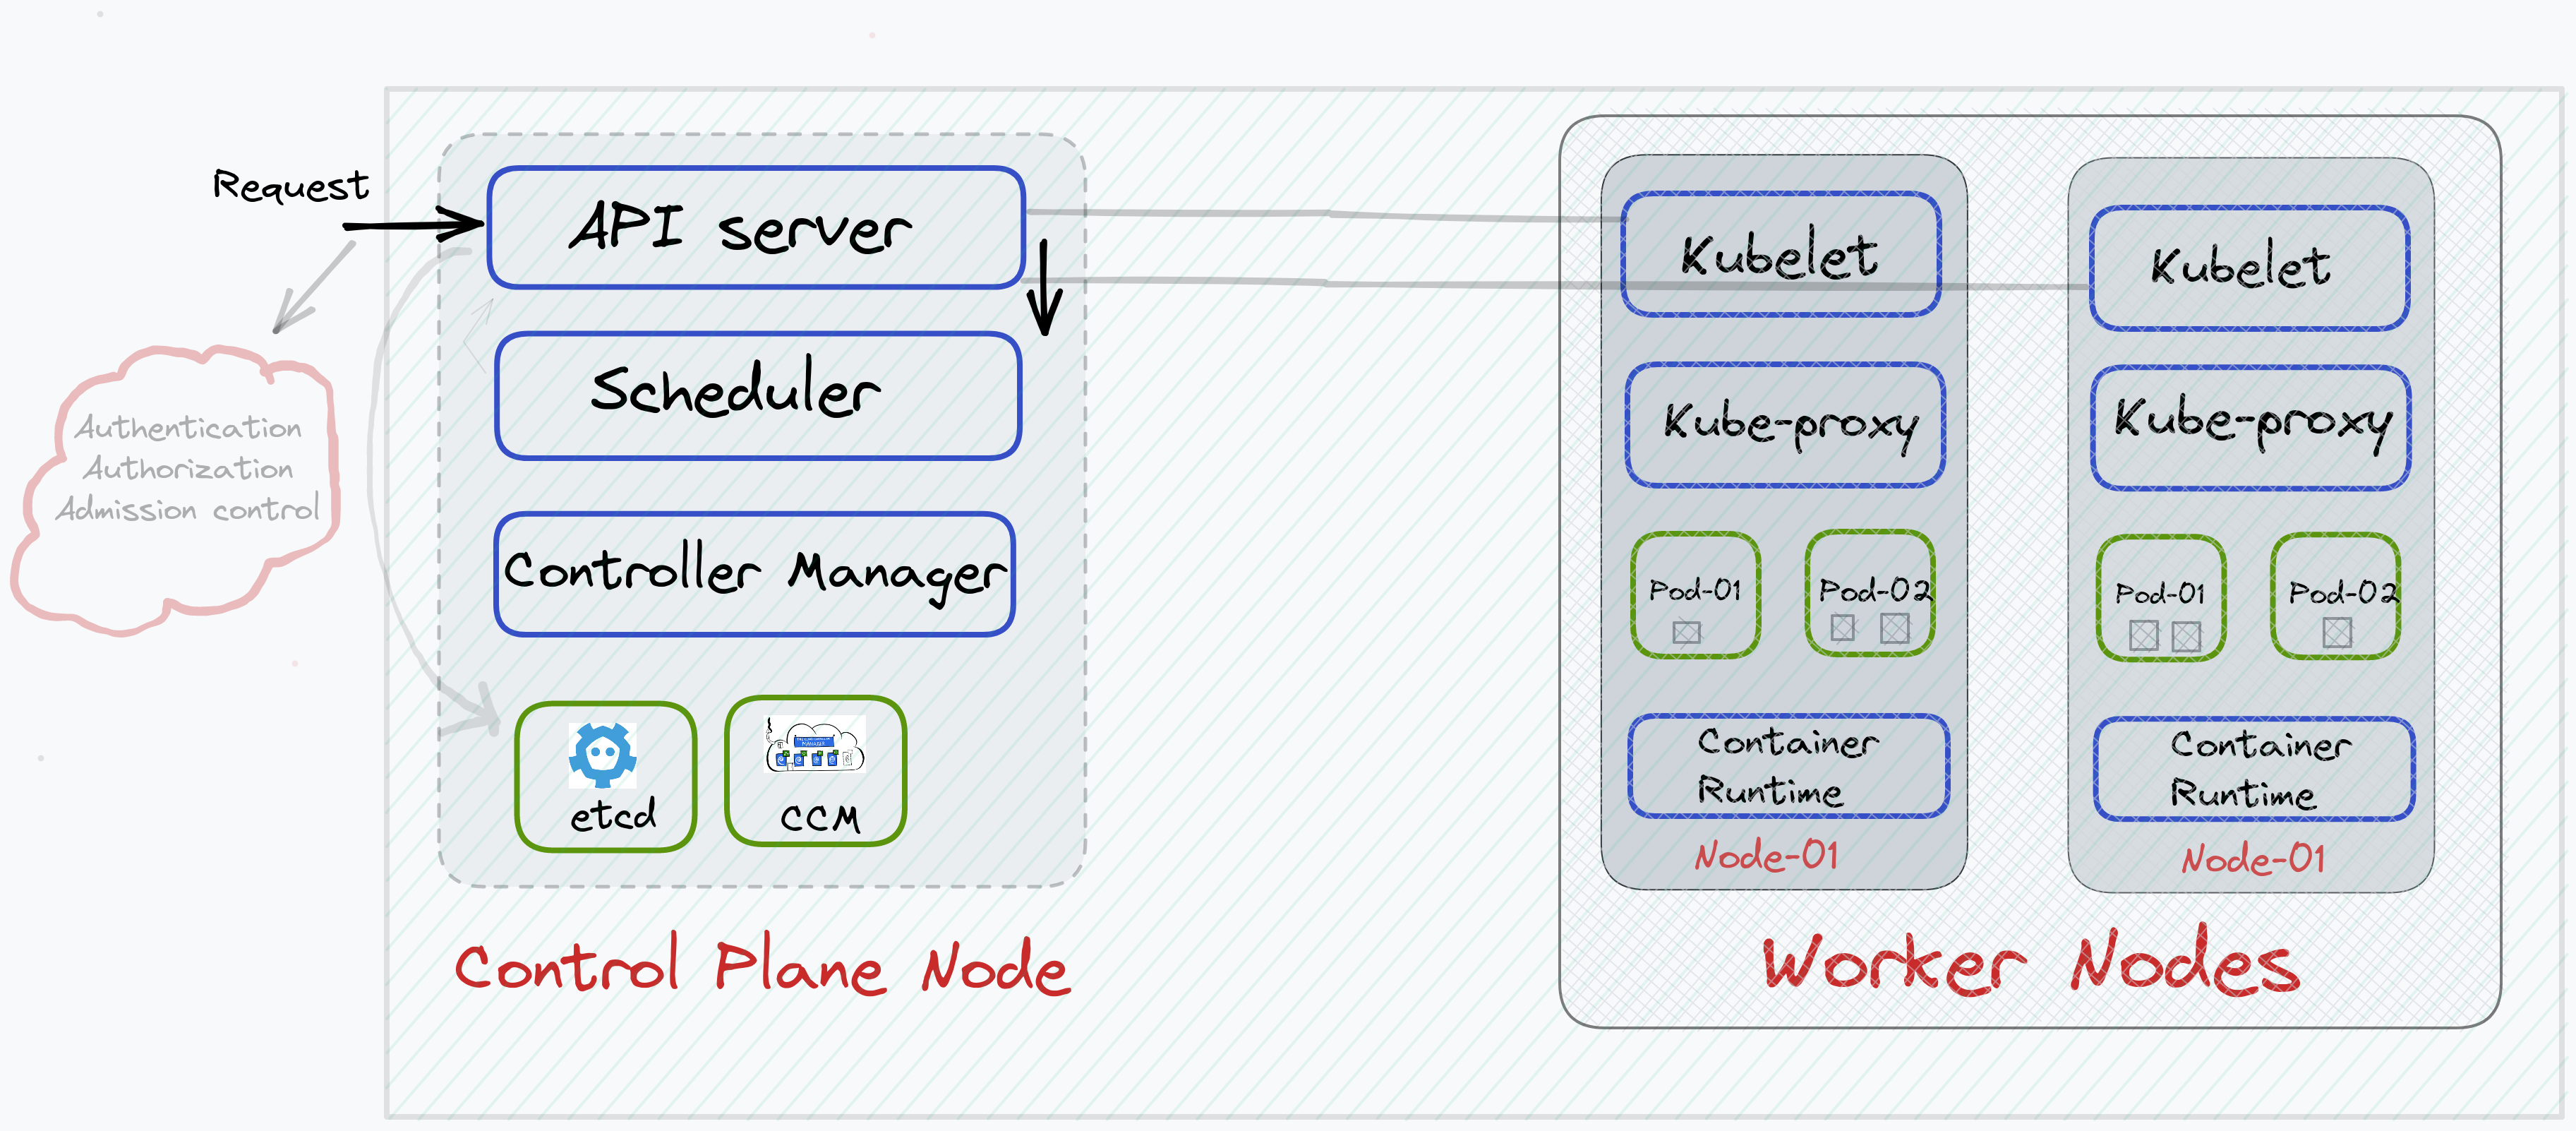
Take a closer look at the below diagram (especially the arrows & lines). We'll take a closer look at what these arrows represent, what is an API server, what is the line that is pointing to the API server from Kubelet, what is the difference between the control plane & worker node, why is there a need for a control plane and many more such questions shall be entirely answered by the end of this blog.
Before understanding the architecture, let's first look at the terminologies used widely in the Kubernetes ecosystem.
-
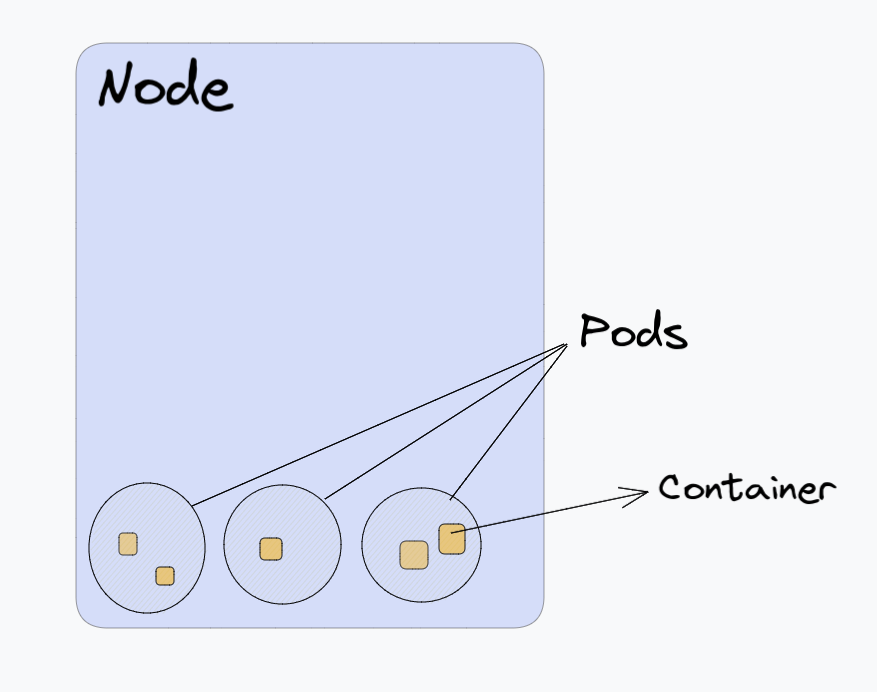
Node: A Node in Kubernetes is a representation of a single machine in your Kubernetes cluster. In production, a node will most likely be a physical machine at a data center or a virtual machine hosted on the cloud.
-
Pods: Kubernetes does not run containers directly. Instead, it runs containers inside a spherical body called Pods.
-
Inside your Node, runs the pod. Inside your Pod, runs the containers. Inside your container, runs the application.
Cluster: It is a group of nodes, both physical & virtual, which is used to run the containerized application.
-
Let's suppose I've 3 nodes that are used to run a containerized application. The grouping of all these nodes to create a more powerful machine is what we call a cluster.
Let's try to understand the architecture of Kubernetes - what is happening behind the scenes?
Look at the above image carefully. We've grouped three nodes (1 Control plane & 2 worker nodes) which is called a Kubernetes cluster. You can create as many nodes as you wish, depending on the application requirement.
In any Kubernetes cluster, two types of nodes are present:
-
One or more Control Plane nodes (also called a Master node)
-
One or more Worker nodes
Now if you look above, you'll find that each node is having some components associated with it. The Control Plane node has some components such as API server, Scheduler, etc. whereas Worker nodes have some components such as kubelet, kube-proxy, etc. We'll take a look at the role of each component in a specific node.
The worker nodes are responsible for running your application (as you can see pods are present inside the worker node) whereas the control plane node is responsible for managing your cluster operations such as starting the cluster, adding new nodes to the cluster, removing pods, scaling pods and much more.
Hence without a control plane node, your Kubernetes cluster won't work. It is important to keep the control plane running at all costs.
Let's understand the usage of each component of the control plane
-
API Server: This is the brain behind all the operations in a Kubernetes cluster. To interact with the cluster, all the requests are sent to the API server. The API Server intercepts RESTful calls from users, administrators, developers, operators, and external agents, then validates and processes them. Whenever a request has been sent to the API server by the user, the API server performs three tasks:
-
Authentication: Authenticates the user
-
Authorization: Authorizes the request made by the authenticated user (using RBAC)
-
Admission control policy: applies certain rules on Pods to run
-
-
Scheduler: The main role of the scheduler is to assign the pods to the nodes. Let's suppose, you request the API server via the command line mentioning running a pod (or a container). That request will be received and forwarded to the scheduler after authentication, authorization & admission control policy so that the scheduler can find the best node (worker node) to run a pod inside of it.
The scheduler determines the valid nodes for the placement of a node in the scheduling queue, ranks each node based on resources available and required, and then binds the pod to a specific node.
-
Controller Manager: The controller manager is the component of the Kubernetes control plane node that regulates the state of the Kubernetes cluster by running controllers or operators. Controllers are watch-loop processes that compare the cluster's desired state with the cluster's actual state. But where does this actual state being stored? Etcd store.
Key-Value data store(etcd): All the cluster-related information is stored inside etcd. It is important to note that the application data is not stored in the etcd store. New data is written in the etcd store by appending and not by overriding. Obsolete data (incorrect data) is compacted (or shredded) periodically to minimize the size of the data store. etcd is based on Raft Consensus Algorithm. Remember, when we discussed above, that the scheduler selects a node to run a pod inside of it? Here's the actual process that happens:
-
A request is sent by the client to the API server to run a pod
-
API server validates the user & request
-
The request is passed to the scheduler to select a node.
-
After receiving the request, the scheduler sends a request to the API server to get the cluster-related information like resources available etc.
-
API server is the only component that can read and write data in the etcd store. No other component can connect directly with the etcd store.
-
API server after receiving the information informs the scheduler
-
Based on the information received by the API server, scheduler binds the pod to a node.
Now you might ask me, "Does this mean that pod is running?"
The answer is No.
Till this time, the correct node has been selected on which a pod should run but a Pod is not running yet.
- Cloud Controller Manager(CCM): The CCM is responsible for running the controllers or operators to interact with the underlying infrastructure of a cloud host provider when nodes become unavailable.
Now try to go through these control plane components once again and then move forward.
It's time to understand the usage of each component on the worker node:
A worker node provides an environment to run a containerized application. The components present inside the worker node are:
-
Kubelet
-
kube-proxy
-
container runtime
-
Addons or DNS
-
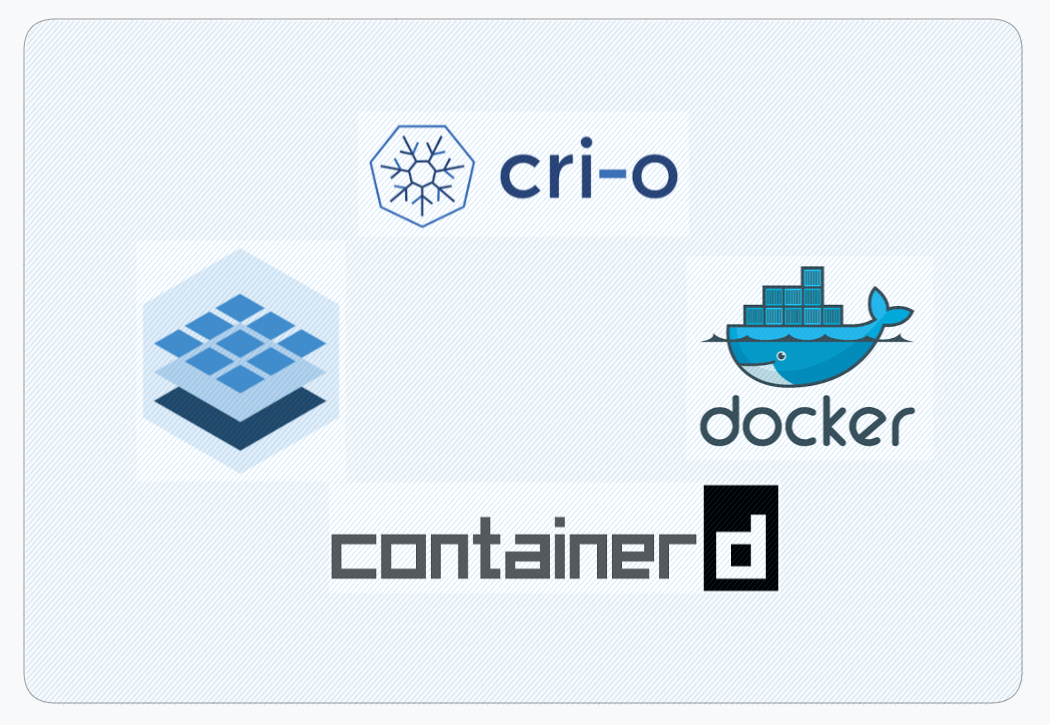
Container runtime: Although Kubernetes is regarded as a “container orchestrating tool” it cannot run containers directly. Hence, a container runtime is needed on a node where a pod is scheduled to manage a container's lifecycle. It is important to note that container runtime are present on both nodes - the control plane and worker. Kubernetes supports several container runtimes, which are mentioned below:
-
CRI-O
-
containerd
-
Docker
-
Mirantis Container Runtime
-
-
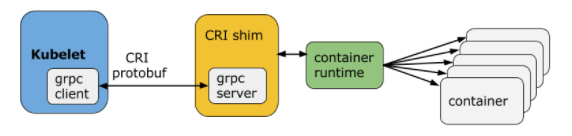
Kubelet: Like container runtime, kubelet is present on both the nodes - the control plane and the worker node. To run a pod that is present on a worker node, there should be some component that must communicate with the control plane to run a pod. Kubelet is that component. The Kubelet of each node interacts with the control plane and waits for the order from the API server to run a Pod. Once the kubelet of a node receives the orders from the API server, it interacts with the container runtime of its node through a plugin-based interface (CRI shim). Hence, a pod starts running now.
In case you got confused, here's the summary of the internal working of Kubernetes components: Don't miss this!
-
The user sends a request to the API server to start a Pod
kubectl run <pod-name> --image=<image-name> -
This request is now being validated by the API server.
-
API server forwards this request to the scheduler on the control plane.
-
In return, Scheduler requests cluster-related information from the API server since API server is the only component that can interact with etcd store.
-
API after receiving this request from the scheduler reads the data from the etcd store and provides it to the scheduler.
-
The scheduler after receiving the information assigns a pod to a node based on the information and conveys this message to the API server.
"Hey API server, the pod should run on node-01"
- scheduler
-
API server assigns a specific node's kubelet to start a pod.
-
On receiving the orders from the API server, kubelet of that node interacts with the container runtime via CRI shim and now a pod has started running on a specific node. While the Pod is running, the controller manager checks whether the desired state of the cluster is in matches the actual state of the Kubernetes cluster.
Now, you might ask me what is the role of kube-proxy & addons?
Kube-proxy (runs on each node) is responsible for networking rules in a cluster. For eg.
-
Container-to-container communication inside Pods
-
Pod-to-Pod communication on the same node and across cluster nodes
-
Pod-to-Service communication within the same namespace and across cluster namespaces
-
External-to-Service communication for clients to access applications in a cluster.
Addons are cluster features that are implemented through 3rd-party pods and services. For eg., a Dashboard is a general-purpose user interface for cluster management via web UI.
Finally, look at the arrows in the topmost image and let me know if you understood what they were referring to.
If you've read up to here, Congratulations!
Feel free to reach out to me on Twitter or LinkedIn.
Follow Kubesimplify on Hashnode, Twitter and LinkedIn. Join our Discord server to learn with us.
Get new posts in your inbox.
Spotted a typo or want to improve this post? Edit on GitHub →