Breaking Down Docker
Docker is the idea behind the container revolution, but how the idea came into play what are the underlying structure used to built up containers.

On this page (9)
Docker is the idea behind the container revolution, but how the idea came into play what are the underlying structure used to built up containers. We are going to the ins and out of the Docker internals in this article. Starting from virtual machines, we will be building our own Docker image and will run the application using Docker compose.
If you are not familiar with any of the mentioned jargons, don't worry, I got your back. By the end of this article, you will get an idea of it or at least some idea so your curiouslty may guide you. I request you not to just read, follow along with the hands-on, so you may get a better understanding of the topics. Let's get started.
Virtual Machines #
As the name suggest, A virtual machine lets you run multiple operating system on your local machine on the top of hypervisor. Let’s first understand what a Hypervisor is.
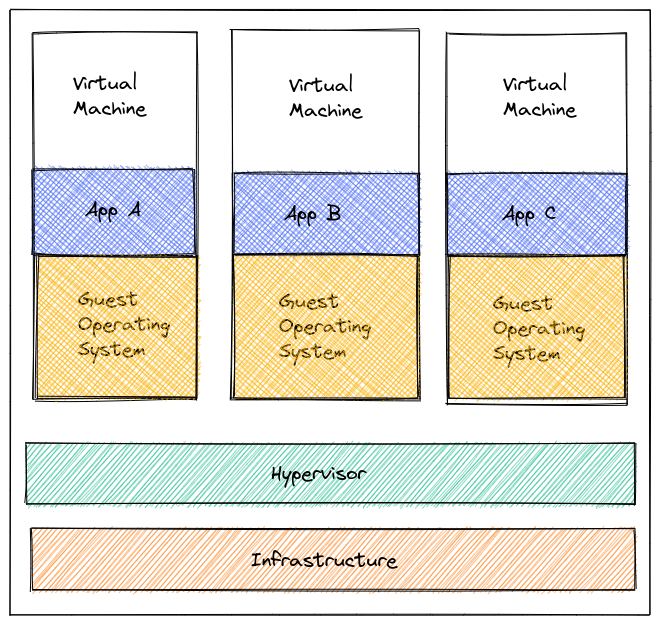
Imagine you have a computer and an operating system, what is the job of operating system? Its job is to create a layer between the hardware and software, same goes with hypervisor in case of virtual machine.
A hypervisor creates a layer between an existing operating system and an environment to run virtual machines. Examples of hypervisors are VmWare and Hyper-V.
In a nutshell Virtual machine virtualises your physical hardware and breaks down your physical machine hardware into slices of hardware. You can run any operating system of your choice in it. Let’s dig deep into containers.
Containers #
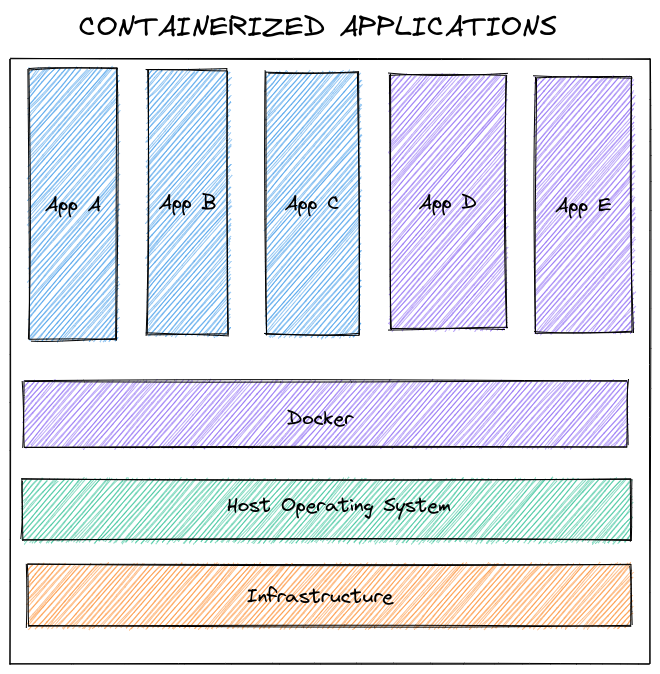
 Containers are lightweight virtual VM, that virtualizes the operating system. A container creates an isolated environment/sandbox (Just like the above image, think of each container as an isolated environment that docker provides) for your operating system, so you can run multiple operating systems isolated with each other. It is like working on virtual machines without the need of it and some added advantage.
Containers consume less space and starts instantly. They are ephemeral in nature, meaning when they die data inside the container are not accessible. One of the examples of container platform is Docker.
Docker is a company that provides the containerization facility. Docker was the Pioneer of the container revolution. Earlier containerization of application was synonymous with Docker, now with the advent of similar platforms it's not the case anymore. Let’s talk more about Docker and what problem it solves.
What problem does Docker solve? #
For an instance imagine Bob, a developer, needs to develop a full stack end to end application using web server (HTTPD), Database(Postgres), messaging(Redis) and orchestration(Ansible). To make sure everything works fine, Bob need to check the compatibility of these tools with the underlying Operating System also with the dependencies and libraries. Sometimes it happens that one service need one version of the library while the other service need some another version of library, so the libraries need to upgraded and the compatibility of the tools need to be checked again and again.
The problem is not that simple as it sounds. It takes a lot of time to setup the development environment, this leads to developer unproductivity and repetition of tasks.
After a while, a new member Chris joined Bob's team, Bob need to ship the application, so Chris can test the app. Chris has to go through the same painful process like Bob did to develop the proper environment. Bob shipped the application, but the app didn't run on the Chris's machine. Bob said, "But it works fine on my machine".
You see, there were a lot of problems in developing an environment and shipping the same application to a different environment. This is not the problem Bob and Chris faces, it is faced by almost every team before the advent of docker.
Docker tries to solve the problem by containerizing and shipping the whole application with all the package, dependencies, libraries included. This way you don't need to worry about anything, just fetch the application using docker container image, and you are good to go. It is almost guaranteed that if an app is running on one machine when Dockerised and shipped will run on any machine.
In the above case, with Docker, Bob can create a container by fetching the prebuilt image of HTTPD, Postgres, Redis and Ansible. That's it! the development environment is created. In case, Bob want to ship the application to Chris, he just needs to Dockerize the whole application and ship it to Chris. The application will be shipped with all the binaries and dependencies included.
Building Block of Docker #
Docker underlying principle is originated from Linux Kernel. Containers are nothing but isolated Linux processes with all the necessities included to run the process in isolation. It is a combination of Kernel namespace, Cgroups and union filesystem. Let’s understand each of them:
Kernel Namespace #
Kernel namespace is a feature by which one set of processes see one set of resources and another set of resources see another/different set of resources. Kernel namespace allows these services to be created in isolation:
- Process trees (PID Namespace)
- Mounts (MNT namespace)
- Network (Network namespace)
- Users / UIDs (User Namespace)
- Hostnames (UTS Namespace)
- Inter Process Communication (IPC Namespace)
Cgroups #
Cgroups accounts for the resources used by processes. It allocates, limits, isolates the resource usage like CPU, Memory, Network etc.
Union File System #
Docker uses the Union file system for building containers to create layers, making them fast and lightweight.
Docker Images #
Docker images are predefined template with instructions of packed application, including its dependencies of what processes will run when launched. There are thousands of images in the dockerhub publicly available. You can fetch and run containers with just few clicks.
 |
|---|
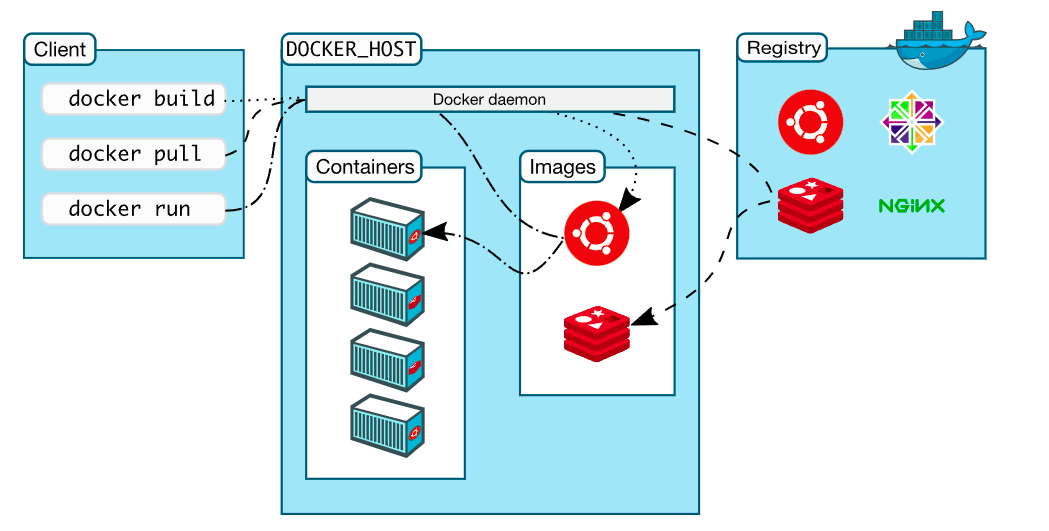
| Image Credits - docs.docker.com |
We interact with Docker daemon via Docker CLI. We send a request to built, pull or run the image. If its locally available Docker Daemon will build a container out of it, if not it will look into its online registry(Dockerhub), fetch it. We will learn about the details of the internals in the next section of this blog.
Let's try fetching image and running a container using Katacoda playground. You can also run the experiment on your local machine if you have Docker installed.
Go on the terminal and type
docker pull nginxThis will pull nginx image from Dockerhub
When the image is pulled, type the below command to run the image
docker run nginxOpen up a new terminal window and type
docker psThis will show up the running processes, In our case, you will see a nginx process running.
Now you can stop the container by typing
docker stop container-IDYaaaaaaay, we fetched an image from docker hub and created a container. Now let’s learn how these things happen internally.
How Docker works internally? #
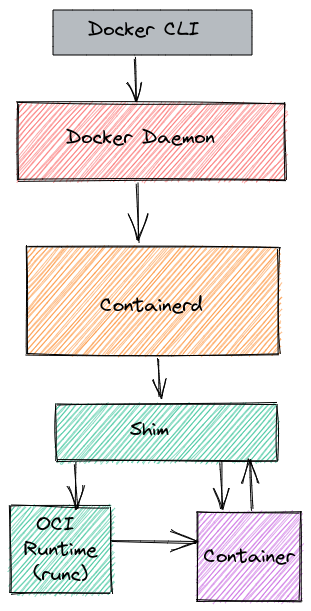
We interact with Docker via Docker CLI. Docker CLI has a bunch of command to interact with Docker Daemon.
Docker Daemon is referred to as the brain of Docker. It performs the command that the client issues like managing images, network, containers and volumes.
Containerd is the high level container runtime, that manages network's namespace. It helps in building the images.
Shim is responsible for all the interaction logic we give to the containers, also it redirects stdin, stdout, stderr to logs. Shim will be present till the state of the container is active, and reports its state to containerd. It detaches the container lifecycle with containerd, in case if you want to update the containerd version it will not affect the running containers.
Before understanding Runc let’s understand OCI (open container initiative). An OCI initiative is a governance structure and a collaborative project by different companies with a goal to establish common and open standards for containers.
Runc is a low level container runtime and is OCI compatible, meaning it will run containers that are OCI compliant. It starts up the container process and then exit.
When we post a request to fetch images, mostly it fetches from DockerHub. Dockerhub is the repository by Docker team for finding, uploading and downloading container images.
There are already some prebuilt image by Docker community and by individual community members, you can also build and push your own Docker image to Dockerhub.
Let's Built an image with Dockerfile #
Dockerfile is the list of instructions listed in a file to assemble and create a Docker image. Lets built a Dockerfile. In the Dockerfile, we will be installing Python on the top of Ubuntu image.
Head over to Katacoda On the terminal, type the below command to make a directory
mkdir dockerHead over to the directory by typing
cd dockerOpen up nano editor and create dockerfile
nano DockerfilePaste the following code
FROM ubuntu:16.04
RUN apt-get update
RUN apt-get install -y python3
LABEL maintainer="Your name "
Save it by pressing ctrl+s
Exit using ctrl+x
Build the image by typing
docker build .Type the below command to check docker images
docker image lsCopy the image-id of the most recent created image and type
docker inspect image-idSee the content and head over to the maintainer section, your name will be there. Yeaaaaaaah, we have built up a docker image using docker file.
Docker Volume #
As we talked earlier, Docker containers are ephemeral, meaning data is not persistent. When the container die, the data can't be accessed.
To solve this problem, we need to make the data persistent and mount it, so it can be accessible anytime. This way, we don't need to rebuild our docker image whenever we do changes in our container.
Docker Volumes is a folder which exist outside the container but in the host machine and can be accessible by container. There are three categories of Docker Volume, let's explore each of them:
Volumes
Volumes are Docker way of assigning the data in the host machine. It will create a path, assign and manage the data itself. With this method, we can't edit the file from outside the container. To use the volume type, the below command
docker run -v volume-name:path-in-container IMAGE_IDYou can use any name and the path of the container you want to link.
Bind Mounts
Bind mount is the same except the fact that you determine the location of the host machine where you want to store the data. Using this method, we can also edit the files from outside the container. To use Bind Mount type:
docker run -v our-machine-path:path-in-container IMAGE_IDTmps Mount
These mounts are stored in the system memory and are temporary. As soon as the container die, the data within it will be wiped out. This type of mount is used by the container during the lifecycle to store not so critical data.
If you have a lot of Data i.e. containers, images, caches which is of no use, type this command and free up some space
docker system pruneDocker Compose #
Remember, we built a Dockerfile earlier in this blog. Dockerfile is used to built up a container by assembling layers of image into a file. What if we want to create multiple container, the usual solution would be to create Dockerfile for each of them and when needed, all of them should be started one by one.
Guess what! We have a better solution. We can run multiple containers as a single service using Docker compose. Let's understand it with an example. To perform the example you need to have Docker in your local machine, you can install it from here.
We will be using WordPress in an isolated environment and a MySQL database connected to it with mount volume. In case, if we shut down the container, it will start back again with data in place. Create a new directory and head over to it.
mkdir wordpress
cd wordpress
create a docker compose file by using
nano docker-compose.yamlpaste the following code into it
version: "3.3"

services:
  db:
    image: mysql:5.7
    volumes:
      - db_data:/var/lib/mysql
    restart: always
    environment:
      MYSQL_ROOT_PASSWORD: somewordpress
      MYSQL_DATABASE: wordpress
      MYSQL_USER: wordpress
      MYSQL_PASSWORD: wordpress

  wordpress:
    depends_on:
      - db
    image: wordpress:latest
    volumes:
      - wordpress_data:/var/www/html
    ports:
      - "8000:80"
    restart: always
    environment:
      WORDPRESS_DB_HOST: db
      WORDPRESS_DB_USER: wordpress
      WORDPRESS_DB_PASSWORD: wordpress
      WORDPRESS_DB_NAME: wordpress
volumes:
  db_data: {}
  wordpress_data: {}
Save and exit the file.
Now, run the docker compose command
docker-compose up -dWait for a while and paste the below link on your web browser
http://localhost:8000You will be able to see WordPress welcome screen on your system. You can enter your details if you want.
To remove the container type
docker-compose downYou can run the container again using docker-compose up command and the application will start with the data you have entered.
We've seen with just a single file, we built an isolated container having WordPress connected with MySQL database. Docker compose provides the ease to run multiple containers with just a single command.
That's a bit about Docker. We learned how to fetch and run an image, create a Dockerfile, running multiple container via Docker compose. If you are curious to learn more about Docker, Docker documentation is a good source to follow.
Get new posts in your inbox.
Spotted a typo or want to improve this post? Edit on GitHub →