Deploy a Maven Project on a Tomcat Server Using Jenkins and AWS
Deploy a Maven Project on a Tomcat Server Using Jenkins and AWS

On this page (11)
- Security Group for Jenkins
- Jenkins Server
- Connect to the Jenkins Server using SSH
- Install Jenkins on your Instance
- Manage some Plugins in Jenkins
- Security Group for Tomcat
- Tomcat Server
- Connect to the Tomcat Server using SSH
- Install Tomcat on your Instance
- Add tomcat credentials to Jenkins
- Create a Job for deploying the Maven Project
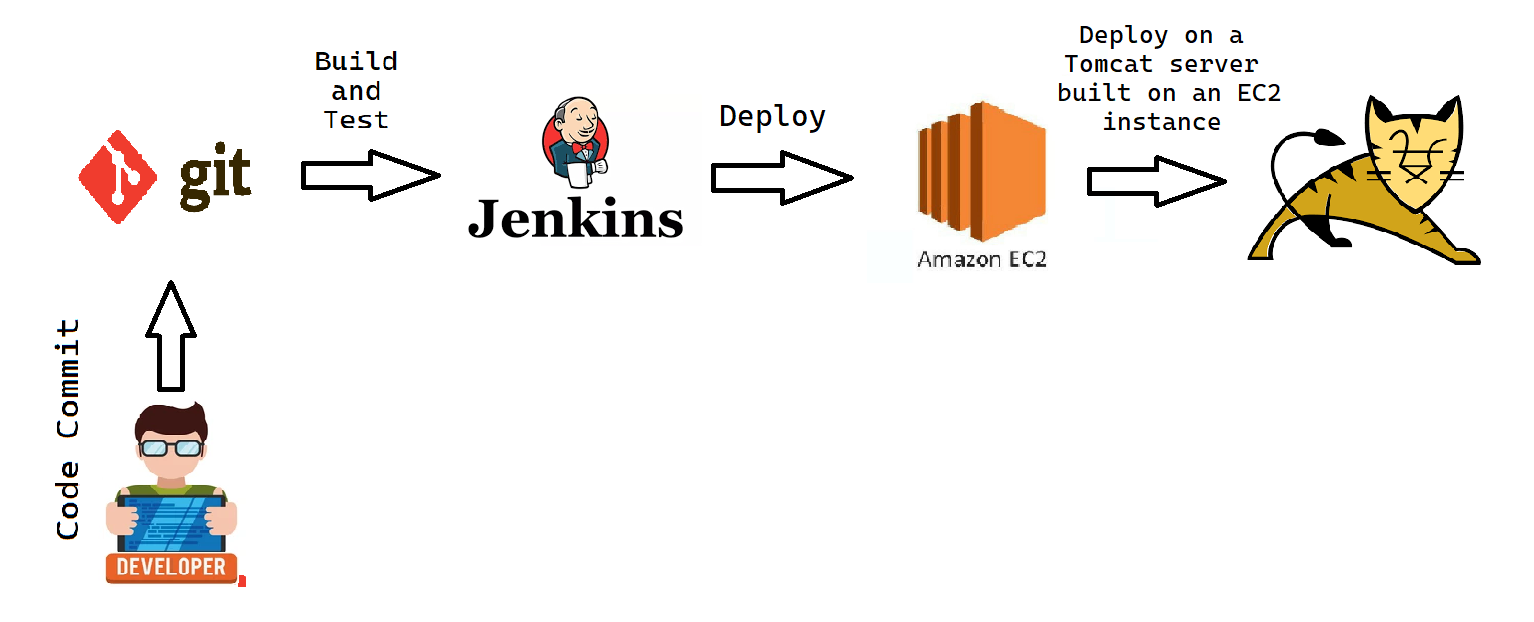
In this blog, we are going to create a simple job that will deploy a Maven project on a tomcat server built on an EC2 instance through Jenkins.
The steps that will be followed for this project are:
-
Create a security group for Jenkins.
-
Set up Jenkins on AWS EC2 instance.
-
Connect to Jenkins instance using SSH.
-
Install Jenkins on the EC2 instance.
-
Manage some Jenkins plugins
-
Create a security group for Tomcat.
-
Set up Tomcat on AWS EC2 instance.
-
Connect to Tomcat instance using SSH.
-
Install Tomcat on the EC2 instance.
-
Create a job for deployment
NOTE: For setting up your AWS account, if you are using it for the first time, you can check out this video https://youtu.be/FRQ9fE4fd5g
Security Group for Jenkins #
-
Go to your AWS Console and sign in as an IAM user.
-
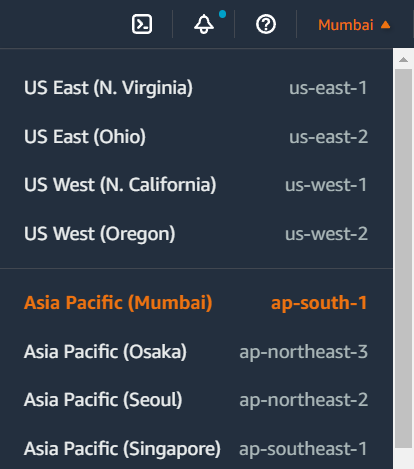
I am choosing the region, ap-south-1 i.e the Mumbai region, which is present in the top right corner of the console, left to your account name.
-
You can select from any of them mentioned.
-
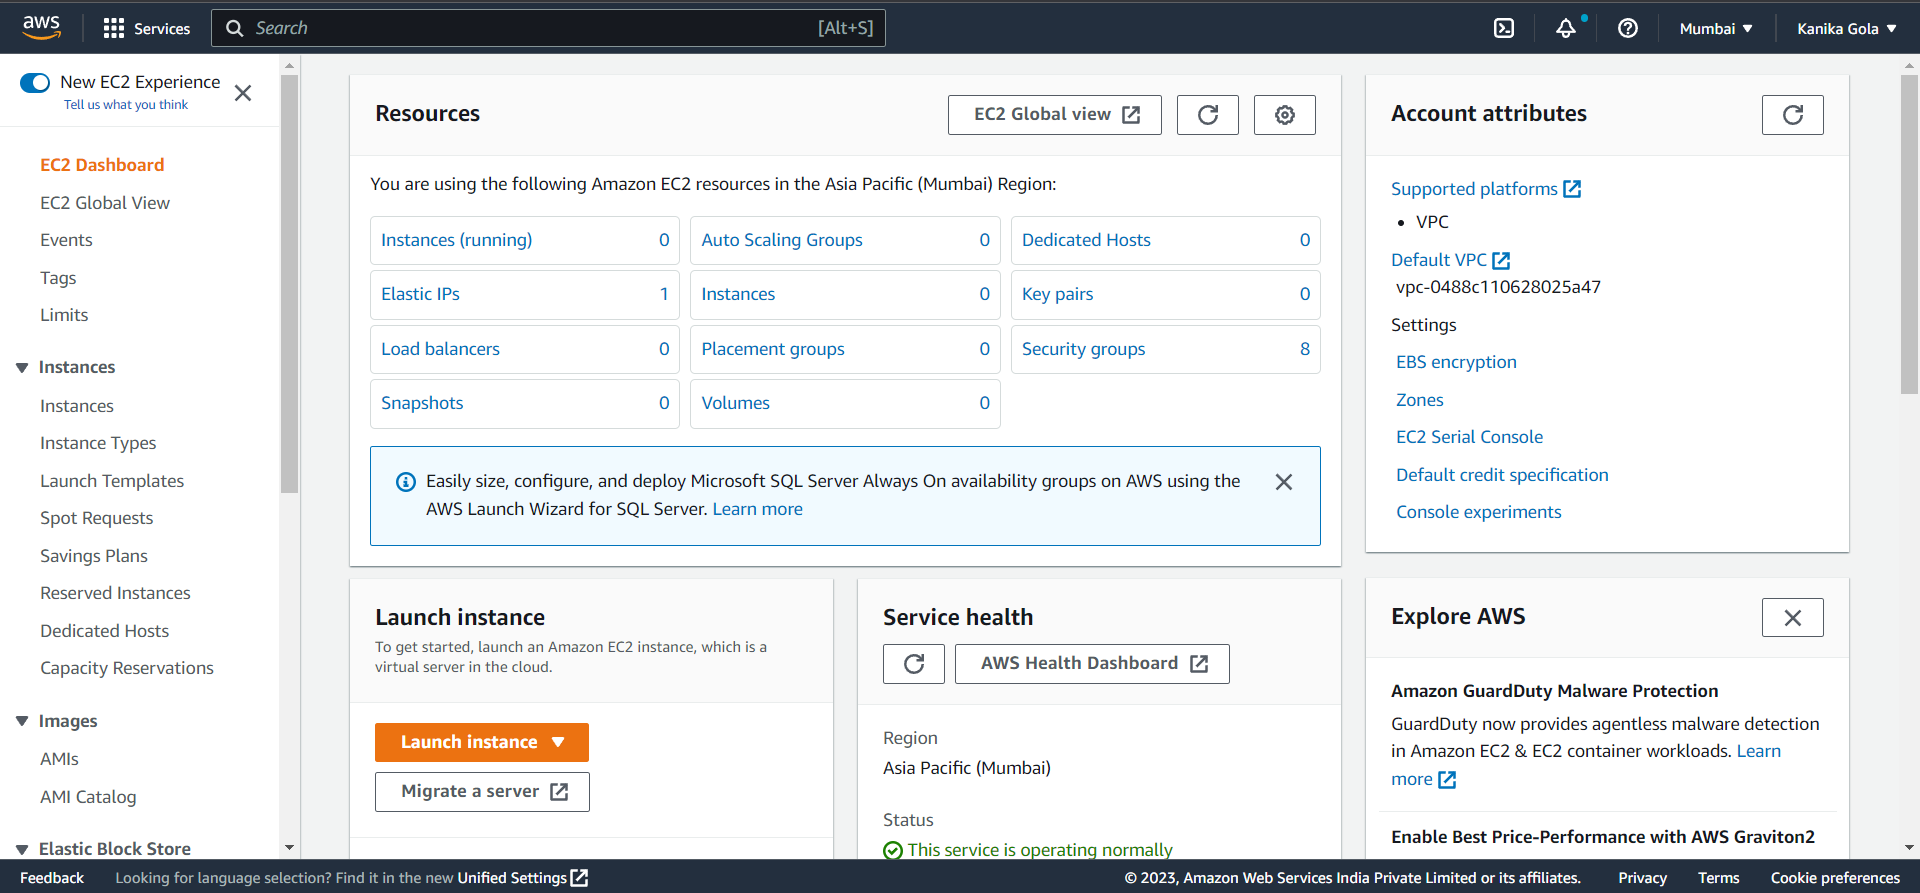
Search for the service EC2 from the search bar.
-
From the left toggle bar, search for “Security Groups”
-
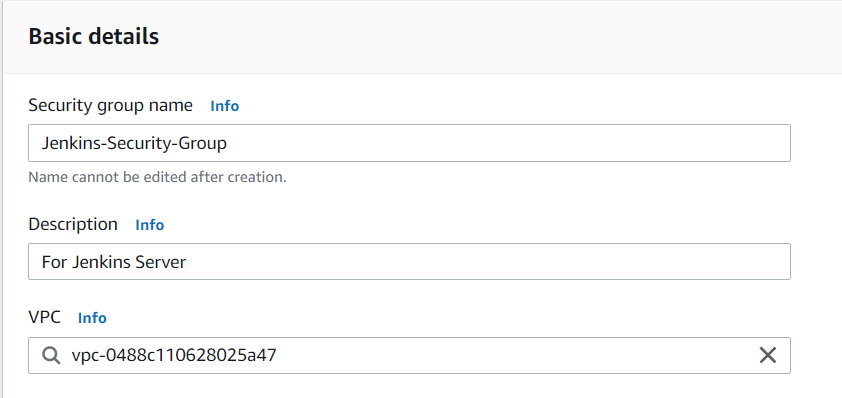
Create a Security Group and name it “Jenkins-Security-Group”
-
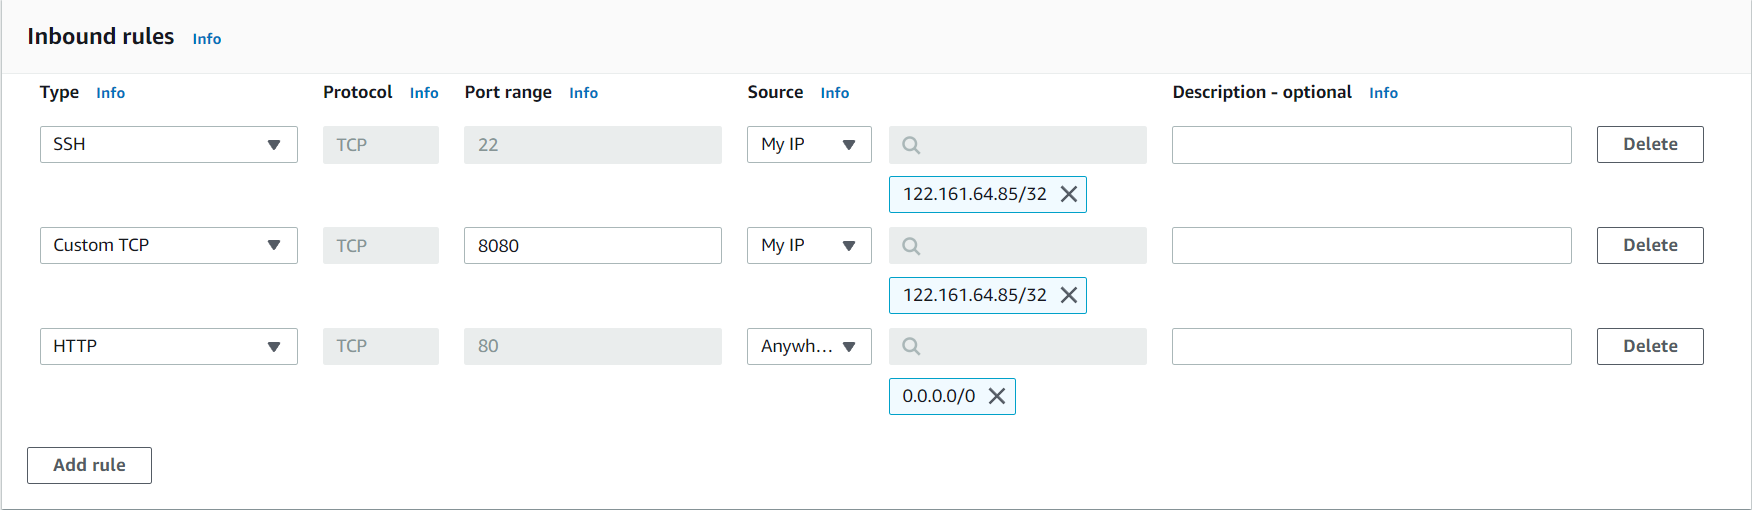
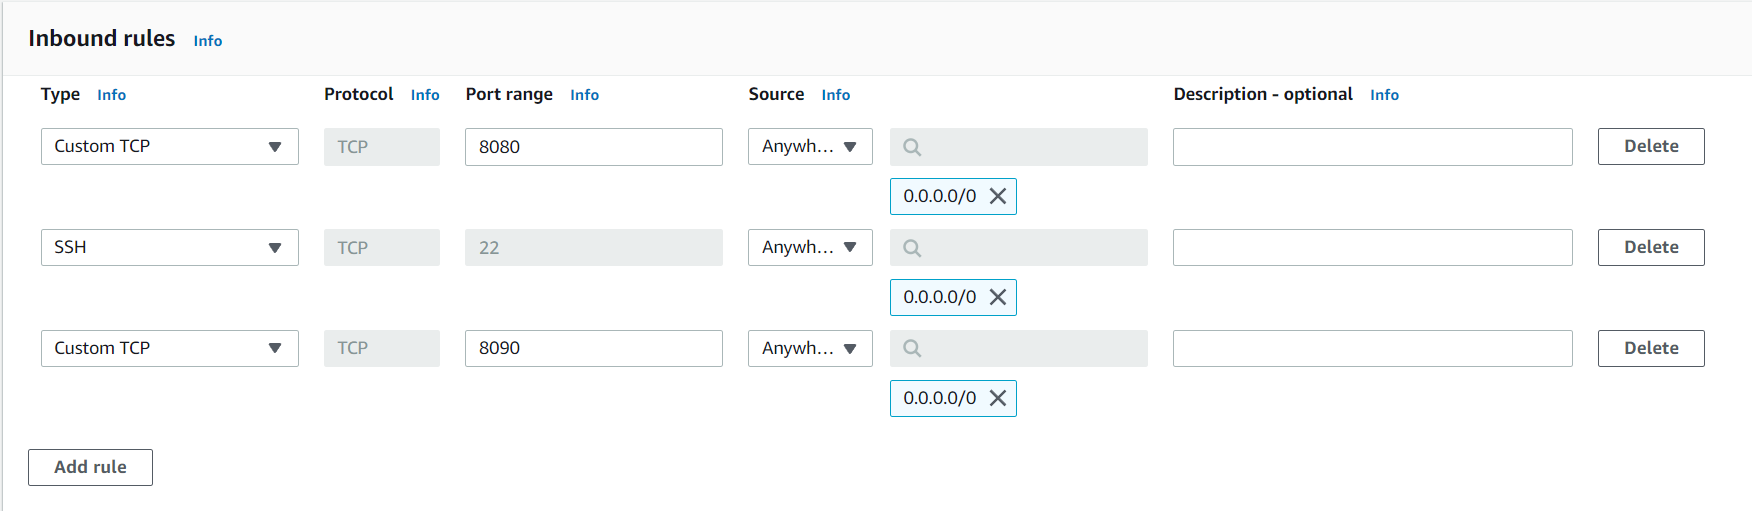
Let's add some Inbound rules
-
First rule: To allow SSH to your EC2 instance, you need to provide this rule by giving your IP i.e., “My IP” so that only you will be allowed to SSH.
-
Second Rule: Next is Custom TCP with Port No. 8080 because our Jenkins server will run on this port.
-
Third Rule: The last one is HTTP with port 80, to give general access to the Internet
-
-
Now go ahead and click on create.
Jenkins Server #
-
Search for the service EC2 from the search bar.
-
Click on 'Instances' from the toggle bar at the left.
-
Now let's launch an instance by clicking on 'Launch instances'
-
Now, enter some details for your instance, name it 'Jenkins-Server'
-
I am opting for Amazon Linux AMI here, you can use Ubuntu, macOS, Windows etc.
-
AMI: An Amazon Machine Image (AMI) is a supported and maintained image provided by AWS that provides the information required to launch an instance.
-
Make sure that the AMI you are opting for, lies in the free tier
-
Choose the size of the instance t3. micro or anything that lies in the free tier.
-
Let's create a key pair for your instance, naming it
Jenkins-Keyand downloading.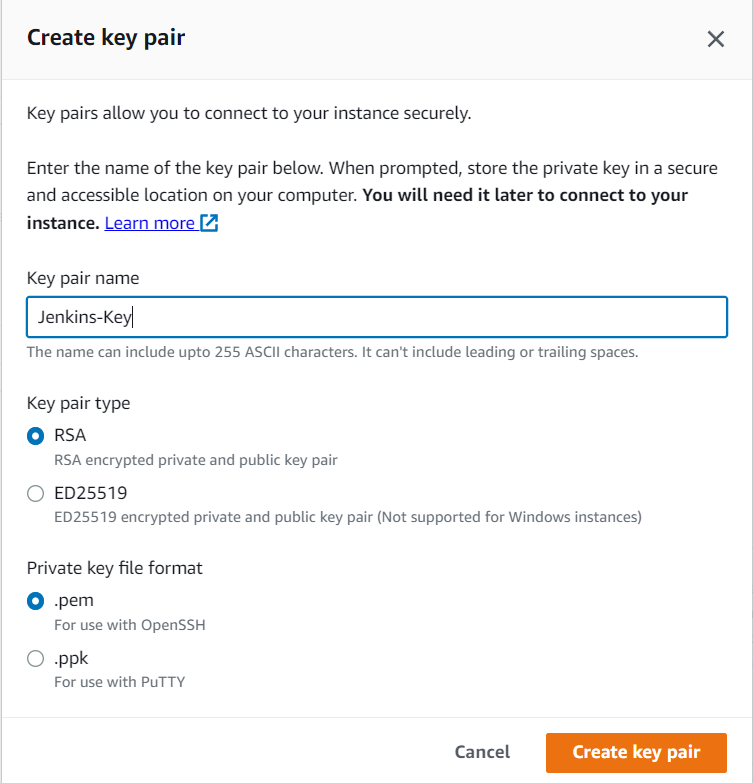
-
Choose ".pem", if you are going to use SSH to connect to your instance, or ".ppk" if you are using putty.
-
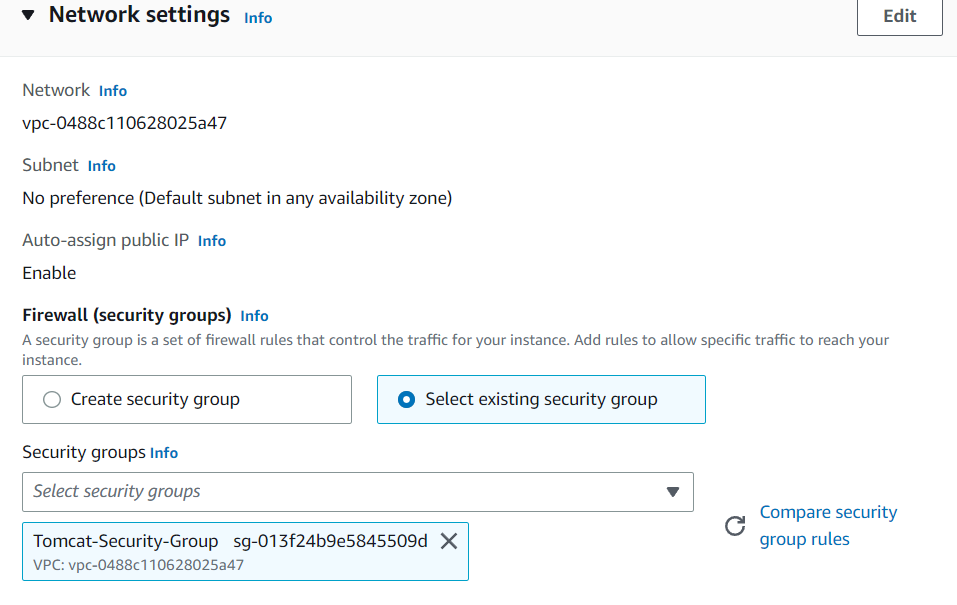
In network settings, select an “Existing Security Group”, which we just created “Jenkins-Security-Group” and then launch the instance.
-
Wait for the Status Check to complete.

Connect to the Jenkins Server using SSH #
-
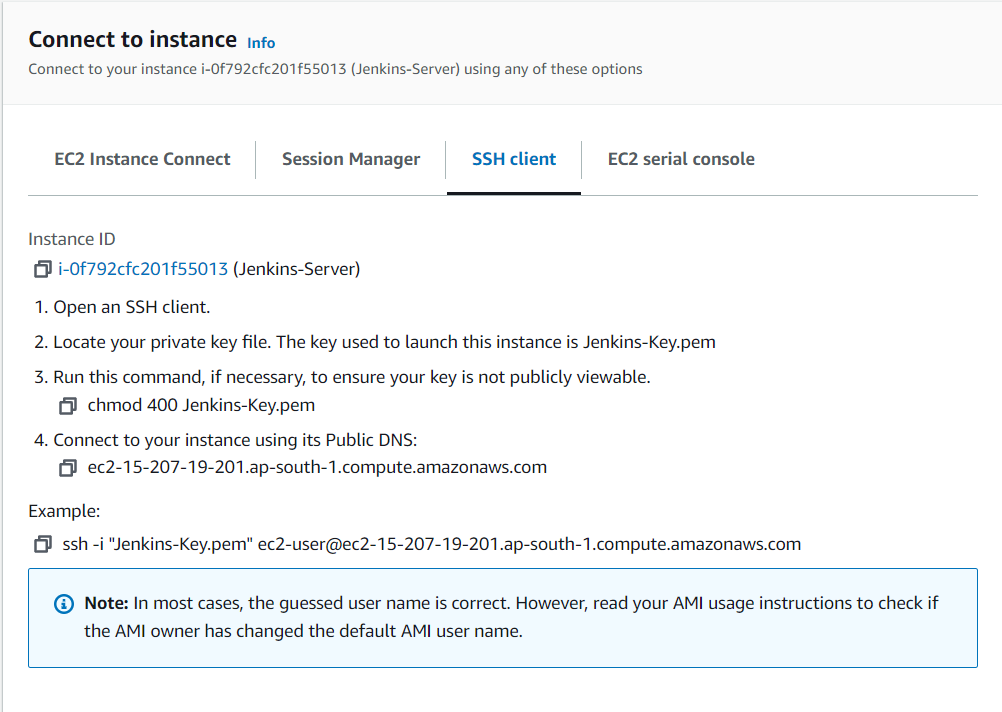
Click on “Connect” and select the “SSH Client” option.
-
Move to the directory, where you have your downloaded key pair. Mine is in the downloads.
-
Copy the third command and enter it in your terminal to ensure all permissions.
-
And then, enter the command given under the example.
-
Note: Make sure to enter the following command with a sudo prefix, if you haven't done
sudo su -at the beginning.sudo ssh -i "Jenkins-Key.pem" ec2-user@ec2-15-207-19-201.ap-south-1.compute.amazonaws.com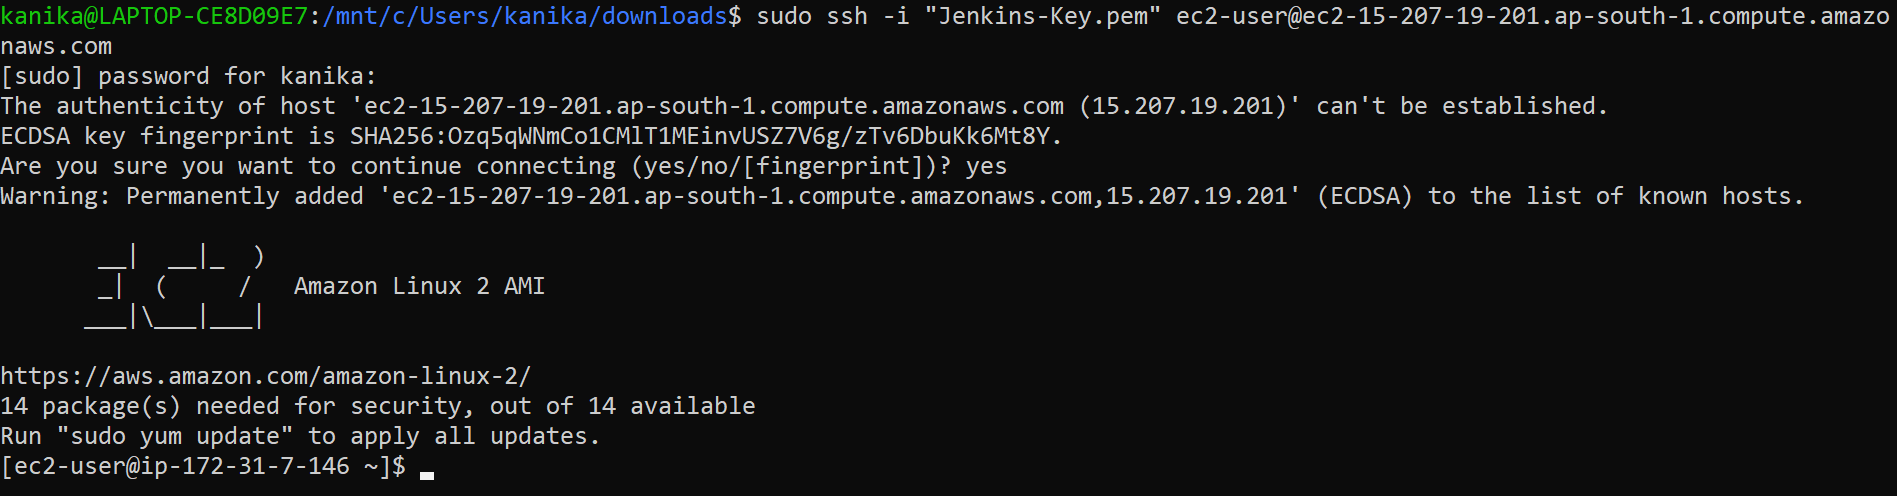
-
Congratulations, you have connected to the instance🎉
Install Jenkins on your Instance #
-
We are using
sudoas a prefix with every command, you can also dosudo -suin the beginning to avoid that. -
Enter the command, for a quick update of all the software packages on your instance
sudo yum update –y -
Add the Jenkins repo
sudo wget -O /etc/yum.repos.d/jenkins.repo \ https://pkg.jenkins.io/redhat-stable/jenkins.repo -
Import a key file from Jenkins-CI to enable installation from the package:
sudo rpm --import https://pkg.jenkins.io/redhat-stable/jenkins.io.key sudo yum upgrade -
Follow these commands
# install java sudo amazon-linux-extras install java-openjdk11 -y # install Jenkins sudo yum install jenkins -y # enable the Jenkins service to start at boot: sudo systemctl enable jenkins -
Start Jenkins as a service
sudo systemctl start jenkins -
Check the status
sudo systemctl status jenkins

-
Now copy the public IP address of the Jenkins instance, which is present in the details of the instance

-
Enter this IP address with the port number, i.e., "<ip_address:port_number>"
-
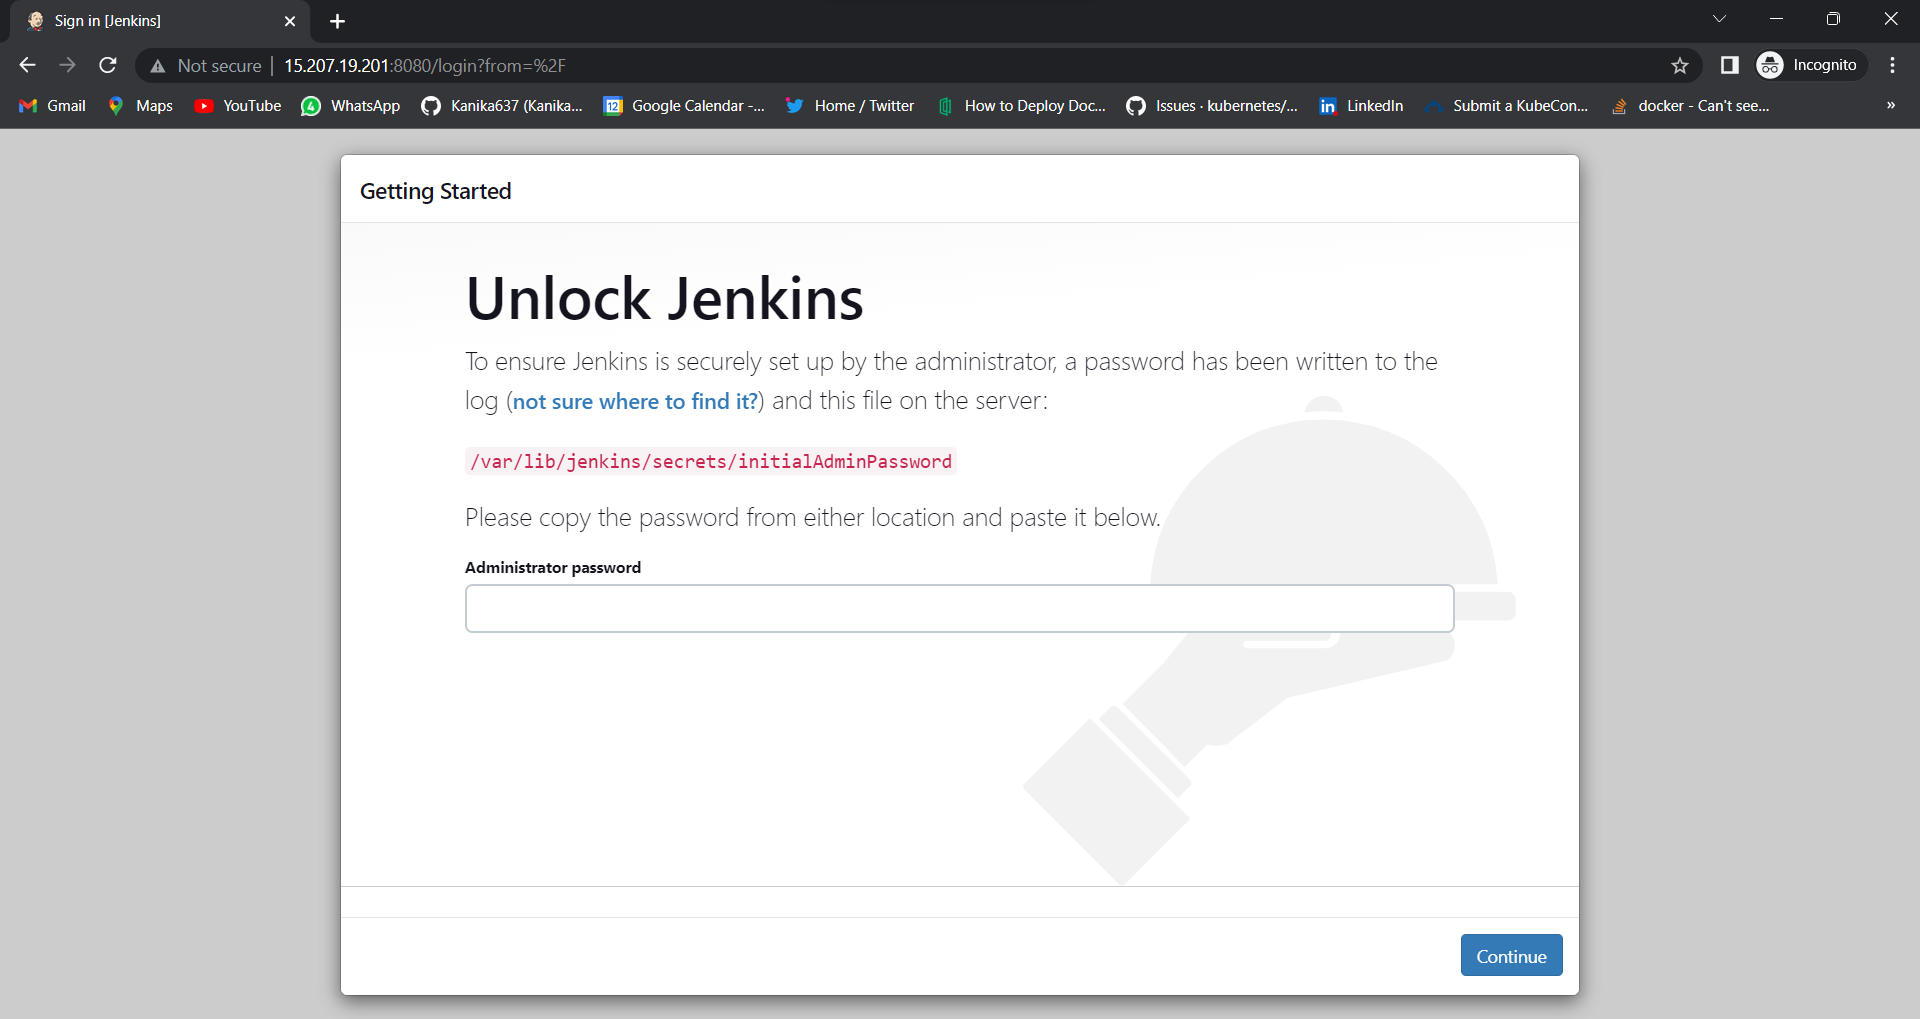
Now, get the password by entering the following command and enter it in the text box
sudo cat /var/lib/jenkins/secrets/initialAdminPassword -
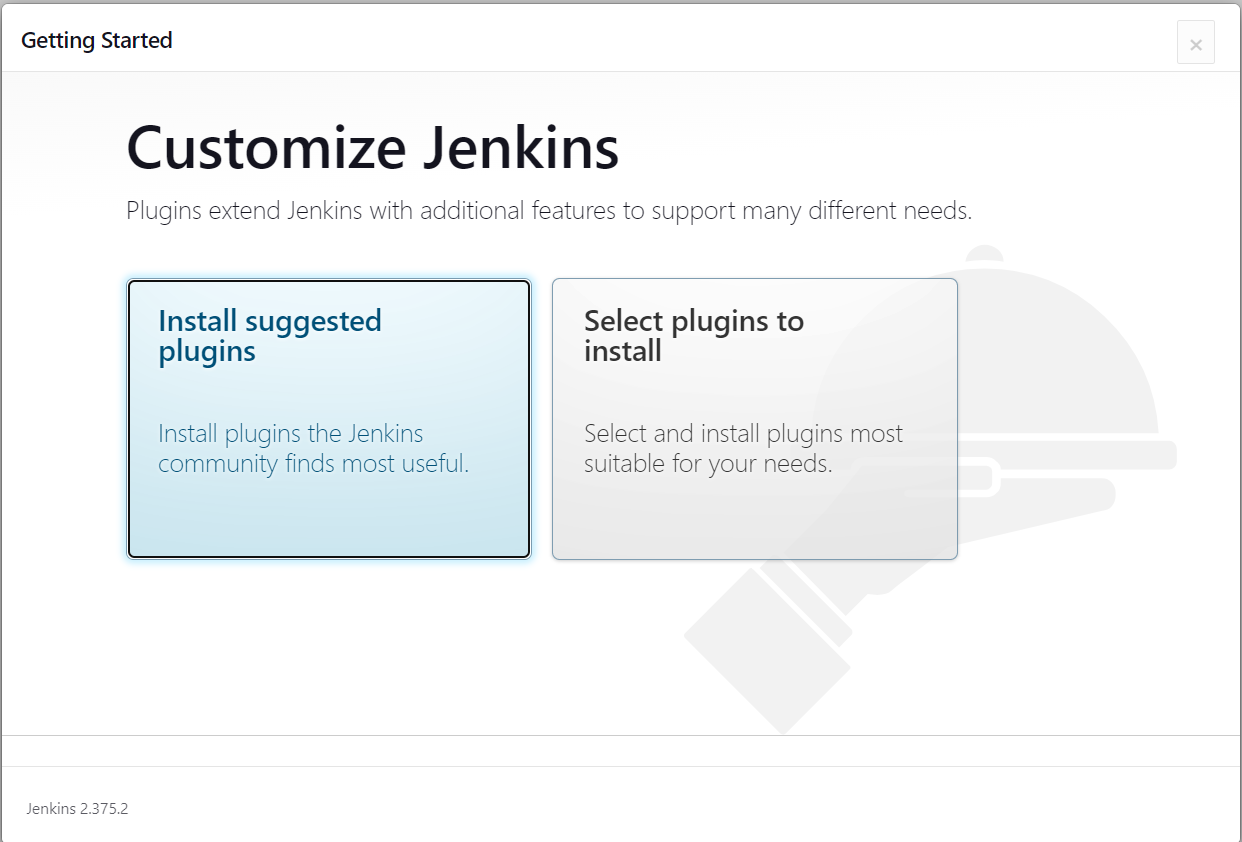
Click on install the suggested plugins
-
Go ahead and enter your username and stuff as asked
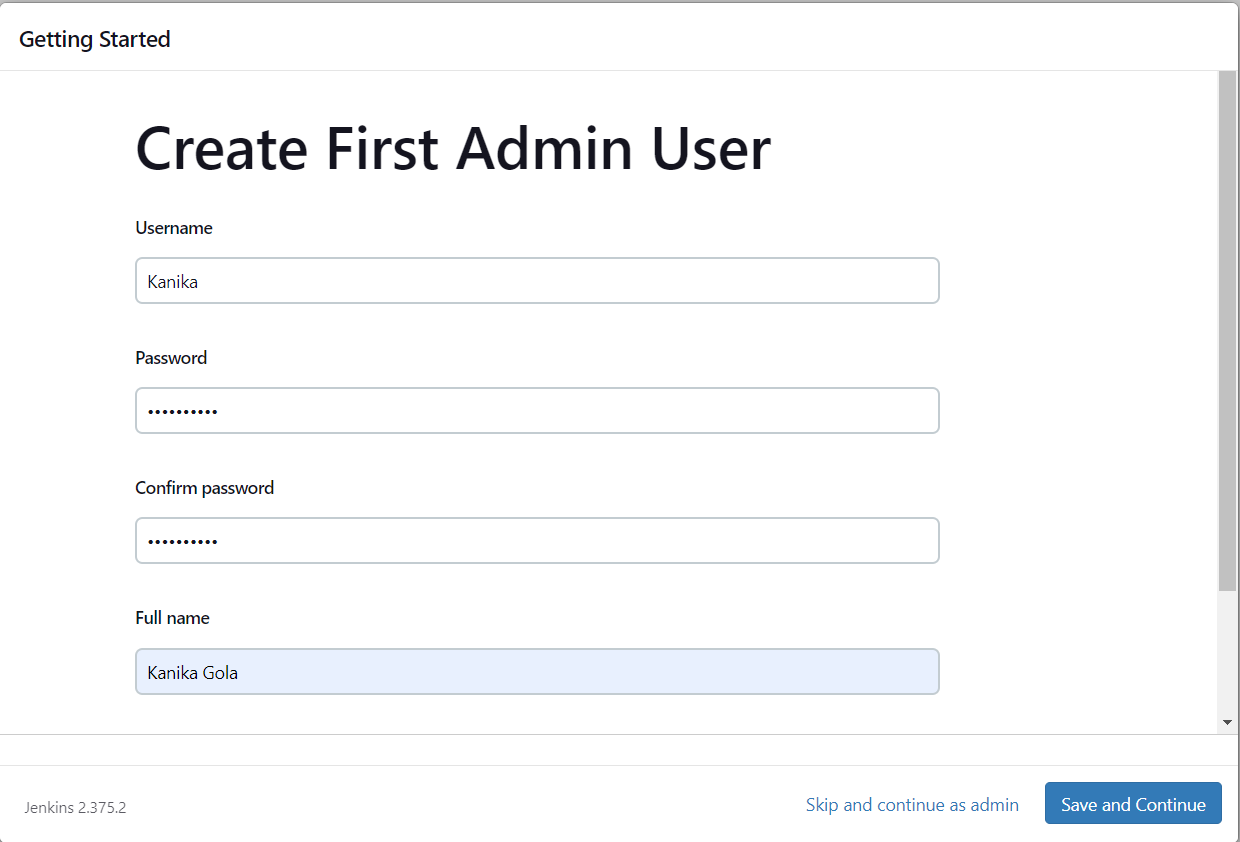
-
You are ready to use Jenkins🎉
-
NOTE: Some extra installations
1. Install git
sudo yum install git -y
2. Install maven
sudo wget https://repos.fedorapeople.org/repos/dchen/apache-maven/epel-apache-maven.repo -O /etc/yum.repos.d/epel-apache-maven.repo

sudo sed -i s/\$releasever/6/g /etc/yum.repos.d/epel-apache-maven.repo

sudo yum install -y apache-maven

# check the installation
mvn --version
Manage some Plugins in Jenkins #
-
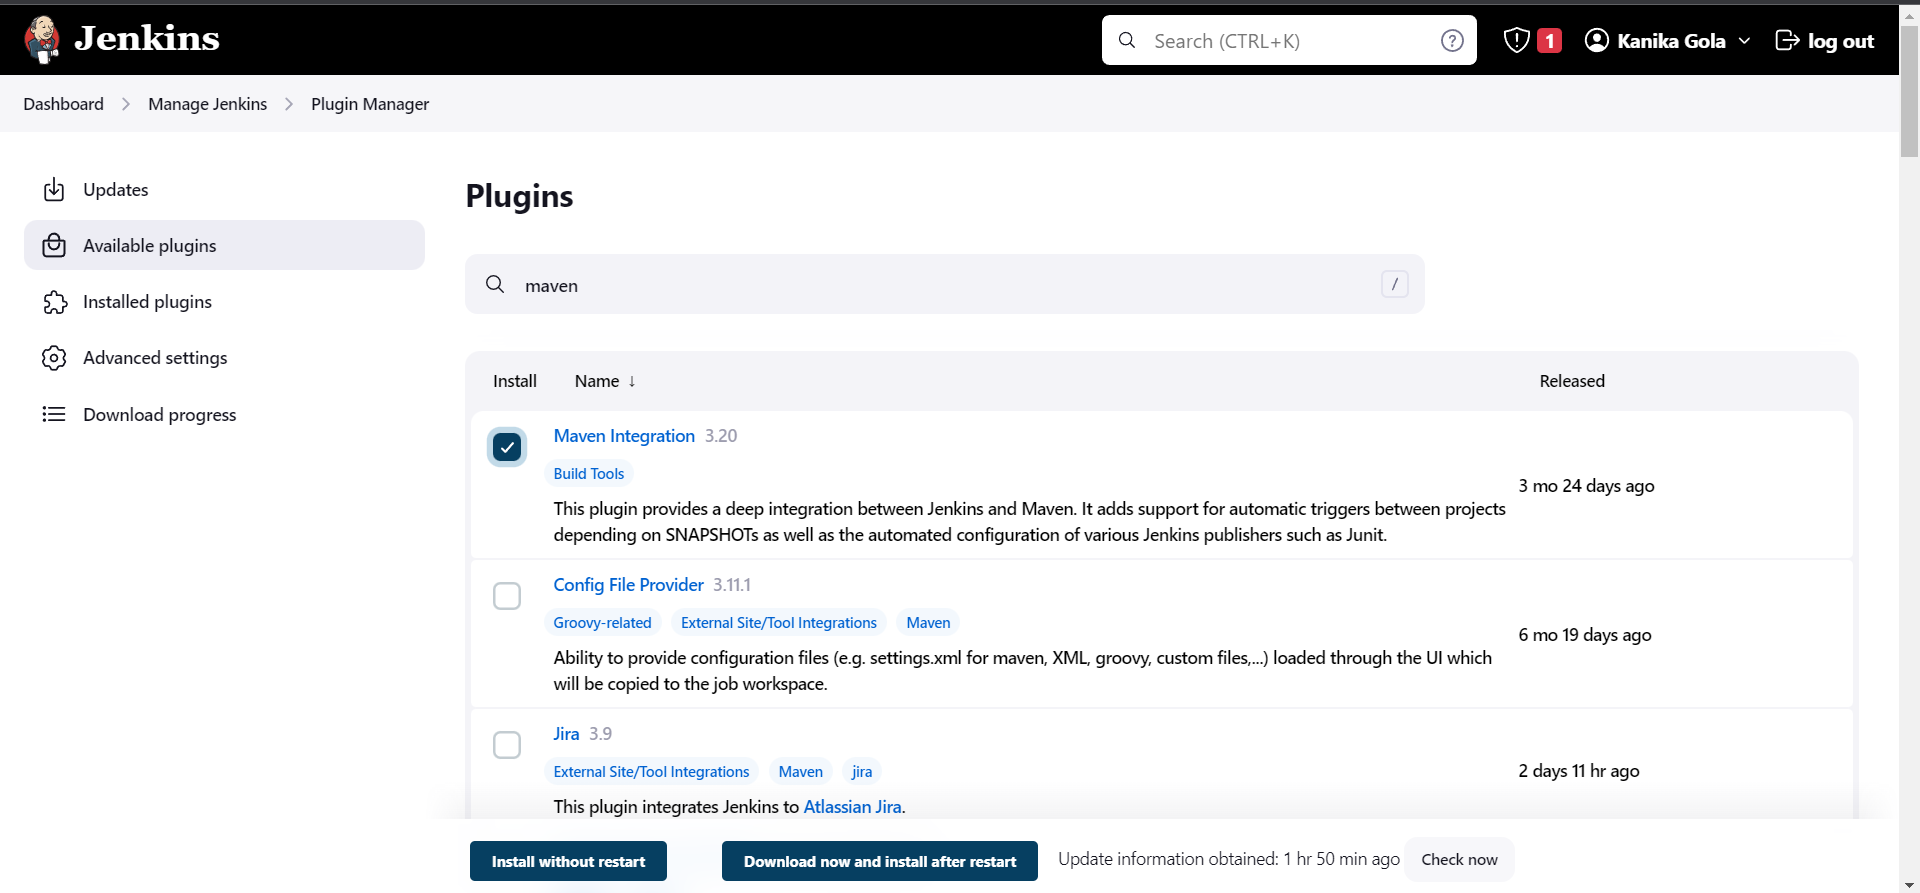
Since we are deploying a maven project, go ahead and select “Manage Jenkins” from the left and then “Manage Plugins”.
-
Search for “maven” in the “available plugins” section and “install without restart”.
-
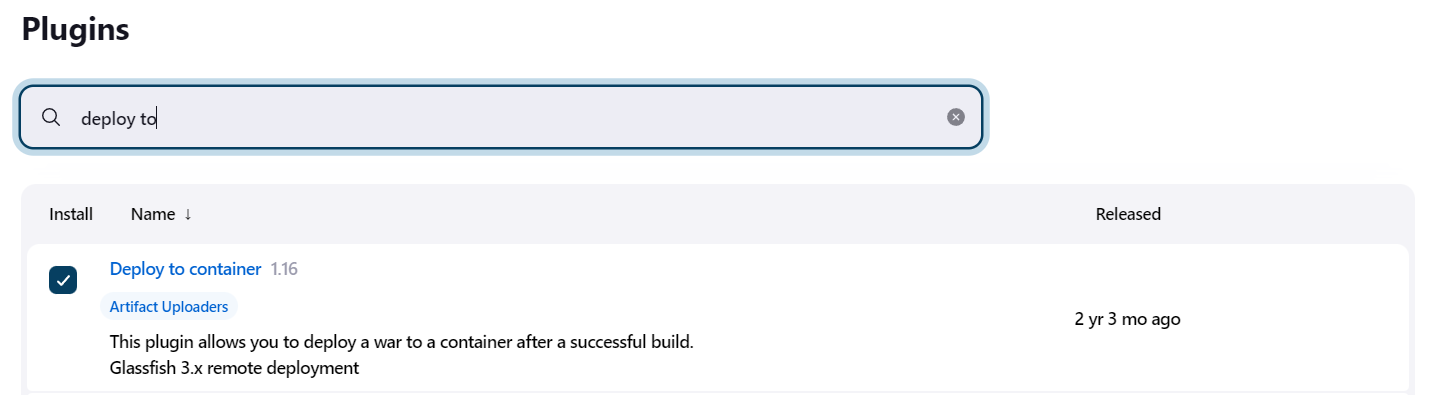
Install another plugin names “Deploy To container” for deployment
-
This plugin allows you to deploy a war to a container after a successful build.
-
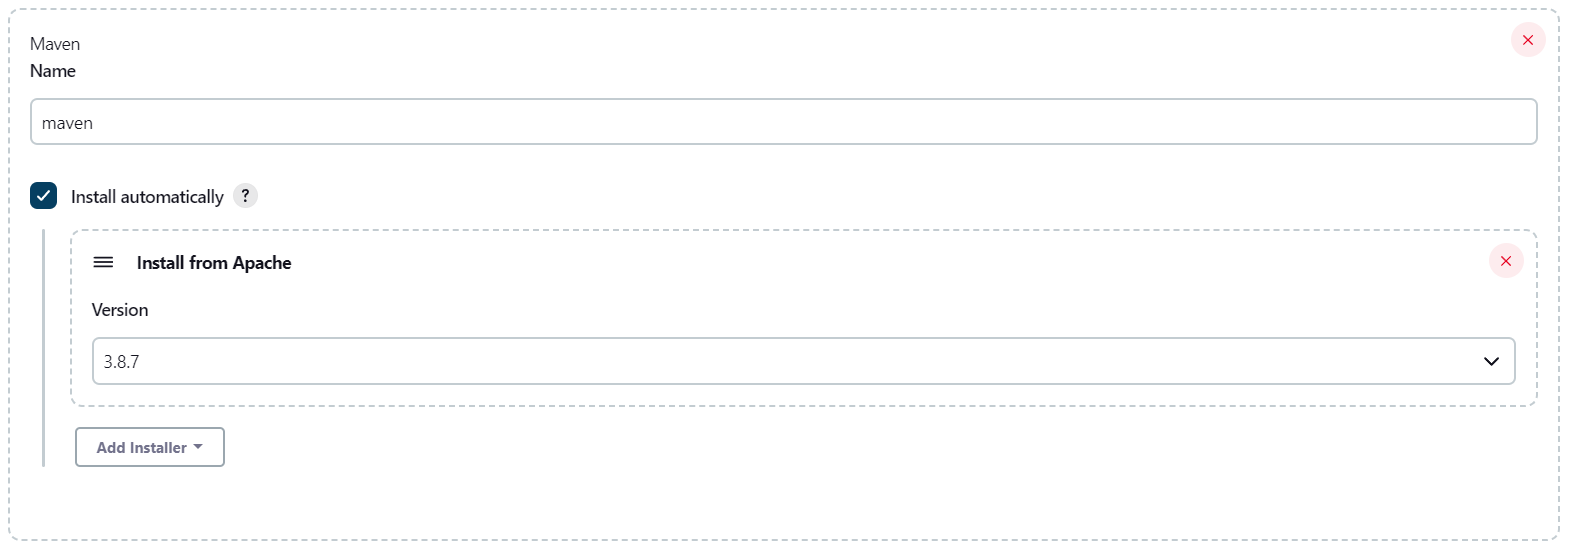
Next, go to Manage Jenkins>Global Tool configuration>Maven and opt for automatic installation
Security Group for Tomcat #
-
Follow the same steps, as followed in creating a security group for Jenkins, with some minor changes.
-
Give the name “Tomcat-Security-Group” to the security group.
-
One inbound rule has to be changed
-
We will use port no. 8090 for accessing it on the browser.
-
And then “Create”🚀
Tomcat Server #
-
Now let's launch an instance by clicking on 'Launch instances'
-
Enter the name “Tomcat-Server”
-
Choose the Amazon Linux AMI.
-
Select the size of the instance t3. micro or anything that lies in the free tier.
-
Let's create a key pair for your instance, naming it 'Tomcat-Key' and download it.
-
Choose “Tomcat-Security-Group”
-
And “Launch” it 🎉
Connect to the Tomcat Server using SSH #
-
Connect to it through SSH, following the same steps as followed in the Jenkins server by clicking on “Connect”.
-
Here we can see both instances are running!

Install Tomcat on your Instance #
-
Go to https://tomcat.apache.org/download-80.cgi and copy the tar.gz file link.

-
Move to the opt directory and download the tomcat package
cd /opt

sudo wget https://downloads.apache.org/tomcat/tomcat-8/v8.5.85/bin/apache-tomcat-8.5.85.tar.gz.asc

-
Do
lsin the opt directory to see the file, you will see the following file
-
Now we have to unzip and untar the package with a single command, i.e.
sudo tar -xvzf apache-tomcat-8.5.85.tar.gz -
Let's just rename the file as tomcat, so it will be easy for us to access it
sudo mv apache-tomcat-8.5.85.tar.gz tomcat -
Move into the file "apache-tomcat-8.5.85.tar.gz" and do
ls
-
Now move to the bin folder

-
Now the “startup.sh” is used for starting the tomcat server and “shutdown.sh” for shutting down.
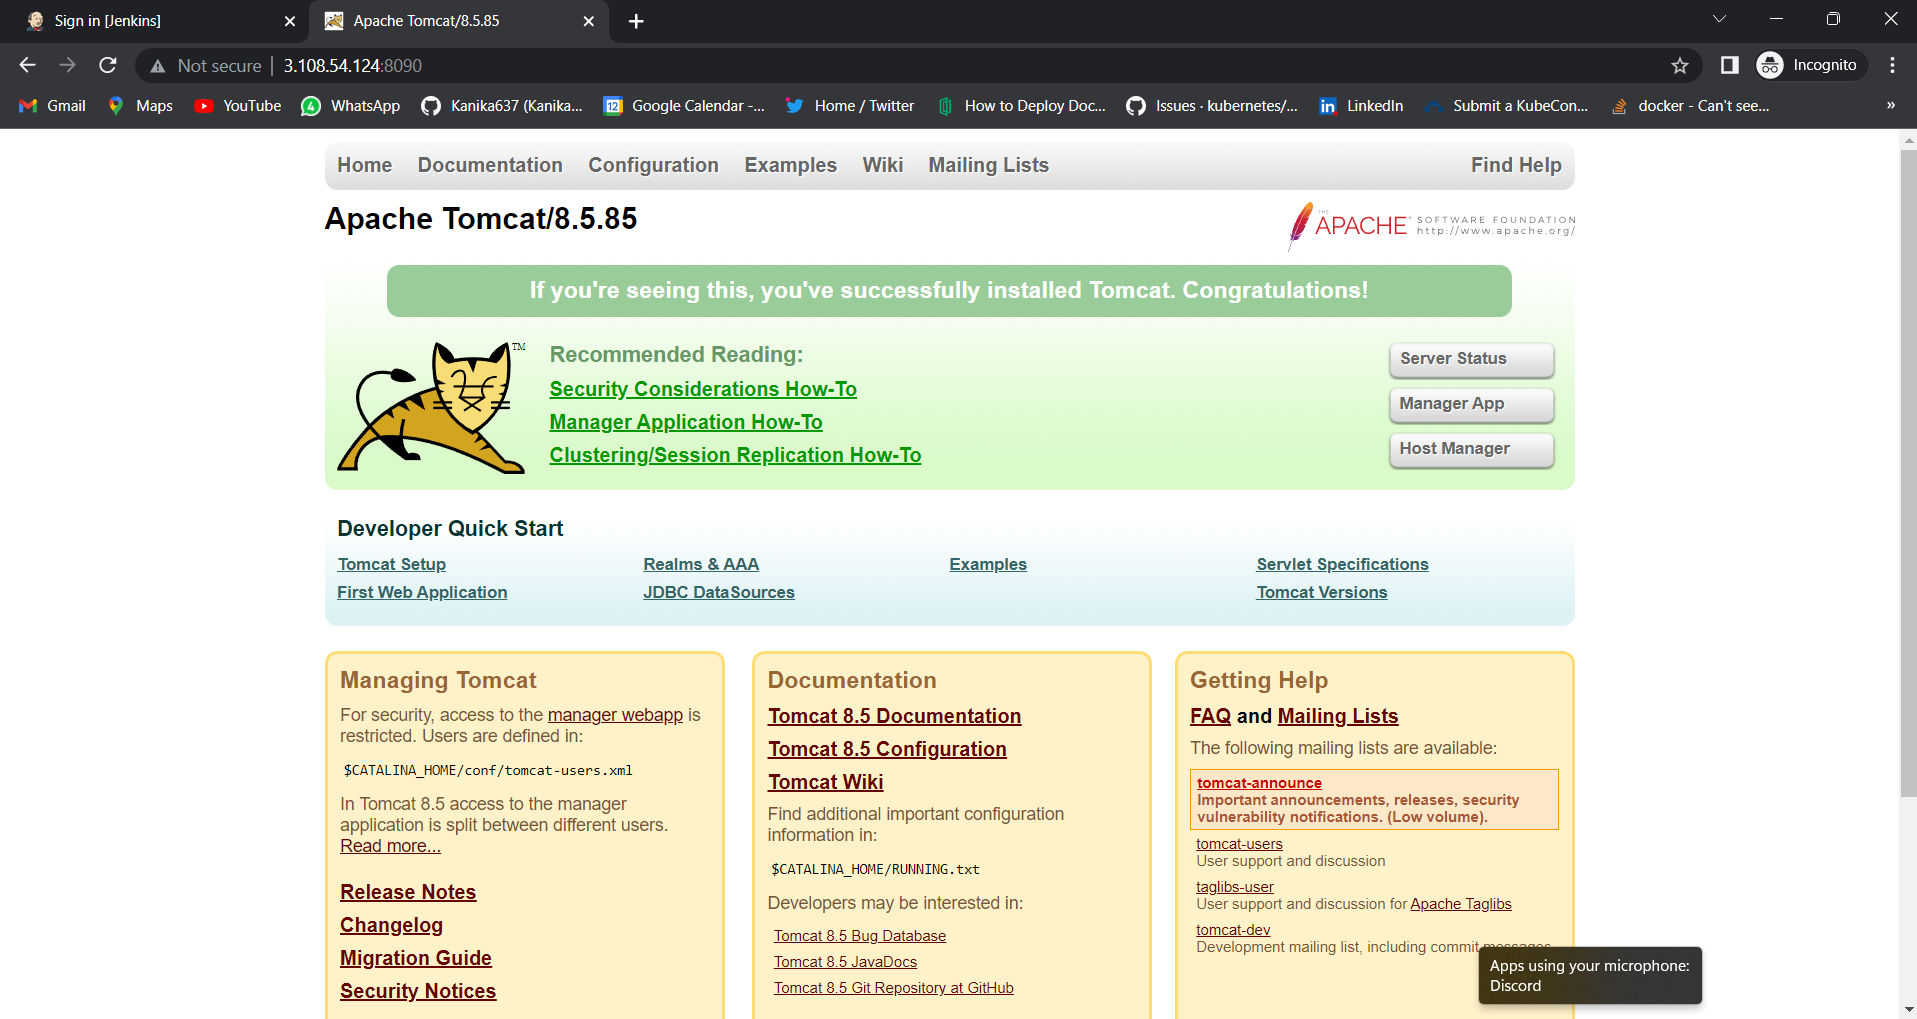
./startup.sh -

-
By default, tomcat will run on port 8080, we have to change it to 8090 by
cd /conf

vi server.xml

-
Change the connector port to “8090”
-
Shut down the server by “./shutdown.sh” and then start again.
-
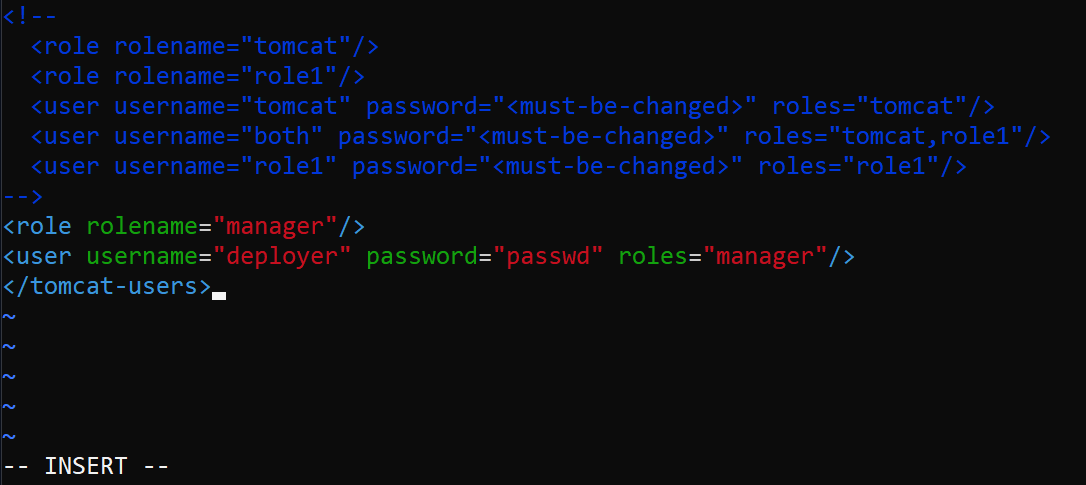
Also, let's add some users to tomcat with different roles
-
Do cd /conf and edit tomcat-users.xml

-
Next thing is, we have to find the context.xml for solving this error when we click on manage App

-
This error comes because tomcat only allows access from the local system, but we want to access from outside as well
find / -name context.xml

-
We will consider files that are under webapps.
-
We have to comment out the valve command as it only allows access from local systems.
-
Do the following with the last two files
vi /opt/apache-tomcat-8.5.85/webapps/host-manager/META-INF/context.xml

vi /opt/apache-tomcat-8.5.85/webapps/manager/META-INF/context.xml
Add tomcat credentials to Jenkins #
-
Go to Manage Jenkins>Manage Credentials

-
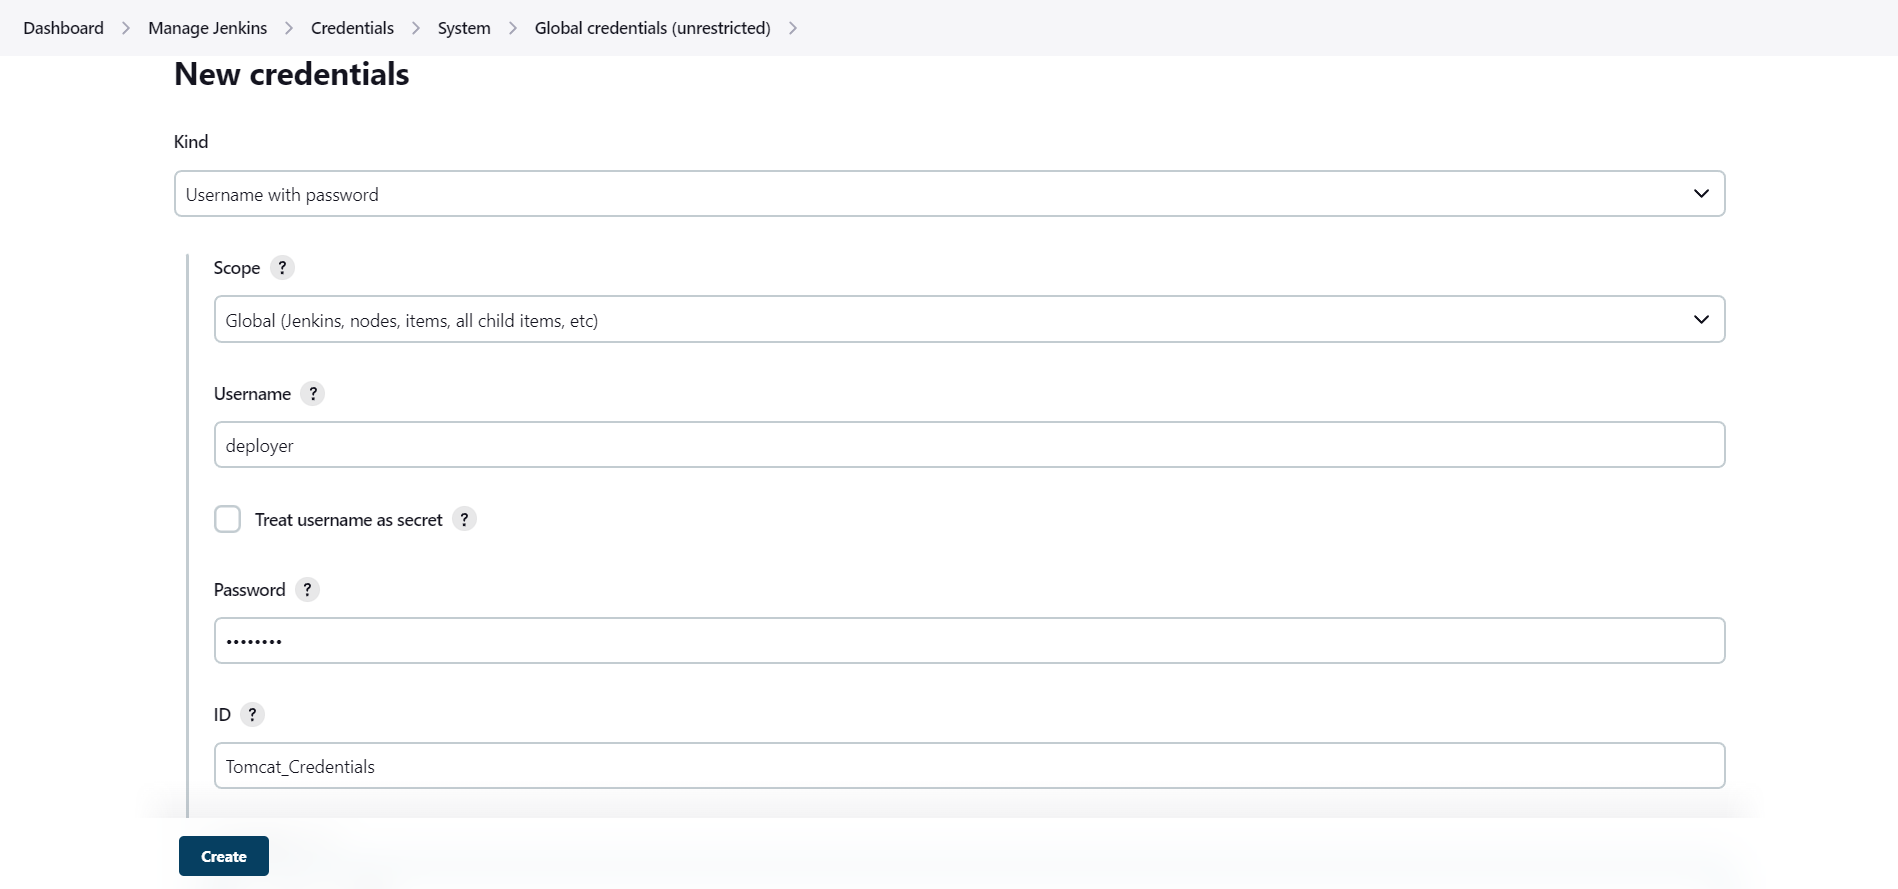
Click on “global Credentials” and then “Add Credentials”
-
Remember, we added a user with a role in tomcat
-
Add the username and password as given and then create.
Create a Job for deploying the Maven Project #
-
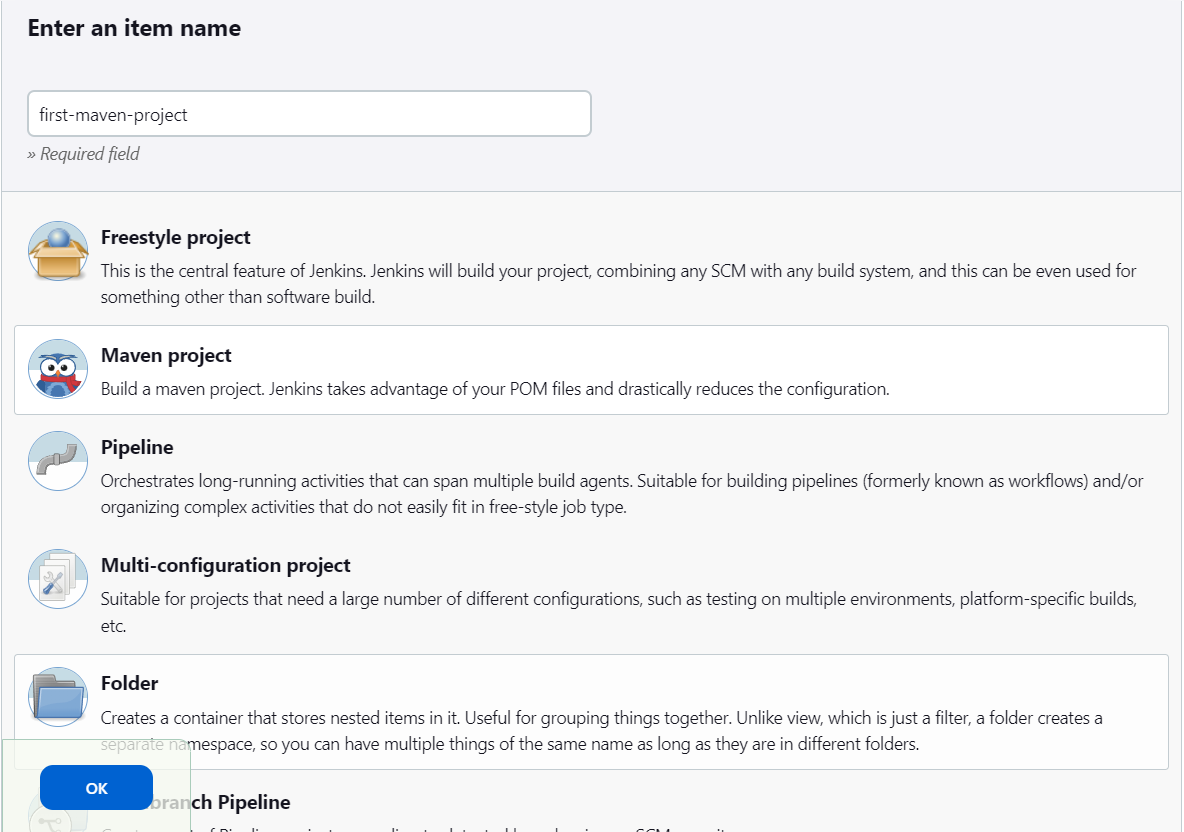
Click on “create a job”.
-
Here is the GitHub Link to the project we are using
-
Fork the repo
-
Enter a name for the project/job and select “maven project”
-
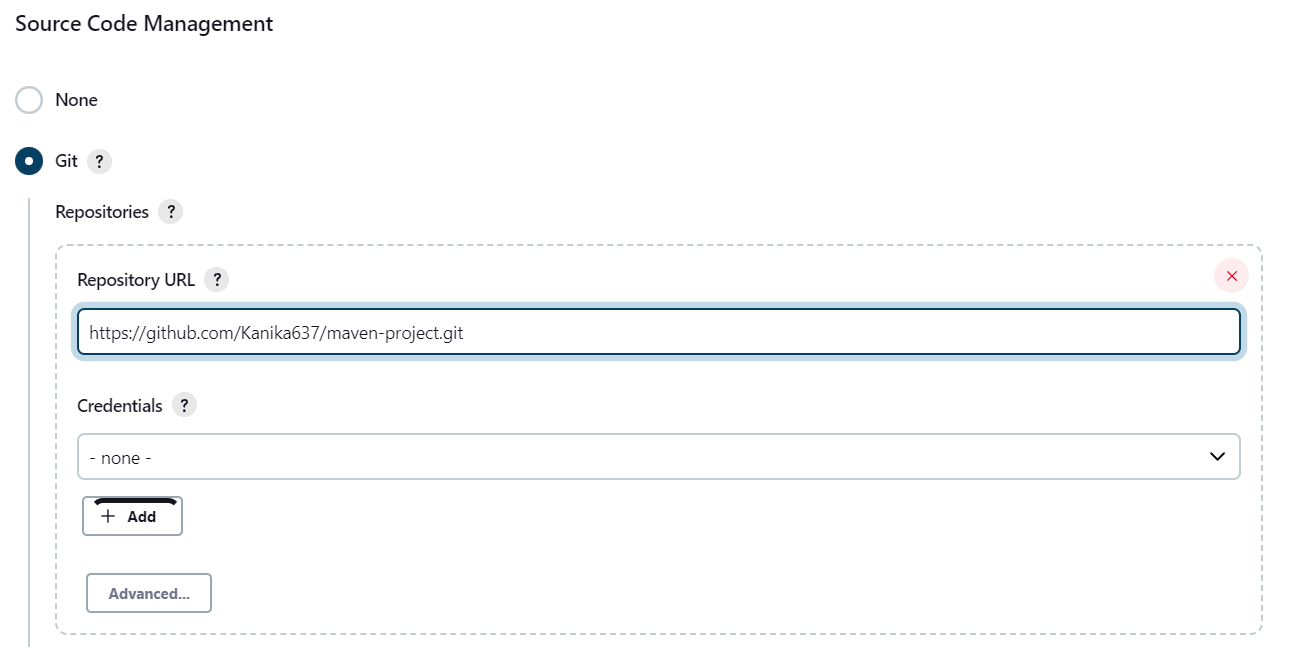
In the Source Code Management, choose git and enter the repository URL, by clicking on code

-
Since all the code is in the master branch in the given project, we will use the master branch.

-
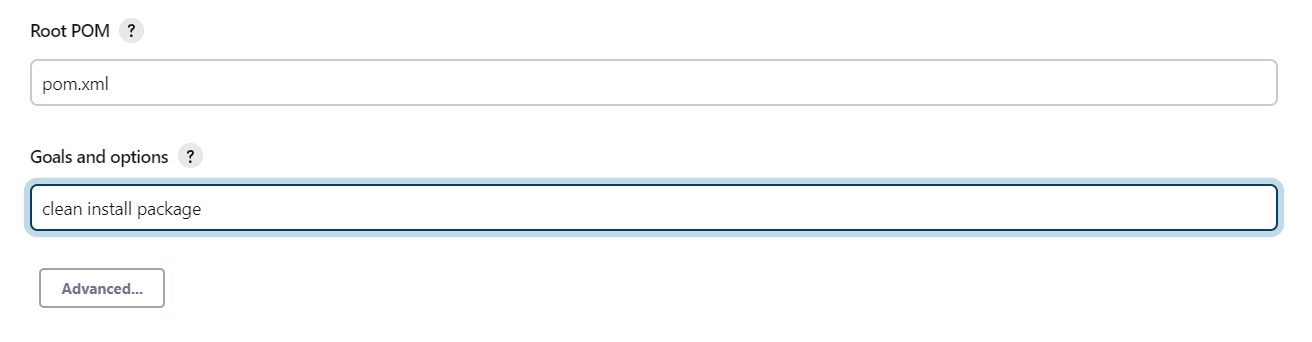
Under the build section, we usually give these three options, i.e., "clean install package” with the pom.xml file already present there.
-
pom.xml → It is an XML file that contains information about the project and configuration details used by Maven to build the project.
-
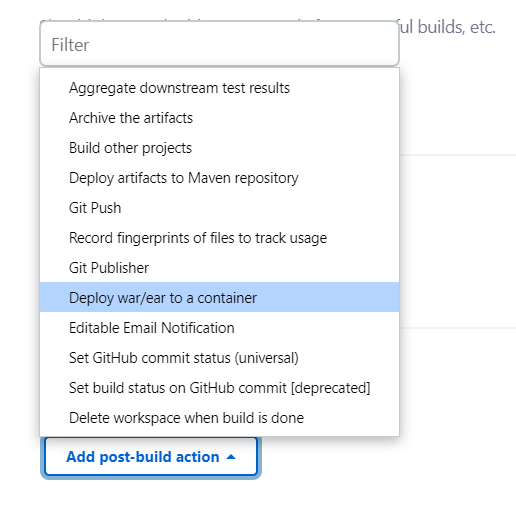
Now choose the option “Deploy war/ear to a container”
-
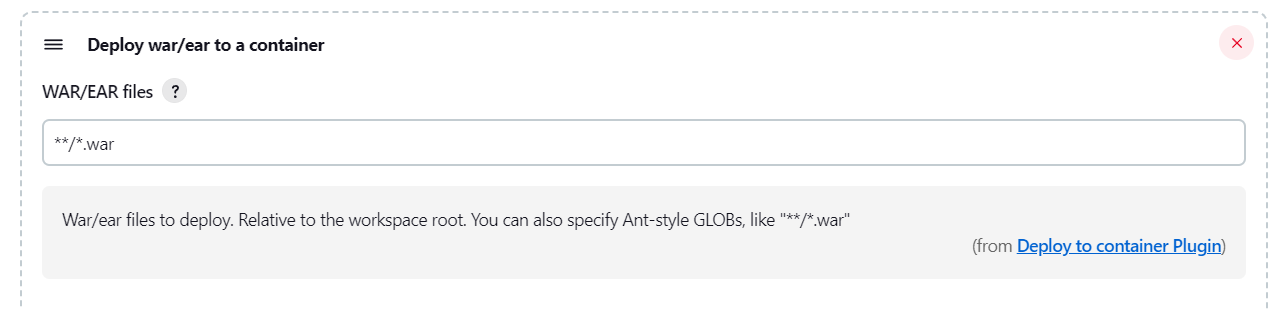
Next, we have to specify the path of the war file, or we can just write “**/*.war” so that Jenkins will find the file having the type “.war” in that particular workspace.
-
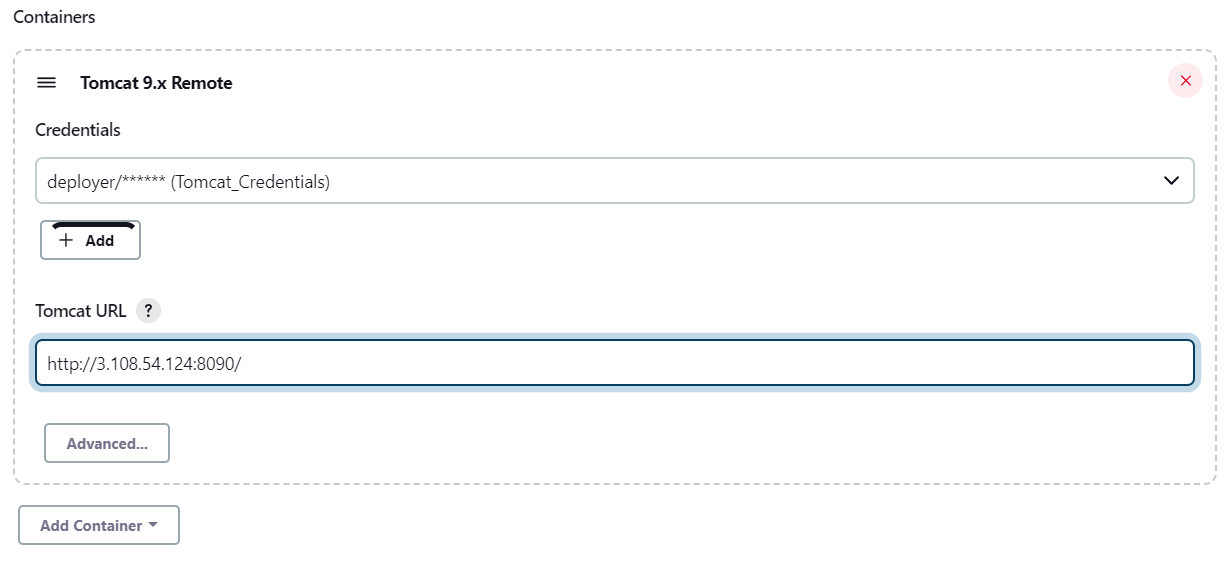
Now in the container section, choose tomcat with its latest version i.e., tomcat 9
-
Also, choose the credentials from the dropdown that we just created, i.e., deployer
-
Next, copy the URL of the tomcat server, on which you can access it from the browser

-
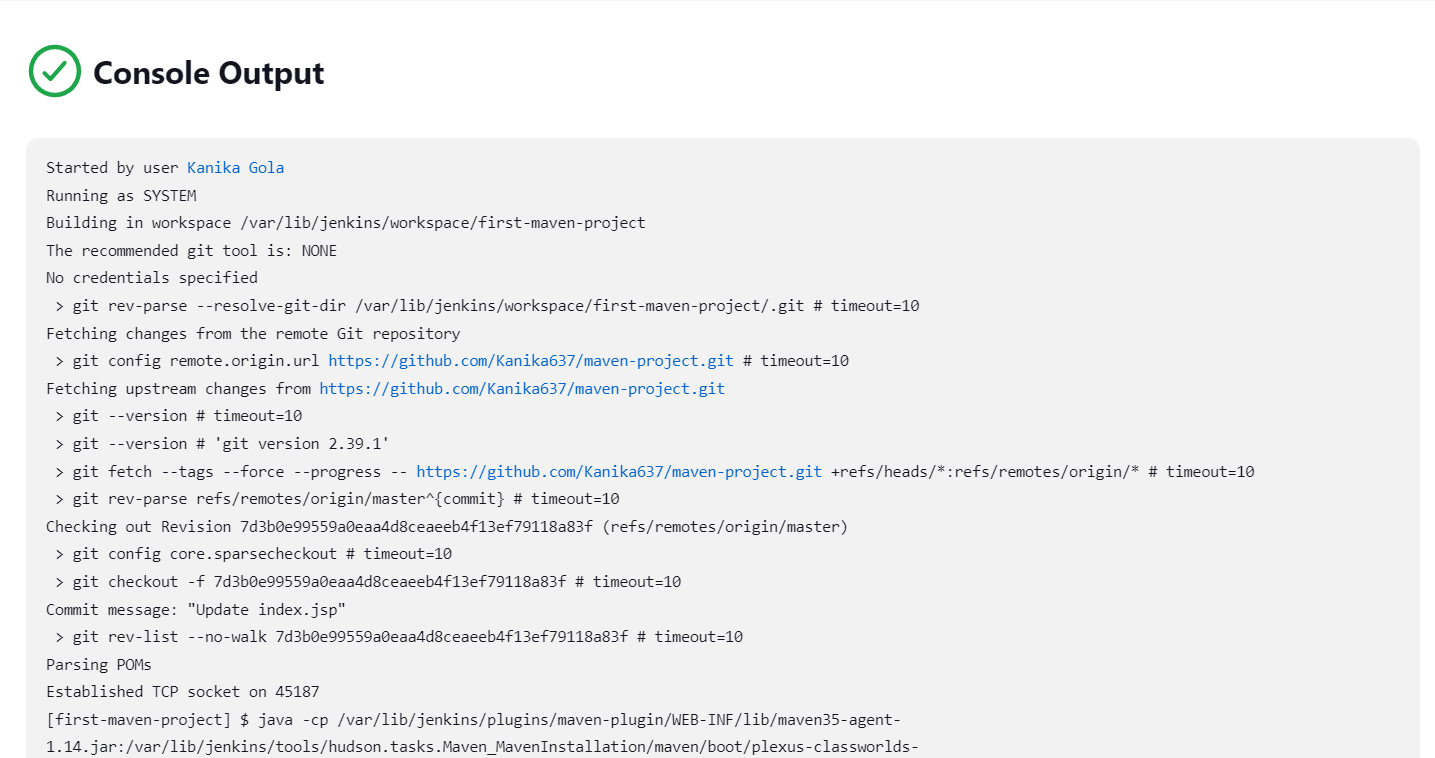
Now save and click on “Build Now”

-
Yay! 🚀 that's a SUCCESS!
-
This is where your war file will be copied, i.e., in the webapps directory

-
Now we can access our app on the browser by adding "/webapp" in the URL
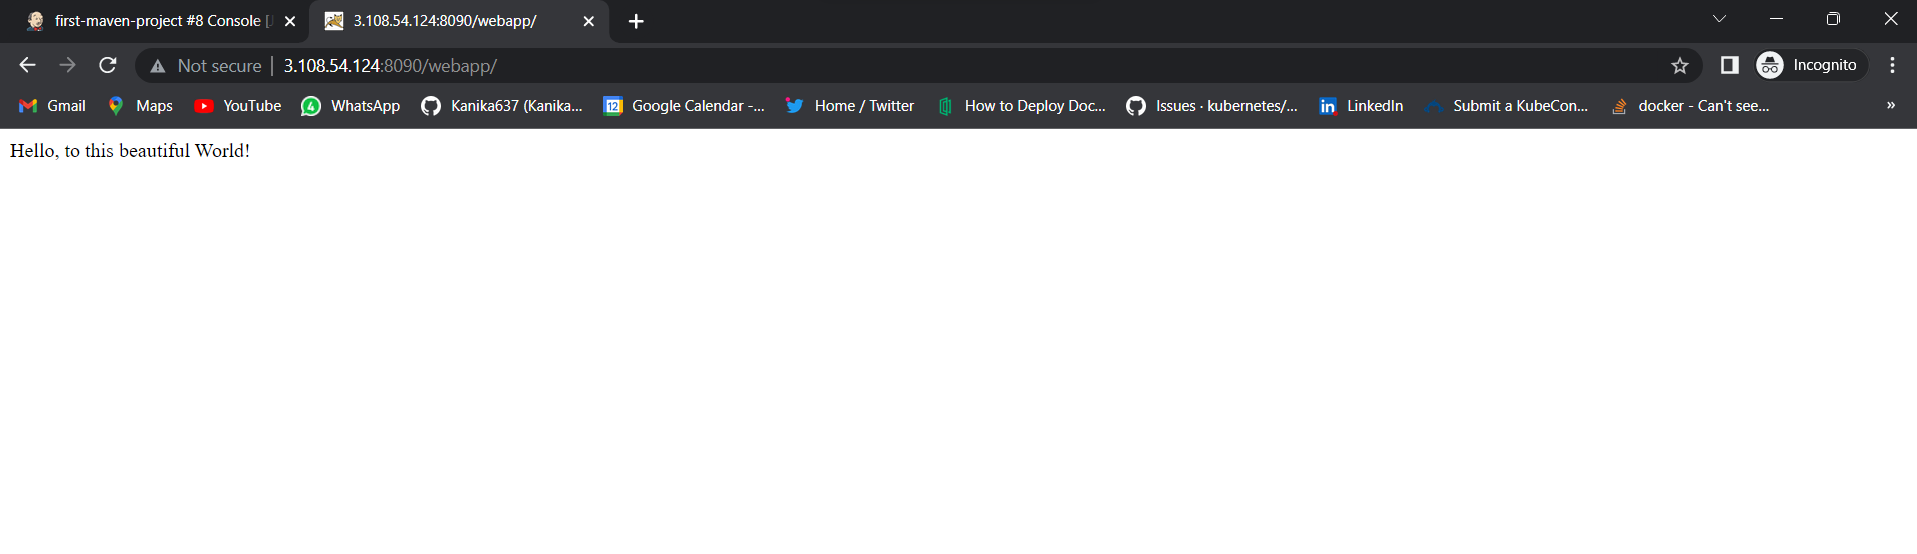
-
So whatever was written in the index.jsp will be visible here!
-
You have successfully deployed a maven application to a tomcat server🎉
Don't forget to like and share this post. Connect with me on Twitter. Follow me for more such blogs on Hashnode.
Follow Kubesimplify on Hashnode, Twitter, Instagram and LinkedIn. Join Discord server to learn a lot more stuff.
Get new posts in your inbox.
Spotted a typo or want to improve this post? Edit on GitHub →