DIY: How To Build A Kubernetes Policy Engine
As usual, here is the link to the code! %[https://github.com/dirien/kubernetes-diy-policy-engine] In this blog post, we want to use one of the biggest…


On this page (19)
- TL;DR Code
- Introduction
- What is an admission controller?
- Prerequisites
- Minikube
- Golang 1.18
- Make
- ko
- Write a validating admission controller
- Coding the validating admission controller
- Create the Kubernetes manifests
- Create the TLS certificates via cert-manager
- Create the ValidatingWebhookConfiguration
- Deploy the validating admission controller
- Write a mutating admission controller
- Coding the mutating admission controller
- Create the MutatingWebhookConfiguration
- Deploy the mutating admission controller
- Wrap up - Next steps
TL;DR Code #
As usual, here is the link to the code!
https://github.com/dirien/kubernetes-diy-policy-engine
Introduction #
In this blog post, we want to use one of the biggest advantages of Kubernetes: The huge ability to be super expandable. How to better show this superpower in action, then to write a dynamic admission controller?
But before we start, we need to talk about the concept of admission controllers and how they work
What is an admission controller? #
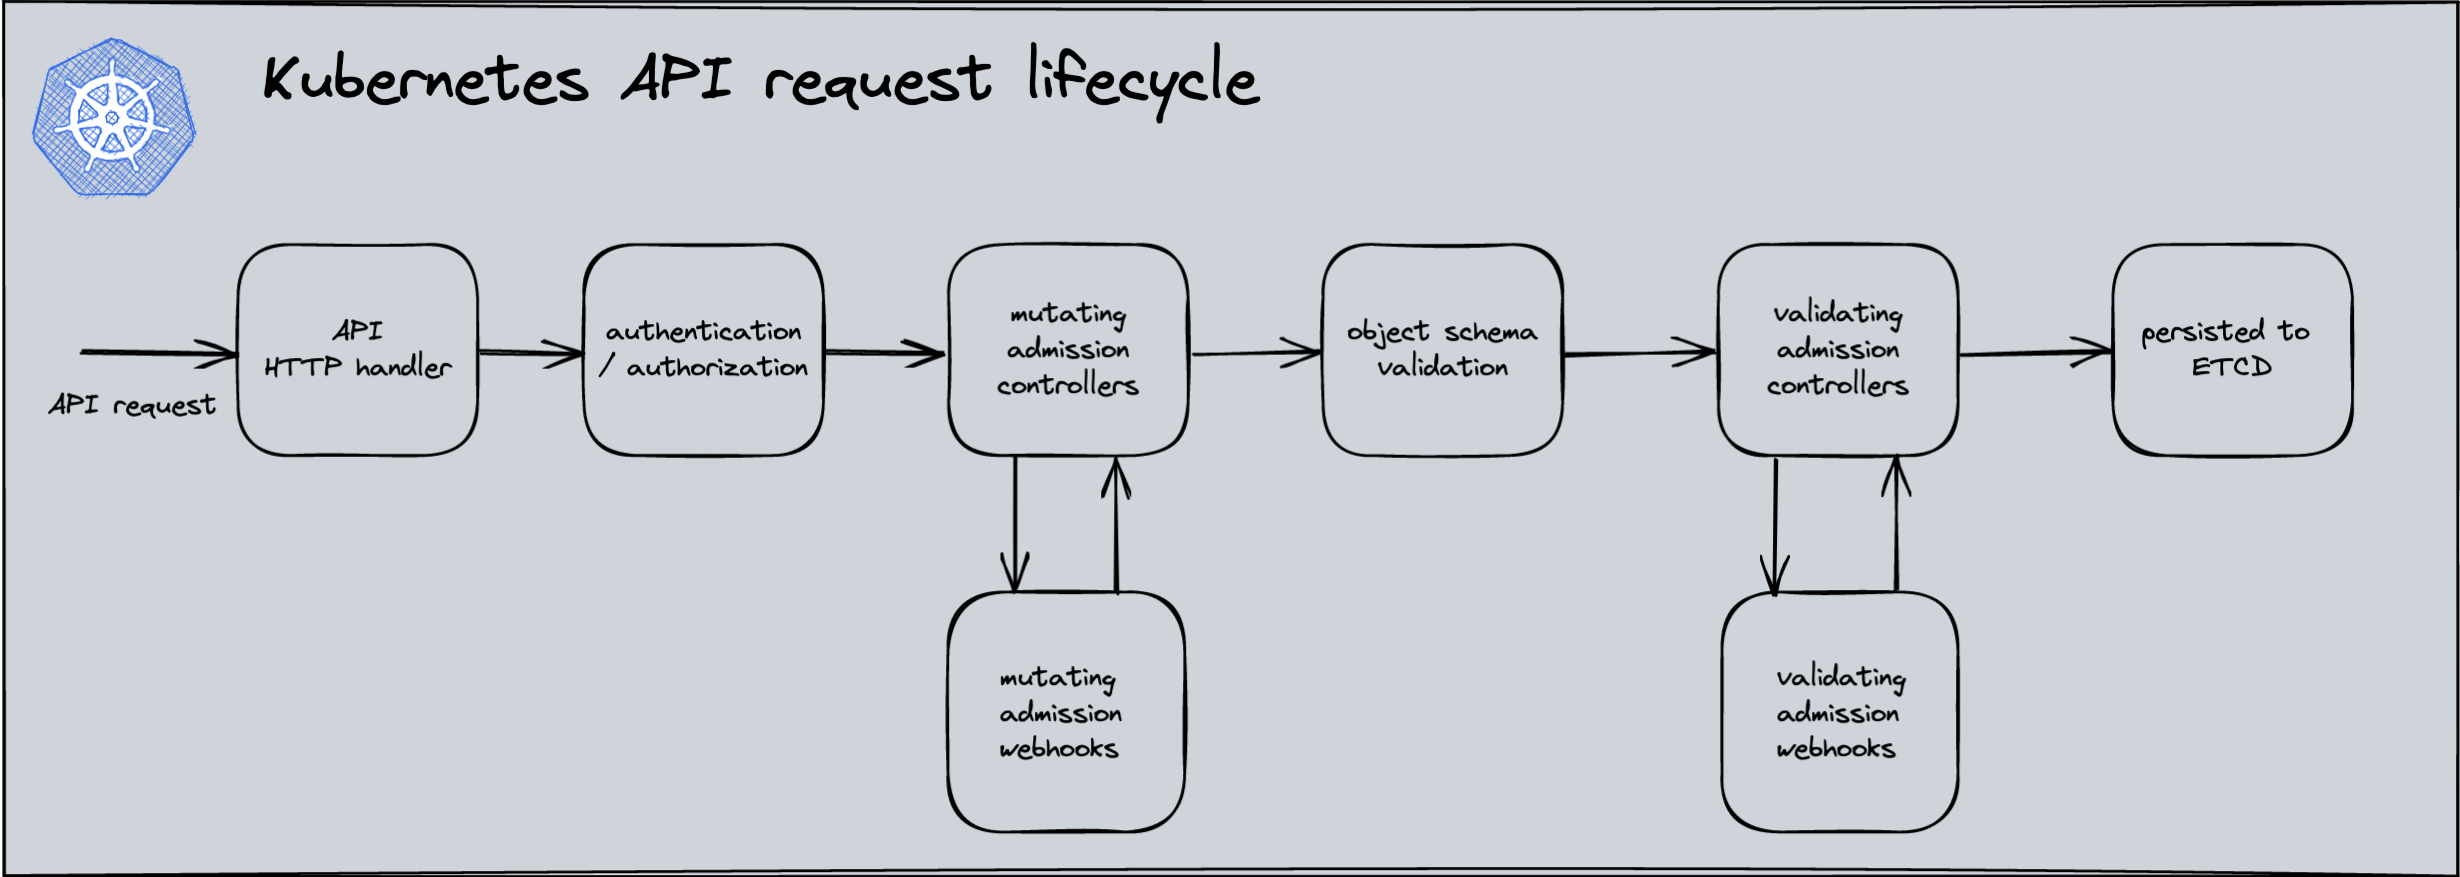
An admission controller is a piece of code that intercepts requests to the Kubernetes API server prior to persistence of the object, but after the request is authenticated and authorized. There are two special controllers:
MutatingAdmissionWebhook and ValidatingAdmissionWebhook. These execute the mutating and validating (respectively)
admission control webhooks, which are configured in the API.
Admission controllers may be "validating", "mutating", or both. Mutating controllers may modify related objects to the requests they admit; validating controllers may not.
Admission controllers limit requests to create, delete, modify objects or connect to proxy. They do not limit requests to read objects.
The admission control process proceeds in two phases. In the first phase, mutating admission controllers are run. In the second phase, validating admission controllers, are run.
If any of the controllers in either phase reject the request, the entire request is rejected immediately and an error is returned to the end-user.
Prerequisites #
In this blog article, I am going to use the following tools:
- minikube
- golang 1.18
- make
- ko
Minikube #

minikube quickly sets up a local Kubernetes cluster on macOS, Linux, and Windows. I will use it to deploy my admission
controllers onto it. You could use of course any other cluster provider.
Check the great documentation and installation guide here: https://minikube.sigs.k8s.io/docs/start/
As I am using a macOS machine, I will install the minikube binary via Homebrew Package Manager .
brew install minikubeGolang 1.18 #

As programming language of my choice, I am using Golang in version 1.18. You can of course use any other programming language as you just communicate with the Kubernetes API server. I like to use Golang because it has already a good ready to use Kubernetes libraries. The reason is quite simple: Kubernetes is written in Golang too!
Make #
I use Make to perform my build and deployment tasks. This is really down to my own taste. If you build your own
admission controllers, you can of course the tool of your choice.
ko #
To build my container images, I am going to use ko. I love this project because I don't need to write any Dockerfile. With a simple command, it will build a container image for me, create an SBOM and push it directly to my container registry. And this is much better than writing a Dockerfile.
ko is working only with golang projects.
And that's it from the tools I need to be able to build my admission controllers. Yes, of course, you should use in a real production environment also a version control system and some pipelines to build your admission controllers. For the sake of this blog post, I will just make everything manually.
Don't do this at home :D
Write a validating admission controller #
The validating admission controller, is currently only validating that pods who store their container image in Docker Hub are scheduled. It's a simple example, but a still common use case. You may run your own private container registry and what to be sure that only this registry is allowed in your cluster.
Coding the validating admission controller #
If you need to build an admission controller program down, I would say that It's not much more than a web server. And this is also the first parts of the code we're going to write:
func runValidatingWebhookServer(tlsCert, tlsKey string, port int) error {
	logger.Print("Starting DIY validating webhook server")
	cert, err := tls.LoadX509KeyPair(tlsCert, tlsKey)
	if err != nil {
		logger.Fatal(err)
	}

	http.HandleFunc("/validate", validate)
	server := http.Server{
		Addr: fmt.Sprintf(":%d", port),
		TLSConfig: &tls.Config{
			Certificates: []tls.Certificate{cert},
		},
		ErrorLog: logger,
	}

	if err := server.ListenAndServeTLS("", ""); err != nil {
		logger.Panic(err)
	}
	return nil
}
We pass the location of the TLS certificates via the cobra library as CLI flags to our binary. Cobra is a library for creating powerful modern CLI applications.
...
var rootCmd = &cobra.Command{
	Use:   "validating-webhook",
	Short: "Kubernetes DIY validating webhook",
	Long: `Kubernetes DIY validating webhook.
Example:
validating-webhook --port <port> --tls-cert <tls_cert> --tls-key <tls_key>`,
	RunE: runValidatingWebhook,
}

...
func init() {
	rootCmd.Flags().String("tls-cert", "", "TLS Certificate")
	rootCmd.Flags().String("tls-key", "", "Key for TLS Certificate")
	rootCmd.Flags().Int("port", 8443, "Port to listen on")
}
...
In this function, we are creating a simple TLS terminated web server. We can configure the server to use a certificate and on which port we want to listen.
The certificate will be provided automatically via cert-manager. We will see later how to deploy and configure the cert-manager to generate self-signed certificates and inject so the Kubernetes API server trust them.
Additionally, we create a router for the /validate endpoint.
The code for the /validate endpoint is pretty straight forward.
Webhooks are sent as POST requests, with Content-Type: application/json, with an AdmissionReview API object in the admission.k8s.io API group serialized to JSON as the body.
See an example AdmissionReview request
In our code, we use the k8s runtime schema and deserializer to map to the JSON to the Golang structs. This will be done in my admissionReviewFromRequest function.
func validate(w http.ResponseWriter, r *http.Request) {
	log.Printf("validate request")

	// https://godoc.org/k8s.io/apimachinery/pkg/runtime#Scheme
	scheme := runtime.NewScheme()

	// https://godoc.org/k8s.io/apimachinery/pkg/runtime/serializer#CodecFactory
	codecFactory := serializer.NewCodecFactory(scheme)
	deserializer := codecFactory.UniversalDeserializer()

	admissionReviewRequest, err := admissionReviewFromRequest(r, deserializer)
	if err != nil {
		writeErrorResponse(w, errors.New(fmt.Sprintf("can't retrieve admission review from request: %v", err)))
		return
	}

	podResource := metav1.GroupVersionResource{Group: "", Version: "v1", Resource: "pods"}
	if admissionReviewRequest.Request.Resource != podResource {
		writeErrorResponse(w, errors.New(fmt.Sprintf("review request is not from kind pod, got %s", admissionReviewRequest.Request.Resource.Resource)))
		return
	}

	rawRequest := admissionReviewRequest.Request.Object.Raw
	pod := corev1.Pod{}
	if _, _, err := deserializer.Decode(rawRequest, nil, &pod); err != nil {
		writeErrorResponse(w, errors.New(fmt.Sprintf("can't decode raw pod definition: %v", err)))
		return
	}

	admissionResponse := &admissionv1.AdmissionResponse{}
	admissionResponse.Allowed = true

	for _, container := range pod.Spec.Containers {
		if !strings.HasPrefix(container.Image, "docker.io") {
			admissionResponse.Allowed = false
			admissionResponse.Result = &metav1.Status{
				Message: "only container from docker.io are allowed",
			}
			break
		}
	}

	var admissionReviewResponse admissionv1.AdmissionReview
	admissionReviewResponse.Response = admissionResponse
	admissionReviewResponse.SetGroupVersionKind(admissionReviewRequest.GroupVersionKind())
	admissionReviewResponse.Response.UID = admissionReviewRequest.Request.UID

	resp, err := json.Marshal(admissionReviewResponse)
	if err != nil {
		writeErrorResponse(w, errors.New(fmt.Sprintf("not possible marshall response: %v", err)))
		return
	}

	w.Header().Set(ContentTypeKey, ContentTypeJSON)
	w.Write(resp)
}
The real validation logic is in this part of the code:
...
admissionResponse := &admissionv1.AdmissionResponse{}
admissionResponse.Allowed = true

for _, container := range pod.Spec.Containers {
    if !strings.HasPrefix(container.Image, "docker.io") {
        admissionResponse.Allowed = false
        admissionResponse.Result = &metav1.Status{
            Message: "only container from docker.io are allowed",
        }
        break
    }
}
...
We loop through the containers in the pod and check if the image name starts with docker.io. If not, we set the AdmissionResponse allowed to false and write a meaningful message to present to the user.
Create the Kubernetes manifests #
To deploy our admission controller, we need to create a Deployment and a Service resource. In the folder deploy you will find the Deployment and Service manifests. We will take a look at the Certificate and ValidatingWebhookConfiguration manifest later in this article. Just ignore them for now.
As you can see, we mount in the Deployment the TLS certificates from a secret and use the flags --tls-cert and --tls-key so our binary knows where to find the certificates.
apiVersion: apps/v1
kind: Deployment
metadata:
  labels:
    app: k8s-diy-validating-webhook
  name: k8s-diy-validating-webhook
spec:
  replicas: 1
  selector:
    matchLabels:
      app: k8s-diy-validating-webhook
  template:
    metadata:
      labels:
        app: k8s-diy-validating-webhook
    spec:
      containers:
        - image: ghcr.io/dirien/k8s-diy-validating-webhook:latest
          name: k8s-diy-validating-webhook
          imagePullPolicy: Always
          args:
            - --port=8443
            - --tls-cert=/etc/webhook/certs/tls.crt
            - --tls-key=/etc/webhook/certs/tls.key
          ports:
            - containerPort: 8443
              name: webhook
              protocol: TCP
          volumeMounts:
            - mountPath: /etc/webhook/certs
              name: certs
      volumes:
        - name: certs
          secret:
            secretName: k8s-diy-validating-webhook-certs
The Service resource is just taking care, that the port 443 is mapped to the port 8443 in the Deployment. As the API server is calling the webhook via the default https port.
I deploy everything into the
defaultnamespace. Don't do this in production.
Create the TLS certificates via cert-manager #
As we don't want to generate the TLS certificates manually, we will use the cert-manager to generate them. Cert-manager is an awesome open source project to manage X.509 certificates within your cluster. As it is packed with a lot of features, we will not go into detail here.
The ca-root-issuer is Self Signed issuers, which is useful for bootstrapping a PKI locally. That's absolutely what we want.
kind: ClusterIssuer
apiVersion: cert-manager.io/v1
metadata:
  name: ca-root-issuer
spec:
  selfSigned: {}
Now we can create our CA certificate via following YAML. Worth to point out is, that we refer to the ca-root-issuer ClusterIssuer in our spec section.
kind: Certificate
apiVersion: cert-manager.io/v1
metadata:
  name: ca-root
spec:
  secretName: ca-root
  isCA: true
  commonName: ca-root
  privateKey:
    algorithm: RSA
    size: 4096
  issuerRef:
    kind: ClusterIssuer
    name: ca-root-issuer
Now that we crated the CA certificate, we can create an additional ClusterIssuer use with the internal CA and issue certificates for the webhooks.
kind: ClusterIssuer
apiVersion: cert-manager.io/v1
metadata:
  name: ca-root
spec:
  ca:
    secretName: ca-root
Create the ValidatingWebhookConfiguration #
Now we can finish the last bits, before we deploy the webhook. As the Kubernetes API server is calling the webhook via https, we need to create the TLS certificates using our internal CA certificate.
The following resource will create the certificate using the ca-root cluster issuer from above and store the result in the Kubernetes secret called k8s-diy-validating-webhook-certs.
Important note: The
dnsNamesfiled should be set to the service name of the webhook. Reminder: In this article I deployed the webhook into thedefaultnamespace. Don't do this in production and change the dnsNames to the appropriate values in your cluster.
kind: Certificate
apiVersion: cert-manager.io/v1
metadata:
  name: k8s-diy-validating-webhook
spec:
  issuerRef:
    name: ca-root
    kind: ClusterIssuer
  secretName: k8s-diy-validating-webhook-certs
  duration: 2160h
  renewBefore: 360h
  dnsNames:
    - k8s-diy-validating-webhook.default.svc
  isCA: false
  privateKey:
    algorithm: RSA
    size: 4096
  usages:
    - client auth
    - server auth
And of course, we need to create the ValidatingWebhookConfiguration resource. Notable parts of the ValidatingWebhookConfiguration
are the client config, where we point to the service name of our admission controller and the endpoint.
The next part is the rules section. Here we define, on which resource and operation, the admission controller should be called.
Here we check if the resource is a Pod and the operation is CREATE. As scope, we decided that only namespaced resources will be
checked.
The cert-manager.io/inject-ca-from: default/k8s-diy-validating-webhook annotation is used to inject the certificate from
the step above.
kind: ValidatingWebhookConfiguration
apiVersion: admissionregistration.k8s.io/v1
metadata:
  name: docker-io-required
  annotations:
    cert-manager.io/inject-ca-from: default/k8s-diy-validating-webhook
webhooks:
  - name: docker-io-required.ediri.io
    clientConfig:
      service:
        namespace: default
        name: k8s-diy-validating-webhook
        path: /validate
    rules:
      - apiGroups:
          - ""
        apiVersions:
          - "v1"
        resources:
          - "pods"
        operations:
          - "CREATE"
        scope: Namespaced
    sideEffects: None
    admissionReviewVersions:
      - "v1"
Deploy the validating admission controller #
Now we can finally deploy the admission controller into our minikube cluster. Let's start the cluster with the following
command:
minikube start
😄  minikube v1.26.0 on Darwin 10.15.7
✨  Automatically selected the docker driver. Other choices: hyperkit, virtualbox, ssh, qemu2 (experimental)
📌  Using Docker Desktop driver with root privileges
👍  Starting control plane node minikube in cluster minikube
🚜  Pulling base image ...
🔥  Creating docker container (CPUs=2, Memory=5391MB) ...
🐳  Preparing Kubernetes v1.24.1 on Docker 20.10.17 ...
    ▪ Generating certificates and keys ...
    ▪ Booting up control plane ...
    ▪ Configuring RBAC rules ...
🔎  Verifying Kubernetes components...
    ▪ Using image gcr.io/k8s-minikube/storage-provisioner:v5
🌟  Enabled addons: storage-provisioner, default-storageclass
🏄  Done! kubectl is now configured to use "minikube" cluster and "default" namespace by default
Quickly check that everything is working by running the following command:
kubectl get nodes
NAME       STATUS   ROLES           AGE   VERSION
minikube   Ready    control-plane   28s   v1.24.1
Now we can navigate into the root folder of your project and call the all target in our parent Makefile.
make allThis will deploy the cert-manager, the manifest to create the local CA, call koto build our container image
and then deploy the k8s-diy-validating-webhook into the default namespace.
After everything is deployed, we can test that our admission controller is working by creating a Pod in the default
with not setting the registry to docker.io.
kubectl run nginx --image=nginx
Error from server: admission webhook "docker-io-required.ediri.io" denied the request: only container from docker.io are allowed
And as expected, the admission controller will deny the request. If we set the registry to docker.io then everything
works as planned in our admission controller.
kubectl run nginx --image=docker.io/nginx
pod/nginx created
But what happens, if we want to actively change or amend values in our Pod resource? For this we can create a mutating admission controller. Why? Because with this we can ensure, that specific best practices in terms of security are enforced.
This rules can be written by the platform team, who provide the service to the user. It could be the security team, or the SRE team.
Write a mutating admission controller #
Most of the steps from above are similar for the mutating admission controller. I will go only in detail on the parts that differ from the validating admission controller.
Coding the mutating admission controller #
We create a new route called mutate in our runMutatingWebhookServer function.
...
http.HandleFunc("/mutate", mutate)
...
We still need to decode the json request to create our AdmissionReview object, so there is no change in this part.
The actual change, is where we create the mutation of the Pod resource.
...
var patch string
patchType := admissionv1.PatchTypeJSONPatch

for i := 0; i < len(pod.Spec.Containers); i++ {
    if pod.Spec.Containers[i].Resources.Limits == nil {
        patch = fmt.Sprintf(`{"op": "add", "path": "/spec/containers/%d/resources/limits", "value": {"cpu": "100m", "memory": "100Mi"}}, %s`, i, patch)
        patch = strings.TrimSpace(patch)
    }
}

if len(patch) > 0 {
    patch = strings.TrimRight(patch, ",")
    patch = fmt.Sprintf(`[%s]`, patch)
}

admissionResponse.Allowed = true
if patch != "" {
    admissionResponse.PatchType = &patchType
    admissionResponse.Patch = []byte(patch)
}
...
The code loops through the Containers of the Pod resource and if no Limits are set, we add some default values. The AdmissionResponse is currently only support as patch type JSONPatch.
So I create the JSONPatch object with the add operation and the path to the Limits field.
Create the MutatingWebhookConfiguration #
Similar to the validating admission controller, we need to create a MutatingWebhookConfiguration and the certificate:
kind: Certificate
apiVersion: cert-manager.io/v1
metadata:
  name: k8s-diy-mutating-webhook
spec:
  issuerRef:
    name: ca-root
    kind: ClusterIssuer
  secretName: k8s-diy-mutating-webhook-certs
  duration: 2160h
  renewBefore: 360h
  dnsNames:
    - k8s-diy-mutating-webhook.default.svc
  isCA: false
  privateKey:
    algorithm: RSA
    size: 4096
  usages:
    - client auth
    - server auth
The certificate, will be issued from our intenal CA that we created and also used in the validating admission controller. Again the certificates will be stored in a Secret resource.
The MutatingWebhookConfiguration is nearly similar to the ValidatingWebhookConfiguration but just with different values reflecting to use the mutating admission controller. The service to use is the mutating webhook service and the /mutate endpoint.
The cert-manager.io/inject-ca-from annotation is used to inject the CA to the kubernetes api server.
kind: MutatingWebhookConfiguration
apiVersion: admissionregistration.k8s.io/v1
metadata:
  name: set-resource-limits
  annotations:
    cert-manager.io/inject-ca-from: default/k8s-diy-mutating-webhook
webhooks:
  - name: set-resource-limits.ediri.io
    clientConfig:
      service:
        namespace: default
        name: k8s-diy-mutating-webhook
        path: /mutate
    rules:
      - apiGroups:
          - ""
        apiVersions:
          - "v1"
        resources:
          - "pods"
        operations:
          - "CREATE"
        scope: Namespaced
    sideEffects: None
    admissionReviewVersions:
      - "v1"
Deploy the mutating admission controller #
Similar to the validating admission controller, we need to deploy the mutating admission controller. Just navigate to the root folder of your project and call the all target in our parent Makefile.
make allAfter everything is deployed we can test that our admission controller is working by creating a Pod in the default
and check if the missing Limits are set.
kubectl run nginx --image=docker.io/nginx
pod/nginx created
kubectl get pods nginx -o=jsonpath='{.spec.containers.*.resources}'
{"limits":{"cpu":"100m","memory":"100Mi"},"requests":{"cpu":"100m","memory":"100Mi"}}% Wrap up - Next steps #

Congratulations, you created your first two admission controllers. One for validating and one for mutating. Now you can think about to create additional admission controllers depending on your needs.
You could also merge both admission controllers into one to avoid duplicate code and just add additional rules to reflect your needs.
Follow Kubesimplify on Hashnode, Twitter and Linkedin. Join our Discord server to learn with us.
Cloud Native Pilgrim | Kubernetes Enthusiast | Serverless Believer | Customer Experience Architect @ Pulumi | (he/him) | CK{A,AD} |
Get new posts in your inbox.
Spotted a typo or want to improve this post? Edit on GitHub →