Docker Networking Demystified
Docker has transformed the way developers build, ship, and run applications. Its networking capabilities are a key feature that allows containers to…

On this page (9)
Introduction #
Docker has transformed the way developers build, ship, and run applications. Its networking capabilities are a key feature that allows containers to communicate with one another and the outside world. However, Docker networking can be complex and challenging to comprehend, particularly for those new to the technology. In this article, we will demystify Docker networking by exploring how containers communicate with each other and the concept of network namespaces. Read on to gain a better understanding of Docker networking.
Network Namespaces #
On Linux, a network namespace is a technique used to isolate network resources, such as network interfaces, routing tables, and firewall rules, from the rest of the system. Each network namespace provides an independent network stack that can be used by processes running within that namespace. This allows multiple applications to run on the same host while using different network configurations.
Docker leverages network namespaces to provide container-level networking isolation. When a Docker container is started, it is assigned its own network namespace. This namespace provides a virtual network interface, IP address, routing table, and firewall rules for the container. The Docker daemon also creates a bridge network, which acts as a virtual switch connecting all the containers in the same network. Containers can communicate with each other through this bridge network or with the outside world through the host's network interface.
Docker also supports other network drivers, such as overlay networks, which allow containers to communicate across multiple hosts, and host networks, which allow containers to use the host's network interface directly. Each network driver uses a different network namespace to provide network isolation and different features for container networking.
Overall, network namespaces provide a powerful tool for isolating and managing network resources on Linux, and Docker leverages this technology to provide flexible and secure networking for containerized applications.
How it works #
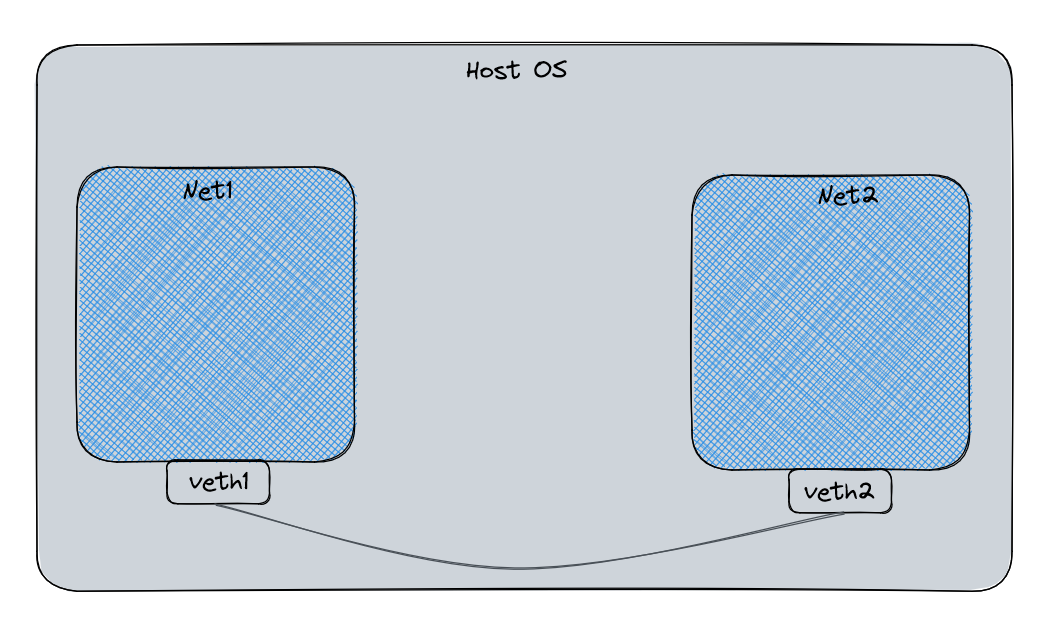
To recreate docker containers at the most basic level we can create two network namespaces and then create a virtual Ethernet pair (veth pair) and plug the two ends into each of the network namespaces now this creates our simple container network in the most basic terms.
Below is the script that does the same. So let's understand it line by line.
https://gist.github.com/sauravrana646/f68f9cd8acf05e7994c72c475feca66f
set -o pipefailThis sets the Bash option "pipefail", which causes a pipeline (a series of commands separated by pipes) to fail if any command in the pipeline fails. This ensures that errors in the pipeline are detected, and the script exits with a non-zero status.
string="$1"This assigns the first command-line argument to the variable "string".
if [ "$string" = "up" ]; thenThis checks if the value of "string" is equal to "up". If it is, the following commands will be executed.
ip netns add net1
ip netns add net2
These commands create two network namespaces called "net1" and "net2" using the "ip netns add" command.
ip link add veth1 netns net1 type veth peer name veth2 netns net2This creates a pair of virtual network interfaces called "veth1" and "veth2", with "veth1" connected to "net1" and "veth2" connected to "net2", using the "ip link add" command.
ip netns exec net1 ip addr add 10.100.0.1/16 dev veth1
ip netns exec net2 ip addr add 10.100.0.2/16 dev veth2
These commands assign IP addresses to both virtual interfaces using the "ip addr add" command.
ip netns exec net1 ip link set lo up
ip netns exec net2 ip link set lo up
These commands bring up the loopback interface in both namespaces using the "ip link set" command.
ip netns exec net2 ip link set veth1 up
ip netns exec net2 ip link set veth2 up
These commands bring up the virtual network interfaces in "net2" using the "ip link set" command.
ip netns exec net1 ping -c 3 10.100.0.2This command tests connectivity from "net1" to "net2" by pinging the IP address of "veth2" in "net2" using the "ping" command.
ip netns exec net2 ping -c 3 10.100.0.1This command tests connectivity from "net2" to "net1" by pinging the IP address of "veth1" in "net1" using the "ping" command.
if [ "$1" == "down" ]; thenThis checks if the value of the first command-line argument is equal to "down". If it is, the following commands will be executed.
ip netns delete net1
ip netns delete net2
These commands delete the network namespaces "net1" and "net2" using the "ip netns delete" command.
Let's run it #
To run this bash script, we can make an executable using chmod +x just run it with the bash -c parameter.
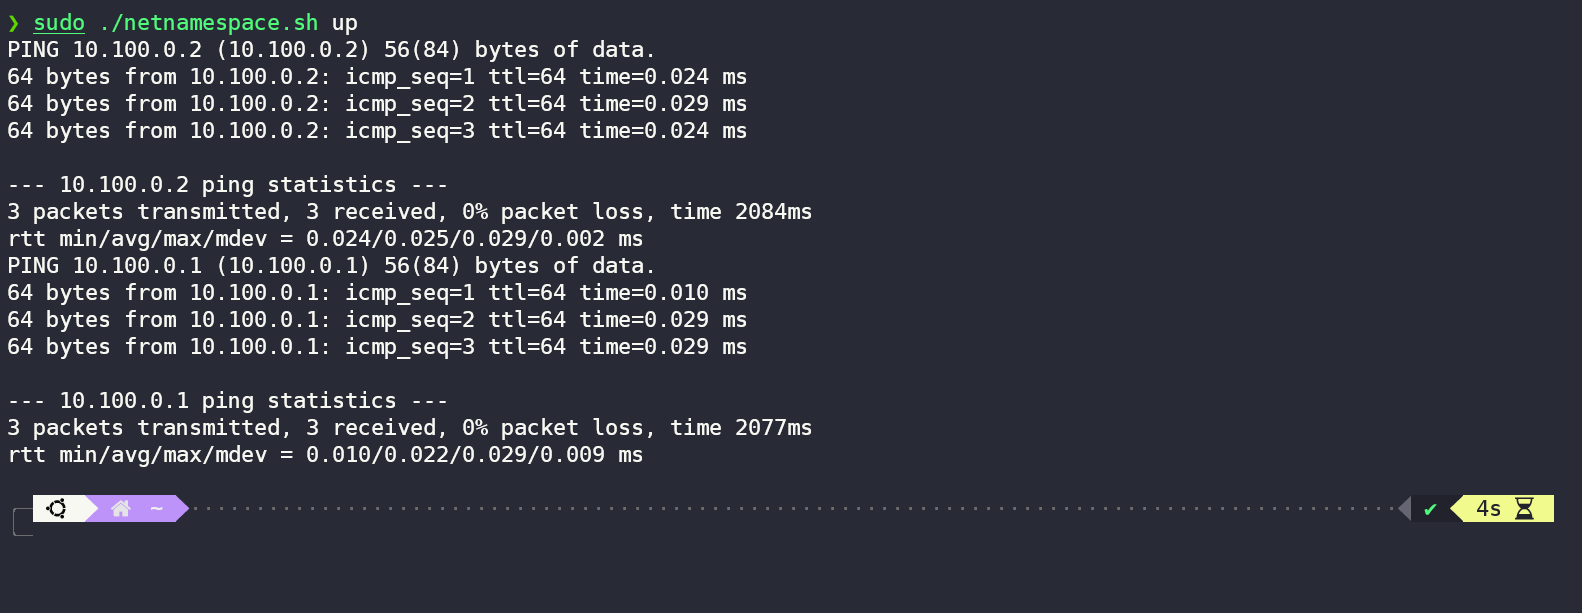
As we can see, our script ran, and we can ping namespaces from one another. We can also get inside these namespaces to see their details.
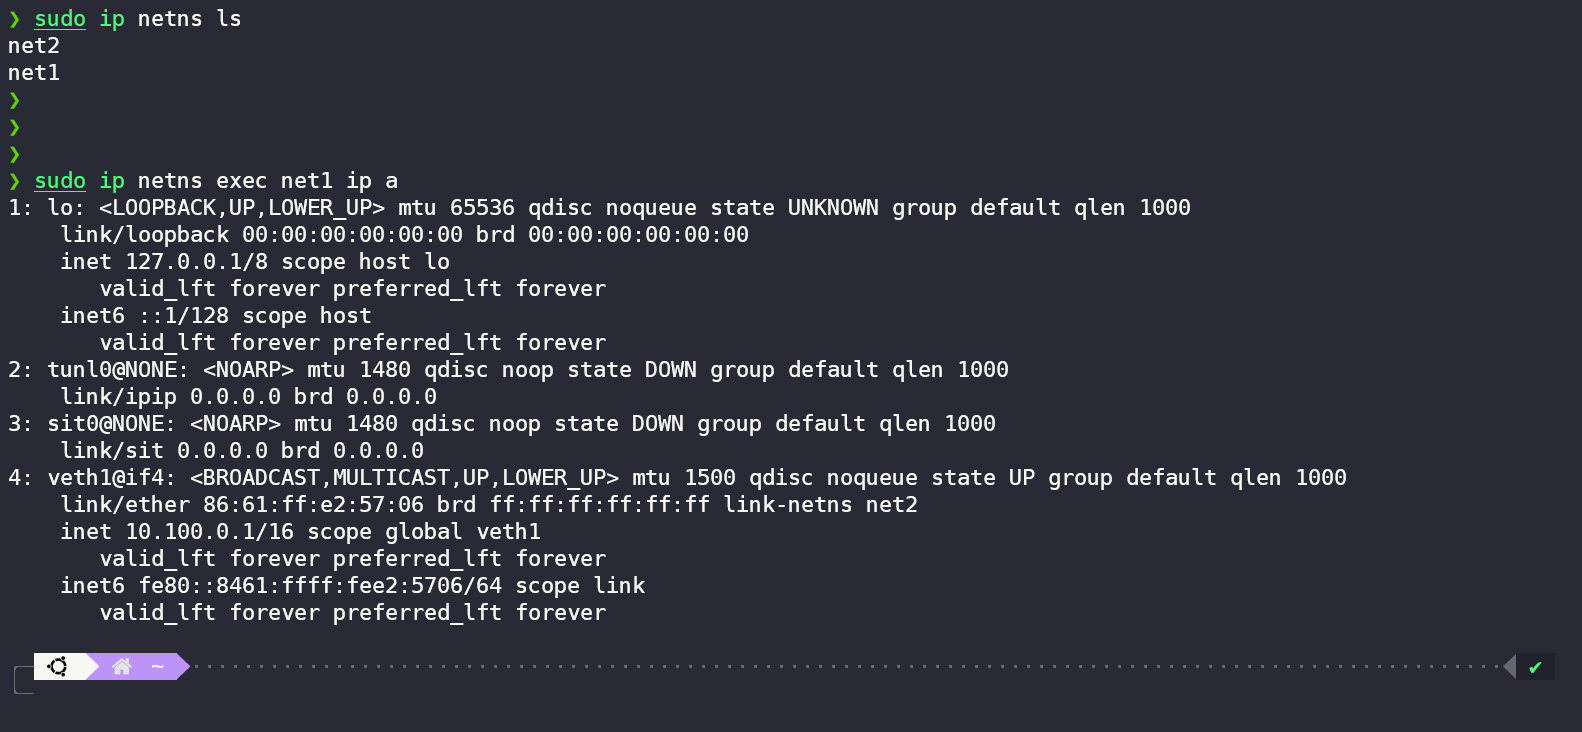
sudo ip netns exec net1 ip aThis command shows us the interfaces inside the net1 namespace, and we can see that net1 has veth1 interface which is assigned the same IP as we did in the script.
This marks the completion of our first part but there's some problem with this approach that we are going to discuss now.
The Problem #
We have just begun to scratch the surface of Linux and virtual networks. As we learned how, two containers can talk to each other through virtual Ethernet pairs, but there is a problem. Can you guess what may be the issue?
Yes, the issue is, that it is not scalable if we have a large no. of containers because we have to create an Ethernet pair and attach it to all the containers so that all can communicate with each other.
For example, if we have four containers, we would need to create N*(N-1)/2 containers, i.e. we would be needing 6 veth pairs to connect all of them.
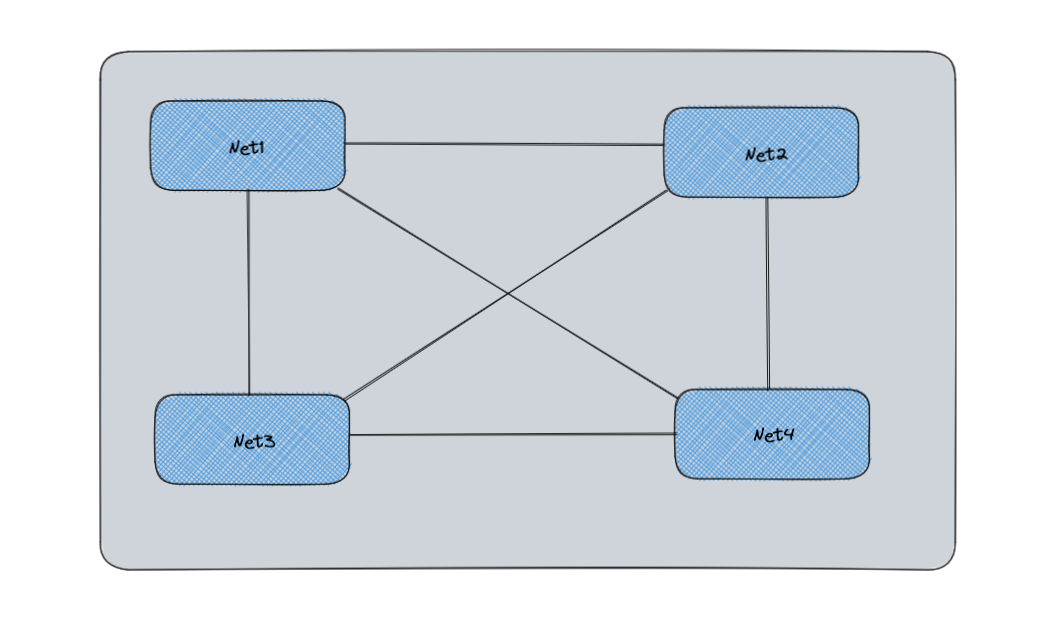
Thus, to solve this problem, the concept of bridges was introduced.
Linux Bridge #
A Linux bridge is a software bridge that connects multiple network interfaces together into a single network segment. It is a layer 2 devices that operates at the data link layer of the OSI model, allowing it to connect network segments together by forwarding traffic between interfaces.
In the context of Docker, a Linux bridge is a common networking solution used to connect containers running on a host system to the external network. When a container is created, Docker creates a virtual Ethernet (veth) pair, which consists of two virtual network interfaces: one end is attached to the container's namespace, while the other end is attached to the host system's bridge interface.
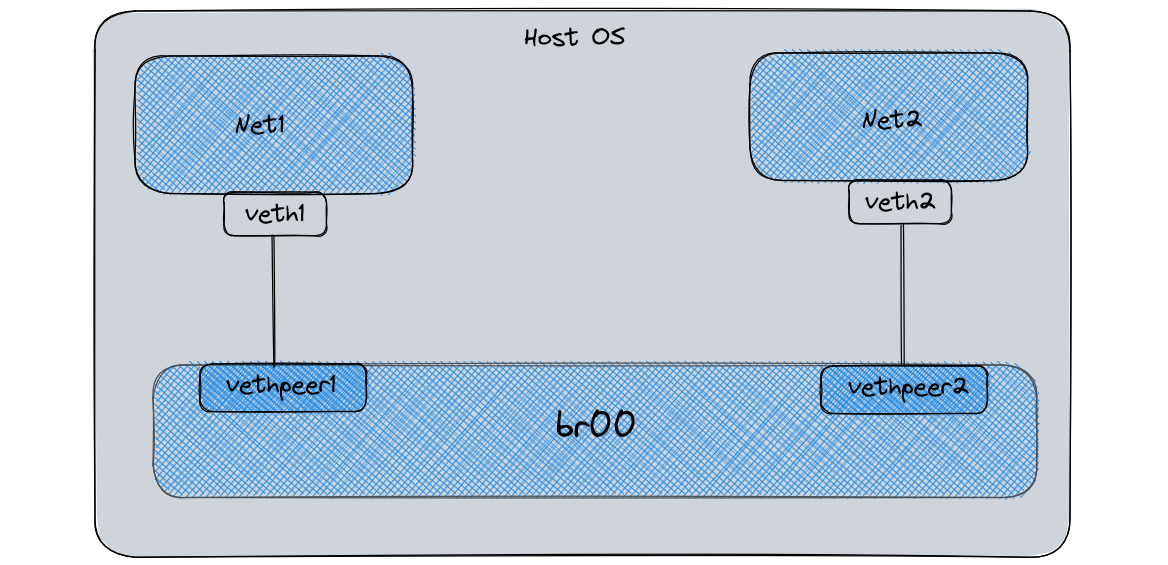
The Linux bridge is created on the host system, and all containers are connected to the bridge via their virtual interfaces. This allows them to communicate with each other and with the external network.
One of the primary benefits of using a Linux bridge with Docker is that it simplifies the process of managing container networking. With a bridge, Docker containers can be easily connected to a single network segment, eliminating the need to manually configure network interfaces for each container.
Let's create a bridge #
Here's the modified bash script to include a bridge as a mode of communication between the namespaces.
https://gist.github.com/sauravrana646/56d4efb50b4dbd4ebbe077652591c511
Let's go through it line by line one more time.
ip netns add net1
ip netns add net2
These commands create two new network namespaces, named net1 and net2, respectively.
ip link add veth1 type veth peer name vethpeer1
ip link add veth2 type veth peer name vethpeer2
These commands create two virtual Ethernet devices named "veth1" and "veth2", each with a peer device named "vethpeer1" and "vethpeer2", respectively.
ip link set veth1 up
ip link set veth2 up
These commands bring the veth1 and veth2 interfaces up.
ip link set vethpeer1 netns net1
ip link set vethpeer2 netns net2
These commands move the peer devices "vethpeer1" and "vethpeer2" into the network namespaces "net1" and "net2", respectively.
ip netns exec net1 ip link set lo up
ip netns exec net2 ip link set lo up
These commands bring the loopback interfaces up in the net1 and net2 network namespaces, respectively.
ip netns exec net1 ip link set vethpeer1 up
ip netns exec net2 ip link set vethpeer2 up
These commands bring up the peer devices "vethpeer1" and "vethpeer2" in their respective network namespaces.
ip netns exec net1 ip addr add 10.100.0.10/16 dev vethpeer1
ip netns exec net2 ip addr add 10.100.0.20/16 dev vethpeer2
These commands assign IP addresses to the vethpeer1 and vethpeer2 interfaces, giving them IP addresses 10.100.0.10 and 10.100.0.20, respectively.
ip link add br00 type bridge
ip link set br00 up
These commands create a new bridge interface named br00 and bring it up.
ip link set veth1 master br00
ip link set veth2 master br00
These commands add the veth1 and veth2 interfaces to the br00 bridge.
ip addr add 10.100.0.1/16 dev br00This command assigns an IP address to the br00 interface, giving it IP address 10.100.0.1.
ip netns exec net1 ip route add default via 10.100.0.1
ip netns exec net2 ip route add default via 10.100.0.1
These commands add default routes to the net1 and net2 network namespaces, directing traffic to the br00 interface.
ip netns exec net1 ping -c 3 10.100.0.20
ip netns exec net2 ping -c 3 10.100.0.10
These commands test the connectivity between the two network namespaces by running ping commands from one namespace to the other.
bash -c 'echo 1 > /proc/sys/net/ipv4/ip_forward'This command enables IP forwarding by setting the value of the ip_forward sysctl parameter to 1.
iptables -t nat -A POSTROUTING -s 10.100.0.1/16 ! -o br00 -j MASQUERADEThis command sets up NAT (Network Address Translation) using iptables. Specifically, it adds a rule to the nat table (-t nat) that applies to packets with a source IP address of 10.100.0.1/16 (-s 10.100.0.1/16) that are not going out through the br00 interface (! -o br00). The rule action is to apply MASQUERADE (-j MASQUERADE), which modifies the source IP address of the packet to the IP address of the outgoing interface (in this case, br00).
ip netns exec net1 ping -c 3 8.8.8.8This command tests connectivity to the Google DNS server (8.8.8.8) from the net1 namespace by sending three ICMP echo request packets.
Let's bridge it #
Run the bash script using sudo ./bridge.sh up
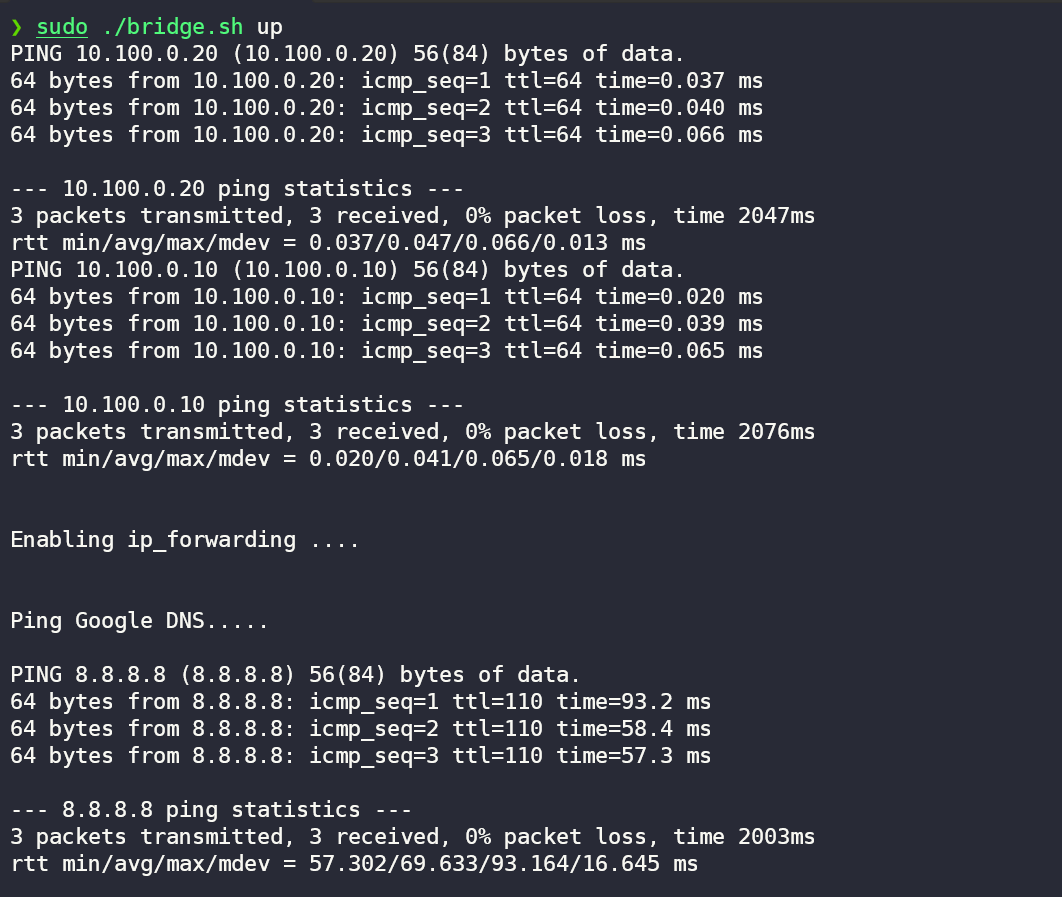
As we can see that our namespaces are able to communicate with each other through the bridge and after some additional configuration we can also ping the internet through our namespaces.
We can also check our bridge through brctl and ifconfig command like this.


Summary #
In this part, we learned how containers talk to each other through virtual ethernet pairs and what is the problem with that approach, and how bridges solve the problem of connecting multiple containers effectively. We understood why a bridge is required, how it works and helps to manage container networking.
But there is something that might be confusing here, why we had to use
ip_forwardingand addiptablerule?
This we will explore in the next part of the series so stay tuned for the next part and until then keep growing, keep grinding, and keep learning .... !!
Follow Kubesimplify on Hashnode, Twitter and Linkedin. Join our Discord server to learn with us.
I am a learner who likes to get behind the new technologies of the world and integrate them for a more efficient workflow. Currently learning AWS, GitOps, Kubernetes, and much more...
Get new posts in your inbox.
Spotted a typo or want to improve this post? Edit on GitHub →