How get started with Hashicorp Vault🛡️
it provides how to setup vault, how to configure backend with S3 and more and finally how to make auto-seal work and HTTPS with self signed certificate


On this page (12)
- Vault config (Example)📃
- What is AutoSeal, Why do we need and how to config? 📝
- What is Backend, Why do we need and how to config? 📝
- Step 1: Setup AWS Credentials 🛶
- Step 2: Make the installed vault package to start automatically by systemd 🚤
- Step 3: Create AWS S3 bucket for storage of the vault 🛥️
- Step 4: Create a key in AWS KMS for AutoSeal ⛴️
- Step 5: Create an Endpoint in VPC (Regional based service) to access the key(s) 🚢
- Step 6: vault configuration 🛳️
- Let's bootup the vault 🤞
- Turn on Specific auth method and policies
- Update for HTTPS 🛡️ (self-signed cert)
Introduction #
It is a tool for managing secrets and sensitive data in modern computing environments. Especially in a dynamic environment. Which can be accessed using API, CLI as well as web app also if you don't want to manage the infrastructure on your own then you can use the SaaS offering by HashiCorp
Why?
In earlier app development we have to manually update the Secret / API Tokens which means human intervention for Key Rotation and updating the App Source Code's configurations. But, using the vault the app reaches out to the vault for fetching the token by providing valid authentication, and then the token will be used for authorization purposes, getting Required Secret Keys, and more. Tokens are frequency rotated based on max TTL(Time To Live) (i.e. Dynamic secrets 😉 ) hence taking out the logic for managing the key rotation out of apps hence better security management and lowering the development overhead for adding security functionality
How to Install #
There are various methods:
-
binary
-
package manager
If you have brew
brew tap hashicorp/tap
brew install hashicorp/tap/vaultHow to start the vault in dev mode ⛓️ #
Running development/testing mode
vault server -dev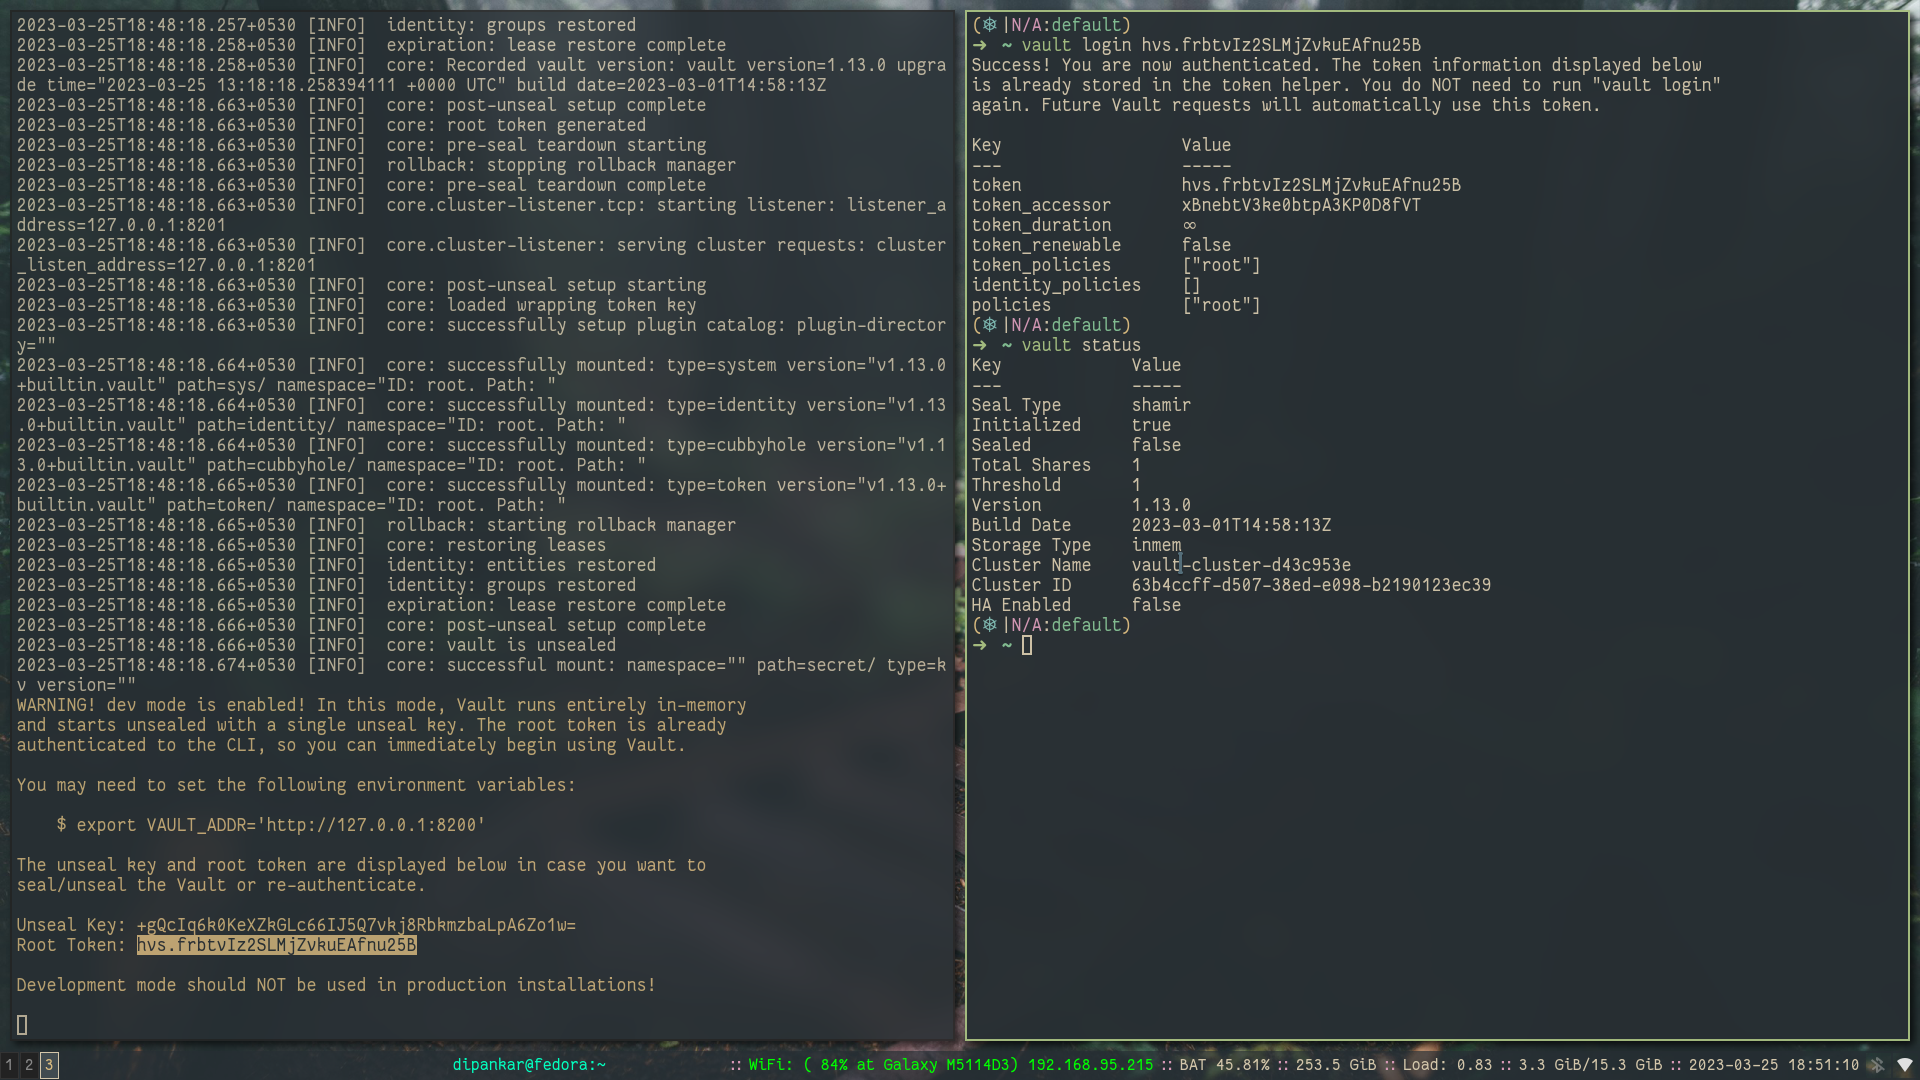
then you need to set the required export for vault_addr and login as a root user using ROOT token. and check the status of the vault cluster which says the following:
-
the Cluster is
unsealed(seal-> cluster is running it requires the keys to decrypt the master key which in itself decrypts the backend storage) -
backend storage type is
inmemwhich is in-memory -
seal type is
shamir
Note:
ROOT TOKENmust be saved in highly secured environment
Now let's do it in prod environment 🏭 #
vault server -config=config.hcl
# here the config.hcl will contain the required config for vault to run in production mode
Vault config (Example)📃 #
# for vault config -> /etc/vault.d/vault.hcl
storage "consul" {
  address = "127.0.0.1:8500"
  path    = "vault/"
  token   = "XXXXXX-yyyy-zzz-aaaa-BBBBBB"
}

listener "tcp" {
 address = "0.0.0.0:8200"
 cluster_address = "0.0.0.0:8201"
 tls_disable = 0
 tls_cert_file = "/etc/vault.d/client.pem"
 tls_key_file = "/etc/vault.d/cert.key"
 tls_disable_client_certs = "true"
}

seal "awskms" {
  region = "<Region of KMS>"
  kms_key_id = "<AWS KMS key ID>",
  endpoint = "example.kms.<Region of KMS>.vpce.amazonaws.com"
}

api_addr = "https://vault-us-east-1.example.com:8200"
cluster_addr = " https://node-a-us-east-1.example.com:8201"
cluster_name = "vault-prod-us-east-1"
ui = true
log_level = "INFO"
license_path = "/opt/vault/vault.hcl"
disable_mlock=true
Key points
-
Backend storage -
consulwhich is another storage which is a product of Hashicorp, and various field can be checked out 👉 Docs link -
Listener method -
tcpmeans tcp connection as Transport Layer protocol 👉 Docs link -
Seal - we are using
awskmsfor automatic unseal of the vault cluster 👉 Docs link -
UI - to set whether we want UI interface for the cluster
-
and more option 👉 Docs link
What is AutoSeal, Why do we need and how to config? 📝 #
Vault unseal operation requires a quorum of existing unseal keys split by Shamir's Secret sharing algorithm. This is done so that the "keys to the kingdom" won't fall into one person's hand.
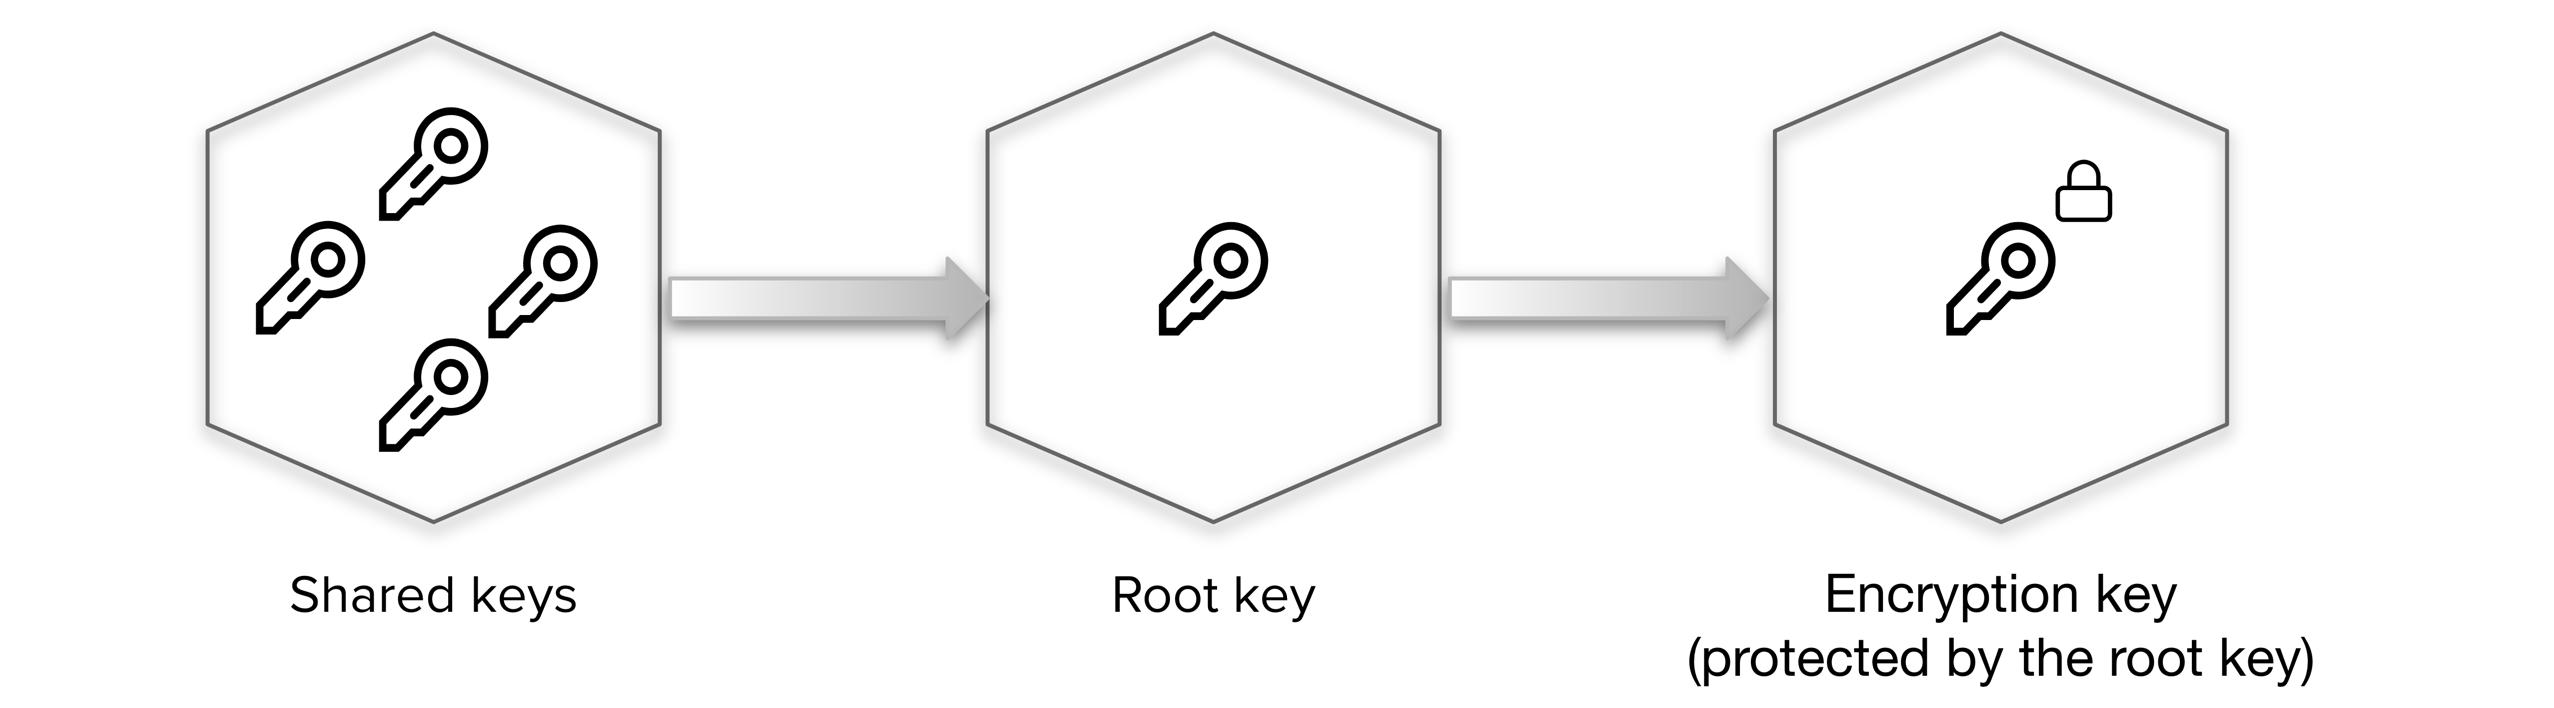
As, this process is manual and can become painful when you have many Vault clusters as there are now many different key holders with many different keys.
Instead of using shared keys are replaced by the vault transit key in a ault secrets engineor instead of creating another vault cluster for maintaining this process we can make some trusted cloud environment handle it for us like awskms
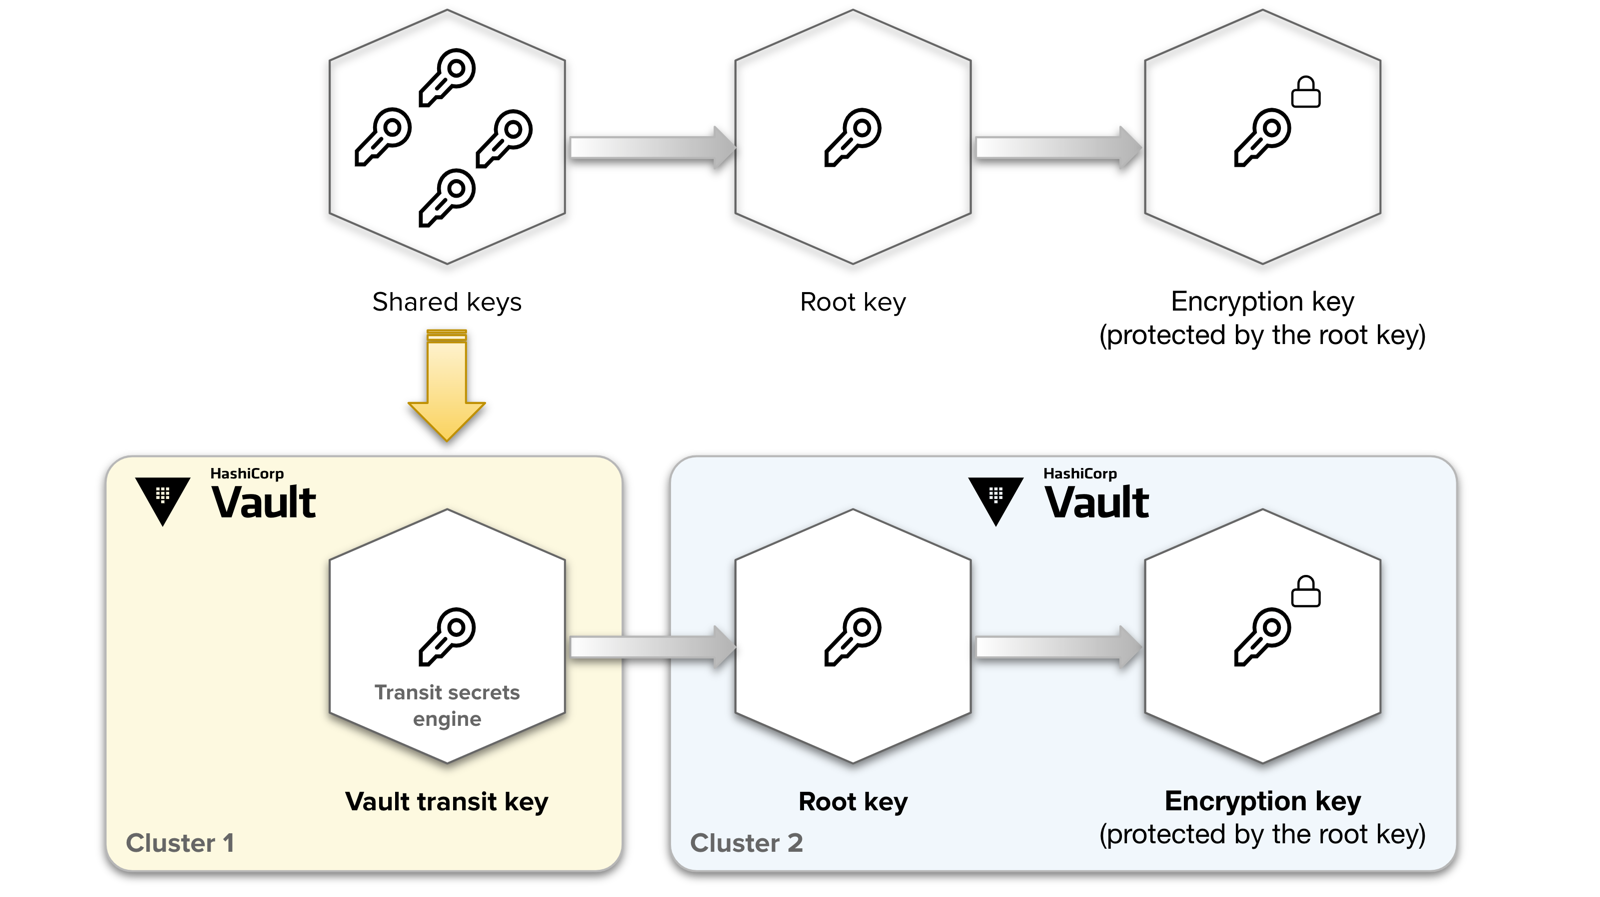
for instance, when awskms is configured, the vault cluster during init stage creates and transfers data between kms and the cluster to store the vault keys. After any further shutdown or restart of cluster, it will reach out the awskms for unseal of cluster. It is an automatic process
seal "awskms" {
  #......
}
# Add this block to /etc/vault.d/vault.hcl
For more info on this topic 👉 Refer Docs link
What is Backend, Why do we need and how to config? 📝 #
In vault language storage backend is untrusted storage where only encrypted data is stored and all the logic of encrypt and decrypt are inside a confined layer inside Vault cluster, whenever the data goes out of cluster it's always encrypted. Logging is given more priority than Performace as it's more important to log the event for a later security audit than to log after the data is processed. If the event is unable to be logged, vault does not process the event and throws an error
So in a nutshell, the storage backend is the location for the durable storage of Vault's information. When selecting which backend to use, remember each backend has pros, cons, advantages, and trade-offs.
For more info on this topic 👉 Refer Docs link
Let's play around and learn 🏏 #
Let's get started with configuring the vault server
Prerequisites
-
Vault binary
-
root access to the server
-
AWS account
-
server is authenticated to AWS cloud
Step 1: Setup AWS Credentials 🛶 #
Install the credentials using AWS CLI or directly create a file
cat <<EOF > ~/.aws/credentials
[default]
aws_access_key_id = AABBCCXyz
aws_secret_access_key = Abdcdcdiweif43323
Now the AWS credential part is ready!
Step 2: Make the installed vault package to start automatically by systemd 🚤 #
let's move forward and add systemd file to make automatic startup of vault binary on startup
sudo su
cat << EOF > /usr/lib/systemd/system/vault.service
[Unit]
Description="HashiCorp Vault - A tool for managing secrets"
Documentation=https://www.vaultproject.io/docs/
Requires=network-online.target
After=network-online.target
ConditionFileNotEmpty=/etc/vault.d/vault.hcl  # important
StartLimitIntervalSec=60
StartLimitBurst=3

[Service]
User=root # important
Group=root # important
ProtectSystem=full
ProtectHome=read-only
PrivateTmp=yes
PrivateDevices=yes
SecureBits=keep-caps
AmbientCapabilities=CAP_IPC_LOCK
Capabilities=CAP_IPC_LOCK+ep
CapabilityBoundingSet=CAP_SYSLOG CAP_IPC_LOCK
NoNewPrivileges=yes
ExecStart=/usr/bin/vault server -config=/etc/vault.d/vault.hcl # important
ExecReload=/bin/kill --signal HUP $MAINPID
KillMode=process
KillSignal=SIGINT
Restart=on-failure
RestartSec=5
TimeoutStopSec=30
StartLimitInterval=60
StartLimitIntervalSec=60
StartLimitBurst=3
LimitNOFILE=65536
LimitMEMLOCK=infinity # important

[Install]
WantedBy=multi-user.target
EOF
systemctl daemon-reload
As now the startup script is ready, we can now config the vault server settings
Step 3: Create AWS S3 bucket for storage of the vault 🛥️ #
We are using cloud-based storage as it is highly available. No data loss
-
with the name "<Bucket_Name>" or make it something unique as it will be our storage with default settings
-
Make sure you allow all public access
NOTE: only for demonstration purpose
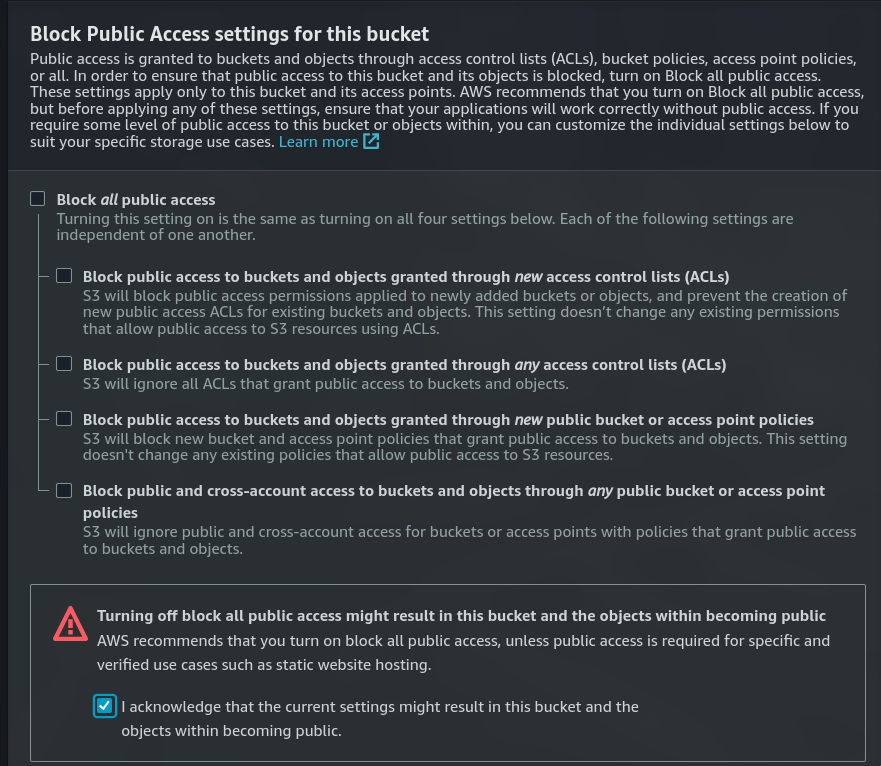
-
Link for how to create 👉 S3 bucket
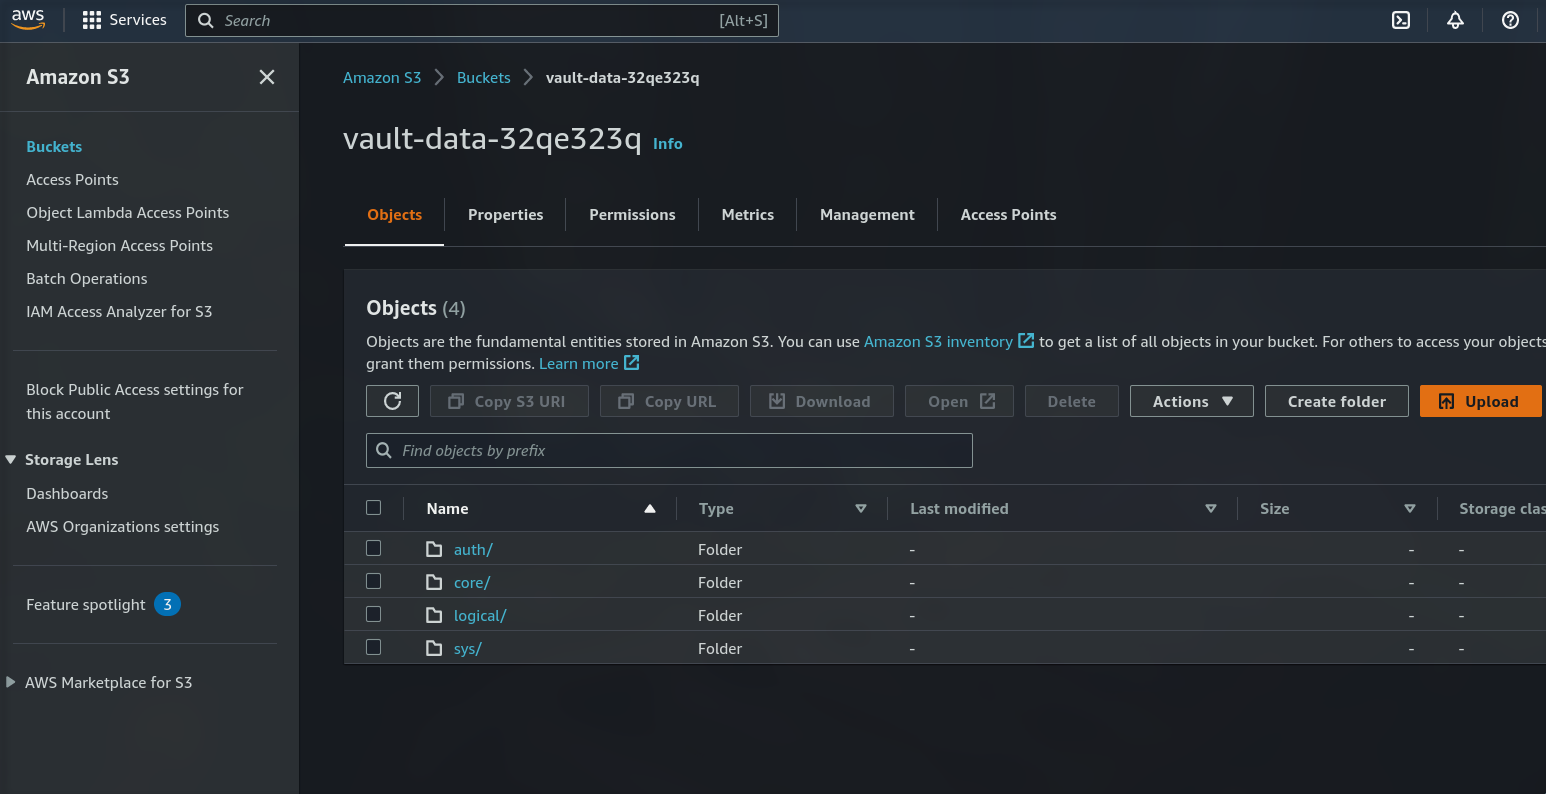
-
Once created the bucket it will be empty
-
copy the bucket name
Step 4: Create a key in AWS KMS for AutoSeal ⛴️ #
It will help a lot when you vault server/cluster restarts, or you start it after shutdown it will automatically unseal it
-
Go to AWS KMS dashboard
-
Click on the customer-managed key


- Select the checkbox to enable a specific IAM user to have permission to delete the KMS key
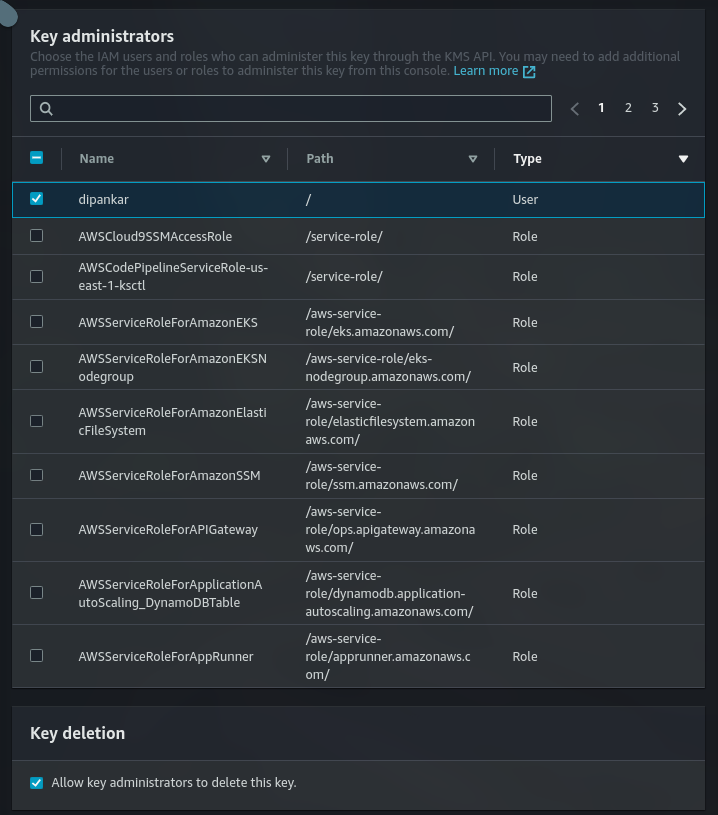
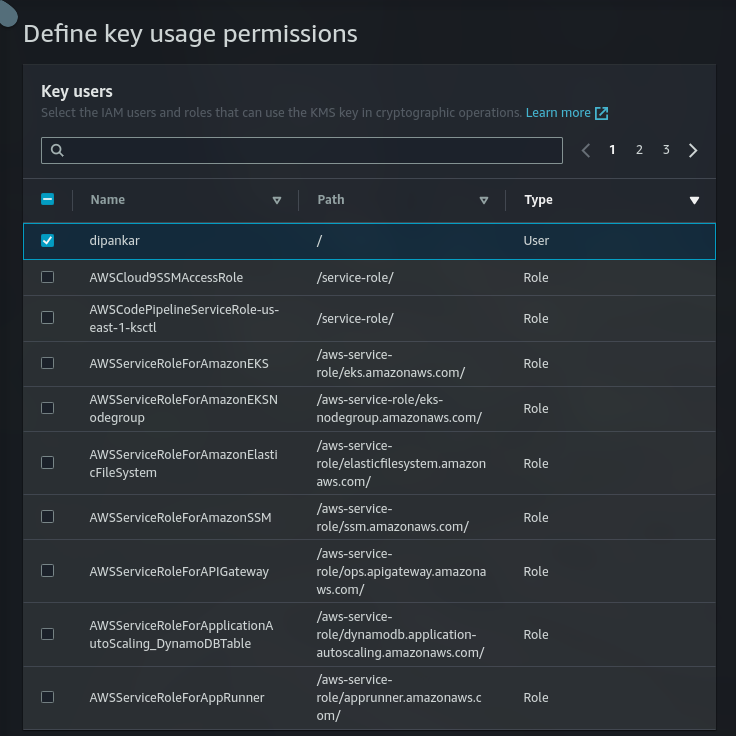
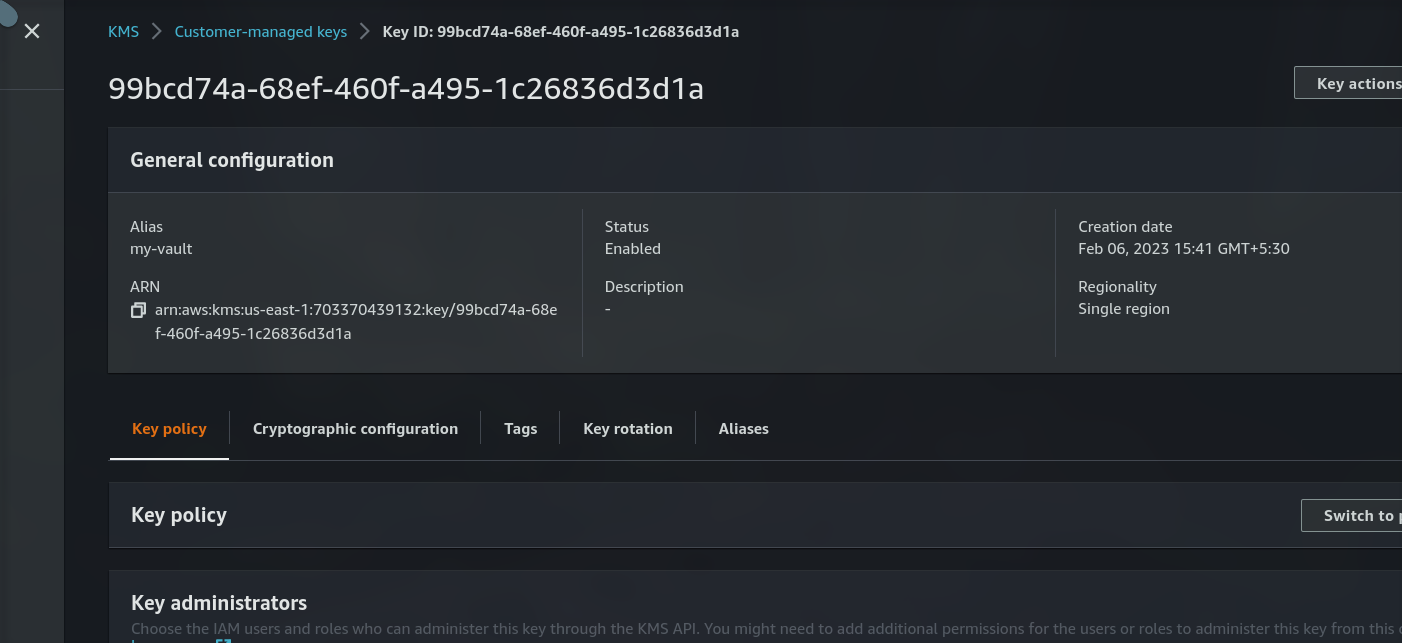
- Save the KMS ID and region where its created
Step 5: Create an Endpoint in VPC (Regional based service) to access the key(s) 🚢 #

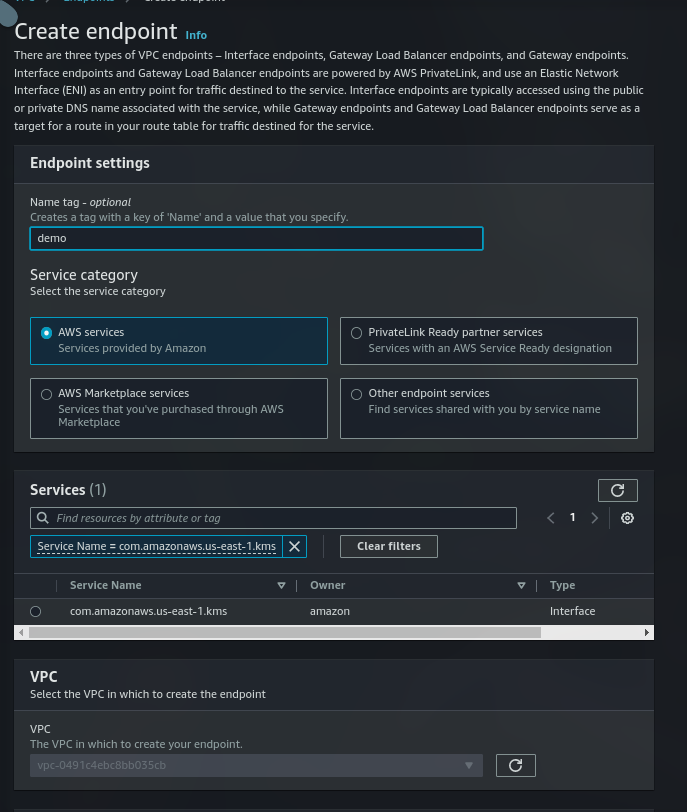
As the endpoint is created we can now be able to use the KMS service using that VPC
Note: Make sure KMS and endpoint are in the same region
Step 6: vault configuration 🛳️ #
cat <<EOF > /etc/vault.d/vault.hcl
# Full configuration options can be found at https://www.vaultproject.io/docs/configuration

ui = true

#mlock = true
#disable_mlock = true

disable_mlock = true
#storage "file" {
#  path = "/home/dipankar/vault/data"
#}

storage "s3" {
  bucket = "<Bucket_Name>"
}

# HTTP listener
#listener "tcp" {
#  address = "127.0.0.1:8200"
#  tls_disable = 1
#}

listener "tcp" {
  address       = "0.0.0.0:8200"
  tls_disable = 1  # no TLS i.e. no HTTPS
  tls_cert_file = "/etc/vault.d/vault.crt"
  tls_key_file  = "/etc/vault.d/vault.key"
  tls_disable_client_certs = "true"
}

seal "awskms" {
  region = "<KMS_KEY_REGION>"
  kms_key_id = "<KMS_KEY_ID>"
  endpoint = "kms.<KMS_KEY_REGION>.amazonaws.com"
}
EOF
Let's bootup the vault 🤞 #

sudo systemctl start vault
sudo systemctl enable vault
sudo systemctl stop vault # to stop the vault server
# vault is uninitialized and sealed
vault status
# lets initialize the vault server
vault operator init # it will output the root login token(KEEP IT SAVED)
# so now the vault must be initialized and unsealed
vault status
# login
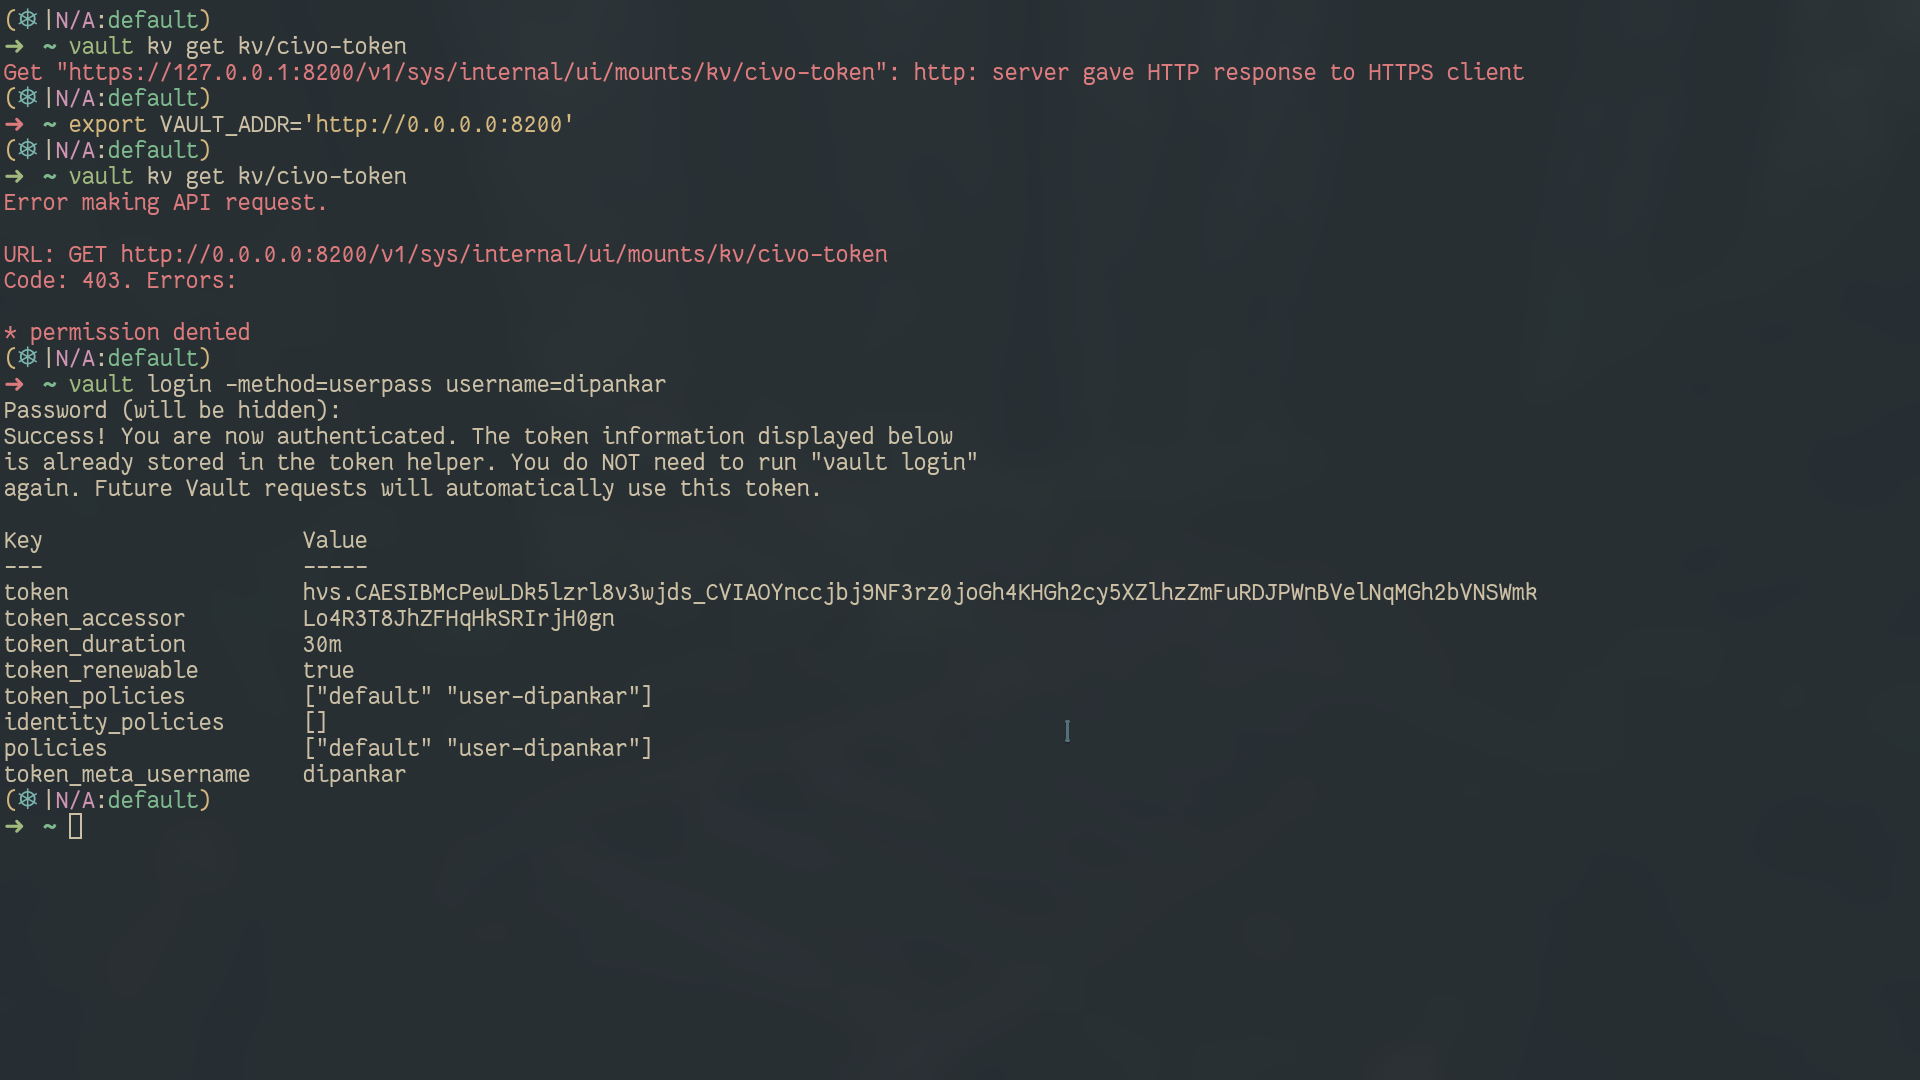
vault login <ROOT_TOKEN>
# In order to use login method other than token and it is
# userpass then we first need to enable the auth method
vault auth enable userpass
# now we need to specify the nwe username and password
vault write auth/userpass/users/<username> password=<password>
# Lets add a new secret
vault secrets enable kv
# In next section we will enable specific auth method and policies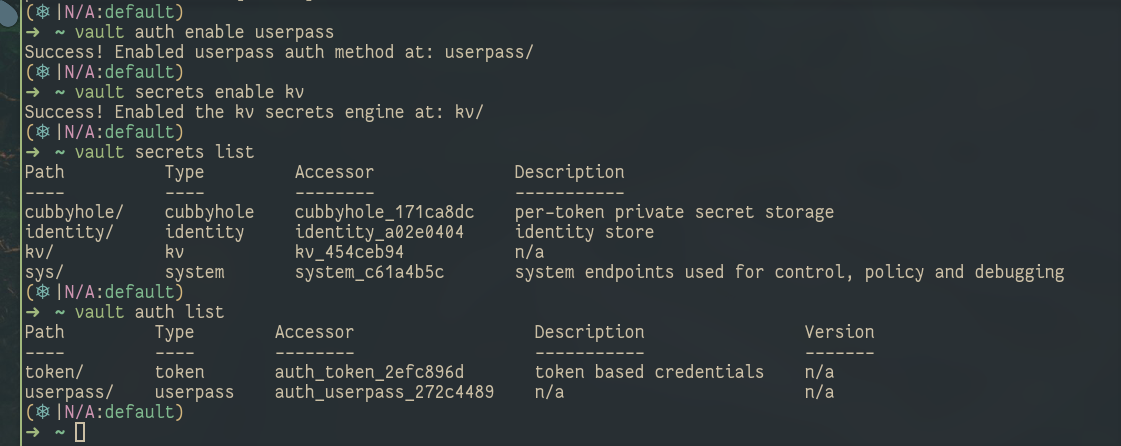
login into specific userpass user
Created the secret key and how to access them

Turn on Specific auth method and policies #
# for restrictive access for the user to kv store only
cat <<EOF > user-policy.hcl
path "kv/*" {
  capabilities = ["list", "read", "update", "delete"]
}

path "kv" {
  capabilities = ["list", "delete"]
}
EOF

vault policy write user-dipankar user-policy.hcl
vault write auth/userpass/users/dipankar policy=user-dipankar password=1234
vault secrets enable kv
the above policy
user-dipankarwill allow user who has this policy attached to read, update, list, and delete permissions in the path kv/......but you may ask them to then allow kv path its because to query the secret the user must have permission to access kv path i.e. able to see kv option in UI and then can navigate to other subdirectories
For more info on CLI commands, do refer 👉 CLI Docs link
Update for HTTPS 🛡️ (self-signed cert) #
#!/bin/bash
cd /etc/vault.d
openssl req -new -newkey rsa:4096 -x509 -sha256 -days 365 -nodes -out vault.crt -keyout vault.key

# it will create the vault.crt and vault.key

# now make changes to the vault.hcl
listener "tcp" {
  address = "0.0.0.0:8200"
  tls_cert_file = "/etc/vault.d/vault.crt"
  tls_key_file  = "/etc/vault.d/vault.key"
  tls_disable_client_certs = "true"
}
if you want to use that commonName you can edit the /etc/hosts file
End remarks 🪂 #
I hope you liked this blog. If any mistake, do comment down below 🚀.
Do like and share this blog♥️
https://media.giphy.com/media/RlrcXMffVZaouUVPGD/giphy.gif
Here are my socials:
Twitter https://twitter.com/DipankarDas011
Linkedin https://www.linkedin.com/in/dipankar-das-1324b6206/
Follow Kubesimplify on Hashnode, Twitter and LinkedIn. Join our Discord server to learn with us.
DevOps, Development and CLoud related stuff Kubesimplify ambassador and a OSS contributor to various CNCF projects
Get new posts in your inbox.
Spotted a typo or want to improve this post? Edit on GitHub →