Iptables Firewall Demo: Learn How to Secure Your Network
Secure your Linux network with an IPTABLES firewall demo. Learn about chains, rule matching, and extensions for improved security

On this page (4)
Introduction #
This hands-on tutorial on creating your own firewall rules is in continuation of my previous blog. So if you haven't already read that, here's the link:
https://blog.kubesimplify.com/firewall-a-networks-gatekeeper
💻IPTABLES firewall in Linux #
The Linux kernel firewall can be configured by system administrators using iptables, a user-space utility program. It is a crucial tool for Linux users as it offers a robust firewall to safeguard against malicious attacks. It can be used for managing network traffic efficiently.
Netfilter modules are used to implement the firewall, which contains filters organized into various tables. These tables contain chains of rules for handling network traffic packets. Establishing these rules for incoming and outgoing network traffic gives you complete control over the packets allowed through or blocked from entering or leaving your system based on source and destination addresses, ports, and other criteria. Iptables even permit the creation of custom rules for specific services or applications, granting you greater flexibility in managing your network. Additionally, it helps ensure that only authorized users can access specific parts of your network.
A comprehensive understanding of iptables and their proper use can significantly enhance your system's security against potential attackers. As a Linux system administrator, IPTABLES is an essential part of your toolkit for providing secure access control to your network.
Traversing chains and Rule matching #
Now that you've got a basic understanding of iptables, it's time to dive deeper into the world of network security and explore the intricacies of traversing chains and rule matching. These concepts are at the heart of how iptables filters and manages network traffic, allowing you to specify precisely which packets should be allowed or blocked based on a set of rules. By understanding how chains and rule matching work in iptables, you can gain greater control over your network traffic and ensure that only authorized traffic is allowed through.
In iptables, a chain is a collection of rules applied to incoming or outgoing network traffic. When a packet arrives on a network interface, iptables checks the packet against the rules in the appropriate chain and either accepts, rejects, or modifies the packets based on the rules.
There are three main types of chains in iptables: the INPUT chain, the OUTPUT chain, and the FORWARD chain. The INPUT chain is used to filter incoming traffic to the local system, while the OUTPUT chain filters outgoing traffic from the local system. The FORWARD chain is used to filter traffic that is being routed through the system, such as traffic between two different networks. In addition to these three main chains, several predefined chains are used for specific purposes, such as the PREROUTING and POSTROUTING chains, which are used for network address translation (NAT), and the mangle chain, which is used for packet modification. Finally, you can also create your own custom chains, which can organize your rules into logical groups, simplify your rule sets, and make your iptables configuration more manageable. By understanding the different types of chains in iptables, you can gain greater control over your network traffic and create a more secure and stable network environment.
Now, Rule matching is a crucial aspect of iptables that enables you to define precisely which packets should be accepted or blocked based on a set of criteria. When a packet arrives on a network interface, iptables checks the packet against a series of rules to determine what actions should be taken. Each rule specifies a set of conditions that must be met for the rule to match, such as the source or destination IP address, the protocol, the port number, or other attributes of the network traffic. If a packet matches a rule, iptables will apply the action specified in the rule, such as accepting, rejecting, or modifying the packet.
Rule matching in iptables is incredibly flexible and powerful, allowing you to define complex rules that filter traffic based on multiple criteria. You can also use various operators and modifiers to refine your rules further, such as negating a condition, using regular expressions, or applying a rule only to certain network interfaces. By understanding how rule matching works in iptables, you can create a more effective and efficient firewall configuration that provides the level of network security that you require. Whether you're a Linux administrator, a network engineer, or just a curious user, iptables' rule-matching capabilities offer a valuable tool for managing your network traffic and keeping your systems secure.
Extension Modules #
Iptables offers more advanced functionality to your firewall configuration with its extension modules. These modules act as plugins that enhance the built-in chains and rule-matching capabilities of iptables. By using these extension modules, you can add more features and options to your firewall configuration beyond what the base system provides.
A wide range of extension modules is available for iptables, each of which provides a different set of features and capabilities. Some examples of commonly used extension modules include the conntrack module, which enables iptables to track and manage network connections, and the limit module, which allows you to limit the rate of incoming or outgoing network traffic.
By leveraging extension modules, you can extend the functionality of iptables to meet your specific network security needs and gain greater control over your network traffic. Whether you're a system administrator, a developer, or just a curious user, iptables' extension modules offer a powerful tool for customizing your firewall configuration and creating a more secure and reliable network environment.
⭐Some rules to make you familiar with Iptables. #
-
Installing iptables.
sudo apt install -y iptables // The command installs the iptables package on the system without requiring any confirmation. -
Delete all existing rules.
iptables -F //-F: a parameter that stands for "flush". It deletes all the rules from the selected chain (or all chains if none is given). -
Show the current rules.
iptables -L

//-L: a parameter that stands for "list".
//The command lists all the rules in the current iptables configuration. It shows the table name, chain name, target name, and any additional parameters for each rule.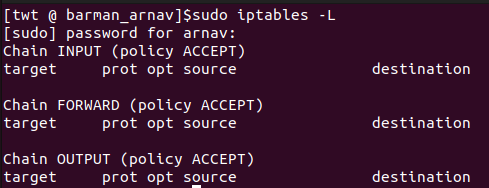
-
Set default chain policies to DROP (drops all packets).
iptables -P INPUT DROP iptables -P FORWARD DROP iptables -P OUTPUT DROP //-P: a parameter that stands for "policy". It sets the default policy for the selected chain to the specified target. //INPUT, FORWARD, OUTPUT: Chain names. //DROP: Command to drop all traffic matching the given rule. -
Block a specific IP address.
BLOCK_THIS_IP="x.x.x.x" //variable, it could be a single IP address (e.g., 192.168.1.2) or a network address (e.g., 192.168.1.0/24). iptables -A INPUT -s "$BLOCK_THIS_IP" -j DROP //-A: a parameter that stands for "append". It adds a new rule at the end of the selected chain. //-s: a parameter that stands for "source". It specifies the source IP address or network of the traffic to be matched. //-j: a parameter that stands for "jump". It specifies the target action to take when the rule is matched. -
MultiPorts (Eg. To allow incoming SSH, HTTP, and HTTPS).
iptables -A INPUT -i eth0 -p tcp -m multiport --dports 22,80,443 -m state --state NEW,ESTABLISHED -j ACCEPT iptables -A OUTPUT -o eth0 -p tcp -m multiport --sports 22,80,443 -m state --state ESTABLISHED -j ACCEPT //i: a parameter that stands for "input interface". It specifies the network interface through which the incoming traffic is expected to arrive. Similarly 'o' for "output interface". //eth0: the name of the network interface through which the incoming traffic is expected to arrive. //tcp: the transport protocol used by the traffic. //-m: a parameter that stands for "match". It specifies additional criteria to be matched by the traffic. //multiport: a match extension that allows matching multiple destination ports. //--dports: a parameter that stands for "destination ports". It specifies the destination port or ports to which the traffic is expected to arrive. Similarly '--sports' for "source ports". //--state: a match extension that allows matching the connection state of the traffic. //ACCEPT: Command to accept all traffic matching the given rule. -
Allow outgoing SSH only to a specific network.
iptables -A OUTPUT -o eth0 -p tcp -d 192.168.1.0/24 --dport 22 -m state --state NEW,ESTABLISHED -j ACCEPT iptables -A INPUT -i eth0 -p tcp --sport 22 -m state --state ESTABLISHED -j ACCEPT -
Load balancing the incoming HTTPS traffic.
iptables -A PREROUTING -i eth0 -p tcp --dport 443 -m state --state NEW -m nth --counter 0 --every 3 --packet 0 -j DNAT --to-destination 192.168.1.101:443 iptables -A PREROUTING -i eth0 -p tcp --dport 443 -m state --state NEW -m nth --counter 0 --every 3 --packet 1 -j DNAT --to-destination 192.168.1.102:443 iptables -A PREROUTING -i eth0 -p tcp --dport 443 -m state --state NEW -m nth --counter 0 --every 3 --packet 2 -j DNAT --to-destination 192.168.1.103:443 //-m nth: a match extension that allows matching packets based on their sequence number. //--counter 0: a parameter that specifies the starting sequence number for matching packets. //--every 3: a parameter that specifies that every third packet should match the rule. //--packet 0: a parameter that specifies that the first packet should match the rule (since we specified a starting counter of 0). //-j DNAT: a parameter that stands for "jump destination NAT". It specifies the target action to take when the rule is matched, which is to perform Destination Network Address Translation (DNAT). //--to-destination: a parameter that specifies the new destination IP address and port for the traffic. //the command adds a new rule to the end of the PREROUTING chain that redirects every third incoming TCP packet on port 443 (HTTPS) through the eth0 network interface to the IP address 192.168.1.101/102/103 respectively and port 443 using DNAT. -
Ping from inside to outside.
iptables -A OUTPUT -p icmp --icmp-type echo-request -j ACCEPT iptables -A INPUT -p icmp --icmp-type echo-reply -j ACCEPT //-p icmp --icmp-type echo-request: match the ICMP echo-request packets. //-p icmp --icmp-type echo-reply: match the ICMP echo-reply packets. -
Ping from outside to inside.
iptables -A INPUT -p icmp --icmp-type echo-request -j ACCEPT iptables -A OUTPUT -p icmp --icmp-type echo-reply -j ACCEPT -
Allow loopback access.
iptables -A INPUT -i lo -j ACCEPT iptables -A OUTPUT -o lo -j ACCEPT //-i lo: match traffic coming in from the loopback interface (i.e., lo). //-o lo: match traffic going out from the loopback interface (i.e., lo). //These commands allow loopback traffic (i.e., traffic between applications running on the same machine) to pass through the firewall, as loopback traffic doesn't need to be filtered. -
Allow packets from the internal network to reach the external network.
iptables -A FORWARD -i eth0 -o eth1 -j ACCEPT //if eth1 is connected to external network (internet) //if eth0 is connected to internal network (192.168.1.x) -
Allow outbound DNS.
iptables -A OUTPUT -p udp -o eth0 --dport 53 -j ACCEPT iptables -A INPUT -p udp -i eth0 --sport 53 -j ACCEPT //-p udp: match UDP traffic. //These commands allow DNS traffic to pass through the firewall, as DNS queries and responses use UDP port 53 by default. The first command allows DNS traffic to leave the machine through the eth0 interface, while the second command allows DNS traffic to enter the machine through the same interface. -
Port forwarding from 443 to 80.
iptables -t nat -A PREROUTING -p tcp -d 192.168.1.2 --dport 443 -j DNAT --to 192.168.1.2:80 //--to 192.168.1.2:80: change the destination port of the traffic to port 80 (HTTP) on the same IP address. This is useful when you want to redirect HTTPS traffic to HTTP for a web server. iptables -A INPUT -i eth0 -p tcp --dport 443 -m state --state NEW,ESTABLISHED -j ACCEPT //This command allows new or existing HTTPS traffic coming into the machine through the eth0 interface to pass through the firewall. iptables -A OUTPUT -o eth0 -p tcp --sport 443 -m state --state ESTABLISHED -j ACCEPT //This command allows existing HTTPS traffic going out of the machine through the eth0 interface to pass through the firewall. -
Log the dropped packets.
iptables -N LOGGING
//This command creates a new chain that we can use to log traffic that matches certain criteria.
iptables -A INPUT -j LOGGING
//This command adds a new rule to the end of the INPUT chain that will jump to the LOGGING chain for any traffic that doesn't match any of the previous rules.
iptables -A LOGGING -m limit --limit 2/min -j LOG --log-prefix "IPTables Packet Dropped: " --log-level 7
//-m limit --limit 2/min: limit the rate at which log messages are generated to 2 per minute.
//-j LOG: log the traffic.
//--log-prefix "IPTables Packet Dropped: ": prefix the log message with the specified string.
//--log-level 7: set the log level to debug.
iptables -A LOGGING -j DROP
//This command adds a new rule to the end of the LOGGING chain that will drop any traffic that reaches it. This is useful for blocking traffic that doesn't match any of the other rules and for which you don't want to generate log messages.
Hands-on Experimenting with firewalls✨ #
🧱Stateless Firewall #
In this hands-on demo, we will create a stateless firewall using iptables. A stateless firewall is a type of firewall that inspects each network packet independently without considering the state of the connection. This is in contrast to stateful firewalls that keep track of the state of network connections to determine which packets to allow or block. The advantage of a stateless firewall is its simplicity and low overhead.
Steps to be followed #
-
Set default policies for INPUT, FORWARD, and OUTPUT chains to DROP
-
Allow traffic on the loopback interface
-
Allow traffic to/from specified ports or services
-
Block traffic to/from specified IP addresses or range
Code #
// Set default policies for INPUT, FORWARD, and OUTPUT chains to DROP
sudo iptables -P INPUT DROP
sudo iptables -P FORWARD DROP
sudo iptables -P OUTPUT DROP

// Allow traffic on loopback interface
sudo iptables -A INPUT -i lo -j ACCEPT
sudo iptables -A OUTPUT -o lo -j ACCEPT

// Allow traffic to/from specified ports or services
sudo iptables -A INPUT -p tcp -m multiport --dports 22,23,53 -j ACCEPT
sudo iptables -A OUTPUT -p tcp -m multiport --sports 22,23,53 -j ACCEPT

// Block traffic to/from specified IP addresses or ranges
sudo iptables -A INPUT -s <IP_ADDRESS> -j DROP
sudo iptables -A OUTPUT -d <IP_ADDRESS> -j DROP
Testing the Firewall #
To test the firewall, we can use various tools like: ping and ssh to see if the traffic is allowed or blocked based on our rules. Here are some examples:
-
Ping loopback interface
ping 127.0.0.1
//Expected result: Packets should be sent and received successfully.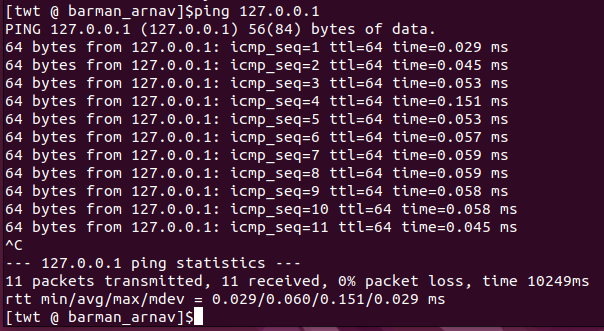
-
Ping external IP address
ping google.com
//Expected result: Packets should be dropped due to the default DROP policy.
-
SSH into the machine
ssh user@<IP address>
//Expected result: Connection should be established successfully.
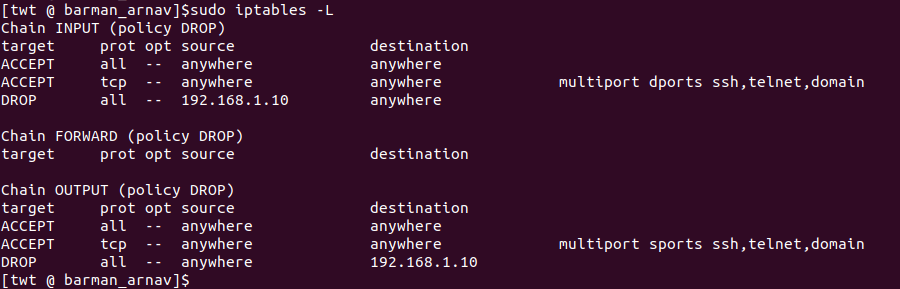
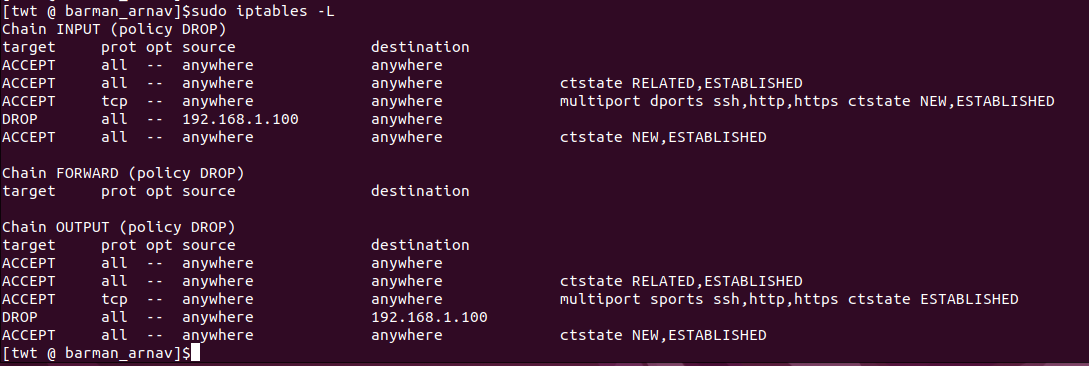
You can also check the status of the firewall by running the iptables -L command, which lists all the rules currently defined in the firewall. Note that this is not an exhaustive set of rules, and you may need to customize the rules based on your specific requirements.
Conclusion #
This demonstration showcases the development of a stateless firewall with iptables. Our configuration includes rules that enable or restrict traffic based on criteria such as source and destination IP addresses, ports, and protocols. We have verified the effectiveness of our firewall by conducting tests with multiple tools.
🧱Stateful Firewalls #
In this hands-on demo, we will create a stateful firewall using iptables. A stateful firewall is a type of firewall that keeps track of the state of network connections to determine which packets to allow or block. This allows the firewall to recognize legitimate traffic and prevent malicious traffic from entering the network.
Steps to be followed #
-
Set default policies for INPUT, FORWARD, and OUTPUT chains to DROP
-
Allow traffic on the loopback interface
-
Allow traffic related to established connections
-
Allow traffic to/from specified ports or services
-
Block traffic to/from specified IP addresses or ranges
-
Allow traffic from established connections and their related traffic
Code #
// Set default policies for INPUT, FORWARD, and OUTPUT chains to DROP
sudo iptables -P INPUT DROP
sudo iptables -P FORWARD DROP
sudo iptables -P OUTPUT DROP

// Allow traffic on loopback interface
sudo iptables -A INPUT -i lo -j ACCEPT
sudo iptables -A OUTPUT -o lo -j ACCEPT

// Allow traffic related to established connections
sudo iptables -A INPUT -m conntrack --ctstate RELATED,ESTABLISHED -j ACCEPT
sudo iptables -A OUTPUT -m conntrack --ctstate RELATED,ESTABLISHED -j ACCEPT

// Allow traffic to/from specified ports or services
sudo iptables -A INPUT -p tcp -m multiport --dports 22,80,443 -m conntrack --ctstate NEW,ESTABLISHED -j ACCEPT
sudo iptables -A OUTPUT -p tcp -m multiport --sports 22,80,443 -m conntrack --ctstate ESTABLISHED -j ACCEPT

// Block traffic to/from specified IP addresses or ranges
sudo iptables -A INPUT -s 192.168.1.100 -j DROP
sudo iptables -A OUTPUT -d 192.168.1.100 -j DROP

// Allow traffic from established connections and their related traffic
sudo iptables -A INPUT -m conntrack --ctstate NEW,ESTABLISHED -j ACCEPT
sudo iptables -A OUTPUT -m conntrack --ctstate NEW,ESTABLISHED -j ACCEPT
Testing #
To test the firewall, we can use various tools like ping and telnet to see if the traffic is allowed or blocked based on our rules. Here are some examples:
-
Ping loopback interface
ping 127.0.0.1
//Expected result: Packets should be sent and received successfully.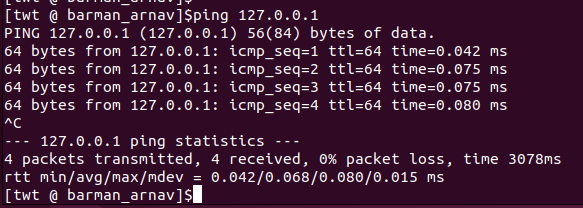
-
SSH into the machine
ssh user@<IP address> //Expected result: Connection should be established successfully. -
Make a request to a website.
curl google.com
//Expected result: Connection should be established, and the content of the page should be displayed.
-
Make a request to a blocked IP address
curl 192.168.1.100
//Expected result: The connection should be dropped due to the block rule.
Conclusion #
In this demo, we have created a stateful firewall using iptables. We have defined rules to allow or block traffic based on different criteria like source/destination IP addresses, ports or services, and connection states. Testing the firewall with different tools and scenarios verified that the rules were working as expected.
It is important to note that this is a very basic example, and many other rules and configurations can be added to create a more secure and customized firewall. Additionally, iptables can be complex and confusing for those who are not familiar with it, so it is important to thoroughly test and understand the rules before implementing them in a production environment.
🧱Application Firewall & Web Proxy #
So, there's this thing called an application firewall that works at the app level. It either lets or stops traffic depending on the app-specific protocols or commands. Then there's a web proxy, which is like a middleman between clients and servers. It sends client requests to the right server and gives the server's response back to the client. Cool, right?
The optimal way to structure an application firewall and web proxy utilizing iptables is as follows:
-
Set up iptables rules to redirect traffic from the client to the proxy server. This can be done by configuring a DNAT rule for the port and protocol used by the application.
-
Install a web proxy server, such as Squid, on the proxy server to receive the redirected traffic.
-
Configure the web proxy server to listen for incoming traffic on the redirected port.
-
Set up iptables rules to redirect HTTP/HTTPS traffic to the web proxy server.
-
Configure the web proxy server to inspect the traffic for security threats or other issues. This can be done by enabling various security features such as SSL interception, IP whitelisting, and content filtering.
-
Set up iptables rules to block or allow traffic based on the web proxy server's security policies. For example, traffic from blacklisted IPs or containing malicious payloads can be blocked.
-
Configure the web proxy server to forward the traffic to the application server for processing. This can be done by configuring the web proxy server to use a load balancer or a round-robin algorithm to distribute traffic evenly among multiple servers.
-
Set up iptables rules to rewrite the source address of the forwarded traffic to that of the proxy server, so the application server can send the response back to the proxy server.
-
Configure the web proxy server to send the application server's response back to the client.
By simply following the steps above, you can set up an application firewall and web proxy using iptables, ensuring your web apps are secure and run smoothly on a remote server.
Rest assured that iptables is a powerful tool that can be complex, and mastering its configuration requires a solid understanding of networking and security concepts. To ensure optimal firewall implementation, I'd recommend seeking guidance from a certified network security professional prior to deploying in a production environment.
Follow Kubesimplify on Hashnode, Twitter, and LinkedIn. Join our Discord server to learn with us.
Like the explanation? Want to connect? You can find me here! Till then, happy learning ✨
Get new posts in your inbox.
Spotted a typo or want to improve this post? Edit on GitHub →