Kubeflow Pipelines: Orchestrating Machine Learning Workflows - Part 3
Kubeflow Pipelines is a great way to build and deploy end-to-end scalable and portable Machine Learning workloads. In this article, we take a look at how…

On this page (14)
- Previous articles in the series
- Kubeflow Pipelines
- Running a pre-built pipeline
- Components of Kubeflow Pipelines
- The Python SDK
- What do you need?
- Installing the SDK
- Building new pipelines
- Function based components
- Specifying Base Images
- Using container images
- Passing data between steps
- Conditional execution
- Conclusion
Kubeflow Pipelines is a great way to build and deploy end-to-end scalable and portable Machine Learning workloads. In this article, we take a look at how to use Kubeflow Pipelines for your own tasks and how Kubeflow Pipelines works under the hood.
Previous articles in the series #
In the last article, we already took a look at Kubeflow Notebooks, when can they be used, customizations you could make, and how they work. The time around we will talk about Kubeflow Pipelines, another component of Kubeflow.
Kubeflow Pipelines #
Building and deploying portable, scalable machine learning workflows is really important especially since you would have different stages in your machine learning workflow all of which use different tools: preparing data, training the model, evaluating performance, deployment, and more. This particularly motivates the need for an orchestrator and is also a way to foster reusability.
This is exactly what Kubeflow Pipelines aims to do. Kubeflow Pipelines is based on top of Argo Workflows, which is an open-source, container-native workflow engine for Kubernetes, we will talk more about this later. With Kubeflow Pipelines your machine learning pipeline is implemented as a graph, and each of the nodes in this graph forms different stages in a workflow.
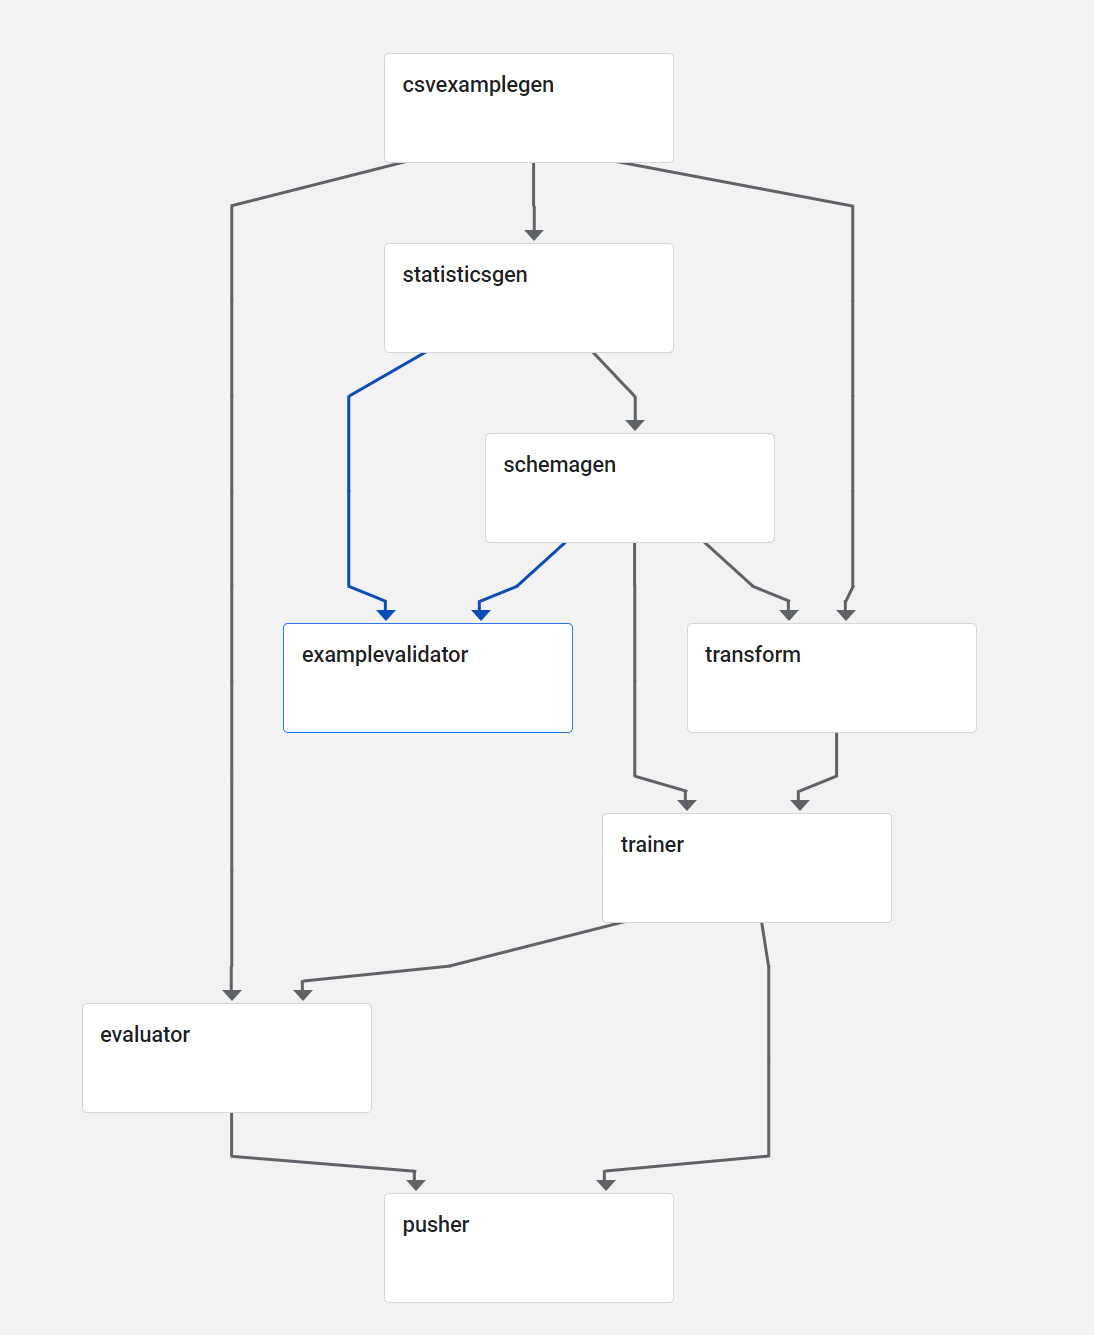
A workflow in Kubeflow Pipelines
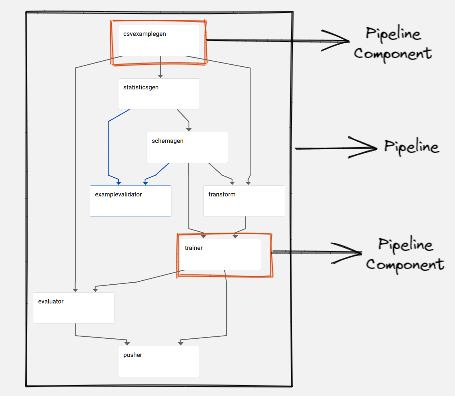
You can think of a pipeline as a description of your machine learning workflow including the inputs required to run the pipeline and all the pipeline components. A pipeline component is a self-contained set of code (a Docker image) that performs a single step in your pipeline, such as data preprocessing, model training, and so on. Multiple of these components and how you arrange them in a graph will make up your pipeline.
The main goals of Kubeflow Pipelines are:
-
End-to-end orchestration: enabling and simplifying the orchestration of machine learning pipelines.
-
Easy experimentation: making it easy for you to try numerous ideas and techniques and manage your various trials/experiments.
-
Easy re-use: enabling you to re-use components and pipelines to quickly create end-to-end solutions without having to rebuild each time.
Running a pre-built pipeline #
We will start by exploring how we can run a pre-built Kubeflow pipeline, this will help you get familiar with Kubeflow Pipelines UI as well as set the background for the other sections in this article. Kubeflow comes installed with a few sample pipelines which you can notice under the Pipelines tab in the Kubeflow Central Dashboard.
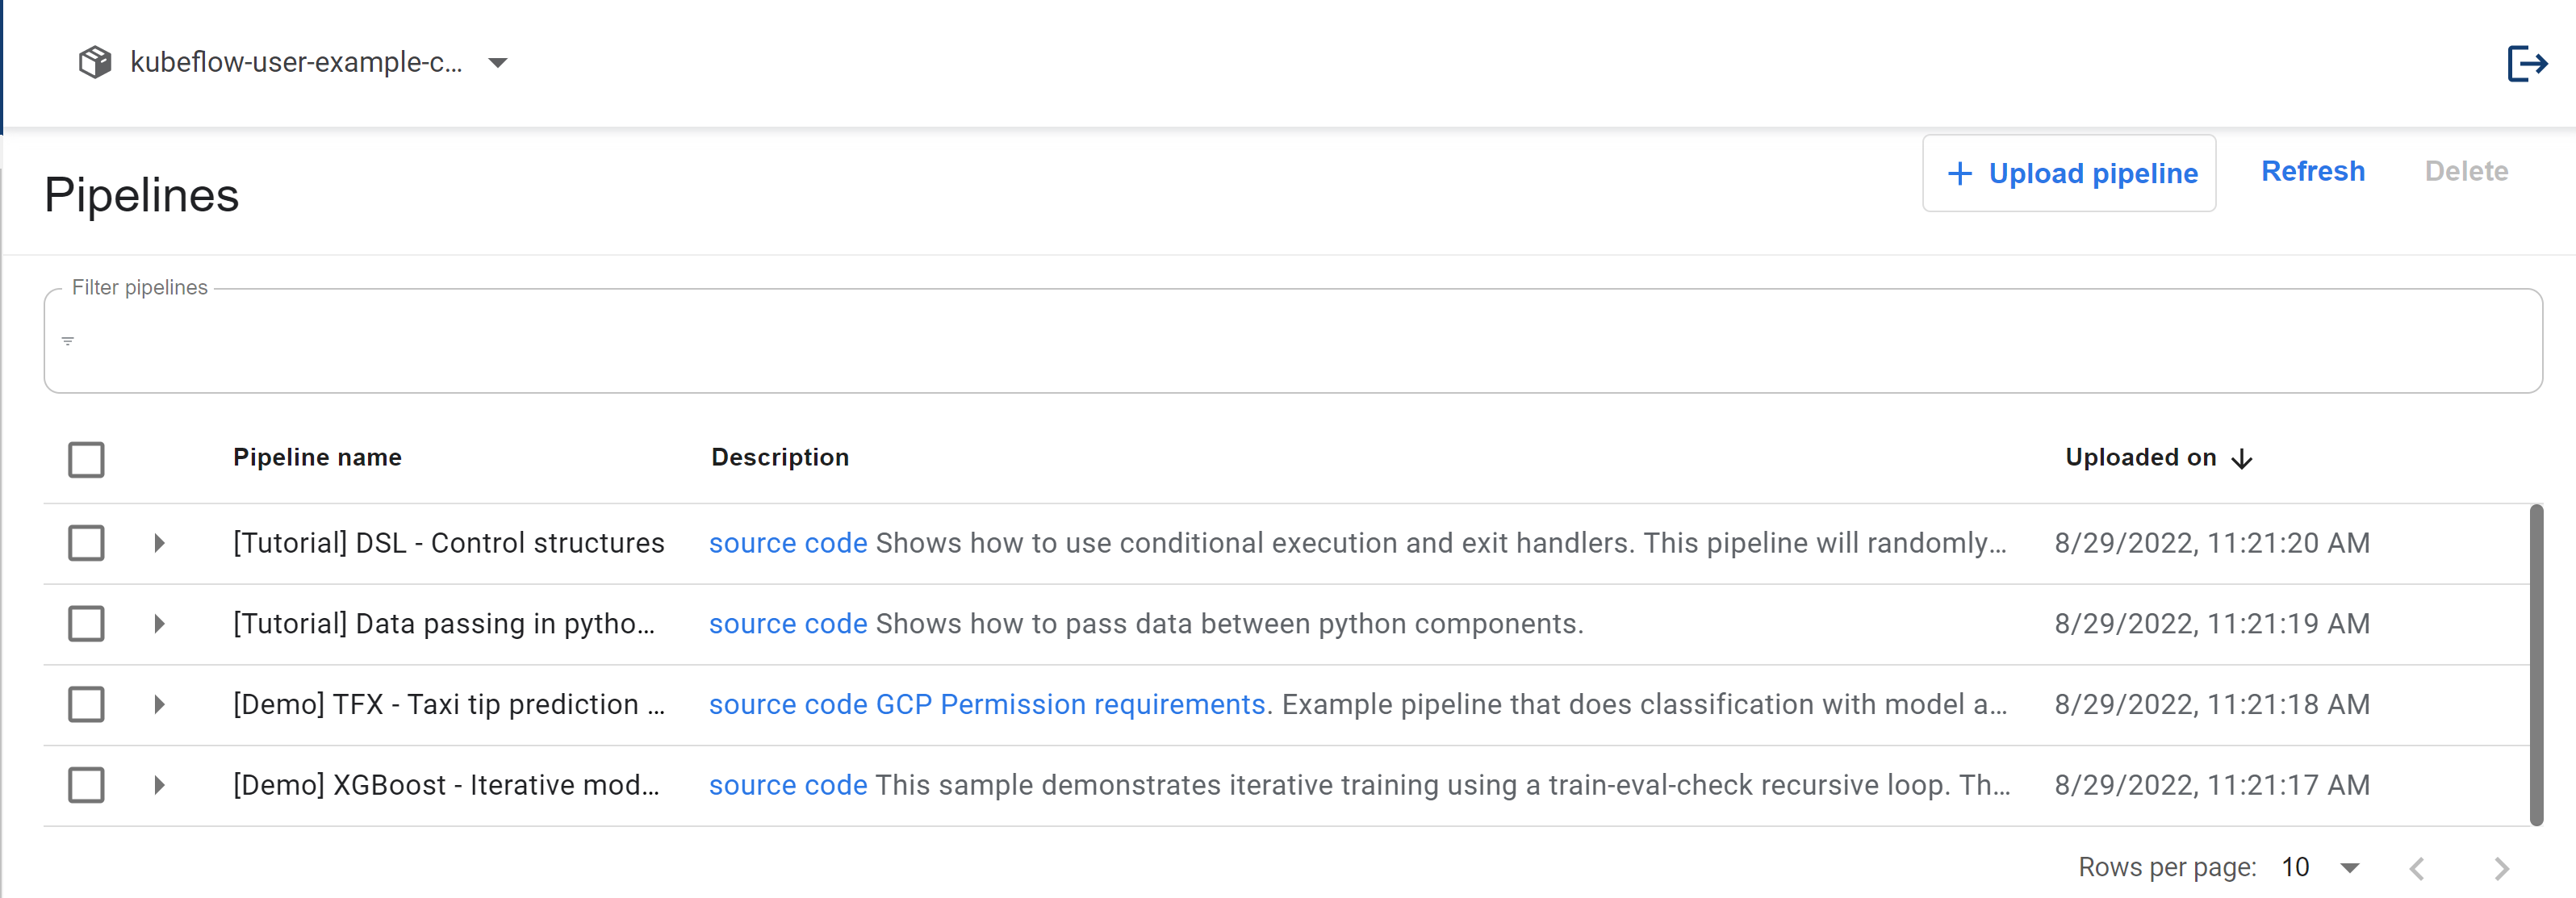
Kubeflow comes with pre-packaged Pipelines
Clicking on a specific pipeline you can see its graph as well as the pipeline or pipeline component's compiled code, which is essentially an Argo YAML file.
When running a pipeline you must choose an experiment, an experiment is a workspace and you can use experiments to organize your runs into logical groups.
Start by clicking on the "Data passing in python components" pipeline and as you will notice, it is a quite simple pipeline that runs some Python commands. We will start by creating an experiment by clicking the "Create an Experiment" on the UI, give it a name, and then you should end up on a page to start a run.
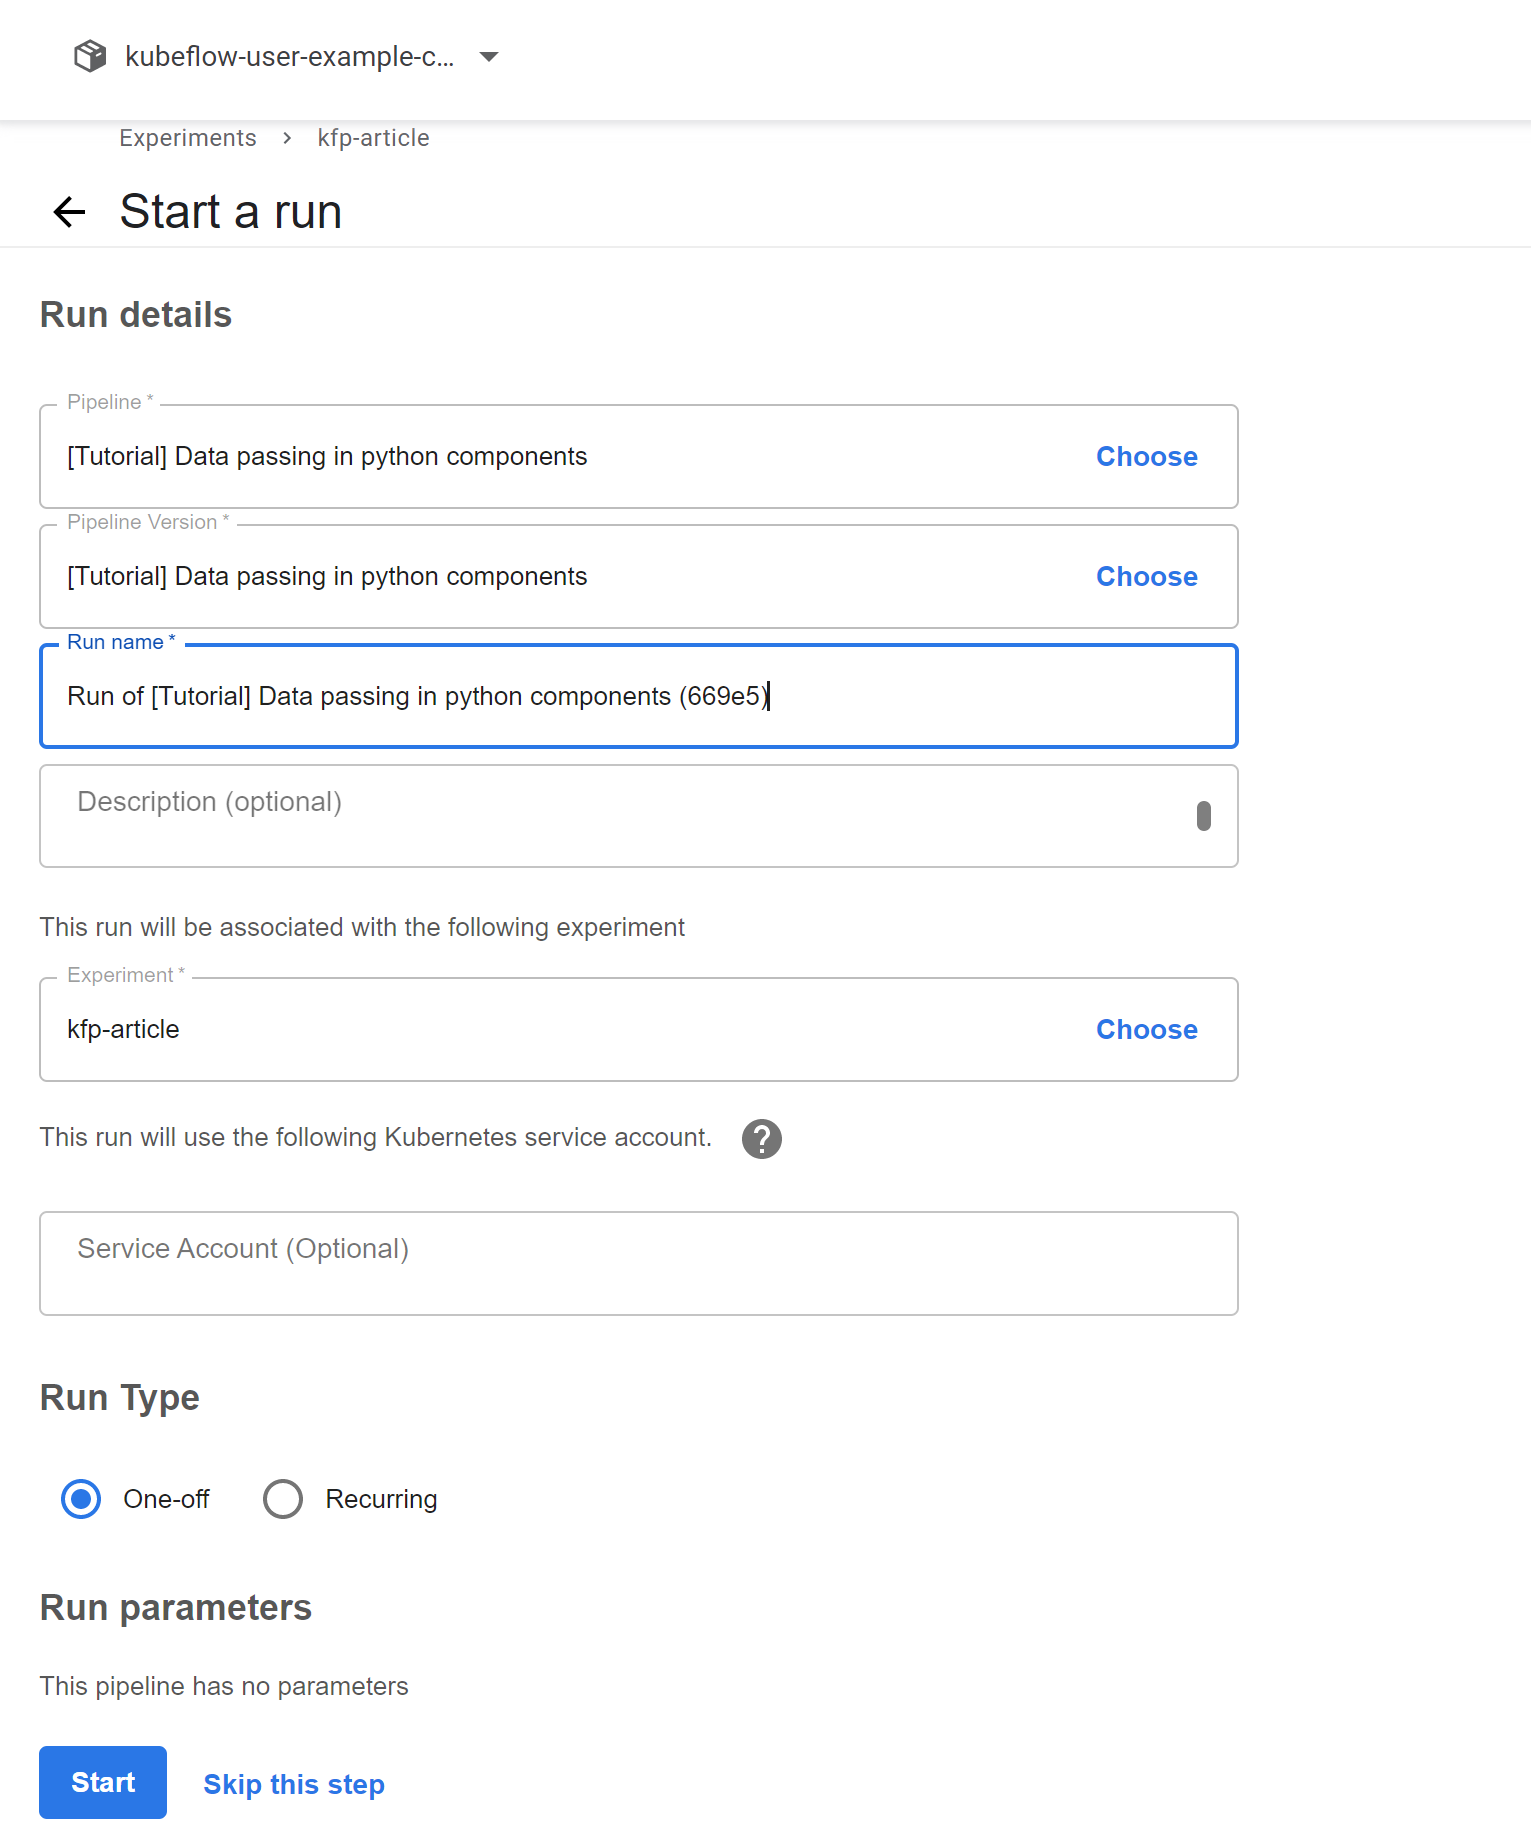
The Start a Run page
Right now, we will just select our run to be a one-off run and not set up a recurring run which allows you to (as the name suggests) run the pipeline after some set time. Your pipeline run will now start, Your run should soon be over since it is a very small pipeline.

The run is completed
You just run your first Kubeflow pipeline and Before talking about building the pipeline using the Python SDK we will see the main components of Kubeflow Pipelines.
Components of Kubeflow Pipelines #
The Kubeflow Pipelines platform consists of:
-
A UI for managing and tracking pipelines and their execution
-
An engine for scheduling a pipeline’s execution
-
An SDK for defining, building, and deploying pipelines in Python
-
Notebook support for using the SDK and pipeline execution
We already took a look at the UI and now we will take a better look at using the Python SDK and how you can create your own new pipelines.
The Python SDK #
As you now know Kubeflow Pipelines are stored as Argo YAML files executed by Argo. Kubeflow also exposes a Python domain-specific language for creating new pipelines. The Kubeflow Pipelines SDK provides a set of Python packages that we can use to specify and run our machine-learning workflows as pipelines.
A pipeline is just a graph of container execution. In addition to specifying which containers should run in which order, it also allows us to pass arguments to the entire pipeline and between these containers.
What do you need? #
For all of these containers, we need to make sure a couple of things are being done:
-
First off you of course want to create a container and this could be as simple as you writing a Python function and Kubeflow Pipelines packaging it up as a container or bringing your container as well
-
You then need to show Kubeflow Pipelines how it should run the container which could involve any command line arguments or data mounts you need to be able to run this container as desired
-
You also need to order these containers, which of these should run sequentially which of these should run in parallel, and so on
-
Finally, as you know Kubeflow Pipelines needs an Argo YAML file and not Python code so finally, you want to be able to compile your Python code into Argo YAML files
And all of this is how the Kubeflow Pipelines Python SDK helps us out.
Installing the SDK #
You can install the Kubeflow Pipelines SDK through PyPI considering you already have Kubeflow with all of its components installed or just the standalone Kubeflow Pipelines installed:
pip install kfp --upgradeI would recommend working through the demos in a Kubeflow Notebook which by default has kfp installed as well as gives you access to Kubeflow Pipelines by default since the notebook lives in the same cluster. I will be using Kubeflow Notebooks as we talked about in Kubeflow Notebooks: ML Experimentation Made Easier article.
However, You are not bound to do so you could most certainly try out these experiments outside Kubeflow Notebooks as well. You would need to connect to Kubeflow Pipelines with the SDK, an in-depth guide on doing so can be found here.
In this article, I will connect to the SDK simply using:
client = kfp.Client()which works well since the notebook is in the same cluster as Kubeflow Pipelines.
Building new pipelines #
We will first take a look at building components with just a Python function and allowing Kubeflow to package it.
Function based components #
We will build a component in our pipeline which multiplies two numbers, this is a rather simple component and creating Python function-based components will be an easier way to go rather than building a container image for your component which we will soon see as well.
Here is a simple function that multiplies two numbers:
def multiply(a: float, b: float) -> float:
  return a * b
Next up, we create a pipeline component just from this function using the create_component_from_func method. You can also see the underlying component yaml file created at multiply_component.yaml, if you notice under the hood this creates a container with a Python container image and runs our program while also adding some code for serialization and passing arguments. This yaml file is a reusable and shareable definition of your component.
The create_component_from_func also returns a factory function, were you to call multiply_op() it would create kfp.dsl.ContainerOp class instances which are how you represent an op implemented by a container image, we would use the multiply_op later while creating a pipeline.
def multiply(a: float, b: float) -> float:
    return a * b

import kfp

multiply_op = kfp.components.create_component_from_func(
    multiply, output_component_file="multiply_component.yaml"
)
We will now create a pipeline using this component. We first annotate the pipeline creation function with @dsl.pipeline which specifies that this function will be used to create a pipeline.
Notice something odd? The arguments to multiply_pipeline are strings and not floats, this is indeed expected and would be taken care of by the serializer and deserializer.
Finally, this piece of code also connects to the Kubeflow Pipelines using the SDK, you should also read this documentation which lists how you would do so for all kinds of platforms. After connecting to Kubeflow Pipelines we also create a run for this pipeline: if you remember from earlier we should now expect to see our pipeline running in Kubeflow dashboard.
def multiply(a: float, b: float) -> float:
    return a * b

import kfp

multiply_op = kfp.components.create_component_from_func(
    multiply, output_component_file="multiply_component.yaml"
)

import kfp.dsl as dsl
@dsl.pipeline(name="Multiply", description="An example pipeline.")
def multiply_pipeline(
    a="1",
    b="5",
):
    multiply_task = multiply_op(a, b)

arguments = {"a": "2", "b": "3"}

client = kfp.Client()
client.create_run_from_pipeline_func(multiply_pipeline, arguments=arguments)
Alternatively, you could also create a zipped yaml file for our pipeline and load it to Kubeflow Pipelines which works the same way.
compiler = kfp.compiler.Compiler()
compiler.compile(multiply_pipeline, 'multiply-pipeline.zip')
The above code creates a file multiply-pipeline.zip which can be uploaded using the Kubeflow Pipeline UI.
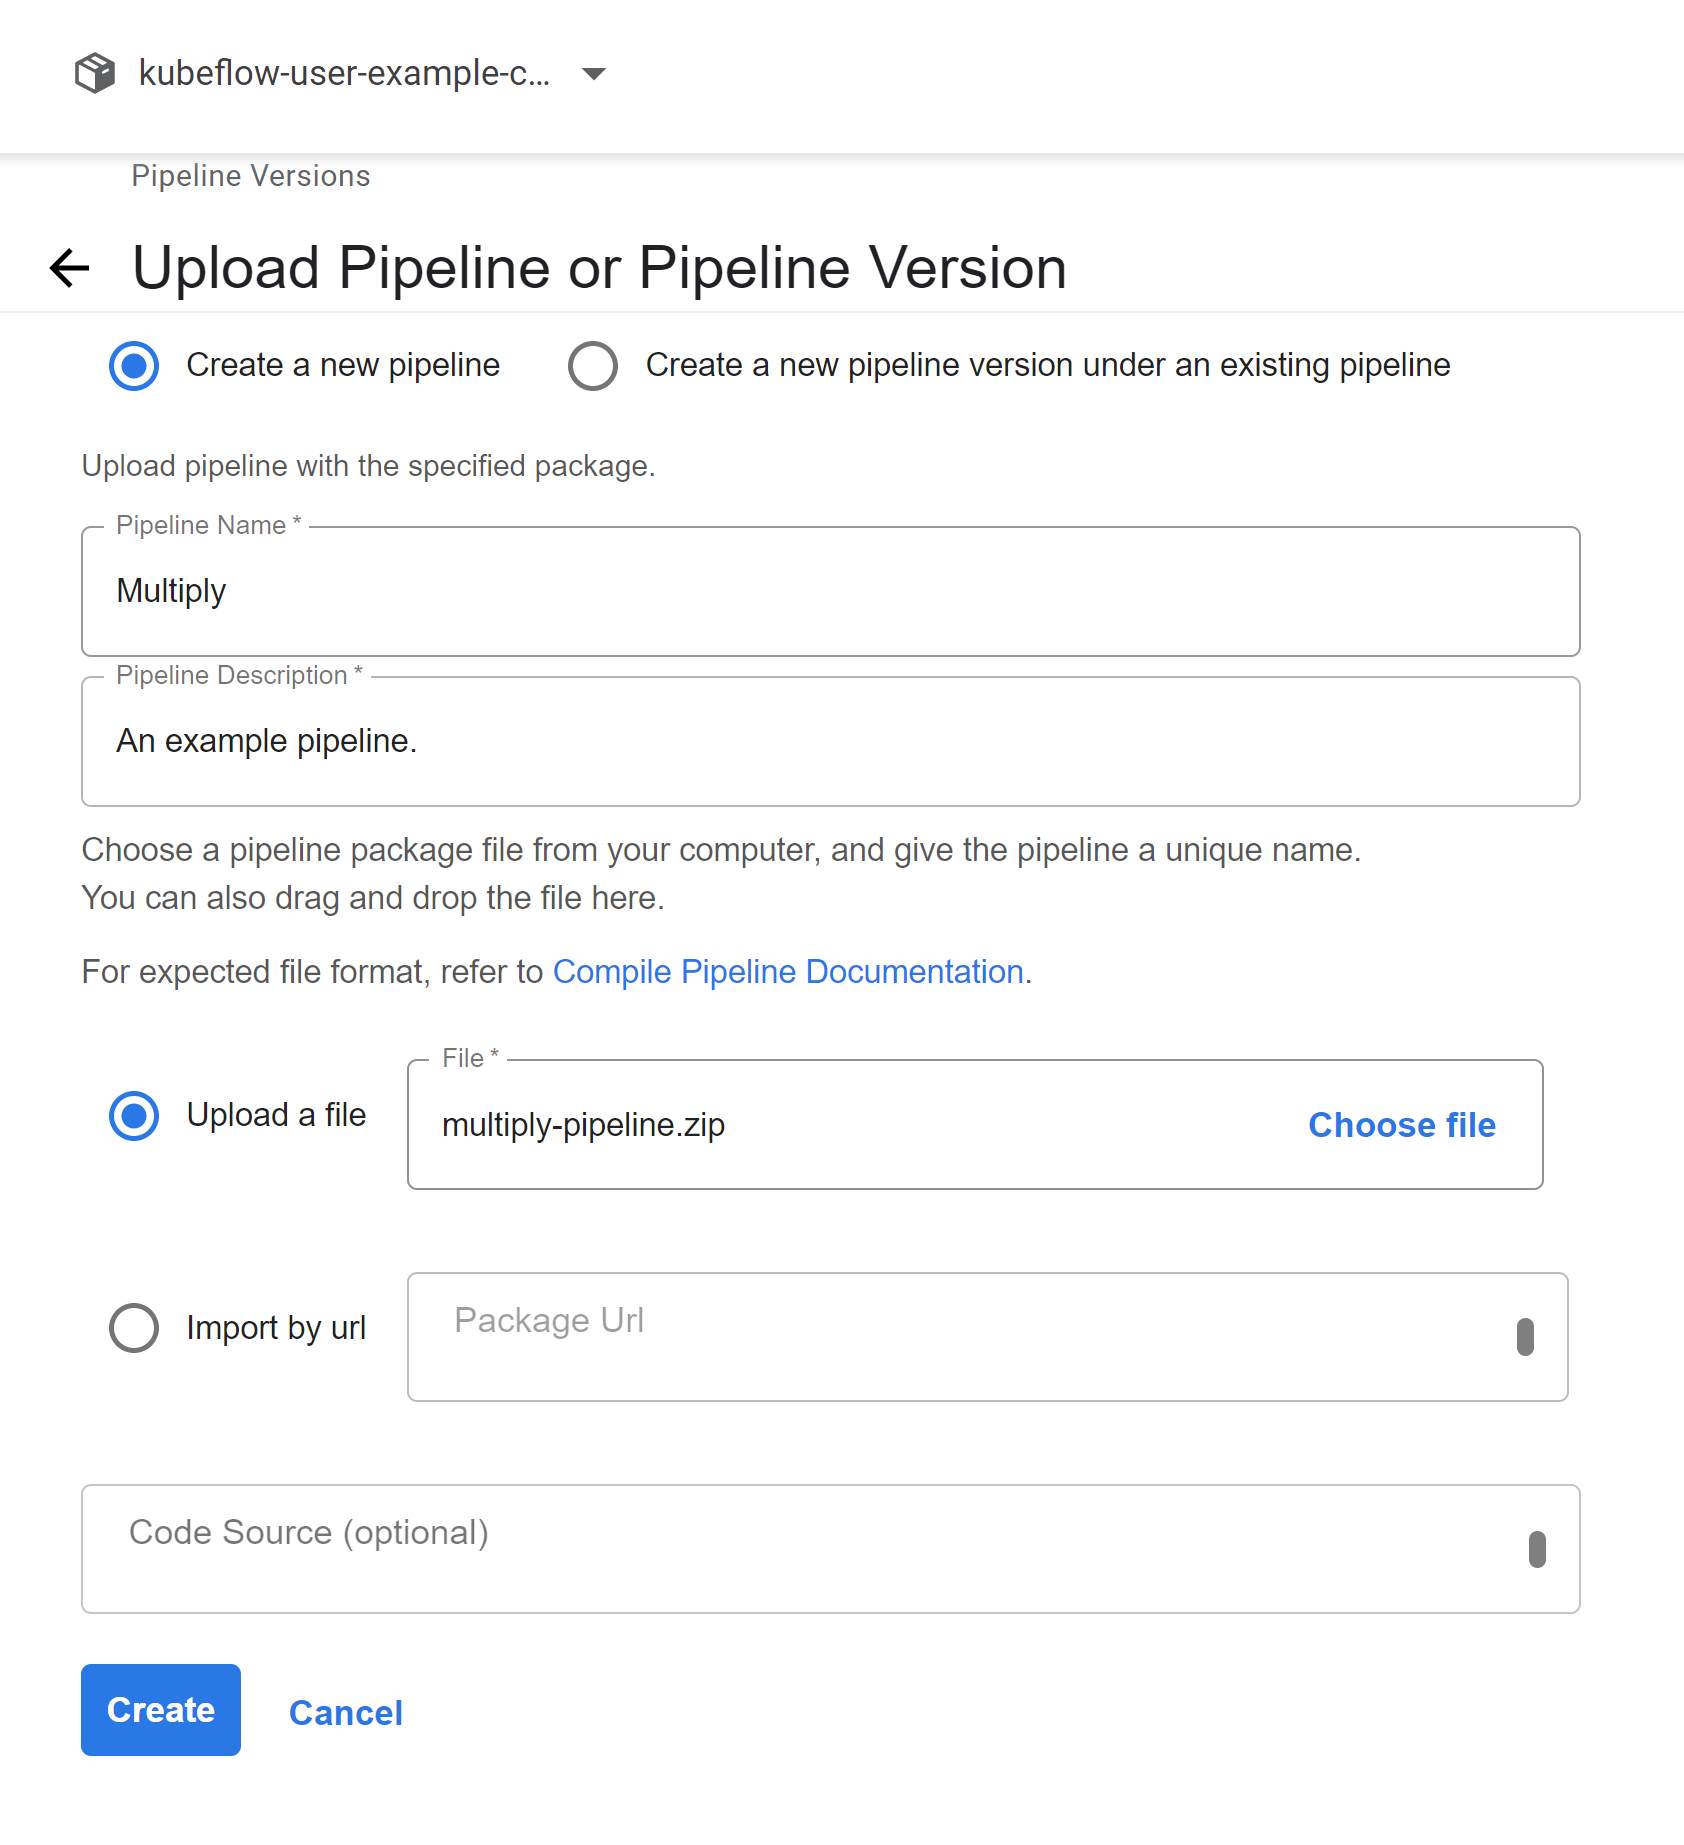
You would also need to follow the steps we covered earlier in this article to run the pipeline we just uploaded however this time around when running the pipeline through the UI you see the option of run parameters which is the parameters our pipeline accepts, in our case a and b.
Specifying Base Images #
The current approach we saw, was using Python functions as pipeline components. By default, this uses the Python image corresponding to the current Python environment. However, Kuebflow also allows explicitly specifying base images to use for your pipeline components.
Here is an example where I create a pipeline component from the same Python function however, I specify a different base image for running this:
def multiply(a: float, b: float) -> float:
    return a * b


import kfp

multiply_op = kfp.components.create_component_from_func(
    multiply,
    output_component_file="multiply_component.yaml",
    base_image="python:3.7",
)

import kfp.dsl as dsl


@dsl.pipeline(name="Multiply", description="An example pipeline.")
def multiply_pipeline(
    a="1",
    b="5",
):
    multiply_task = multiply_op(a, b)


arguments = {"a": "2", "b": "3"}

client = kfp.Client()
client.create_run_from_pipeline_func(multiply_pipeline, arguments=arguments)
You can also specify a list of packages you want to install before the pipeline component is run, this is particularly helpful if your component just requires a few other libraries to be installed. Here is an example of the same function however using the default image and installing one new package.
def multiply(a: float, b: float) -> float:
    return a * b


import kfp

multiply_op = kfp.components.create_component_from_func(
    multiply,
    output_component_file="multiply_component.yaml",
    packages_to_install=['pandas==0.24'],
)

import kfp.dsl as dsl


@dsl.pipeline(name="Multiply", description="An example pipeline.")
def multiply_pipeline(
    a="1",
    b="5",
):
    multiply_task = multiply_op(a, b)
We can now run this just as we did earlier directly through the SDK using this piece of code:
arguments = {"a": "2", "b": "3"}

client = kfp.Client()
client.create_run_from_pipeline_func(multiply_pipeline, arguments=arguments)
Or we could also trigger a run from the UI by running the following to get the compiled pipeline:
compiler = kfp.compiler.Compiler()
compiler.compile(multiply_pipeline, 'multiply-pipeline.zip')
Using container images #
Building pipeline stages directly from Python provides a great way to do much with Kubeflow Pipeline. It does limit our implementation to Python, though. With Kubeflow Pipelines we can orchestrate the execution of container images thus allowing us to use any tool or language for your pipeline. For Kubeflow Pipelines to run your component, your component must be packaged as a Docker container image and published to a container registry that your Kubernetes cluster can access. This does not involve doing any changes to your container image for Kubeflow pipelines.
We can do this by using kfp.dsl.ConatinerOp, here is some simple code to load the Python image and then run some commands on the container image:
import kfp
import kfp.dsl as dsl


@dsl.pipeline(name="cointoss", description="Example Pipeline.")
def random_coin_toss():
    random_step = dsl.ContainerOp(
        name="Flip coin",
        image="python:alpine3.7",
        command=["sh", "-c"],
        arguments=[
            "python -c \"import random; result = 'heads' if random.randint(0,1) == 0 "
            "else 'tails'; print(result)\" | tee /tmp/output"
        ],
        file_outputs={"output": "/tmp/output"},
    )
We can also have environment variables while running this step, to do so we would need to use the Kubernetes Python Client:
from kubernetes import client as k8s_client
import kfp
import kfp.dsl as dsl


some_step = (
    dsl.ContainerOp(
        name="example", image=image
    )
    .add_env_variable(k8s_client.V1EnvVar(name=env_var_1, value=value_1))
    .add_env_variable(k8s_client.V1EnvVar(name=env_var_2, value=value_2))
)
However, ideally, you would want to be able to better reusable steps and it is often suggested to not directly use kfp.dsl.ContainerOp and rather use load_component_from_text. below is an example of the same step using load_component_from_text this time around and as you might observe the syntax is pretty similar:
create_step_coin_toss = kfp.components.load_component_from_text("""
    name: Flip Coin
    description: Example Pipeline.

    inputs:
    - {name: text, type: String}

    outputs:
    - {name: data, type: Data}

    implementation:
      container:
        image: python:alpine3.7
        command:
        - sh
        - -c
        - |
          python -c \"import random; result = 'heads' if random.randint(0,1) == 0
          else 'tails'; print(result)\" | tee /tmp/output
""")
Passing data between steps #
The examples we saw earlier were pretty simple with a single function being run however as you start building complex pipelines, you most certainly would need to pass data between containers and maybe even pass the output of one step to the other step.
Under the hood, when Kubeflow Pipelines runs a component, a container image is started in a Kubernetes Pod and your component’s inputs are passed in as command-line arguments. When your component has finished, the component’s outputs are returned as files.
We can do this using .output on a dsl.ContainerOp object. Building a pipeline that reuses the outputs from other steps also tells Kubeflow Pipelines the order in which the components should be run. Here is an example of a pipeline that reuses the outputs from a previous step:
def multiply(a: float, b: float) -> float:
    return a*b

def add(a: float, b: float) -> float:
    return a + b

import kfp

multiply_op = kfp.components.create_component_from_func(
    multiply, output_component_file="multiply_component.yaml"
)

add_op = kfp.components.create_component_from_func(
    add, output_component_file="multiply_component.yaml"
)

import kfp.dsl as dsl
@dsl.pipeline(name="Multiply and Add", description="An example pipeline.")
def multiply_add_pipeline(
    a="2",
    b="5",
    c="3"
):
    multiply_task = multiply_op(a, b)

    # Calculate (a * b) + c
    add_task = add_op(multiply_task.output, c)
However, it might be helpful to have multiple outputs and not just a single output from a function that you can use, we can use NamedTuples here. We would essentially still return a single value, a tuple however we would be able to reference the outputs we need from it. Here is an example of a pipeline that achieves the same goal but with NamedTuples:
from typing import NamedTuple

def multiply(a: float, b: float) -> NamedTuple("MultiplyOutput",[("result", float)]):
    from collections import namedtuple
    output = namedtuple('MultiplyOutput', ['result'])
    return output(a*b)

def add(a: float, b: float) -> float:
    return a + b

import kfp

multiply_op = kfp.components.create_component_from_func(
    multiply, output_component_file="multiply_component.yaml"
)

add_op = kfp.components.create_component_from_func(
    add, output_component_file="multiply_component.yaml"
)

import kfp.dsl as dsl
@dsl.pipeline(name="Multiply and Add", description="An example pipeline.")
def multiply_add_pipeline(
    a="2",
    b="5",
    c="3"
):
    multiply_task = multiply_op(a, b)

    # Calculate (a * b) + c
    add_task = add_op(multiply_task.outputs["result"], c)
Until now, we took a look at passing simple data between containers, primitive types, or Python objects however that limits what we can do with Kubeflow Pipeline. We would often want to pass much larger data maybe blobs and not just objects. One particular example could be passing the entire dataset between steps. You would probably want to leverage Kubernetes Persistent Volumes for this.
From the Kubernetes documentation which accurately summarizes Persistent Volumes:
The PersistentVolume subsystem provides an API for users and administrators that abstracts details of how storage is provided from how it is consumed.
We can use Kubeflow Pipelines’ VolumeOp class to allow us to create an automatically managed persistent volume. This allows us to represent an op that will be translated into a resource template that creates a PersistentVolumeClaim. Let us now try to create a pipeline that is able to create a Persistent Volume and then have the next step write some data to the volume. We will start with some code and I will try to explain what is happening:
import kfp
import kfp.dsl as dsl


@kfp.components.create_component_from_func
def write_to_volume():
    with open("/mnt/file.txt", "w") as file:
        file.write("Hello world")


@dsl.pipeline(
    name="volumeop-basic",
    description="A Basic Example on VolumeOp Usage."
)
def volumeop_basic(size: str="1Gi"):
    vop = dsl.VolumeOp(
        name="create-pvc",
        resource_name="my-pvc",
        modes=dsl.VOLUME_MODE_RWO,
        size=size
    )

    write_to_volume().add_pvolumes({"/mnt": vop.volume})
The first step in the pipeline description tells it to use VolumeOp to create a Persistent Volume Claim and Persistent Volume and here we show a couple of options to customize the Volume creation particularly the resource_name, modes and the size of the volume. The modes argument allow us to specify the access modes for the Persistent Volume Claim and it can be any one of the:
-
ReadWriteOnce: The volume can be mounted as read-write by a single node.
-
ReadOnlyMany: The volume can be mounted read-only by many nodes.
-
ReadWriteMany: The volume can be mounted as read-write by many nodes.
Here we make a Persistent Volume Claim with the ReadWriteOnce access mode. Running this step should allow us to have a Persistent Volume created for us and well that does happen:

There are quite a few customizations you could add to making a Persistent Volume which can be quite helpful while designing larger stateful pipelines. Some things which might be of interest to you while using the VolumeOp could be adding Kubernetes Affinity, adding nodeSelector, or even Kubernetes tolerations which among others can be very useful and can be done easily with the VolumeOp.
Next up we have a component that simply writes "Hello World" to a new file. We want this to use the Persistent Volume we created which we can easily do using the .add_pvolumes() which as the name suggests allows you to sue this volume. It might be helpful for further customization to also check out .add_volume() which allows you to use a Kubernetes Volume you created, well we do that as well, but using .add_volume() you are not limited to volumes creating using the Kubeflow Pipelines VolumeOp.
Conditional execution #
At the moment, all steps we define in the pipeline are run. One way to get around this would be to make a wrapper pipeline step and run some conditional in that however, this becomes difficult to implement for larger pipelines. With Kubeflow Pipelines we can make use of conditional executions via kfp.dsl.Condition.
Here is a very simple example taken from the samples showing conditional execution:
import kfp
from kfp import dsl
from kfp.components import func_to_container_op, InputPath, OutputPath


@func_to_container_op
def get_random_int_op(minimum: int, maximum: int) -> int:
    """Generate a random number between minimum and maximum (inclusive)."""
    import random

    result = random.randint(minimum, maximum)
    print(result)
    return result


@func_to_container_op
def process_small_op(data: int):
    """Process small numbers."""
    print("Processing small result", data)
    return


@func_to_container_op
def process_medium_op(data: int):
    """Process medium numbers."""
    print("Processing medium result", data)
    return


@func_to_container_op
def process_large_op(data: int):
    """Process large numbers."""
    print("Processing large result", data)
    return


@dsl.pipeline(
    name="Conditional execution pipeline",
    description="Shows how to use dsl.Condition().",
)
def conditional_pipeline():
    number = get_random_int_op(0, 100).output
    with dsl.Condition(number < 10):
        process_small_op(number)
    with dsl.Condition(number > 10 and number < 50):
        process_medium_op(number)
    with dsl.Condition(number > 50):
        process_large_op(number)
We start by building all the steps we need in the same way as we did earlier and while running the pipeline we just use dsl.Condition to identify the steps we want to run.
Conclusion #
Thank you for sticking with me until the end. I hope that you've taken away a thing or two about Kubeflow Pipelines, and how they work, and enjoyed reading this. If you learned something new or enjoyed reading this article, please share it so that others can see it. Until then, see you in the next post!
We will take forward what we talk about in this article in the next article in this series where we will take a deeper dive into Kubeflow Pipelines, until then, adieu!
You can also find me on Twitter @rishit_dagli, where I tweet about machine learning, and open-source.
Follow Kubesimplify on Hashnode, Twitter and LinkedIn. Join our Discord server to learn with us.
Get new posts in your inbox.
Spotted a typo or want to improve this post? Edit on GitHub →