Kubernetes 1.26 - The electrifying release setup
Kubernetes 1.26 was released four days ago; a huge thanks to the release team for pulling off this awesome release! This release includes: 37 Enhancement…


On this page (4)
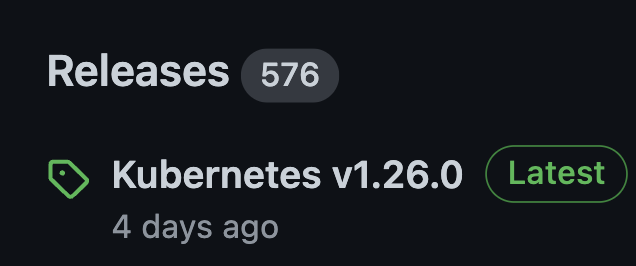
Kubernetes 1.26 was released four days ago; a huge thanks to the release team for pulling off this awesome release!
This release includes:
-
37 Enhancement
-
11 graduating to stable
-
10 graduating to beta
-
16 coming into alpha
Some highlights
-
The new release images will now be under registry.k8s.io - This will provide faster downloads and also removes a single point of failure.
kubeadm init --image-repository=registry.k8s.io -
CRI v1alpha2 removed - kubelet will not register the node if the container runtime doesn't support CRI v1. So to work with Kubernetes 1.26, containerd 1.6.0 is required.
-
Storage improvements -
1 - the vSphere and Azure in-tree driver migration to CSI have graduated to Stable.
2 - With 1.26 CSI drivers now have the option to apply the
fsGroupsettings during attach or mount time of the volumes.3 - GlusterFs and OpenStack cinder in-tree storage is removed in this release.
-
Kuberentes release signing - graduates to beta and binaries now ship additional
*.sig(signature) and*.cert(certificate) files side by side with the artifacts for verifying their integrity. -
Not a Windows fan but I think this is also highlighted as a major feature in the release - Support for running privileged containers on windows nodes graduates to beta.
-
Kubernetes metrics include significant improvements: The framework moves to alpha with all the metrics documented here.
/metrics/slisfor Kubernetes binaries for better health dashboards of Kubernetes components. -
PodSchedulingReadiness - You can now specify using the new
schedulinggatesfeature in the pod to mark the pod asSchedulingGated. -
nodeInclusionPolicy moves to beta - this is to indicate whether to take taints/tolerations into consideration when calculating Pod Topology Spread skew.
-
Loadbalancers can now use multiple protocols like UDP and TCP both.
-
Dynamic resource allocation will let the pods use external hardware resources
Many other features can be read here.
Now that we know some of the cool features, let's set up a Kubernetes cluster on Ubuntu 20.04 machines for version 1.26.
Prerequisites
-
4 Ubuntu 20.04 instances with ssh access to them, you can use any cloud provider to launch these instances
-
Each instance should have a minimum of 4GB of ram
Here I have 4 instances in place
Let's being!!
Step 1 - Run this on all the machines #
Kubeadm | kubectl | kubelet install
curl -s https://packages.cloud.google.com/apt/doc/apt-key.gpg | sudo apt-key add -
echo "deb https://apt.kubernetes.io/ kubernetes-xenial main" | sudo tee /etc/apt/sources.list.d/kubernetes.list
sudo apt update -y
sudo apt -y install vim git curl wget kubelet=1.26.0-00 kubeadm=1.26.0-00 kubectl=1.26.0-00
sudo apt-mark hold kubelet kubeadm kubectl
Load the br_netfilter module and let iptables see bridged traffic
sudo modprobe overlay
sudo modprobe br_netfilter
sudo tee /etc/sysctl.d/kubernetes.conf<<EOF
net.bridge.bridge-nf-call-ip6tables = 1
net.bridge.bridge-nf-call-iptables = 1
net.ipv4.ip_forward = 1
EOF
sysctl --system
Setup Containerd
cat <<EOF | sudo tee /etc/modules-load.d/containerd.conf
overlay
br_netfilter
EOF

sudo modprobe overlay
sudo modprobe br_netfilter

# Setup required sysctl params, these persist across reboots.
cat <<EOF | sudo tee /etc/sysctl.d/99-kubernetes-cri.conf
net.bridge.bridge-nf-call-iptables  = 1
net.ipv4.ip_forward                 = 1
net.bridge.bridge-nf-call-ip6tables = 1
EOF

# Apply sysctl params without reboot
sudo sysctl --system

#Install and configure containerd
curl -fsSL https://download.docker.com/linux/ubuntu/gpg | sudo apt-key add -
sudo add-apt-repository "deb [arch=amd64] https://download.docker.com/linux/ubuntu $(lsb_release -cs) stable"
sudo apt update -y
sudo apt install -y containerd.io
sudo mkdir -p /etc/containerd
containerd config default | sudo tee /etc/containerd/config.toml

#Start containerd
sudo systemctl restart containerd
sudo systemctl enable containerd
Above will install contained version 1.6.12-1.
Pull the images, pulls the images for Kubernetes 1.26 version.
sudo kubeadm config images pull --image-repository=registry.k8s.io --cri-socket unix:///run/containerd/containerd.sock --kubernetes-version v1.26.0Step2 - Run the kubeadm init command on the control plane node #
Here the pod network CIDR is dependent on the CNI you will be installing later on, so in this case, I am using flannel, and --control-plane-endpoint will be the public IP for the instance (it can be private IP as well but if you want to access it from outside the node by using Kubeconfig then you need to give the public IP).
sudo kubeadm init --pod-network-cidr=10.244.0.0/16 --upload-certs --kubernetes-version=v1.26.0 --control-plane-endpoint=74.220.27.73 --cri-socket unix:///run/containerd/containerd.sockThe above command will give the following output
[init] Using Kubernetes version: v1.26.0
[preflight] Running pre-flight checks
[preflight] Pulling images required for setting up a Kubernetes cluster
[preflight] This might take a minute or two, depending on the speed of your internet connection
[preflight] You can also perform this action in beforehand using 'kubeadm config images pull'
[certs] Using certificateDir folder "/etc/kubernetes/pki"
[certs] Generating "ca" certificate and key
[certs] Generating "apiserver" certificate and key
[certs] apiserver serving cert is signed for DNS names [kube-1-1-1-26-1-5b02-7bcf18 kubernetes kubernetes.default kubernetes.default.svc kubernetes.default.svc.cluster.local] and IPs [10.96.0.1 192.168.1.21 74.220.27.73]
[certs] Generating "apiserver-kubelet-client" certificate and key
[certs] Generating "front-proxy-ca" certificate and key
[certs] Generating "front-proxy-client" certificate and key
[certs] Generating "etcd/ca" certificate and key
[certs] Generating "etcd/server" certificate and key
[certs] etcd/server serving cert is signed for DNS names [kube-1-1-1-26-1-5b02-7bcf18 localhost] and IPs [192.168.1.21 127.0.0.1 ::1]
[certs] Generating "etcd/peer" certificate and key
[certs] etcd/peer serving cert is signed for DNS names [kube-1-1-1-26-1-5b02-7bcf18 localhost] and IPs [192.168.1.21 127.0.0.1 ::1]
[certs] Generating "etcd/healthcheck-client" certificate and key
[certs] Generating "apiserver-etcd-client" certificate and key
[certs] Generating "sa" key and public key
[kubeconfig] Using kubeconfig folder "/etc/kubernetes"
[kubeconfig] Writing "admin.conf" kubeconfig file
[kubeconfig] Writing "kubelet.conf" kubeconfig file
[kubeconfig] Writing "controller-manager.conf" kubeconfig file
[kubeconfig] Writing "scheduler.conf" kubeconfig file
[kubelet-start] Writing kubelet environment file with flags to file "/var/lib/kubelet/kubeadm-flags.env"
[kubelet-start] Writing kubelet configuration to file "/var/lib/kubelet/config.yaml"
[kubelet-start] Starting the kubelet
[control-plane] Using manifest folder "/etc/kubernetes/manifests"
[control-plane] Creating static Pod manifest for "kube-apiserver"
[control-plane] Creating static Pod manifest for "kube-controller-manager"
[control-plane] Creating static Pod manifest for "kube-scheduler"
[etcd] Creating static Pod manifest for local etcd in "/etc/kubernetes/manifests"
[wait-control-plane] Waiting for the kubelet to boot up the control plane as static Pods from directory "/etc/kubernetes/manifests". This can take up to 4m0s
[apiclient] All control plane components are healthy after 7.507032 seconds
[upload-config] Storing the configuration used in ConfigMap "kubeadm-config" in the "kube-system" Namespace
[kubelet] Creating a ConfigMap "kubelet-config" in namespace kube-system with the configuration for the kubelets in the cluster
[upload-certs] Storing the certificates in Secret "kubeadm-certs" in the "kube-system" Namespace
[upload-certs] Using certificate key:
74bfd9237ded9661ca3ee337057caba0be417c19b6493034ec0da3dbcffc8fff
[mark-control-plane] Marking the node kube-1-1-1-26-1-5b02-7bcf18 as control-plane by adding the labels: [node-role.kubernetes.io/control-plane node.kubernetes.io/exclude-from-external-load-balancers]
[mark-control-plane] Marking the node kube-1-1-1-26-1-5b02-7bcf18 as control-plane by adding the taints [node-role.kubernetes.io/control-plane:NoSchedule]
[bootstrap-token] Using token: 3y24ca.kq73lohh99nzmcl5
[bootstrap-token] Configuring bootstrap tokens, cluster-info ConfigMap, RBAC Roles
[bootstrap-token] Configured RBAC rules to allow Node Bootstrap tokens to get nodes
[bootstrap-token] Configured RBAC rules to allow Node Bootstrap tokens to post CSRs in order for nodes to get long term certificate credentials
[bootstrap-token] Configured RBAC rules to allow the csrapprover controller automatically approve CSRs from a Node Bootstrap Token
[bootstrap-token] Configured RBAC rules to allow certificate rotation for all node client certificates in the cluster
[bootstrap-token] Creating the "cluster-info" ConfigMap in the "kube-public" namespace
[kubelet-finalize] Updating "/etc/kubernetes/kubelet.conf" to point to a rotatable kubelet client certificate and key
[addons] Applied essential addon: CoreDNS
[addons] Applied essential addon: kube-proxy

Your Kubernetes control-plane has initialized successfully!

To start using your cluster, you need to run the following as a regular user:

  mkdir -p $HOME/.kube
  sudo cp -i /etc/kubernetes/admin.conf $HOME/.kube/config
  sudo chown $(id -u):$(id -g) $HOME/.kube/config

Alternatively, if you are the root user, you can run:

  export KUBECONFIG=/etc/kubernetes/admin.conf

You should now deploy a pod network to the cluster.
Run "kubectl apply -f [podnetwork].yaml" with one of the options listed at:
  https://kubernetes.io/docs/concepts/cluster-administration/addons/

You can now join any number of the control-plane node, running the following command on each as root:

  kubeadm join 74.220.27.73:6443 --token 3y24ca.kq73lohh99nzmcl5 \
	--discovery-token-ca-cert-hash sha256:f22dadb9c02bd9ac69b1819cbeaa11330ee70bb5fb6343f8b8a288b9ea83b00f \
	--control-plane --certificate-key 74bfd9237ded9661ca3ee337057caba0be417c19b6493034ec0da3dbcffc8fff

Please note that the certificate-key gives access to cluster sensitive data, keep it secret!
As a safeguard, uploaded-certs will be deleted in two hours; If necessary, you can use
"kubeadm init phase upload-certs --upload-certs" to reload certs afterward.

Then you can join any number of worker nodes by running the following on each as root:

kubeadm join 74.220.27.73:6443 --token 3y24ca.kq73lohh99nzmcl5 \
	--discovery-token-ca-cert-hash sha256:f22dadb9c02bd9ac69b1819cbeaa11330ee70bb5fb6343f8b8a288b9ea83b00f
Export KUBECONFIG and install CNI Flannel
mkdir -p $HOME/.kube
sudo cp -i /etc/kubernetes/admin.conf $HOME/.kube/config
sudo chown $(id -u):$(id -g) $HOME/.kube/config
export KUBECONFIG=/etc/kubernetes/admin.conf
kubectl apply -f https://github.com/coreos/flannel/raw/master/Documentation/kube-flannel.yml
Step 3 - Run the join command on all the worker nodes #
kubeadm join 74.220.27.73:6443 --token 3y24ca.kq73lohh99nzmcl5 \
> --discovery-token-ca-cert-hash sha256:f22dadb9c02bd9ac69b1819cbeaa11330ee70bb5fb6343f8b8a288b9ea83b00f
[preflight] Running pre-flight checks
[preflight] Reading configuration from the cluster...
[preflight] FYI: You can look at this config file with 'kubectl -n kube-system get cm kubeadm-config -o yaml'
[kubelet-start] Writing kubelet configuration to file "/var/lib/kubelet/config.yaml"
[kubelet-start] Writing kubelet environment file with flags to file "/var/lib/kubelet/kubeadm-flags.env"
[kubelet-start] Starting the kubelet
[kubelet-start] Waiting for the kubelet to perform the TLS Bootstrap...

This node has joined the cluster:
* Certificate signing request was sent to apiserver and a response was received.
* The Kubelet was informed of the new secure connection details.

Run 'kubectl get nodes' on the control-plane to see this node join the cluster.
Step 4 - Nginx Test #
You can copy the kubeconfig file from the controlplane node(~/.kube/config ) to local and export the KUBECONFIG variable or directly access the cluster from the controlplane node.
kubectl get nodes
NAME                          STATUS   ROLES           AGE    VERSION
kube-1-1-1-26-1-5b02-7bcf18   Ready    control-plane   4m1s   v1.26.0
kube-1-1-1-26-2-c673-7bcf18   Ready    <none>          59s    v1.26.0
kube-1-1-1-26-3-be3b-7bcf18   Ready    <none>          54s    v1.26.0
kube-1-1-1-26-4-dc16-7bcf18   Ready    <none>          52s    v1.26.0
The cluster is up and running with a single control plane and 3 worker nodes.
Now run nginx
kubectl run nginx --image=nginx
pod/nginx created

kubectl expose pod nginx --type=NodePort --port 80
service/nginx exposed

kubectl get pods
NAME    READY   STATUS    RESTARTS   AGE
nginx   1/1     Running   0          10s

kubectl get svc nginx
NAME    TYPE       CLUSTER-IP     EXTERNAL-IP   PORT(S)        AGE
nginx   NodePort   10.109.33.40   <none>        80:32573/TCP   10s
Access the service using Node public IP:32573 (make sure your firewall rules are properly set to allow traffic to required ports)
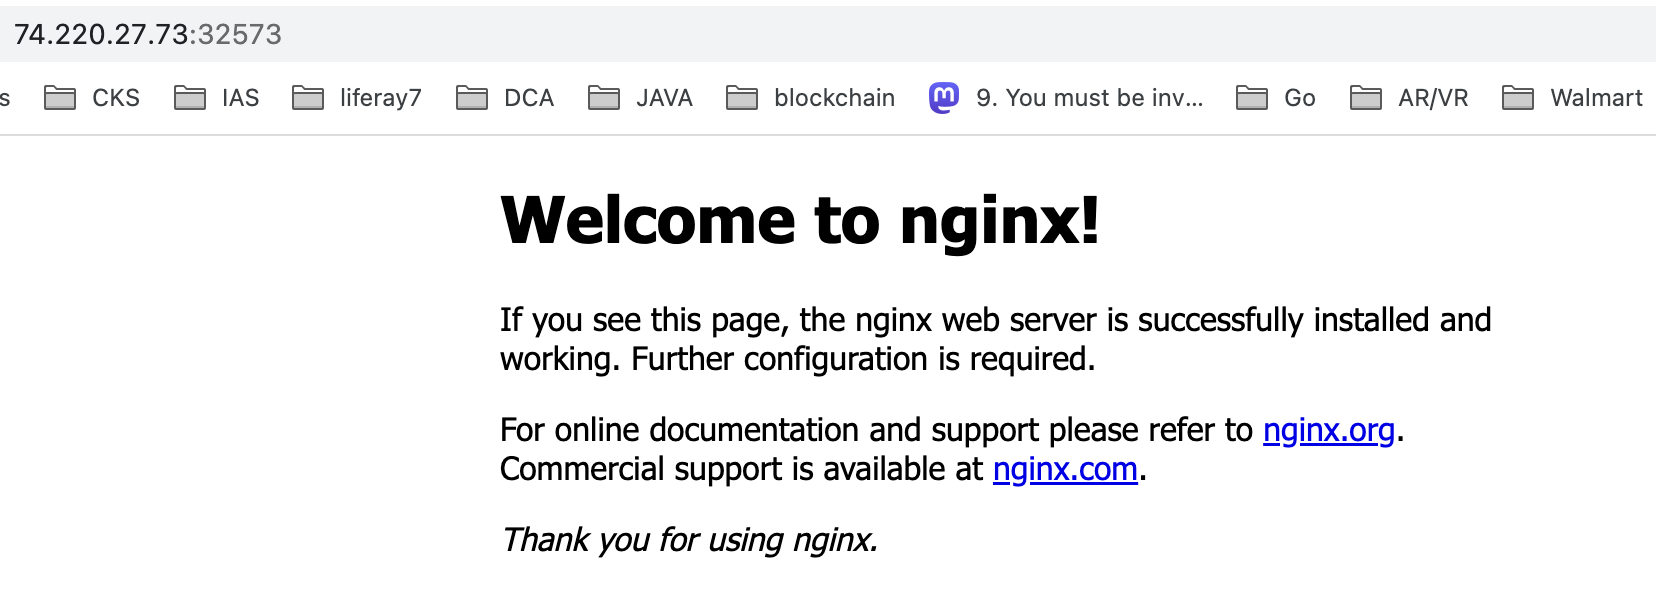
YAY!! You have successfully set up a self-managed Kubernetes cluster, version 1.26.0 and containerd as the container runtime.
Saiyam Pathak created a Killercoda playground with Kubernetes 1.26. Give it a try -> K8s 1.26 playground
Follow Kubesimplify on Hashnode, Twitter and LinkedIn. Join our Discord server to learn with us.
Get new posts in your inbox.
Spotted a typo or want to improve this post? Edit on GitHub →