Kubernetes Access Control with Authentication, Authorization & Admission Control
Hey! are you using kubernetes? Have you ever wondered how a simple request you make, as a user gives you access to various Kubernetes objects like pods…


On this page (7)
Hey! are you using kubernetes? Have you ever wondered how a simple request you make, as a user gives you access to various Kubernetes objects like pods and deployments? "Access control", thats how everything works! 🤔
In this blog, lets learn what access control is and how K8s manages access permissions behind the scenes. So, let's get started ! 🔗
Suppose, you are travelling from your country to another country, and you don't have any permission to enter into that country. So firstly you have to authenticate yourself (who you are) to that country by your identity ex:- passport. Then you have to get authorization to enter into that country by your Visa and after that you still have to go through some customs checking which is admission control for k8s to successfully enter into that country. This is exactly what happens for kubernetes access control to get enter permission to the k8s cluster. Likewise, a user must be authenticated first, and then the particular user must be authorized to access the resources of Kubernetes. We will be using minikube cluster & kubectl cli in this blog for example.
All Kubernetes clusters have two categories of users:- #
-
service accounts managed by Kubernetes
-
normal users account
Normal users account #
Kubernetes does not have objects which represent normal user accounts. Normal users cannot be added to a cluster through an API call. They need to go through the access control processes to get added to the cluster.
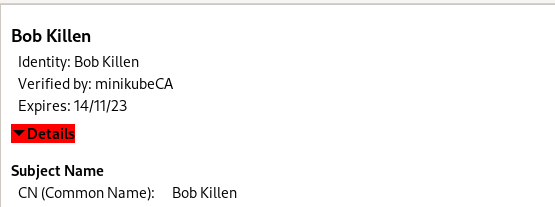
Though a normal user cannot be added via an API call, any user that presents a valid certificate (ex:- passport) signed by the cluster's certificate authority (CA) is considered authenticated. There is no username concept in the Kubernetes. In the configuration, Kubernetes determines the username from the common name field in the 'subject' of the cert (e.g., "/CN=Bob Killen"). From there, the role based access control (RBAC) sub-system would determine whether the user is authorized to perform a specific operation on a resource or not.
Service account #
In contrast, service accounts are users managed by the Kubernetes API. Here, do not need the access control permission. They are bound to specific namespaces, and created automatically by the API server or manually through API calls. Each service account is associated with a secret, and each secret has a token. And that particular token is used for authentication.
Authentication Methods :- #
Authentication step use to happen before reaching the request to api-server. Kubernetes uses client certificates, bearer tokens, or an authenticating proxy to authenticate API requests through authentication plugins.
As HTTP requests are made to the API server, plugins attempt to associate the following attributes with the request:
-
Username: a string which identifies the end user. Common values might be kube-admin or jane@example.com. -
UID: a string which identifies the end user and attempts to be more consistent and unique than username. -
Groups: a set of strings, each of which indicates the user's membership in a named logical collection of users. Common values might be system:masters or devops-team. -
Extra fields: a map of strings to list of strings which holds additional information authorizers may find useful.
So, Username, UID, Groups, and extra fields all will be added before the request goes to the authorization stage after the authentication is passed.
A lot of authentication methods are there. You can use one of them to authenticate a user.
  1. X509 Client Certs
  2. Static Token File
  3. Service Account Tokens
  4. Bearer Tokens
  5. OpenID Connect Tokens
we will be using X509 client certificate for authentication in this blog. For minikube you will see initially only one user minikube itself (admin) is there in the kubeconfig file for your cluster, and we can add another user who can access the cluster & perform some action and to add that user we have to go through these three admission control processes.
What is kubeconfig file? #
-
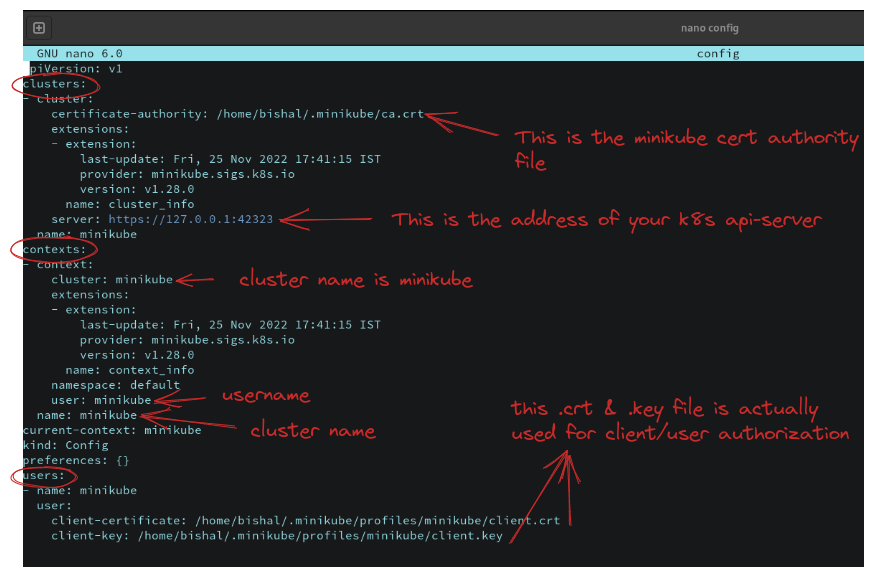
kubeconfig is a yaml file located in
~./kube/configin your machine. This file will be available only after installing
minikube. This is the main file which actually helps any user/client to access Kubernetes cluster and all its resources.This file contains all the user & corresponding cluster list itself. There are three sections in this yaml file -
clusters, contexts & users. Just use this command in your terminalnano ~/.kube/configand you can see that file. But make sure that your minikube cluster is running.
Authorization Methods :- #
After successfully authenticating, that request will go to the authorization step. This authorization step actually happens in api-server. The Kubernetes API server may authorize a request using one of several authorization modes:-
-
Node- A special-purpose authorization mode that grants permissions to kubelets based on the pods they are scheduled to run. -
ABAC- Attribute-based access control (ABAC) defines an access control paradigm whereby access rights are granted to users through the use of policies which combine attributes together. The policies can use any type of attributes (user attributes, resource attributes, object, environment attributes, etc.). -
Webhook- A WebHook is an HTTP callback: an HTTP POST that occurs when something happens; a simple event-notification via HTTP POST. A web application implementing WebHooks will POST a message to a URL when certain things happen. -
RBAC- Role-based access control (RBAC) is a method of regulating access to cluster or cluster resources based
on the roles of individual users within an enterprise. In this context, access is the ability of an individual user to perform a specific task, such as view, create, or modify a file. RBAC works typically for users and groups.Suppose, there are three users called marketing, dev, prod. And you have created 3 roles READ, WRITE, DELETE. You have to bind these roles by another k8s object called RoleBinding to the specific user. By those bound role, they can perform the particular action which is bound to them.
Role and Role binding lives in a namespace level in Kubernetes. This means you could have a dev group who have access to the development namespace where all the development microservices (in pods, container) live for a development project.
Or you have a marketing namespace where all the marketing system live & marketing users have access to that namespace. Roles & Role bindings will give those users access to that namespace because roles & role bindings lives in a namespace level. Also, to provide cluster level permissions meaning to all namespace to a user, you will have to use ClusterRole & ClusterRoleBinding. [ use these two carefully as it is giving whole cluster permission **]**RBAC uses the
rbac.authorization.k8s.ioAPI group to drive authorization decisions, allowing admins to dynamically configure permission policies through the Kubernetes API.
Let's try with Hands-on #
we will first authenticate a user named bob and then will give the authorization using RBAC
Authentication steps :- #
- At first, make sure that your minikube cluster is running & kubectl is installed. Check with this command
minikube status.

#make a folder named RBAC
mkdir RBAC
cd RBAC
# now install OpenSSL which will be used to generate key and cert (search on internet to get install command a/q your OS)
Now we will use ca.crt & ca.key of minikube which already exist in ~/.minikube folder. These two will be used to generate a certificate for user Bob Killen we are going to create in a moment. So copy these two files in your RBAC folder or whatever you gave your folder name.
User Certificates:- #
First thing we need to do is create a certificate signed by our minikube CA (Certificate Authority). We have the CA, (ca.crt ca.key) Let's create a certificate for user Bob Killen:
#start with a private key (use this command)
openssl genrsa -out bob.key 2048
So bob.key is generated. Now we have a key, we need a certificate signing request (CSR) which will be used to sign the cert for Bob using minikube CA. We also need to specify the groups that Bob belongs to. Let's pretend Bob is part of the Marketing group and will be developing applications for the Marketing.
# here we are requesting a csr by -output bob.csr and common name Bob Killen
openssl req -new -key bob.key -out bob.csr -subj "/CN=Bob Killen/O=Marketing"
Now bob.csr is generated in your RBAC folder. We will use this CSR to create a certificate named bob.crt. Use the minikube CA (which you copied ca.crt ca.key) to generate our certificate by signing our CSR. We may set an expiry on our certificate as well.
openssl x509 -req -in bob.csr -CA ca.crt -CAkey ca.key -CAcreateserial -out bob.crt -days 10Here you can see we are using x509 client cert and passing bob.csr & also using ca.crt & ca.key as Certificate Authority (CA) to sign the CSR. And getting the output as bob.crt and expiry of this cert is 10 days. This is the main certificate which will be used for authentication.
Now we also have bob.crt along with bob.key. We will use this two to add user Bob in our ~/.kube/config file. We'll be trying to avoid messing with our current Kubernetes config. So let's tell kubectl to look at a new config that does not yet exist. Don't forget to run this command :
export KUBECONFIG=~/.kube/new-configWe are pointing KUBECONFIG environment variable from ~/.kube/config to ~/.kube/new-config. Otherwise, Bob user will be added in your main kubeconfig file which will be a little bit messed up.
- Create a cluster entry which points to the cluster and contains the details of the CA certificate. Don't forget to copy api-server address from your
~/.kube/configfile. Ex:-https://127.0.0.1:42323. It can be changed at any time, so keep your eye open to this address at~/.kube/configfile and change it in~/.kube/new-configotherwise you will get this type of error below
The connection to the server 127.0.0.1:42323 was refused - did you specify the right host or port?
kubectl config set-cluster dev-cluster --server=https://127.0.0.1:42323 \
--certificate-authority=ca.crt \
--embed-certs=true

#see changes that dev-cluster is added in cluster list
nano ~/.kube/new-config
Here we are adding a new cluster named dev-cluster in your new kubeconfig file & also using the same ca.crt because this ca.crt is certificate of minikube cluster, and we are referencing this to get signed by its CA provided already.

- Now add the user bob in the users section of your kube/new-config file
kubectl config set-credentials bob --client-certificate=bob.crt --client-key=bob.key --embed-certs=true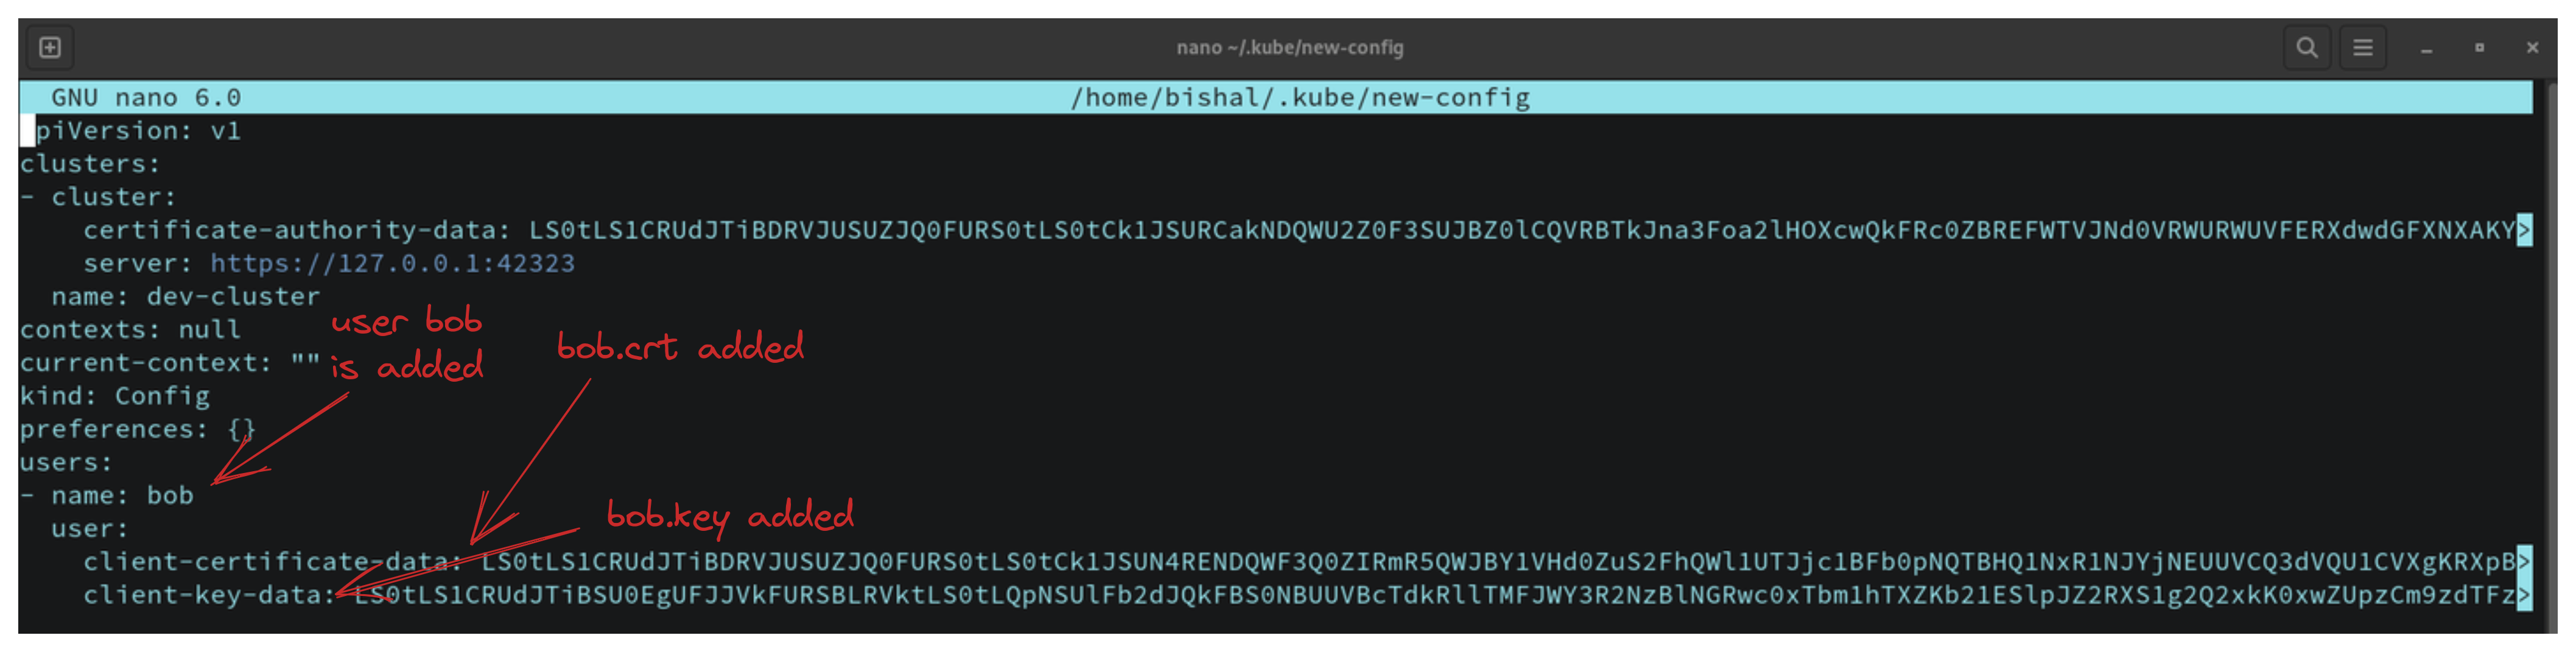
- Now we will add context section into kube/new-config file. This context section is the important section which helps to connect a user with the cluster added in the list (dev-cluster with user bob).
kubectl config set-context dev --cluster=dev-cluster --namespace=marketing --user=bobHere we are setting the namespace marketing as default in dev-cluster and user bob can access this namespace. We have set the context as named dev context. you can switch cluster by changing this current context. As in your kube/new-config, only one context is present named "dev", so you can't switch to another context.
- Now just use this command, and you will be switched into your dev-cluster and context named
dev& namespace is marketing
kubectl config use-context dev- Now your user authentication is successfully completed. Now bob can only access the dev-cluster not its resources like pods, deployment, service or whatever object in marketing namespace. If you run the command :
# command
kubectl get pods

# output
Error from server (Forbidden): pods is forbidden: User "Bob Killen" cannot list resource "pods" in API group "" in the namespace "marketing"
To access those objects, you have to authorize the user bob. We will use RBAC authorization here and will create a role and bind that role to user bob so that bob can access the resources of dev-cluster.
Authorization steps :- #
- Now go back to your minikube cluster from dev-cluster by this command :
export KUBECONFIG=~/.kube/configAs ~/.kube/config file is for minikube cluster, so changing env variable to pointing config not new-config. Now in your minikube cluster create a namespace named marketing and Bob will access this namespace from dev-cluster.
kubectl create namespace marketingNow in the marketing namespace we will create a role and bind that role by RoleBinding so that user bob can access the resources like pod, deployment etc.
- Create the role by this
role.yamlfile
apiVersion: rbac.authorization.k8s.io/v1
kind: Role
metadata:
  namespace: marketing
  name: manage-pods
rules:
- apiGroups: [""]
  resources: ["pods", "pods/exec"]
  verbs: ["get", "watch", "list", "create", "delete"]
- apiGroups: ["apps"]
  resources: ["deployments"]
  verbs: ["get", "watch", "list", "delete", "create"]
Here we are using rbac.authorization.k8s.io/v1 apigroup and kind is Role & namespace: marketing & role-name is manage-pods. We are defining some rules to access the resources. From this above error
output #
Error from server (Forbidden): pods is forbidden: User "Bob Killen" cannot list resource "pods" in API group "" in the namespace "marketing"
So to access pods it is telling that we should use "pods" in the resources list you can see in the yaml file we are using & also for pod apiGroup is "" which also are using. Also, we are using some verbs you can see which is the actual verbal command we will use like kubectl get pods. Actually kubectl get pods this command use list verb that's we have added list in the verbs array. Likewise, for deployment apiGroups "apps" is used and some verbs also added. So you can add more rules like this to access another resources like nodes, secret, service, namespace. For this, you have to write these 3 lines under rules section in your role.yaml for each resource.
- Now create a
rolebinding.yamlwill be used to bind therole.yaml
apiVersion: rbac.authorization.k8s.io/v1
kind: RoleBinding
metadata:
  name: manage-pods
  namespace: marketing
subjects:
- kind: User
  name: "Bob Killen"
  apiGroup: rbac.authorization.k8s.io
roleRef:
  kind: Role
  name: manage-pods
  apiGroup: rbac.authorization.k8s.io
Here kind is RoleBinding and in the metadata section, role binding name is manage-pods. In the subjects section you can see we are binding Role by roleRef section to the User Bob Killen and this name is exactly what we have set in /CN=Bob Killen. As I mentioned before that no username concept is there in k8s. Username always fetched from the common name from your provided certificate (bob.crt) for user, ex:- bob.
-
Now apply your
role.yaml&rolebinding.yamlfile to marketing namespacekubectl -n marketing apply -f role.yaml kubectl -n marketing apply -f rolebinding.yaml
Now check that whether role & role binding has been successfully created or not by this command:
kubectl get role
kubectl get rolebinding
You will see manage-pods is there. Now we have successfully bounded the role to user bob. So go back to your dev-cluster and try to access the resources pods, deployment, as we did not mention more than these two in role.yaml. Go to the dev-cluster by again changing KUBECONFIG env var pointer
export KUBECONFIG=~/.kube/new-configNow you are on your dev-cluster. Test this command :
kubectl get podsYou will see this because you haven't created any pod in your marketing namespace in dev-cluster.
No resources found in marketing namespace.
Now you can create, delete, list your pods, and also you can exec your container running inside your pod as we have added pods/exec in the verbs array in role.yaml. So create a pod -
kubectl run nginx --image=nginxkubectl get podsWohoo! Your pod is running, and user bob has been successfully authenticated & authorized 🎉
Admission Controllers :- #
An admission controller is a piece of code that intercepts requests to the Kubernetes API server prior to persistence of the object, but after the request is successfully authenticated and authorized. And it is the last checking like customs checking. Admission controllers may be validating, mutating, or both. Mutating controllers may modify related objects to the requests they admit; validating controllers may not.
There are two special controllers: MutatingAdmissionWebhook and ValidatingAdmissionWebhook. These execute the mutating and validating (respectively) admission control webhooks which are configured in the API.
-
The admission control process proceeds in two phases. In the first phase, mutating admission controllers are run. In the second phase, validating admission controllers are run. Note again that some of the controllers are both.
If any of the controllers in either phase reject the request, the entire request is rejected immediately and an error is returned to the end-user. So if your request successfully passed the admission control process, you can access any resources what you want. One thing is that you can enable or disable this admission controller checking in your command by passing
--enable-admission-plugins&--disable-admission-plugins.
So these are the three steps to reach to k8s api-server successfully!!
Kubernetes Service Accounts #
So we've seen how to give permission to users, but what about applications or services running in our cluster ? Most business apps will not need to connect to the Kubernetes API unless you are building something that integrates with your cluster, like a CI/CD tool, an autoscaler or a custom webhook.
Generally, applications (not human user) will use a service account to connect with your cluster.
Let's deploy a service account → Go to your minikube cluster by changing KUBECONFIG env var. At first create a serviceaccount.yaml file
apiVersion: v1
kind: ServiceAccount
metadata:
  name: marketing-api
Name of the service account is marketing-api. Then apply your serviceaccount.yaml in marketing namespace.
kubectl -n marketing apply -f serviceaccount.yamlNow we can deploy a pod that uses the service account. So create pod.yaml first
apiVersion: v1
kind: Pod
metadata:
  name: shopping-api
spec:
  containers:
  - image: nginx
    name: shopping-api
  serviceAccountName: marketing-api
Here pod name is shopping-api but we are using recently created serviceAccount named marketing-api. Assume that this pod is the actual application which is using the service account created recently, and suppose this application (shopping-api pod) is actually trying to get the all pod list in the marketing namespace. Like bob (human user) was trying to get all the pod list in marketing namespace but failed for the first time because we didn't create any role or role binding at that time for bob. Don't be confused with application and pod, we are using shopping-api pod as an application which is not a human user and this application could be anything which wants permission from cluster.
Then apply the pod.yaml in marketing namespace. Note:- We are still on minikube cluster
kubectl -n marketing apply -f pod.yamlNow let's go inside the running shopping-api pod by this command:
kubectl -n marketing exec -it shopping-api -- bashThen run this command :
ls -l /var/run/secrets/kubernetes.io/serviceaccount
Now suppose shopping-api pod is trying to get all the pod's list. So firstly we have to set all the necessary variable by fetching all the three values from service account which is namespace, token, ca.crt. Follow this below and run these commands :
# Point to the internal API server hostname
APISERVER=https://kubernetes.default.svc

# Path to ServiceAccount token
SERVICEACCOUNT=/var/run/secrets/kubernetes.io/serviceaccount

# Read this Pod's namespace
NAMESPACE=$(cat ${SERVICEACCOUNT}/namespace)

# Read the ServiceAccount bearer token
TOKEN=$(cat ${SERVICEACCOUNT}/token)

# Reference the internal certificate authority (CA)
CACERT=${SERVICEACCOUNT}/ca.crt

# List pods through the API
# Here we are using all the above set variable to get the list of pods by the shopping-api application (pod)
curl --cacert ${CACERT} --header "Authorization: Bearer $TOKEN" -s ${APISERVER}/api/v1/namespaces/marketing/pods/

# we should see an error not having access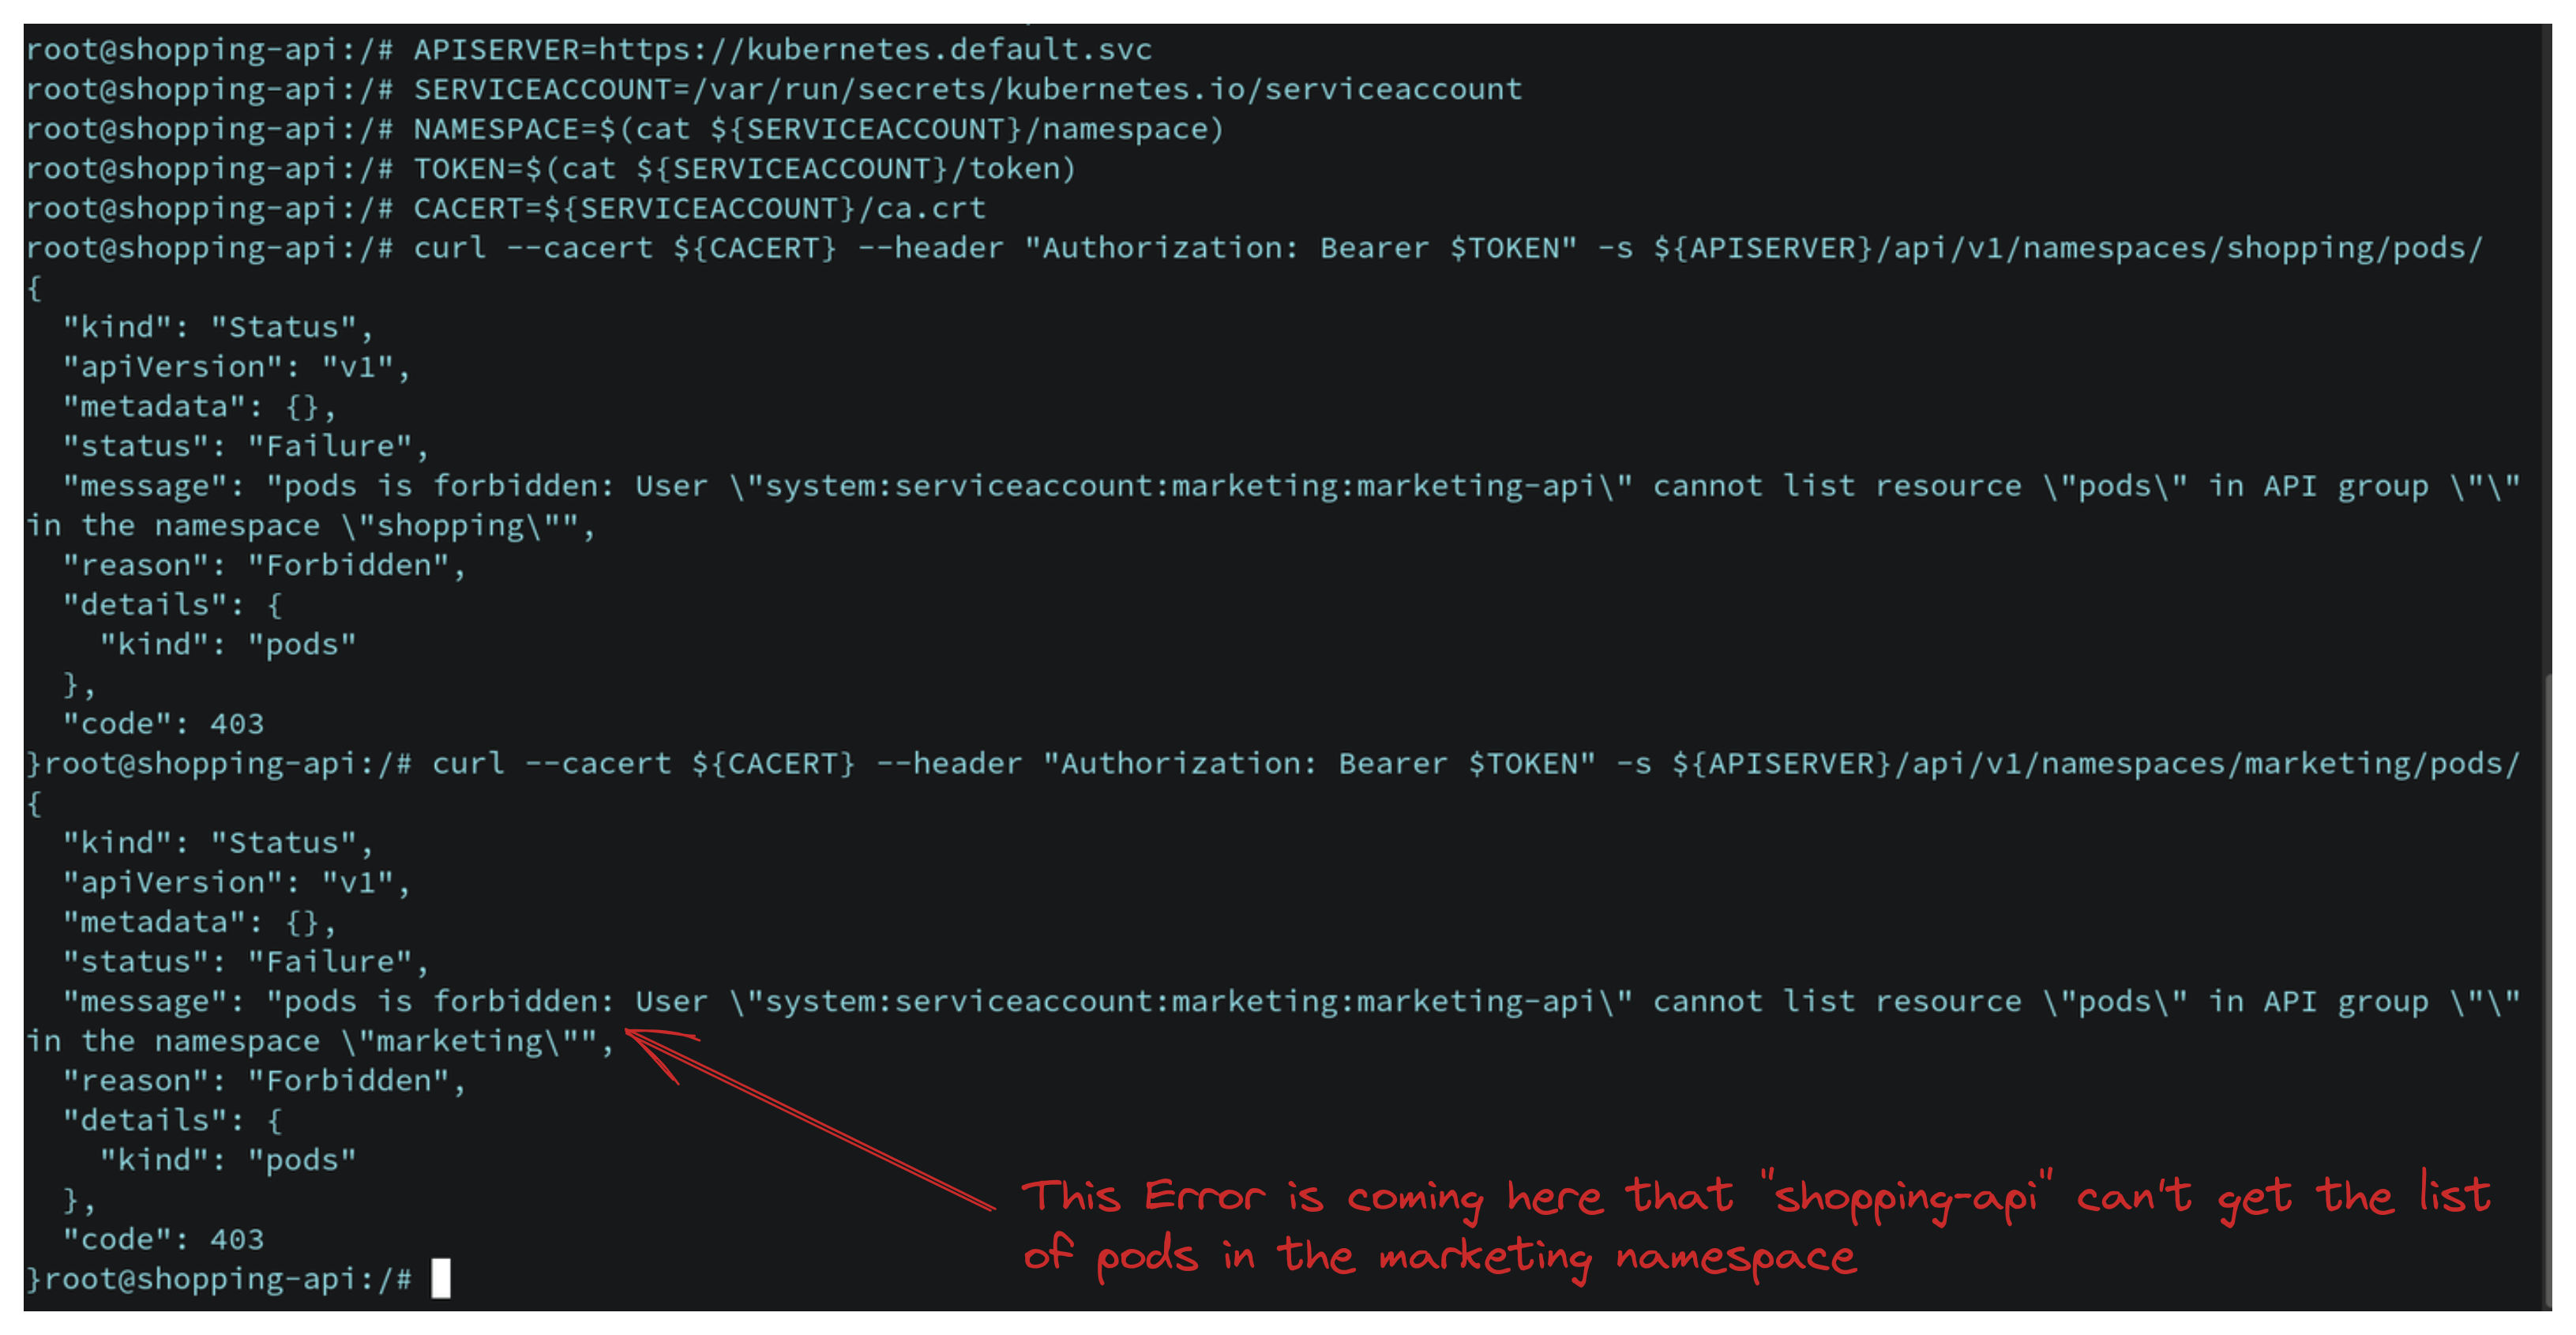
This error is coming because we haven't created any role or rolebinding for the serviceaccount yet. So we will create serviceaccount-role.yaml and serviceaccount-rolebinding.yaml in the minikube cluster so that shopping-api pod/application can get the permission from cluster-admin. So again go back to minikube cluster
Let's create serviceaccount-role.yaml
apiVersion: rbac.authorization.k8s.io/v1
kind: Role
metadata:
  namespace: marketing
  name: shopping-api-role
rules:
- apiGroups: [""]
  resources: ["pods"]
  verbs: ["get", "watch", "list"]
Then create serviceaccount-rolebinding.yaml
apiVersion: rbac.authorization.k8s.io/v1
kind: RoleBinding
metadata:
  name: shopping-api
  namespace: marketing
subjects:
- kind: ServiceAccount
  name: marketing-api
roleRef:
  kind: Role
  name: shopping-api-role
  apiGroup: rbac.authorization.k8s.io
Here we are just changing the kind: from user to ServiceAcount as we are binding this for serviceaccount. Now apply those two yaml file in your minikube cluster.
kubectl -n marketing apply -f serviceaccount-role.yaml
kubectl -n marketing apply -f serviceaccount-rolebinding.yaml
Now go to your dev-cluster and exec to your shopping-api application/pod by same command above and then set all the variable again which we did set before like APISERVER, SERVICEACCOUNT, TOKEN etc. Then again run this command:
curl --cacert ${CACERT} --header "Authorization: Bearer $TOKEN" -s ${APISERVER}/api/v1/namespaces/marketing/pods/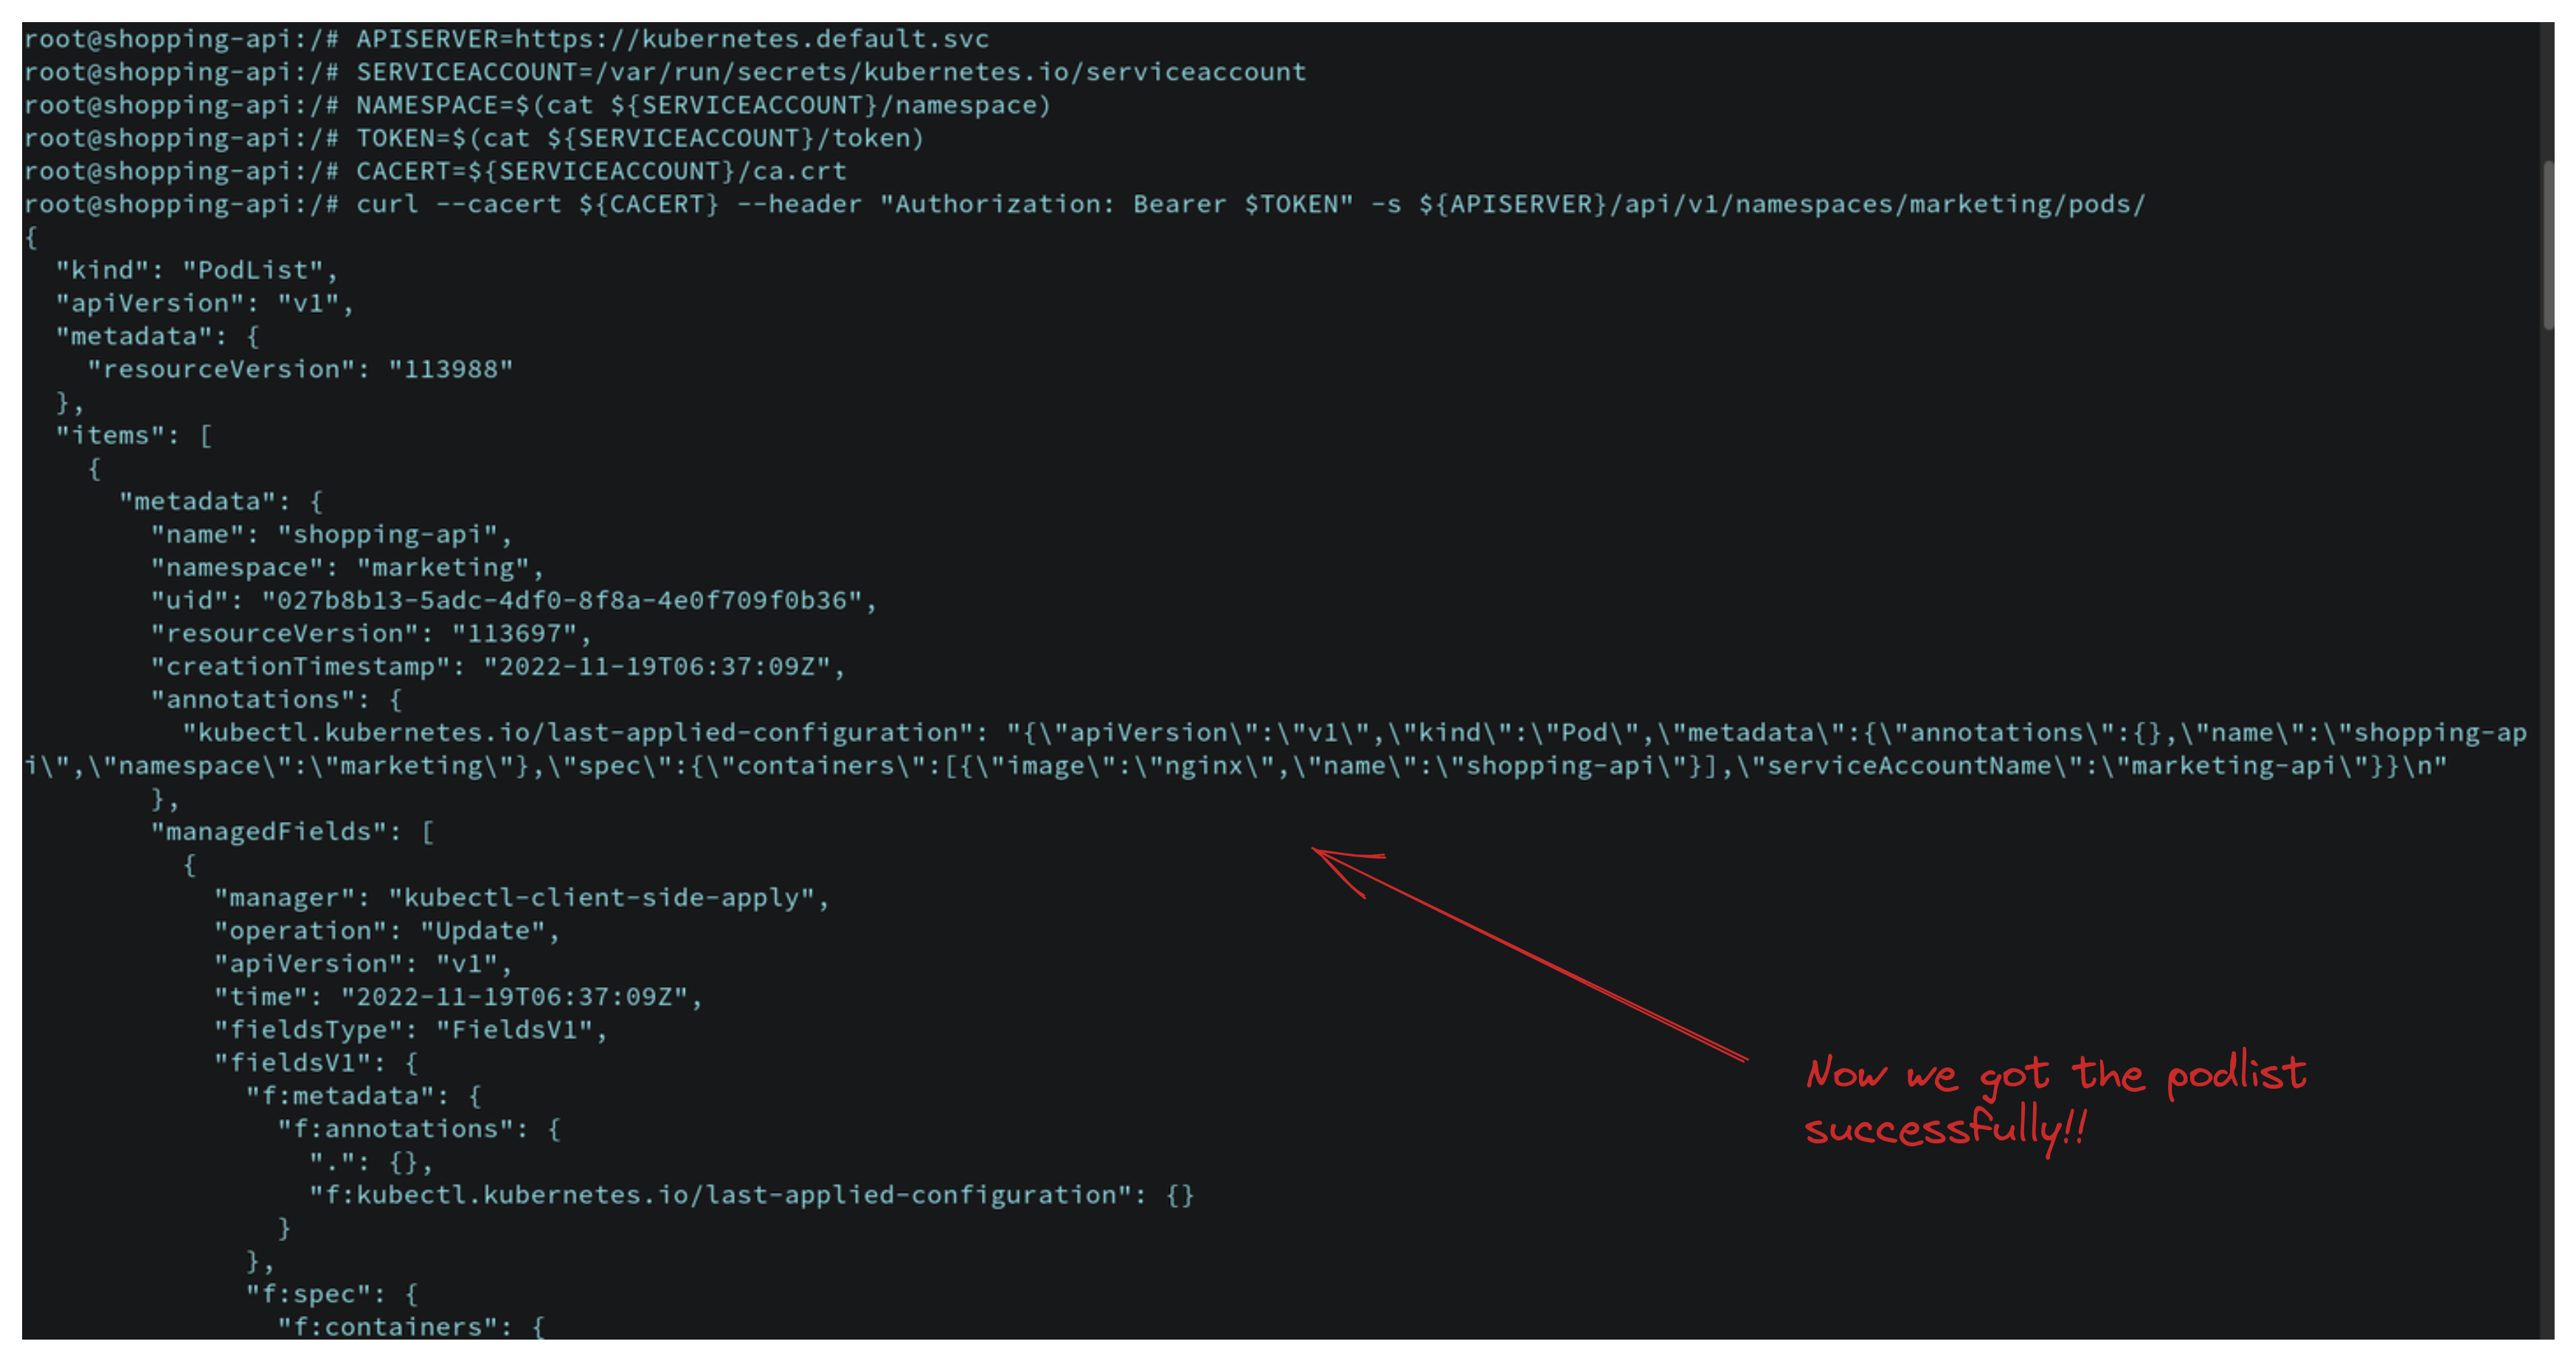
Now your application will successfully get the pod list as we have set role and role binding!! So we have seen how a user can get cluster permission by admission control and how an application (not human user) can get cluster permission via service account.
So, I hope this blog helped you to understand how access control works for a user and how service account works for applications in Kubernetes cluster.
Thanks for reading !!💖
Follow Kubesimplify on Hashnode, Twitter and LinkedIn. Join our Discord server to learn with us.
Get new posts in your inbox.
Spotted a typo or want to improve this post? Edit on GitHub →