Kyverno And Cosign
Kyverno is a Kubernetes native policy engine, and cosign is a tool used for signing container images.


In my previous article, I have written about kyverno. Continuing that, In this short article, I’m going to explore Kyverno and Cosign together. Kyverno is a Kubernetes native policy engine, and cosign is a tool used for signing container images. This article assumes that you know the basics of Kyverno and Cosign.
This article is more hands on oriented, so I will encourage you to try this hands on.
-
What we are going to do in this blog
- Creating a container image
- Pushing the image to container registry
- Signing the Image with Cosign
- Creating a ClusterPolicy that will enforce only signed images to be used while creating k8s resources.
- Creating a pod with the same image that we had made above.
-
For the example purpose, I will be creating a very simple container image based on
nginx:alpineimage. -
Create a new directory and name it anything you want.
-
First, let's create an index.html page that we will be using in the image.
<!DOCTYPE html>
<html lang="en">
<head>
    <meta charset="UTF-8">
    <meta http-equiv="X-UA-Compatible" content="IE=edge">
    <meta name="viewport" content="width=device-width, initial-scale=1.0">
    <title>Cosign and Kyverno</title>
</head>
<body>
    <h1> Having fun with Cosign and Kyverno </h1>
</body>
</html>- Now let's create a Dockerfile in the same directory.
FROM nginx:alpine
COPY index.html /usr/share/nginx/html- Now we need to build the image. To build the image, execute the command
podman build -t kranurag7/kyverno-cosign .- I'm using Podman here. If you use any other tool like docker, then replace podman with docker.
Signing the image #
- Now comes the part of signing the image.
- To sign the image, we will use cosign.
- Execute the command
cosign sign --key cosign.key kranurag7/kyverno-cosign - If everything is correct, you should see this message.

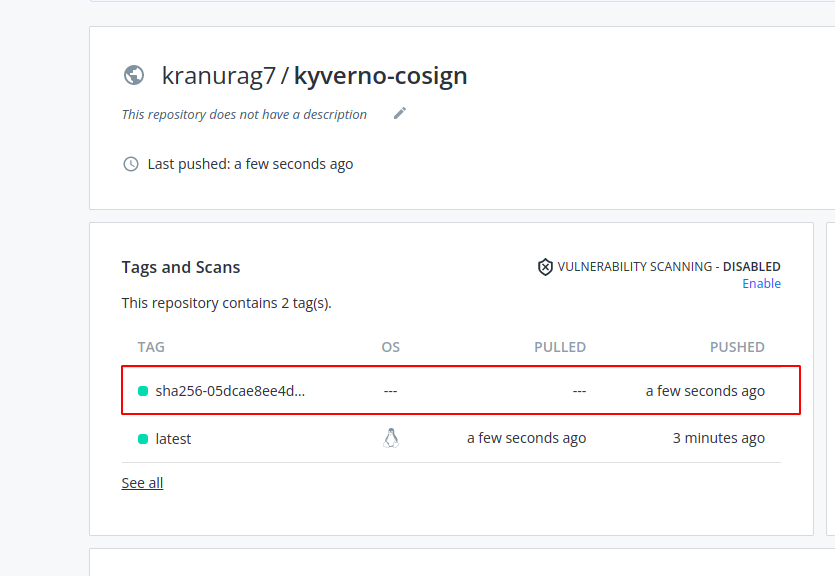
- After signing when you go to docker hub or your respective container registry then you will notice a tag pushed to the repo as soon as you sign the image.
-
I'm not going into the details of cosign in this article. I will write another one for that.
-
If verifies that your image is signed now.
-
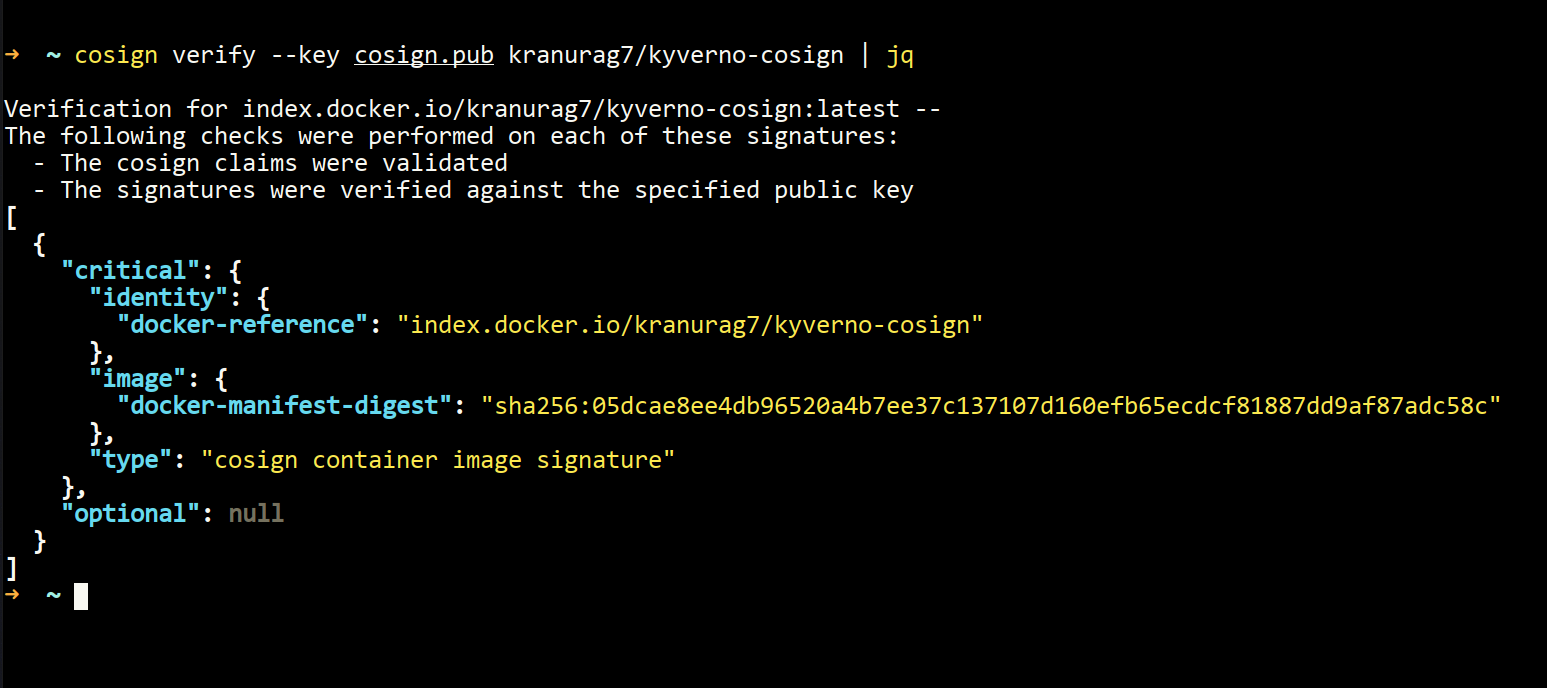
You can also verify your image from the terminal.
cosign verify --key cosign.pub kranurag7/kyverno-cosign | jq- You should see something like this.
- If you don't have
jqinstalled then skipjq
Creating a Pod with the signed Image #
- Now that we have our image ready, let's create a ClusterPolicy that will only allow the pods whose container images are signed with cosign.
- To do that, we will go to https://kyverno.io/policies and copy-paste one policy named
verify_image. You can find it here
apiVersion: kyverno.io/v1
kind: ClusterPolicy
metadata:
  name: verify-image
  annotations:
    policies.kyverno.io/title: Verify Image
    policies.kyverno.io/category: Sample
    policies.kyverno.io/severity: medium
    policies.kyverno.io/subject: Pod
    policies.kyverno.io/minversion: 1.4.2
    policies.kyverno.io/description: >-
      Using the Cosign project, OCI images may be signed to ensure supply chain
      security is maintained. Those signatures can be verified before pulling into
      a cluster. This policy checks the signature of an image repo called
      ghcr.io/kyverno/test-verify-image to ensure it has been signed by verifying
      its signature against the provided public key. This policy serves as an illustration for
      how to configure a similar rule and will require replacing with your image(s) and keys.
spec:
  validationFailureAction: enforce
  background: false
  rules:
    - name: verify-image
      match:
        any:
        - resources:
            kinds:
              - Pod
      verifyImages:
        - image: "*"
          key: |-
            -----BEGIN PUBLIC KEY-----
            MFkwEwYHKoZIzj0CAQYIKoZIzj0DAQcDQgAEBgkz0hpHwOmEXaRaPPFMqhczFGRw
            wcQnj0jnRdsB0U6npFtHCJLIzALIYag9iHEz6RGArOvLa0eFLOkQKRvpg==
-----END PUBLIC KEY----- - Now we will execute the command
kubectl apply -f verify_image.yaml - After this, we will try running our signed image and one unsigned image as well.
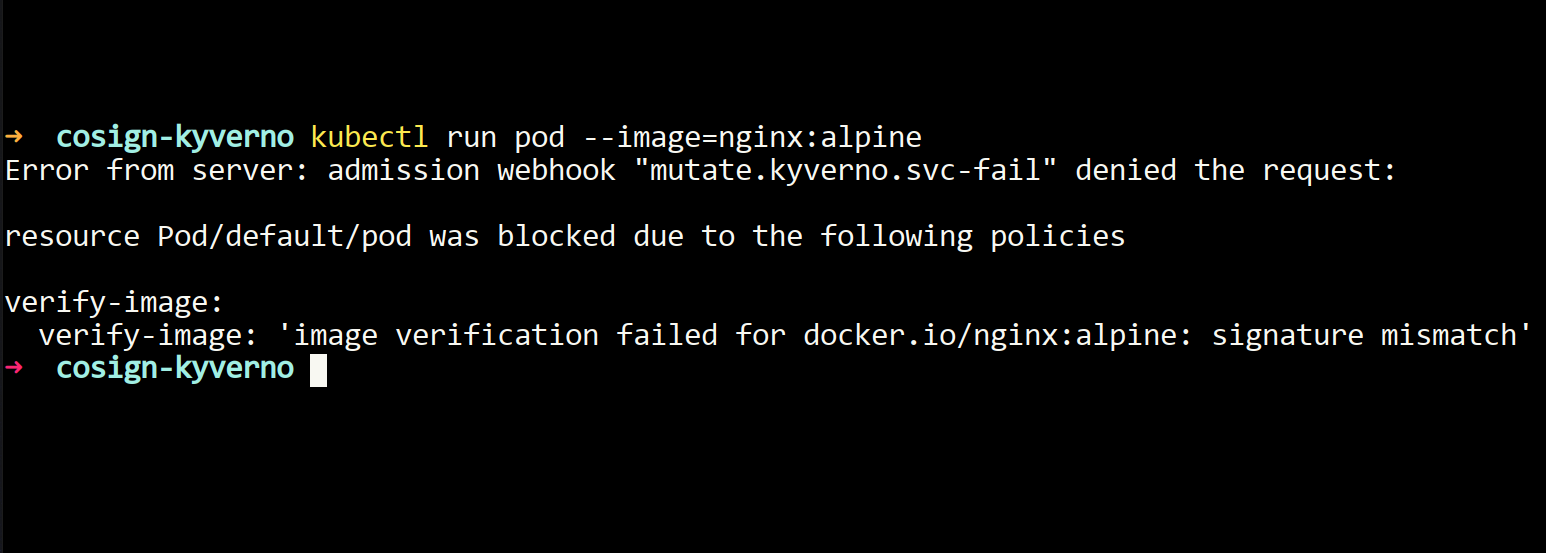
- Let's first start with an image which is not signed by cosign.
- For illustration purpose, we will run the nginx image
kubectl run my-pod --image=nginx - You will notice that the object is not getting created, and it's throwing an error.
- The error will look something like this.
- You can also check this in the policy reports.
kubectl get polr 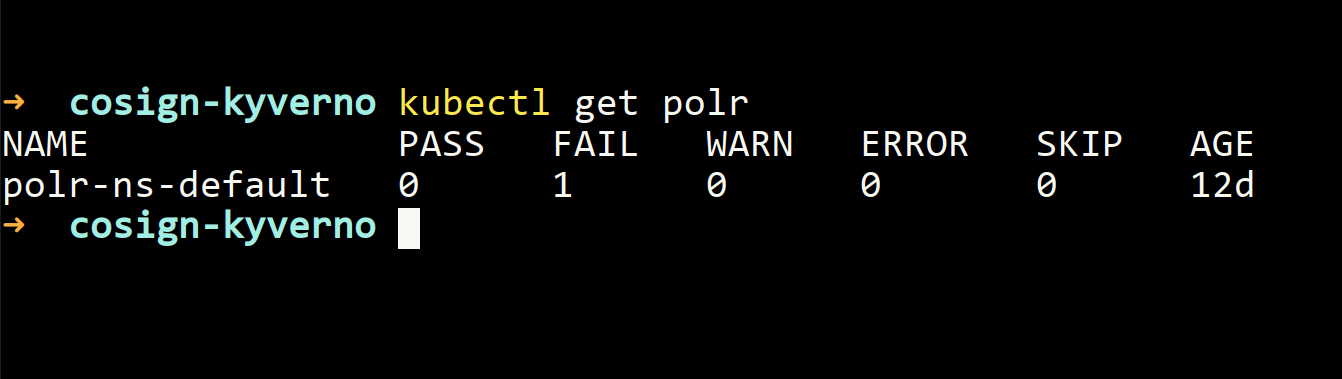
- It's showing that one policy is failing.
- For looking at policies, I generally use policy-reporter. In the policy-reporter Dashboard, you will notice that one failing policy is there. For me, this is much simpler to visualize what's happening in the cluster.
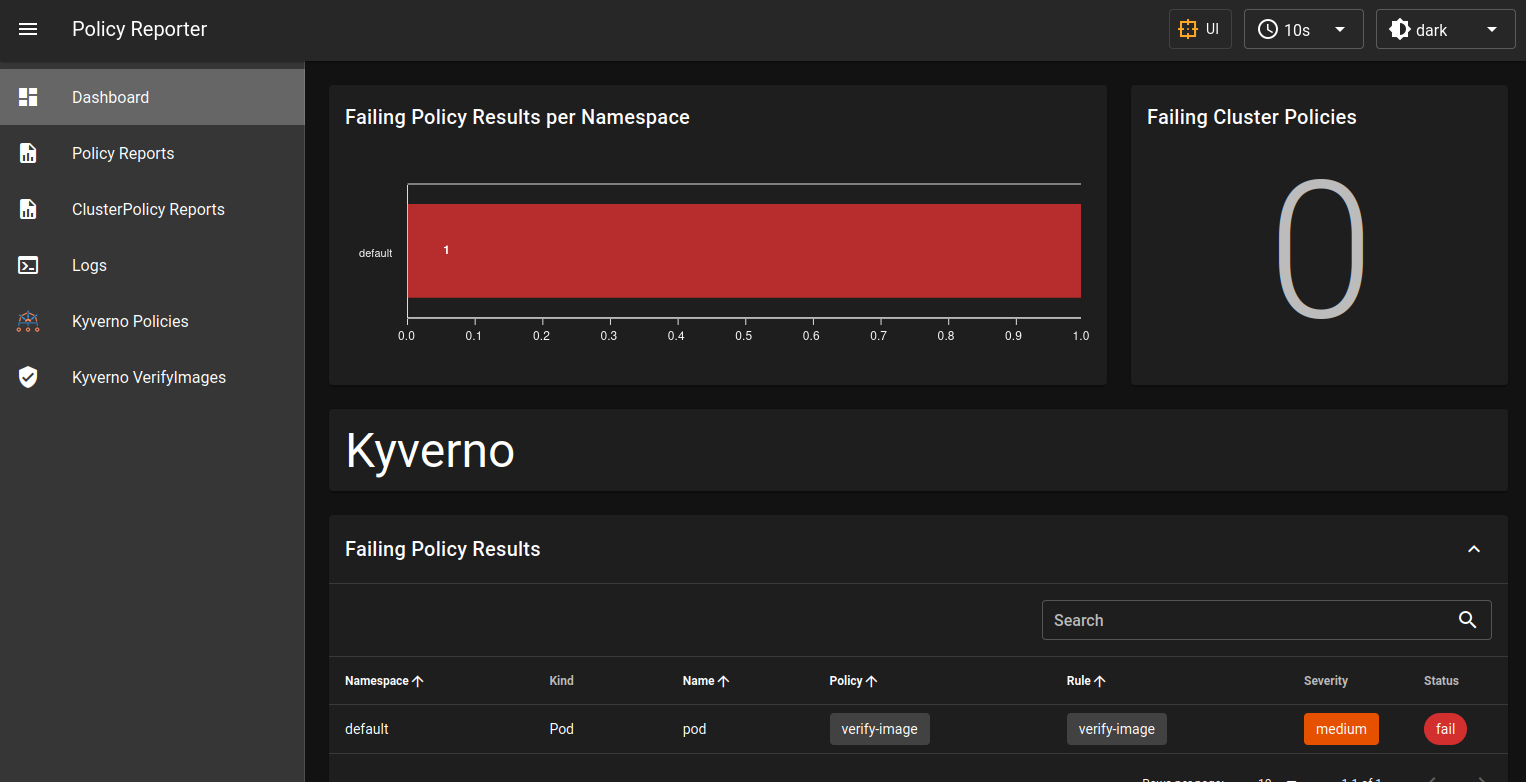
- You can see in the image above that one policy is failing and something is wrong.
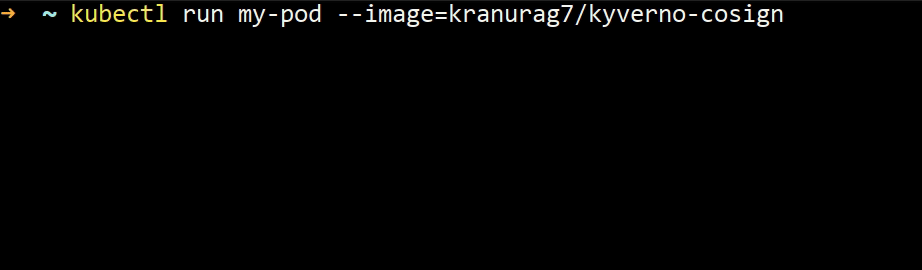
- Now let's deploy a pod with the image we have signed a few minutes back.
kubectl run my-pod --image=kranurag7/kyverno-cosign
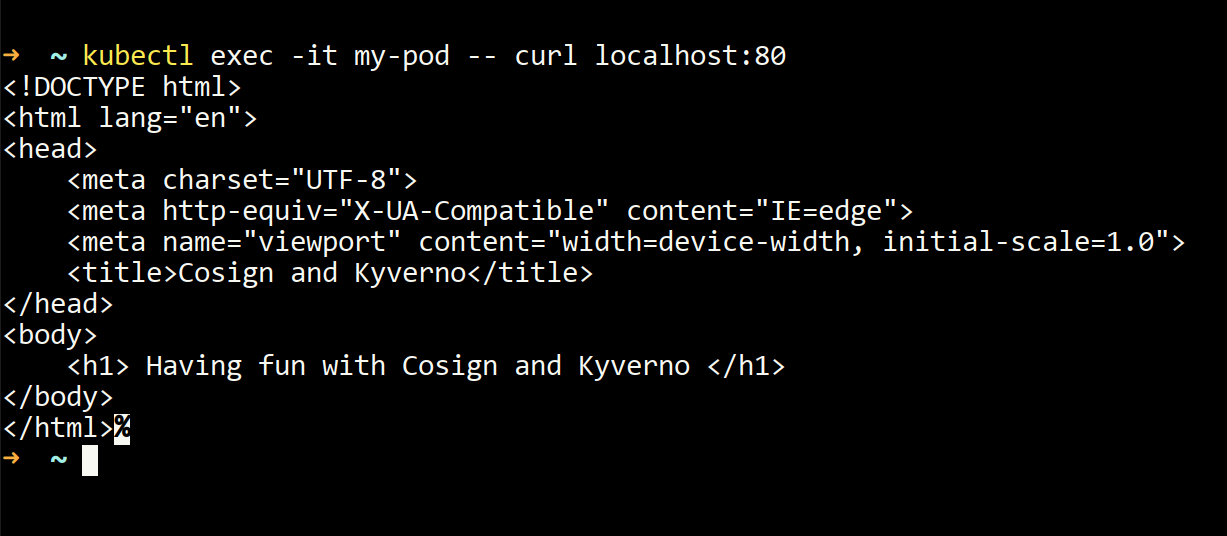
- Now let's try executing the command for the simple web page that we had created.
kubectl exec -it my-pod -- curl localhost:80- You should see some output like this
- Now let's see this in browser
kubectl port-forward my-pod 8081:80-
Go to your browser and type
localhost:8081. You should see this in your browser.
-
That's all I have for this article. I hope you enjoyed reading and practicing it. Stay tuned for more.
Get new posts in your inbox.
Spotted a typo or want to improve this post? Edit on GitHub →