Reducing Image Size using Multi-stage builds for a Go application
multi-stage docker builds

On this page (7)
Introduction #
Anyone who’s built their own containers, either for local development or for cloud deployment, knows the advantages of keeping container sizes small. In most cases, keeping the container image size small translates to real dollars saved by reducing bandwidth and storage costs on the cloud. In addition, smaller images ensure faster transfer and deployments when using them in a CI/CD server.
- The Official Docker Blog
Therefore smaller images translate to:
-
Lesser Bandwidth Consumption
-
Lesser Storage Consumption
-
Faster Deployments on CI/CD
Which all translates to saving money 🤑
What are multi-stage builds? #
Docker has a very cool feature called multi-stage builds, it allows you to build the image with one base and run with another. Let's have a look:
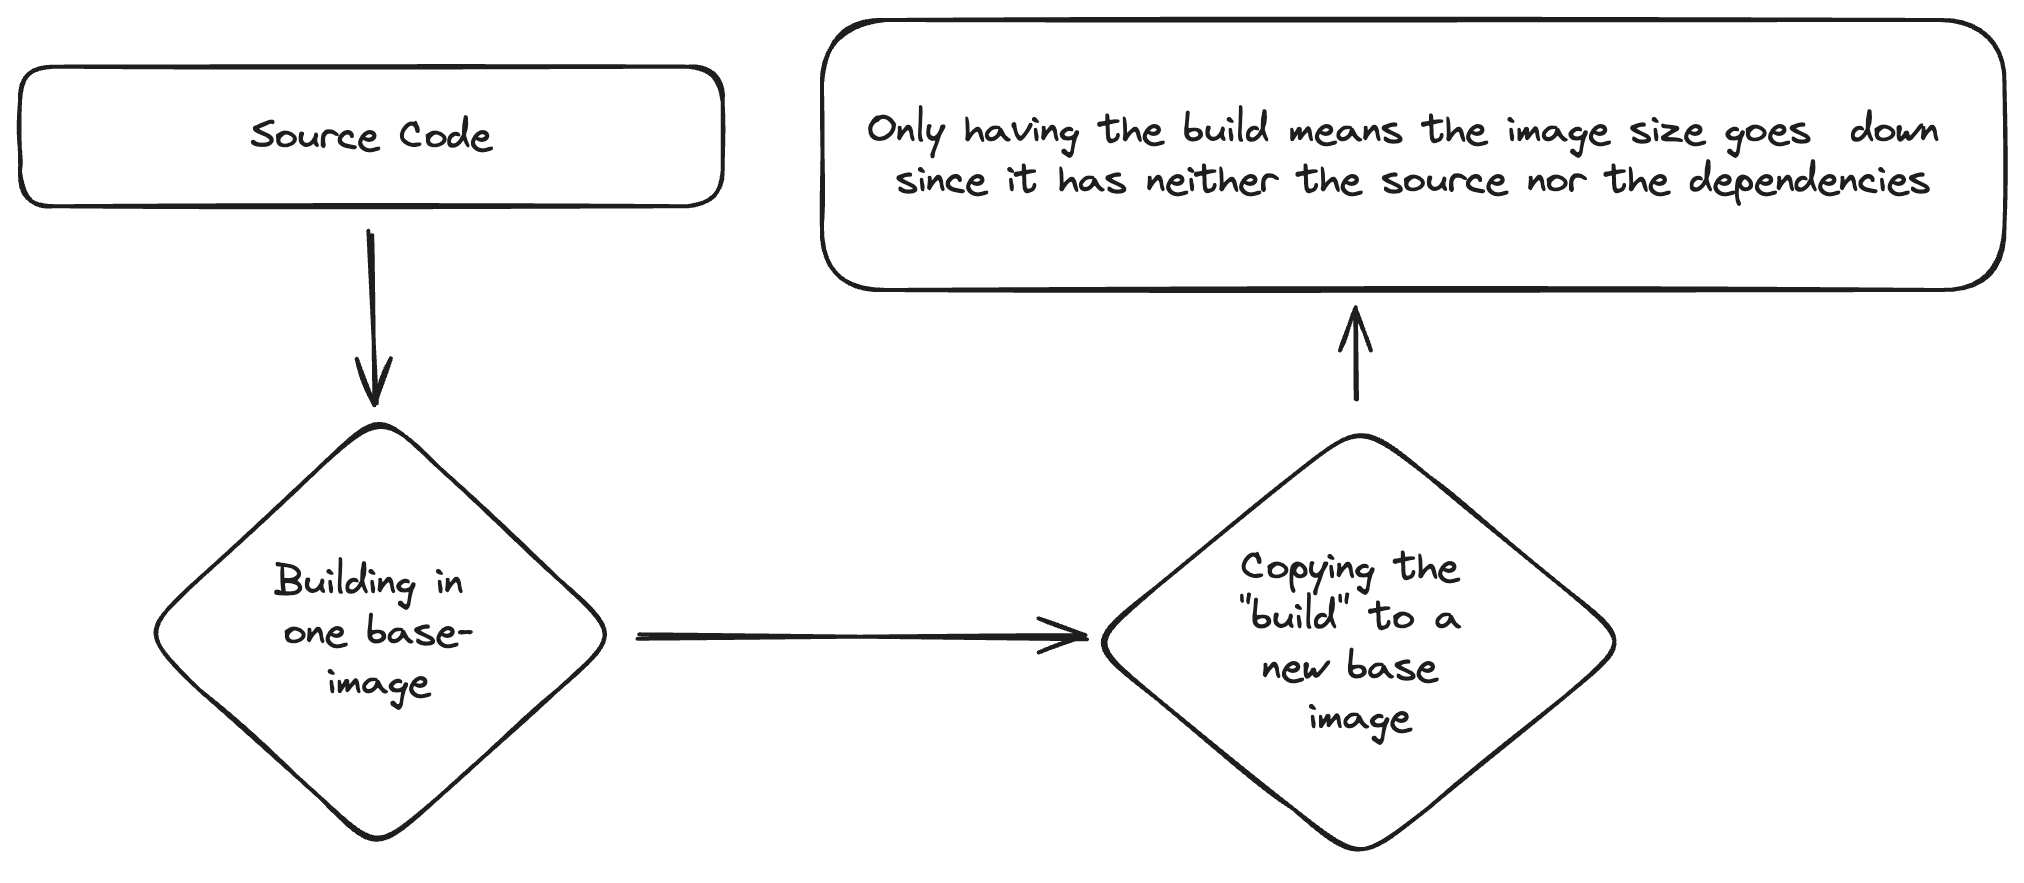
With multi-stage builds, the image get rid of:
-
The heavy base image you needed to build the application
-
The source code
-
The dependencies need to "build" the application.
Golang programs are the perfect lab rats to carry out this on, why?
-
Golang applications compile into "binaries" with customizable OS/ARCH
-
The binary is standalone and does not need "go" in the environment or any of the dependencies
The lab-rat #
So for this 'article', I am creating a hello-world gin-gonic API, you can skip to the next section if you already have a Golang project.
Let's first initialize the application:
go mod init go-gin-api-template
go get -u github.com/gin-gonic/gin
touch main.go
Now, let's write the code, inside of main.go.
package main

import "github.com/gin-gonic/gin"

func main() {
	router := gin.Default()

	router.GET("/", func(c *gin.Context) {
		c.JSON(200, gin.H{
			"message": "Hello World!",
		})
	})

	router.Run(":8080")
}
This does 4 things:
-
Imports gin-gonic as a dependency
-
Use gin gonic to create a router
-
Set the
/endpoint handler to a "Hello World" returner -
Listens on port:8080 for requests
Now let's create the docker image how we would do it usually (without multistage builds)
FROM --platform=linux/amd64 golang:1.21.6-alpine@sha256:fd78f2fb1e49bcf343079bbbb851c936a18fc694df993cbddaa24ace0cc724c5

WORKDIR /app

COPY . .

RUN go get

RUN go build -tags=jsoniter -o app .

EXPOSE 8080

CMD ["./app"]
In this Dockerfile:
-
I am using
golang-alpineas the base image -
Copying the entire source code (
COPY . .) -
Installing dependencies (
RUN go get) -
Building in the app as the filename 'app' (
RUN go build -tags=jsoniter -o app .)
Now let's build this image:
Running it with docker run -p 8080:8080 and looks like it works 🔥

For reference, I built the image twice and the size is 582MB

The image is one GitHub Container Registry and the Repository Source/Template is also on GitHub
Implementing multi-stage builds #
To implement that let's start with the original Dockerfile we already have:
FROM --platform=linux/amd64 golang:1.21.6-alpine@sha256:fd78f2fb1e49bcf343079bbbb851c936a18fc694df993cbddaa24ace0cc724c5

WORKDIR /app

COPY . .

RUN go get

RUN go build -tags=jsoniter -o app .

EXPOSE 8080

CMD ["./app"]
Now, first of all, let's give the first base image a name,
- FROM --platform=linux/amd64 golang:1.21.6-alpine@sha256:fd78f2fb1e49bcf343079bbbb851c936a18fc694df993cbddaa24ace0cc724c5
+ FROM --platform=linux/amd64 golang:1.21.6-alpine as builder
Next up let's after RUN go build -tags=jsoniter -o app . let's add some code to configure the second base image:
FROM alpine:latest

WORKDIR /app

COPY --from=builder /app/app .
So now the final Dockerfile is:
FROM --platform=linux/amd64 golang:1.21.6-alpine as builder

WORKDIR /app

COPY . .

RUN go get

RUN go build -tags=jsoniter -o app .

FROM alpine:latest

WORKDIR /app

COPY --from=builder /app/app .

CMD ["./app"]

EXPOSE 8080
Let's run docker build now!
Diving into each line of the Dockerfile #
Let's look at what we are doing in the multi-stage build Dockerfile
FROM --platform=linux/amd64 golang:1.21.6-alpine as builder

WORKDIR /app

COPY . .

RUN go get

RUN go build -tags=jsoniter -o app .

FROM alpine:latest

WORKDIR /app

COPY --from=builder /app/app .

CMD ["./app"]

EXPOSE 8080-
In the first line,
FROM --platform=linux/amd64 golang:1.21.6-alpine as builderwe are taking the Golang image from dockerhub and using it as our base image under the name ofbuilder -
Second line we switch to the workdir
/app, and third, we copy all the files we have in the folder to/appin the builder -
In the fourth line, we execute
go getto install all of our dependencies -
Finally, in the fifth line, we build the application with the go build command (
go build -tags=jsoniter -o app .). This created an executable binary at/app/appinside thebuilder(golang image). -
Then from the 6th line we move to a new base image (
alpine), consider it like a total image we are creating. Alpine is a very lightweight image which is why we chose it. -
Inside Alpine, we
/app/appfrombuilderto use it -
We tell docker that this image is run using the
./appbinary in Alpine's workdir (the end path being:/app/app)
Finally, we write EXPOSE 8080 so that the user knows that they have to run it with: docker run -p 8080:8080 image-name
Things to be careful of #
-
You need to make sure that the final base image has all the dependencies or requirements.
-
This cannot be used if your project is not standalone, for example: NodeJs projects (It's alright if you use it to transpile typescript)
-
Some tooling such as TestContainers does not support it. Refer to testcontainers/testcontainers-java#1112
-
FYI It does increase the build time, it took around ~35 seconds to build the first image and ~60 seconds to build the second one
Result #
So the original image was roughly 582MB and now it comes around to 18.8MB

That is ~30.9 times less than the original image 😱 This is how docker multi-stage builds can help us in reducing the image size!
Once again the image and the source are available on GitHub
Follow Kubesimplify on Hashnode, Twitter, and LinkedIn. Join our Discord server to learn with us.
Get new posts in your inbox.
Spotted a typo or want to improve this post? Edit on GitHub →