You're probably familiar with Kubernetes, the open-source platform designed by Google and now maintained by the Cloud Native Computing Foundation (CNCF), which automates the deployment, scaling, and management of containerized applications.
But, did you know that under-the-hood, Kubernetes is an API.
That’s right! Every action you take within Kubernetes, from creating pods to monitoring services, is ultimately an API interaction.
The Kubernetes API serves as the backbone of the platform, providing a unified interface for managing and interacting with Kubernetes resources. While you may already be using kubectl, the official Kubernetes CLI tool to interact with your cluster, understanding the API grants you deeper control over your cluster, allowing you to automate tasks, customize configurations, and integrate Kubernetes with other tools and systems.
Now, Kubernetes API is massive — with hundreds of endpoints and concepts involved. Truth be told, it’s a bit more advanced than just a bunch of HTTP endpoints thrown together and for someone new, let’s just say things can get a bit overwhelming at first, if not approached it correctly.
That's where this blog comes in. In this practical guide, we'll cover the fundamental aspects of the Kubernetes API to help you navigate it confidently. Whether you're a developer, a system administrator, or simply curious about Kubernetes, this guide will provide you with the knowledge and skills needed to get started on the path of harnessing the power of the Kubernetes API effectively.
We’ll not go into the details of the REST architecture here, but it’s important to understand that RESTful APIs adheres to a set of principles and getting familiar with them would in turn help us in understanding the nature of the Kubernetes API itself. For example:
Stateless Communication - Each request from a client to the server must contain all the information needed to understand and fulfill the request, without relying on any previous interactions. That means, every time you talk to the Kubernetes API, you don't need to remember past API calls. Each interaction is independent, like sending a new message without needing to refer back to old ones.
Uniform Interface - Due to it’s RESTful nature, the Kubernetes API is pretty consistent and has a standardized interface of communication. This actually is helpful for us, because one just needs to understand a limited number of patterns and then apply that knowledge to understand the rest of the API. So, thats a win for us!
Self-descriptive Messages - RESTful APIs use descriptive messages to communicate between the client and server. This means that each interaction includes information about what action is being requested and how to process it. For example, when you send a request to the Kubernetes API, the response will include clear indications of whether the request was successful, along with any relevant data or error messages. This self-descriptive nature simplifies the communication process, making it easier to understand and troubleshoot interactions with the Kubernetes API.
Apart from it being RESTful in nature, it’s essential to know that API server component of the control plane is the one that exposes the Kubernetes API to users and other components within the cluster. Officially, the implementation is called kube-apiserver and this enables the end users, different parts of your cluster, and external components communicate with one another.
The API server acts as the first point of contact for any external user or request to the cluster and all the internal operations are channeled through the API server component as well.
📍 Not familiar with the API server or in general the Kubernetes architecture? Feel free to check out the Kubernetes 101 Workshop for more clarity.
We understand that at the end of the day, every operation performed in Kubernetes is an API call and involves accessing the core K8s API is some way. Interestingly, there are different ways to access the Kubernetes API, catering to different use cases and preferences:
Via kubectl: kubectl is the official command-line tool for Kubernetes and provides a convenient way to interact with the Kubernetes API. It simplifies tasks like creating, updating, and deleting resources using intuitive commands.
For instance, here is a command to fetch all the running pods in a cluster:
$ kubectl get podsNAME READY STATUS RESTARTS AGEdemo 1/1 Running 0 27sdemo2 1/1 Running 0 23sdemo3 1/1 Running 0 17s
Through Simple REST Calls viacurl: If you are comfortable with HTTP requests, the Kubernetes API can be also be accessed directly through simple REST calls using the curl CLI command. This allows for more granular control and customization of API interactions.
The same request of fetching all the running pods using the curl command looks something like:
Using Client Libraries: Kubernetes also offers a set of client libraries in various programming languages (such as Python, Go, Java) for those looking to develop applications that interact with the Kubernetes API. These libraries abstract away the complexities of making HTTP requests and makes it easier to build applications that interact with Kubernetes.
For instance, have a look at this code snippet in Go that fetches all the running pods in a cluster.
Now that we have a basic familiarity with the nature of the Kubernetes API, we'll now break down the internal structure of the Kubernetes API to give you a clear understanding of how it works.
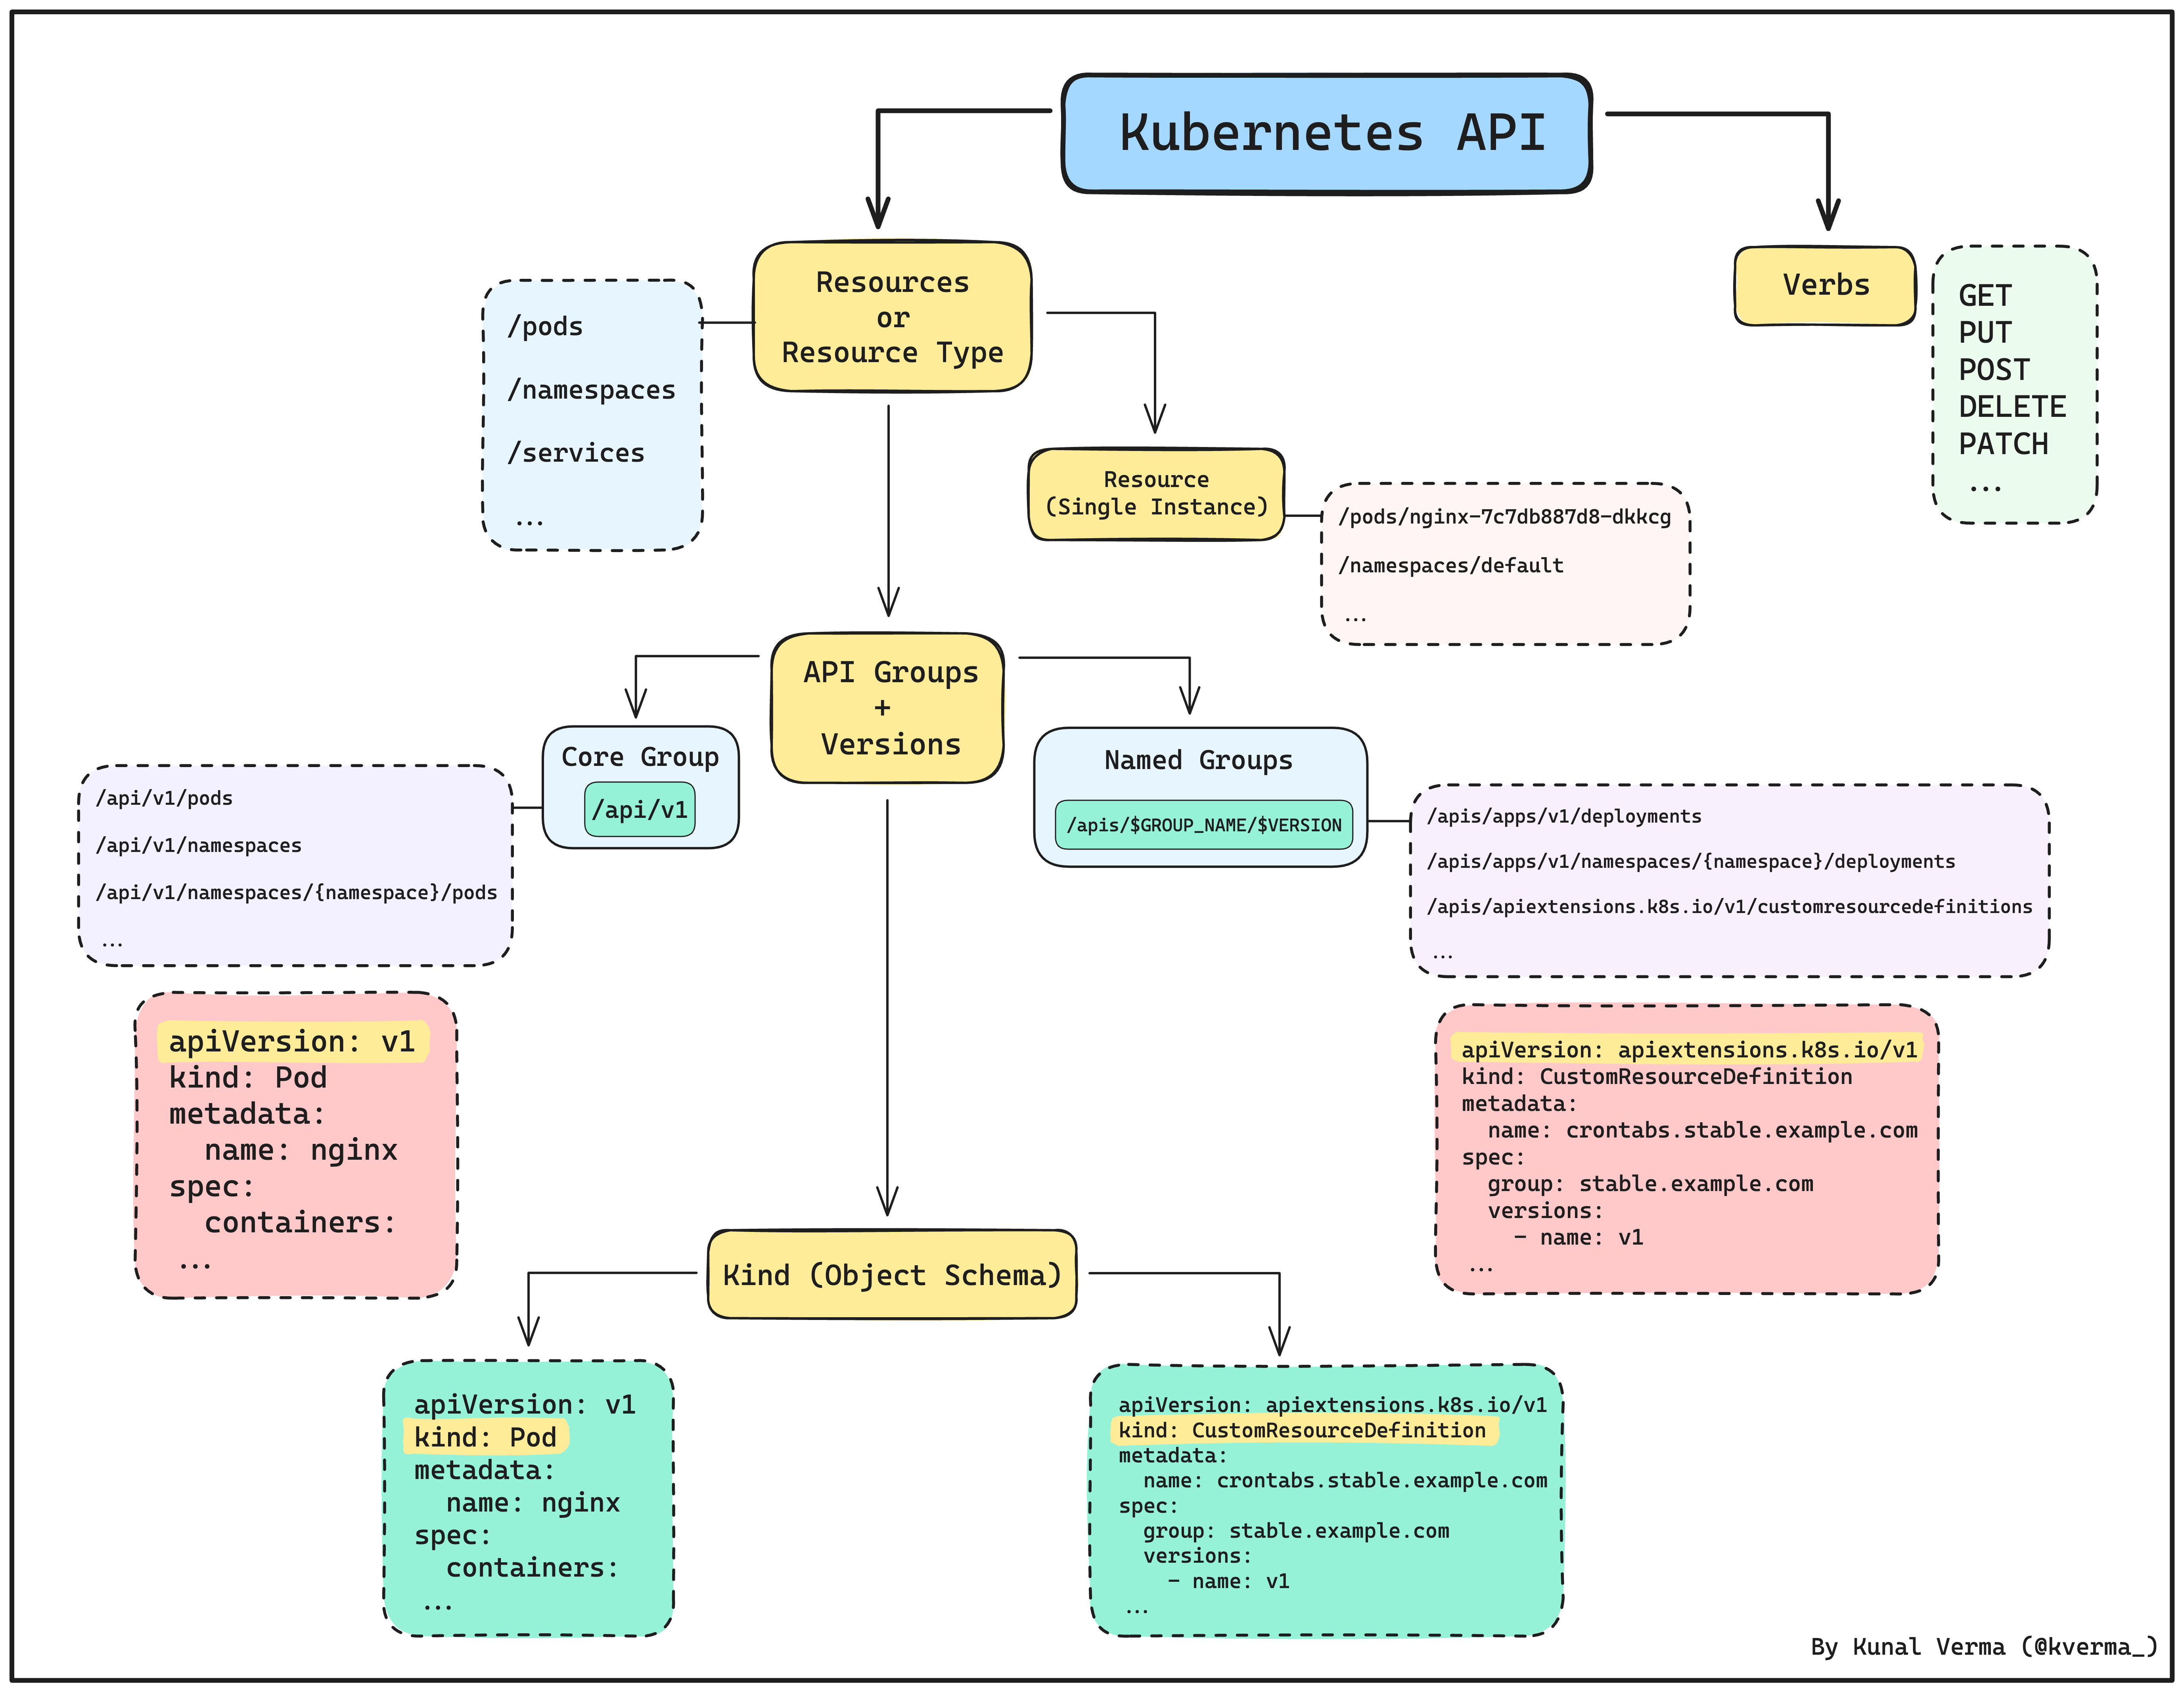
As we are trying to understand a RESTful API here, the communication primarily revolves around resources and verbs. By definition:
Resources represent the entities you want to interact with, while verbs specify the actions you can perform on those resources.
In simple terms, resources are the "things" you want to work with. In case of Kubernetes, we have pods, services, or deployments etc. Verbs, on the other hand, are the "actions" you can take on those things, such as create, get, update, or delete.
In conclusion, each resource is treated as a separate entity and is basically the endpoint of the API, that can be accessed and manipulated independently.
Now, let's apply this concept to the Kubernetes API. In Kubernetes, these resources or API endpoints are officially called as resources types, though in practice, we simply refer to them as “resources”. These are the ones that you’ll find at the end of the request URI. For example, take a look at this request below:
$ kubectl get --raw /api/v1/namespaces/default/pods
Here, /pods represents the pods resource type or endpoint of the API.
Extending this a bit further, a single instance of a resource type is called a resource, which often represents a Kubernetes object such as a pod, deployment, namespace etc. For example, take a look at this request below:
$ kubectl get --raw /api/v1/namespaces/default/pods/nginx-7c7db887d8-dkkcg
Here, we are querying the API to fetch the pod - nginx-7c7db887d8-dkkcg, which is a Kubernetes object or resource and is a single instance of the pods resource type.
💡 Note
In the examples above, you have noticed we are using kubectl with the —-raw flag to send request to the API. This is the kubectl raw mode!
kubectl raw mode is a special feature (pretty handy one as well) allows you to interact with the Kubernetes API directly, bypassing some of the built-in kubectl functionality.
Why it’s useful?
This is useful when you need more flexibility and control over your API requests, such as when troubleshooting or debugging complex issues, or when you want to interact with Kubernetes resources in ways that aren't supported by the standard kubectl commands.
Let’s move onto Verbs. As mentioned above, Verbs are the “actions” you are allowed to perform on the resources (or, resource types in case of Kubernetes).
Talking about the Kubernetes API, all the standard HTTP verbs are supported with some additional ones added to the list. Below is a list of all the operations you can perform (taken from sig-architecture/api-conventions.md):
GET /<resourceNamePlural>: Retrieves a list of resources of type <resourceName>. For instance, GET /pods returns a list of Pods.
POST /<resourceNamePlural>: Creates a new resource based on the JSON object provided by the client.
GET /<resourceNamePlural>/<name>: Fetches a single resource with the given name. For example, GET /pods/first retrieves a Pod named “first”.
DELETE /<resourceNamePlural>/<name>: Deletes a single resource with the given name.
DELETE /<resourceNamePlural>: Deletes a list of resources of type <resourceName>. For instance, DELETE /pods removes a list of Pods.
PUT /<resourceNamePlural>/<name>: Updates or creates the resource with the given name using the JSON object provided by the client.
PATCH /<resourceNamePlural>/<name>: Selectively modifies specified fields of the resource.
GET /<resourceNamePlural>?watch=true: Receives a stream of JSON objects corresponding to changes made to any resource of the given kind over time.
In summary, when we are dealing with a RESTful API like Kubernetes, communication primarily revolves around resources and verbs.
Resources denote the entities you interact with, while verbs signify the actions you can perform on them. In the Kubernetes API, these resources, or API endpoints, are referred to as resource types. Each resource type represents a distinct entity that can be accessed and manipulated independently. Furthermore, a single instance of a resource type is termed a resource, often representing a Kubernetes object like a pod or deployment.
Transitioning to verbs, they dictate the actions permissible on resources. In the Kubernetes API, standard HTTP verbs are supported, with additional ones included (such as PATCH). These include operations such as retrieving a list of resources, creating new resources, updating or deleting specific resources, and selectively modifying resource fields.
In previous section we studied about resource types. As mentioned previously, Kubernetes API is massive and there are lot of different resource types involved — as we can now imagine!
For the purpose of increasing simplicity and extending the API’s capabilities, the resource types are carefully organized into API groups, with each group serving a different purpose.
Below are the two main API groups that are essential to understand:
The Core Group: The core (also called legacy) group is found at REST path - /api. This particular endpoint is only used by core K8s resources such as pods, secrets, configmaps, etc. You'll typically find this mentioned in a yaml file as - apiVersion: v1 field.
For instance, consider the pod specification yaml file below:
Named Group: The named groups are a bit more modern and generic which can be found at the REST path - /apis/<group-name>. This endpoint is used by all the other resources (including custom resources) and deals with specific areas like networking or storage. In a typical Kubernetes yaml file, you'll spot this as apiVersion: $GROUP_NAME/$VERSION.
For instance, take a look at this yaml specification for a Kubernetes Job:
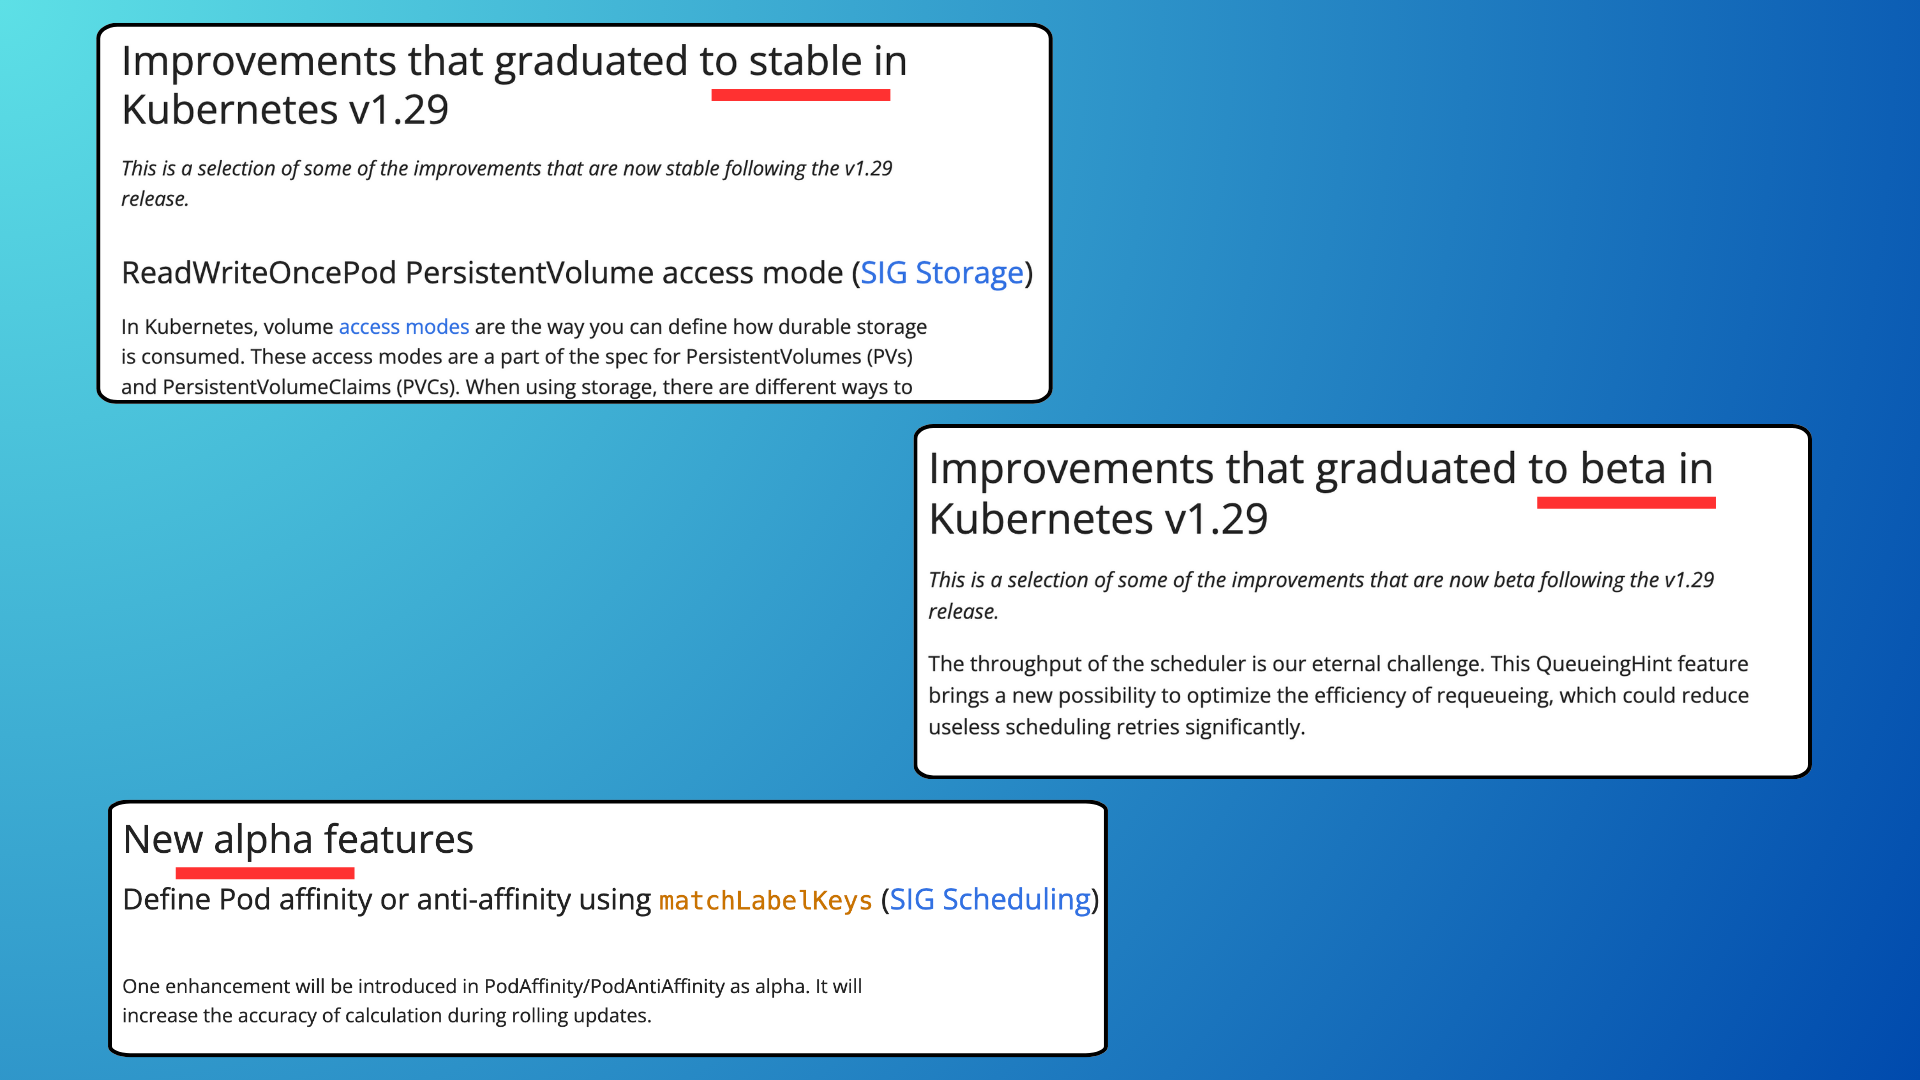
One thing you may have already noticed from the section above is how we also mention a specific version with each API group (whether core or named groups). This is a standard practice followed throughout the entire Kubernetes API. Each API group is versioned independently that evolves over time, moving through different stages of development and use:
alpha - Experimental, potentially unstable.
beta - More tested but still subject to change.
stable or GA (General Availability) - Reliable and ready for production use.
You can refer the full list of all the API groups with their versions in the K8s API reference or use a simple command of kubectl api-resources to do the same:
$ kubectl api-resourcesNAME SHORTNAMES APIVERSION NAMESPACED KINDbindings v1 true Bindingcomponentstatuses cs v1 false ComponentStatusconfigmaps cm v1 true ConfigMapendpoints ep v1 true Endpointsevents ev v1 true Eventlimitranges limits v1 true LimitRangenamespaces ns v1 false Namespacenodes no v1 false Nodepersistentvolumeclaims pvc v1 true PersistentVolumeClaimpersistentvolumes pv v1 false PersistentVolumepods po v1 true Pod...
💡 Interesting Fact
Did you know that in the latest Kubernetes v1.29 release, there are a total of 49 enhancements which includes:
In summary, the resource types in Kubernetes API are organized into API Groups for easier management and increasing Kubernetes’s capabilities.
The core API group, accessed at /api, handles fundamental Kubernetes resources like pods and secrets, often denoted by apiVersion: v1 in YAML files. On the other hand, named API groups, found at /apis/<group-name>, cater to more specialized resources such as networking or storage, indicated by apiVersion: $GROUP_NAME/$VERSION.
Throughout the Kubernetes API, each API group is versioned independently, moving through stages like alpha, beta, and stable or GA (General Availability). This ensures that the API evolves reliably for production use.
If you have worked with Kubernetes before and know your way around a typical Kubernetes yaml manifest, you've likely come across the kind field. For example - kind: Pod, kind: Ingress, kind: Deployment and so on.
Viewing this from a beginner’s perspective, you might assume that kind denotes the name of the resource being created in Kubernetes i.e. a Pod, Ingress, Deployment etc. written in PascalCase format. But in reality, thats actually not the case!
In terms of Kubernetes, each resource (or, resource type when referring to the K8s API) is represented by an object (Kubernetes object to be specific) having a specific “schema” associated with it, called Kind. In simpler terms, a schema is like a blueprint that defines how a particular resource (or, object) looks and behaves.
Essentially, Kind specifies the structure, properties, and behavior of a particular resource, including what attributes it has and how those attributes can be used or modified. Essentially, it outlines the rules and guidelines for working with that specific resource type within a Kubernetes cluster.
Objects (Pod, Service, etc) - persistent entities in the system.
Lists (PodList, APIResourceList, etc) - collections of resources of one or more kinds.
Simple - specific actions on objects (status, scale, etc.) or non-persistent auxiliary entities (ListOptions, Policy, etc).
You may think that — all this is good to know, but what is the actual importance of Kind in the Kubernetes API and why are we discussing this today?
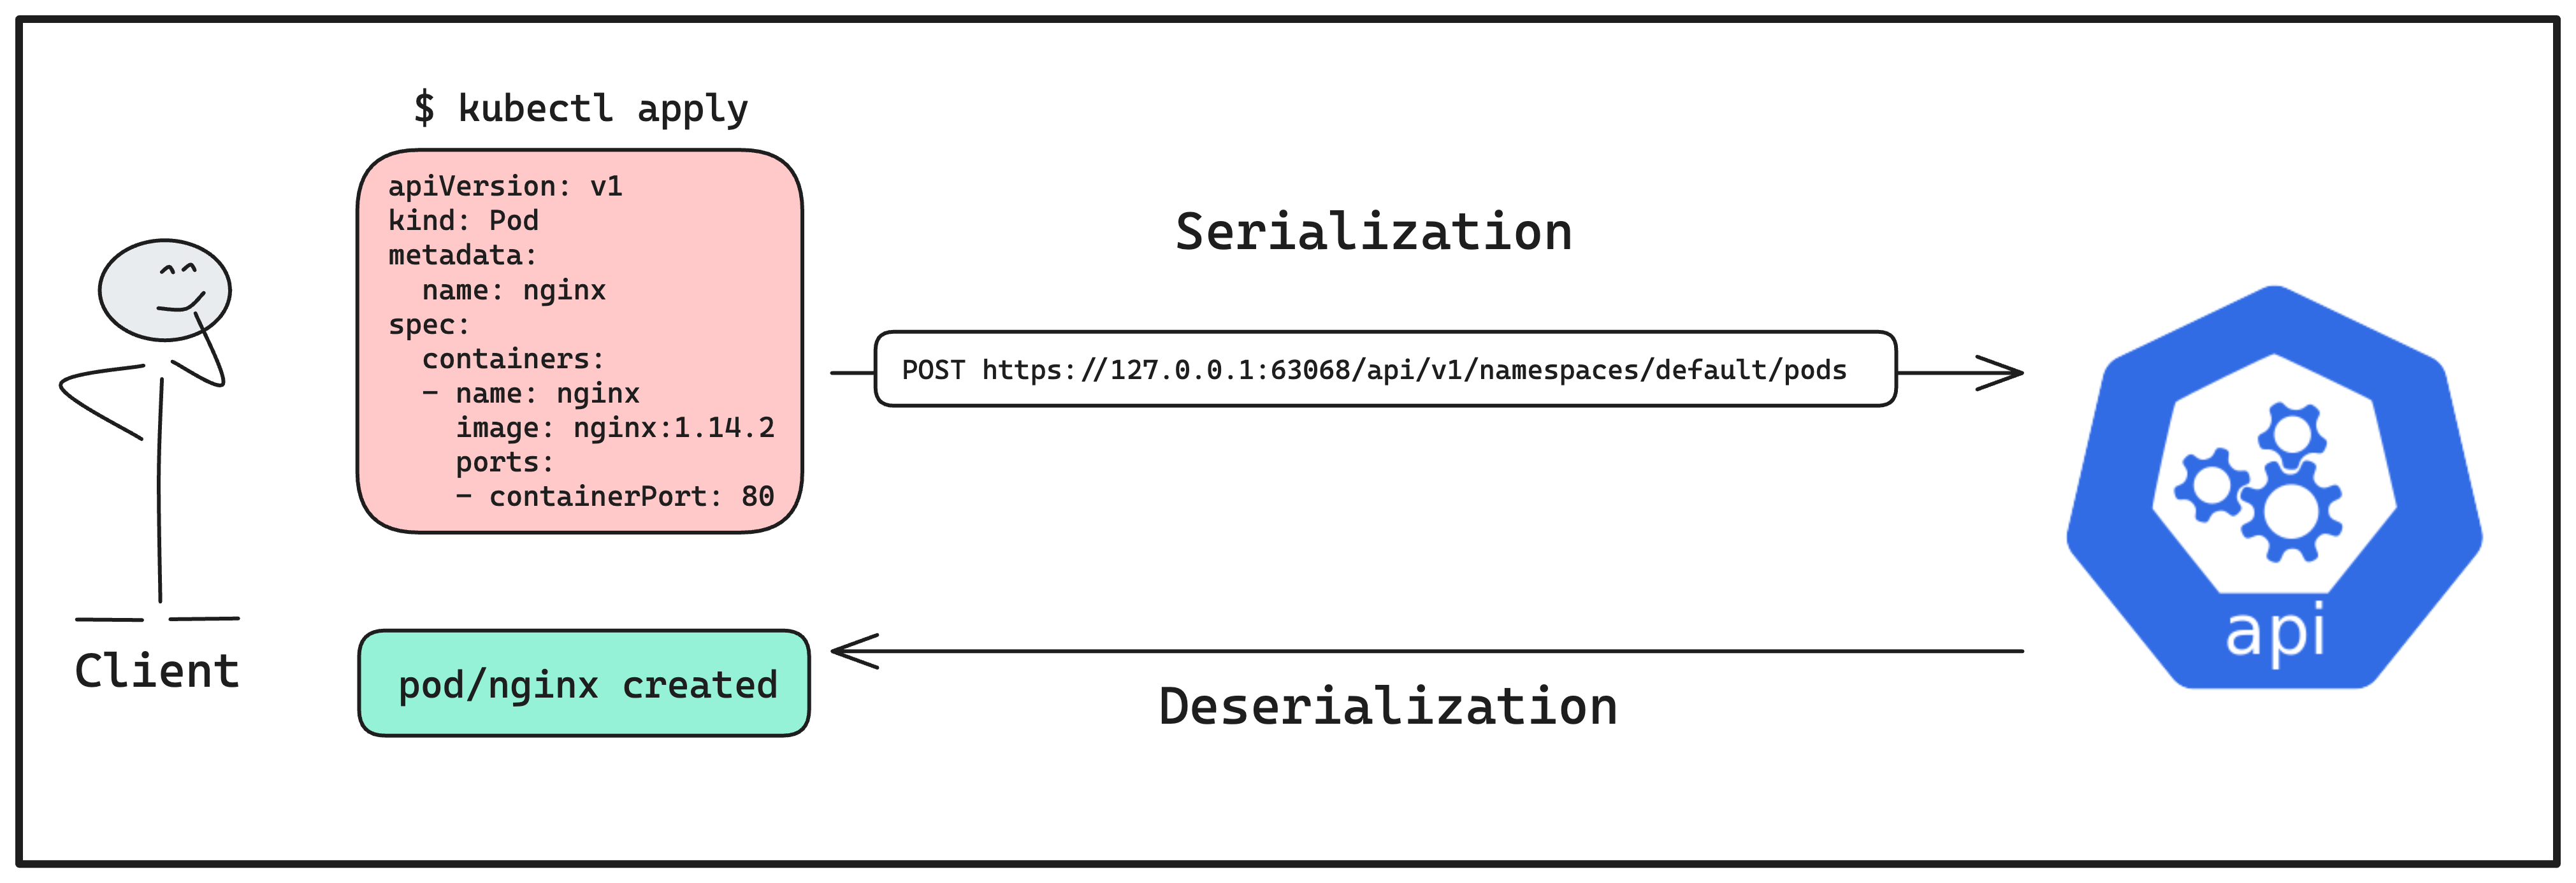
Turns out, this particular field is important when it comes to client - server communication. It allows proper serialization and deserialization of the specified object (mentioned in the Kind field) before transmitting them over a network or storing them.
📍A Quick Tour - Concept of Serialization & Deserialization
Serialization and Deserialization refers to the process of converting data (such as objects, structures, or variables) into a format that can be easily transmitted over a network or stored in a database, and then converting it back to its original form when received by another system.
Talking in terms of the Kubernetes API to give you a better idea, when it comes to sending a request to the cluster to perform a certain operation on a resource — such as create, update, or retrieve, we need to “serialize the data” in the request i.e. convert it into a format that the Kubernetes API understands, typically JSON or YAML. Sounds familiar, right?
Once the Kubernetes API receives this serialized data, it “deserializes it” i.e. converts it back into its original form. This allows the Kubernetes API to process the request, validate the data, and perform the necessary actions, such as creating or updating resources within the cluster.
There’s more!
Interestingly, when the Kubernetes API sends the response back to the client, it serializes the data before transmitting it over the network. The client then deserializes the response, which allows it to interpret and use the data as needed.
Alright, throughout the previous sections we have talked a lot about the “theory” of the Kubernetes API and now have a basic idea of how it’s structured.
Let's roll up our sleeves and get our hands dirty with the Kubernetes API by making a request that lists down all the current running pods in the cluster.
Here, we’ll use minikube to bootstrap a single node K8s cluster using the following command:
$ minikube start😄 minikube v1.32.0 on Darwin 14.4 (arm64)✨ Using the docker driver based on existing profile👍 Starting control plane node minikube in cluster minikube🚜 Pulling base image ...🔥 Creating docker container (CPUs=2, Memory=7792MB) ...🐳 Preparing Kubernetes v1.28.3 on Docker 24.0.7 ...🔗 Configuring bridge CNI (Container Networking Interface) ...🔎 Verifying Kubernetes components... ▪ Using image gcr.io/k8s-minikube/storage-provisioner:v5🌟 Enabled addons: storage-provisioner, default-storageclass...
As the cluster creation process finishes, use the following command to check the cluster information:
$ kubectl cluster-infoKubernetes control plane is running at <https://127.0.0.1:57403>CoreDNS is running at <https://127.0.0.1:57403/api/v1/namespaces/kube-system/services/kube-dns:dns/proxy>
Here, we’ll find the host URL i.e. address of the control plane, to which we’ll making our HTTP request. In this case, it’s - https://127.0.0.1:57403.
Step 2 - Authenticating the API Server to the Client #
As we have already studied above, the API server component in the control plane is the one thats responsible to expose the API to both the client and other components within the cluster.
Now, Kubernetes by default restricts access to its API endpoints. That means, in order for us to send any request, we first need establish trust both ways i.e. between the API Server and the client, and vice versa. Let us understand the first one here!
In Kubernetes, a method to authenticate the API server to the client is by using the CA certificate (Certificate Authority).
📍 The CA certificate is a trusted certificate issued by the Kubernetes cluster that verifies the identity of the API server to the client.
In our case, we are using a local cluster bootstrapped by minikube, which has a CA certificate signed by minikubeCA (minikube’s own Certificate Authority). Therefore, in order to establish trust between the API server and the client, we need to manually point out the location of minikube’s CA certificate in our request, using the --cacert flag provided by curl:
$ curl --cacert ~/.minikube/ca.crt https://127.0.0.1:57403/api/v1/namespaces/default/pods{ "kind": "Status", "apiVersion": "v1", "metadata": {}, "status": "Failure", "message": "pods is forbidden: User \\"system:anonymous\\" cannot list resource \\"pods\\" in API group \\"\\" in the namespace \\"default\\"", "reason": "Forbidden", "details": { "kind": "pods" }, "code": 403}
Now, interestingly this would fail when executed, because an additional authentication is still remaining to be done!
Step 3 - Authenticating the Client to the API Server #
Just as the API server authenticates itself to the client, the client also needs to authenticate itself to the API server. This ensures mutual trust between both parties.
Now, Kubernetes provides several authentication methods for this purpose, but we’ll keep it simple and authenticate the request using client certificate and key.
📍 What is a Client Certificate and Client Key?
The client certificate is a digitally signed document issued by a trusted Certificate Authority (CA) that uniquely identifies the client (user). It contains information such as the client's identity (common name), a public key, and other metadata. When the client sends a request to the API server, it presents this certificate as proof of its identity.
Furthermore, the client key is the corresponding private key that pairs with the client certificate. It is securely stored and known only to the client. The key is used for cryptographic operations, such as encrypting data and generating digital signatures. When the client sends a request, it uses this key to prove ownership of the client certificate and to establish a secure connection with the API server.
In conclusion, the client certificate and key form a crucial part of the mutual TLS (Transport Layer Security) authentication, which ensures that both the client and the API server can trust each other's identities.
Luckily, in minikube, these credentials are typically generated during cluster initialization and stored securely and can be found here:
Great, it works! Although, the output is pretty long and “not so good looking”. Let us use the jq tool to format it and print only the names of all the pods (without any other metadata):
In this guide, we covered the fundamentals of interacting with the Kubernetes API, from understanding its RESTful nature to exploring its internal structure. We leaned about the primary components that make up the API - Resources, Verbs, API Groups, Versions and Kinds i.e. object schema. Lastly, we went through an entire process of making an HTTP request to the API via curl to fetch all the running pods in the cluster.
As you continue your journey with Kubernetes, I encourage you to explore further by diving into more hands-on practice. Experiment with different API endpoints, try out various authentication mechanisms, and even build automation scripts or applications that interact with the Kubernetes API.
By gaining practical experience and deepening your understanding of the Kubernetes API, you'll be better equipped to manage and orchestrate containerized applications effectively in Kubernetes clusters.
Kunal is a DevOps and Cloud Native Advocate with a passion for Open Source. He's been involved in the DevOps and open-source ecosystem for 1.5+ years and has a strong experience in public speaking, community management, content creation etc. He has experience working on and contributing to some of the major projects in the CNCF, including Kubernetes, Layer5 and others. He always strives to empower others with my experiences and believes in growing with the community!