Pure Cilium : A Guide for Local Load Balancing and BGP
In this guide, we'll walk through the steps to build a multi-node Kubernetes cluster on your local workstation or MacBook (M1, M2, or M3) using K3s and…


In this guide, we'll walk through the steps to build a multi-node Kubernetes cluster on your local workstation or MacBook (M1, M2, or M3) using K3s and Cilium. We will also demonstrate using Cilium's powerful Load Balancer (L.B.) Use the IPAM feature to expose your service as a built-in load balancer in your K8s cluster.
-
Pre-Requisites #
Before you begin, make sure you have set up your cluster with Cilium CNI. You can follow the instructions in this GitHub repository to get your cluster up and running in under 3 minutes.
Once Cilium is up and running, the other pods in the cluster should transition into the Running state. You should see one Cilium pod on each node and the Cilium operator.

Cilium components #
Here is a high-level description of Cilium components:
The Cilium agent
The cilium-agent component runs on every node in the cluster. It accepts the configuration via APIs or Kubernetes, which describes requirements for networking, network policies, load balancing, visibility, and monitoring.
The agent waits for events from the orchestration system (i.e., Kubernetes) to indicate when workloads or containers start or stop. It manages eBPF programs that allow the Linux kernel to control network access in and out of the containers.
Cilium CLI
The CLI client is a command-line tool installed alongside the Cilium agent on the same node, interacting with the agent’s REST API. The CLI enables the inspection of the local agent’s state and status. It also offers tools to access and validate the state of eBPF maps directly.
The Cilium operator
The operator handles tasks that require one-time handling for the whole cluster instead of for every node. The Cilium operator is not critical for making network policy decisions or forwarding – clusters can generally function when the operator becomes unavailable.
The CNI plugin
Kubernetes invokes the cilium-cni plugin when it schedules or terminates a pod on the node. The plugin interacts with the node’s Cilium API to trigger the right datapath configurations for the pod’s networking, policy, and load balancing needs.
Cilium BGP #
Picture source: https://cilium.io
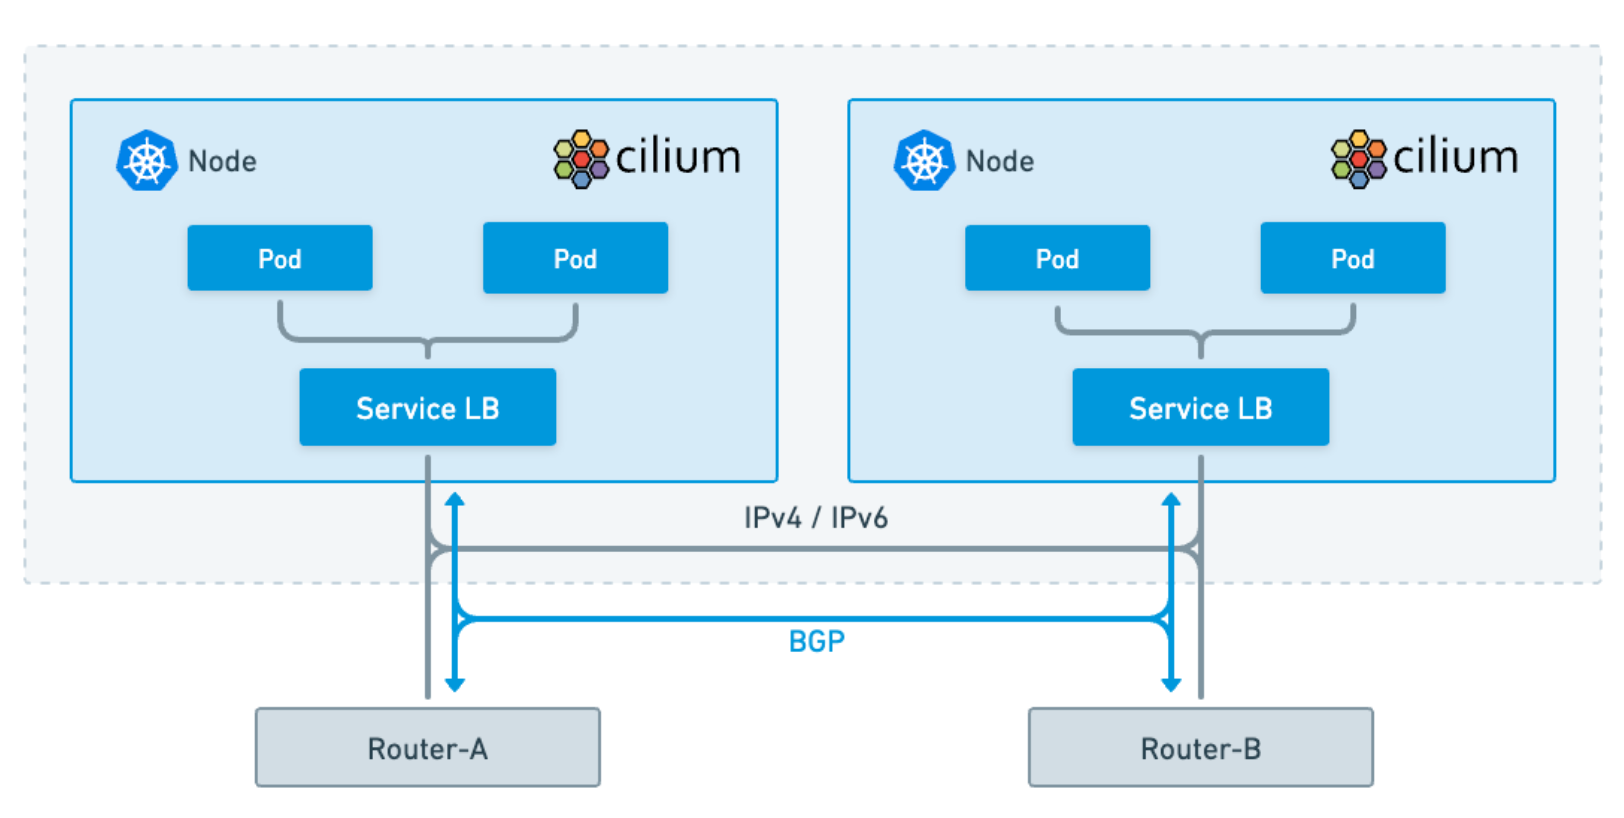
What is a BGP? BGP is an internet routing protocol that enables the exchange of routing information between autonomous systems (ASes), allowing networks to learn and advertise routes to reach different destinations over public and private networks.
For more information on BGP, look at RFC 4271 — BGP.
Enabling BGP
From the official Cilium BGP control plane documentation, you will see that currently, a single flag in the Cilium agent exists to turn on the BGP Control Plane feature set.
There are different ways to enable this flag, however we will continue using the cilium cli (Helm requires a different approach, so check the official documentation if you are using Helm).
Before we change the BGP flag, let’s check the current configuration.
P.S. You can enable BGP when you install Cilium, but we want to show you the underlying steps.

As you can see, the BGP Control Plane feature is turned off by default. Let’s enable it!

The READY state for our Cilium Agents is 0/1, which means there’s a problem. Let’s read the logs to see why the Cilium Agents are no longer READY.

kubectl logs -n kube-system cilium-gdnd7 | tail -1
Defaulted container "cilium-agent" out of: cilium-agent, config (init), mount-cgroup (init), apply-sysctl-overwrites (init), mount-bpf-fs (init), clean-cilium-state (init), install-cni-binaries (init)
level=error msg=k8sError error="github.com/cilium/cilium/pkg/k8s/resource/resource.go:183: Failed to watch *v2alpha1.CiliumBGPPeeringPolicy: failed to list *v2alpha1.CiliumBGPPeeringPolicy: the server could not find the requested resource (get ciliumbgppeeringpolicies.cilium.io)" subsys=k8s
. failed to watch *v2alpha1.CiliumBGPPeeringPolicy.
Setting enable-bgp-control-plane true causes the Cilium Agents to look for the Cilium BGP Peering Policy, which does not yet exist, mainly because the Cilium Operator did not create the CiliumBGPPeeringPolicy CRD. After all, we were not using that feature at installation time.
Let's check the resource types defined in our cluster with the api-resources command:
kubectl api-resources | grep -i cilium
There you go: no BGP policy. Also, we can notice the cilium agents were redeployed but not the operator, which is still running.
let's redeploy it by deleting it and then check the logs of the operator pod, and you can see something
Creating CRD (CustomResourceDefinition)..." name=CiliumBGPPeeringPolicy/v2alpha1
Details are in the screenshot

Now Recheck the api-resources to see the new CRD:

Cilium BGP Peering Policy #
Now that we have a CiliumBGPPeeringPolicy type (CRD), we can create an object of that type to define our Cilium BGP peering policy.
Here is the yaml file which we will use to create it.
cat cilium-bgp-policy.yamlapiVersion: "cilium.io/v2alpha1"
kind: CiliumBGPPeeringPolicy
metadata:
name: 01-bgp-peering-policy
spec:
nodeSelector:
matchLabels:
bgp-policy: a
virtualRouters:
- localASN: 64512
exportPodCIDR: true
neighbors:
- peerAddress: '192.168.1.1/32'
peerASN: 64512
serviceSelector:
matchExpressions:
- {key: somekey, operator: NotIn, values: ['never-used-value']}"cilium.io/v2alpha1" kind: CiliumBGPPeeringPolicy metadata: name: 01-bgp-peering-policy spec: nodeSelector: matchLabels: bgp-policy: a virtualRouters: - localASN: 64512 exportPodCIDR: true neighbors: - peerAddress: '192.168.1.1/32' peerASN: 64512 serviceSelector: matchExpressions: - {key: somekey, operator: NotIn, values: ['never-used-value']}Specification (Spec) #
-
spec: This section defines the behavior of the resource.-
nodeSelector: Specifies which nodes this policy applies to.matchLabels: The policy applies to nodes with the labelbgp-policy: a.
-
virtualRouters: Configures one or more virtual routers for BGP.-
- localASN: 64512: Defines the Autonomous System Number (ASN) for the local node. -
exportPodCIDR: true: This flag indicates that the pod CIDR should be advertised to BGP peers. -
neighbors: Defines BGP neighbors.-
- peerAddress: '192.168.1.1/32': Specifies the address of a BGP neighbor. -
peerASN: 64512: The ASN of the BGP neighbor.
-
-
-
serviceSelector: Specifies which services this policy applies to.-
matchExpressions: A list of criteria for selecting services.- {key: somekey, operator: NotIn, values: ['never-used-value']}: Selects services that do not have a label with the keysomekeyand valuenever-used-value.
-
-
Documentation can be found here.
Now that we have an understanding of the policy, let’s apply it to the cluster: -
Kubernetes nodes label
We need to label the nodes we want the BGP policy to apply. In our case, we will label the follower nodes, leaving out the control-plane node. Our CiliumBGPPeeringPolicy node selector expects the bgp-policy=a label.
kubectl  apply -f cilium-bgp-policy.yaml

ciliumbgppeeringpolicy.cilium.io/01-bgp-peering-policy created
-----
kubectl label nodes k3s-follower bgp-policy=a
------
ubuntu@k3s:~$ kubectl get nodes -l bgp-policy=a
NAME         STATUS   ROLES    AGE    VERSION
k3s-follower   Ready    <none>   2d2h   v1.28.5+k3s1
LB IPAM #
When you create a Load Balancer Service in a Kubernetes cluster, the cluster itself does not assign the Service a Load Balancer I.P. (aka External I.P.); we need a plugin to do that. If you create a Load Balancer Service without a Load Balancer plugin, the External I.P. address will show Pending indefinitely.
The Cilium LoadBalancer IP Address Management (LB IPAM) feature can be used to provision I.P. addresses for our Load Balancer Services.
Here is what the official doc says about it:
LB IPAM is a feature that allows Cilium to assign IP addresses to Services of type LoadBalancer. This functionality is usually left up to a cloud provider, however, when deploying in a private cloud environment, these facilities are not always available.
This section must understand that LB IPAM is always enabled but dormant. The controller is awoken when the first IP Pool is added to the cluster.
Let’s create our cilium LoadBalancer IP pool.
To create a pool, we name it and give a CIDR range. We’ll use 172.198.1.0/24 as our CIDR range; this range mustn't overlap with other networks in use with your cluster.
# cat cilium-ippool.yaml

apiVersion: "cilium.io/v2alpha1"
kind: CiliumLoadBalancerIPPool
metadata:
  name: "lb-pool"
spec:
  cidrs:
  - cidr: "172.198.1.0/24"apirsion: "cilium.io/v2alpha1" kind: CiliumLoadBalancerIPPool metadata: name: "lb-pool" spec: cidrs: - cidr: "172.198.1.0/24"

-------
Kubectl create -f cilium-ippool.yaml
ciliumloadbalancerippool.cilium.io/lb-pool created
Cilium service LoadBalancer
Now, let’s create a pod with a service type LoadBalancer and test it.
We will make a simple nginx pod and a simple service exposing port 8080, with type LoadBalancer.
This should cause Cilium to provision an external I.P. for our logical load balancer and then advertise the route through BGP.
cat pod.yaml service.yaml# pod.yaml apiVersion: v1 kind: Pod metadata: name: simple-pod labels: app: simple-pod spec: containers: - name: my-app-container image: nginx:latest ports: - containerPort: 80 # service.yaml apiVersion: v1 kind: Service metadata: name: my-service spec: selector: app: simple-pod # Make sure this matches the label of the Pod ports: - protocol: TCP port: 8080 targetPort: 80 type: LoadBalancerLet’s create it:
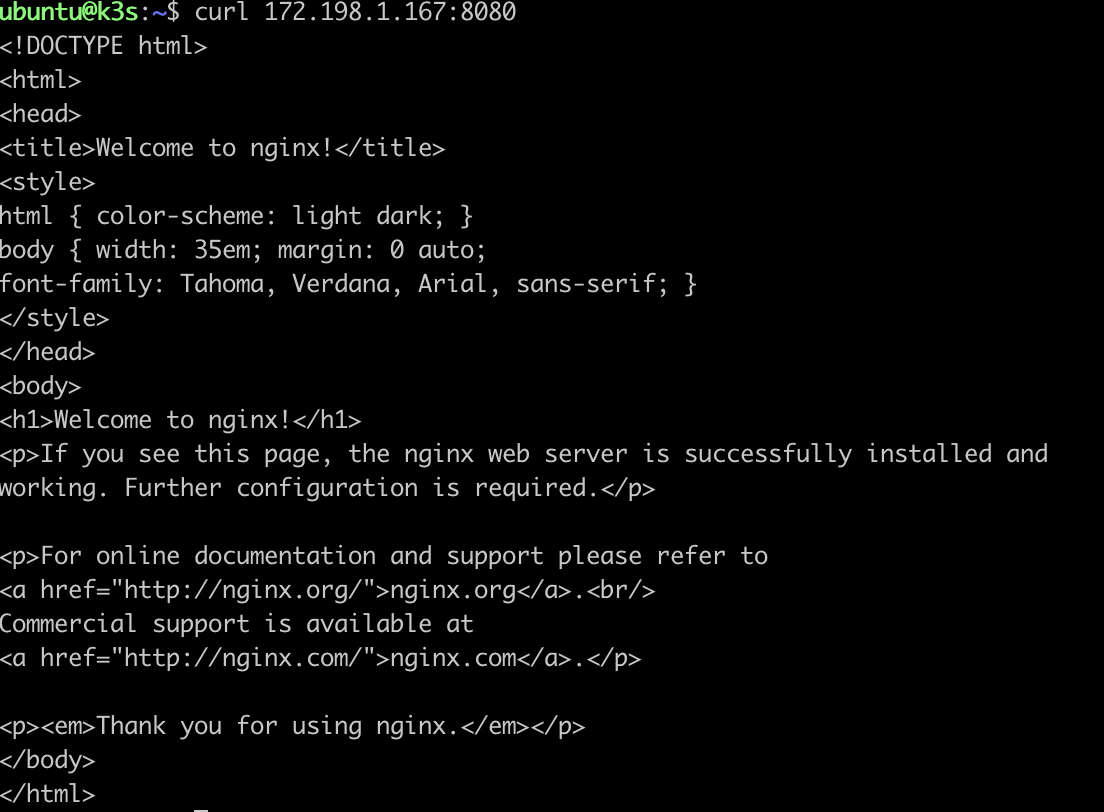
# kubectl apply -f pod.yaml
pod/simple-pod created
# kubectl apply -f service.yaml
service/my-service created
From the output below, we know that we have a running pod with the name simple-pod and a service with the name my-service, but the most crucial part is that we have a service TYPE LoadBalancer with EXTERNAL-IP from our ip-pool, which we created earlier, and we get 172.198.1.167

Validate LoadBalancer External I.P. #
This post guides you through setting up Cilium-based Load Balancer Services in a K3s Kubernetes cluster, detailing the network operations involved and providing a foundation for further experimentation.
-
Thank you for reading!
Inspiration:
https://docs.cilium.io/en/latest/network/lb-ipam/
https://cilium.io/blog/2020/04/29/cilium-with-rancher-labs-k3s/
-
-
Follow Kubesimplify on YouTube, Hashnode, Twitter, and LinkedIn. Join our Discord server to learn with us.
Get new posts in your inbox.
Spotted a typo or want to improve this post? Edit on GitHub →