Tutorial: Build a Cloud Cost Monitoring System with Terraform, Ansible and Komiser
In today's cloud-centric world, businesses rely on cloud services to power their applications and infrastructure. While the scalability and flexibility of…
In today's cloud-centric world, businesses rely on cloud services to power their applications and infrastructure. While the scalability and flexibility of the cloud are undeniable advantages, it's crucial to keep a close eye on the costs associated with these services.
Introducing Komiser, an open-source cloud-agnostic resource manager that offers a powerful solution to address this challenge by seamlessly collecting comprehensive resource data across your organization's Cloud accounts. With Komiser, you can gain deeper insights into resource consumption and expenditureacross different cloud environments, empowering you to make informed decisions and optimize your cloud infrastructure efficiently, and that is what we cover in this article.
In this tutorial, we will walk through the step-by-step process of building a Cloud Cost Monitoring System using Komiser which will enable us to access and aggregate resource data from a cloud infrastructure, provisioned on AWS.
Whether you're a DevOps engineer responsible for managing AWS resources or a cloud architect looking to optimize costs across your cloud infrastructure, this tutorial will demonstrate a practical use case, illustrating how you can leverage Komiser to make informed decisions and drive cost savings in your cloud infrastructure.
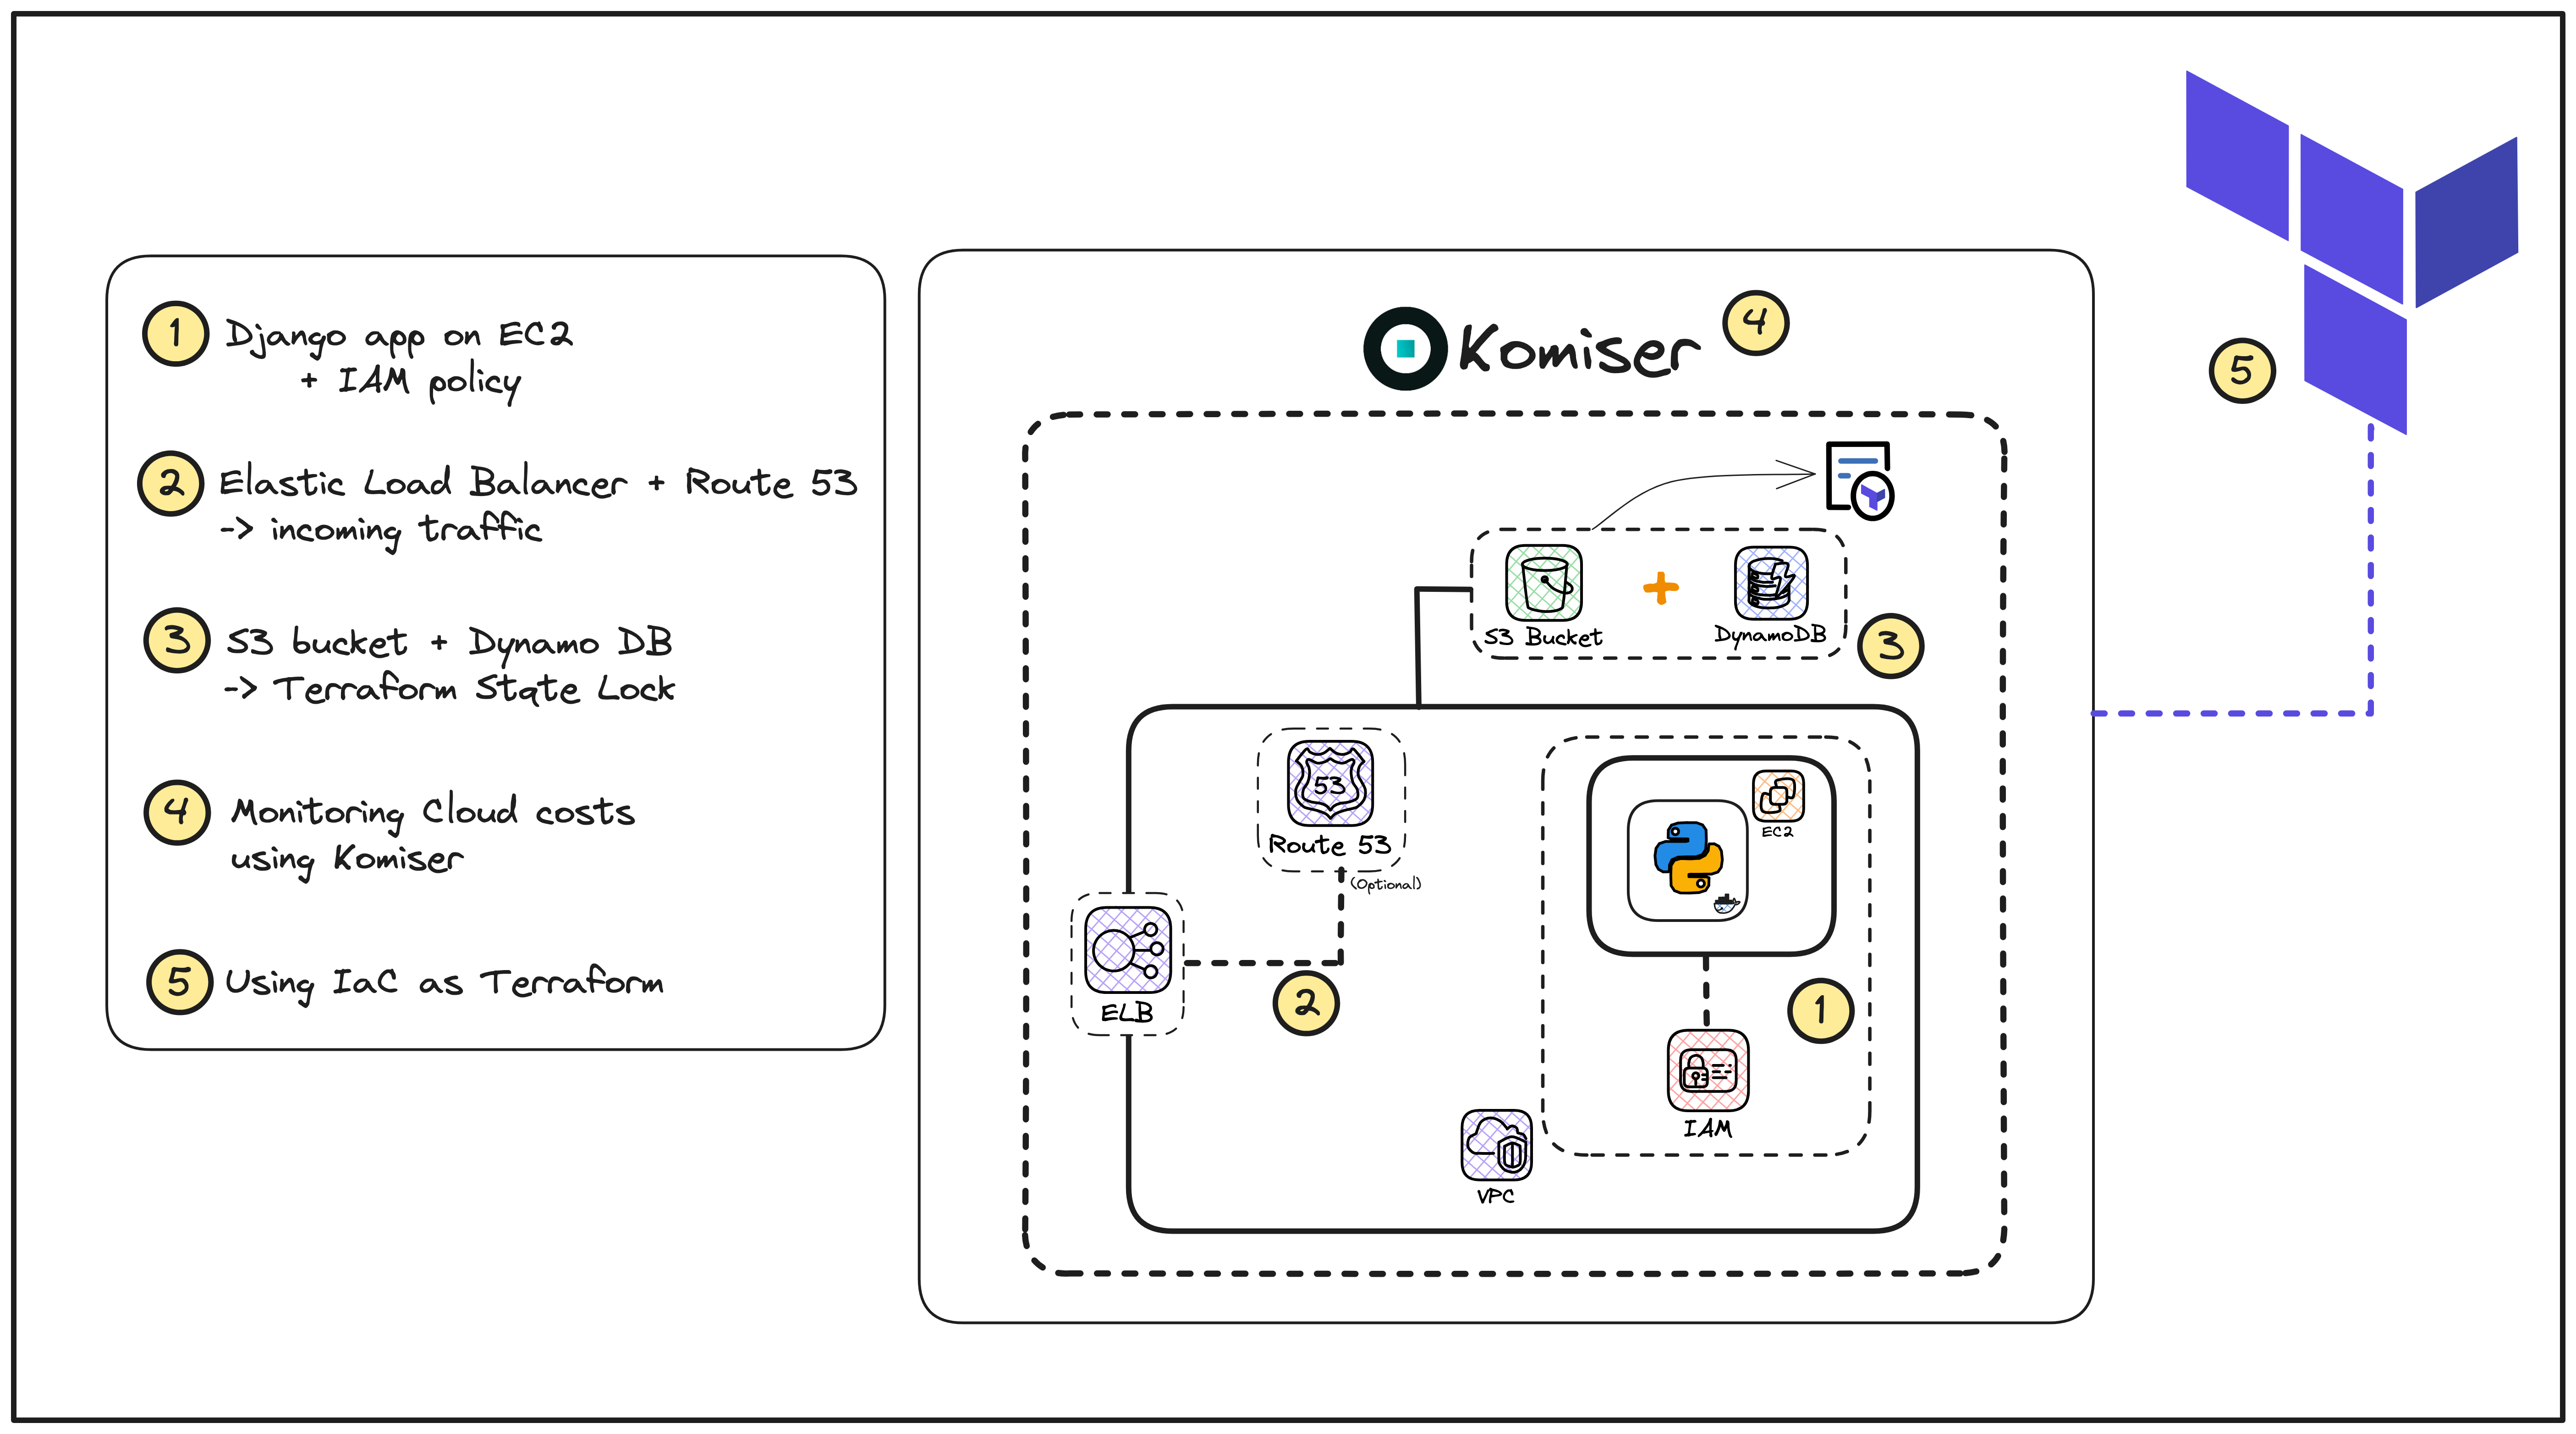
Let us understand the overall architecture and the key components involved in this project.
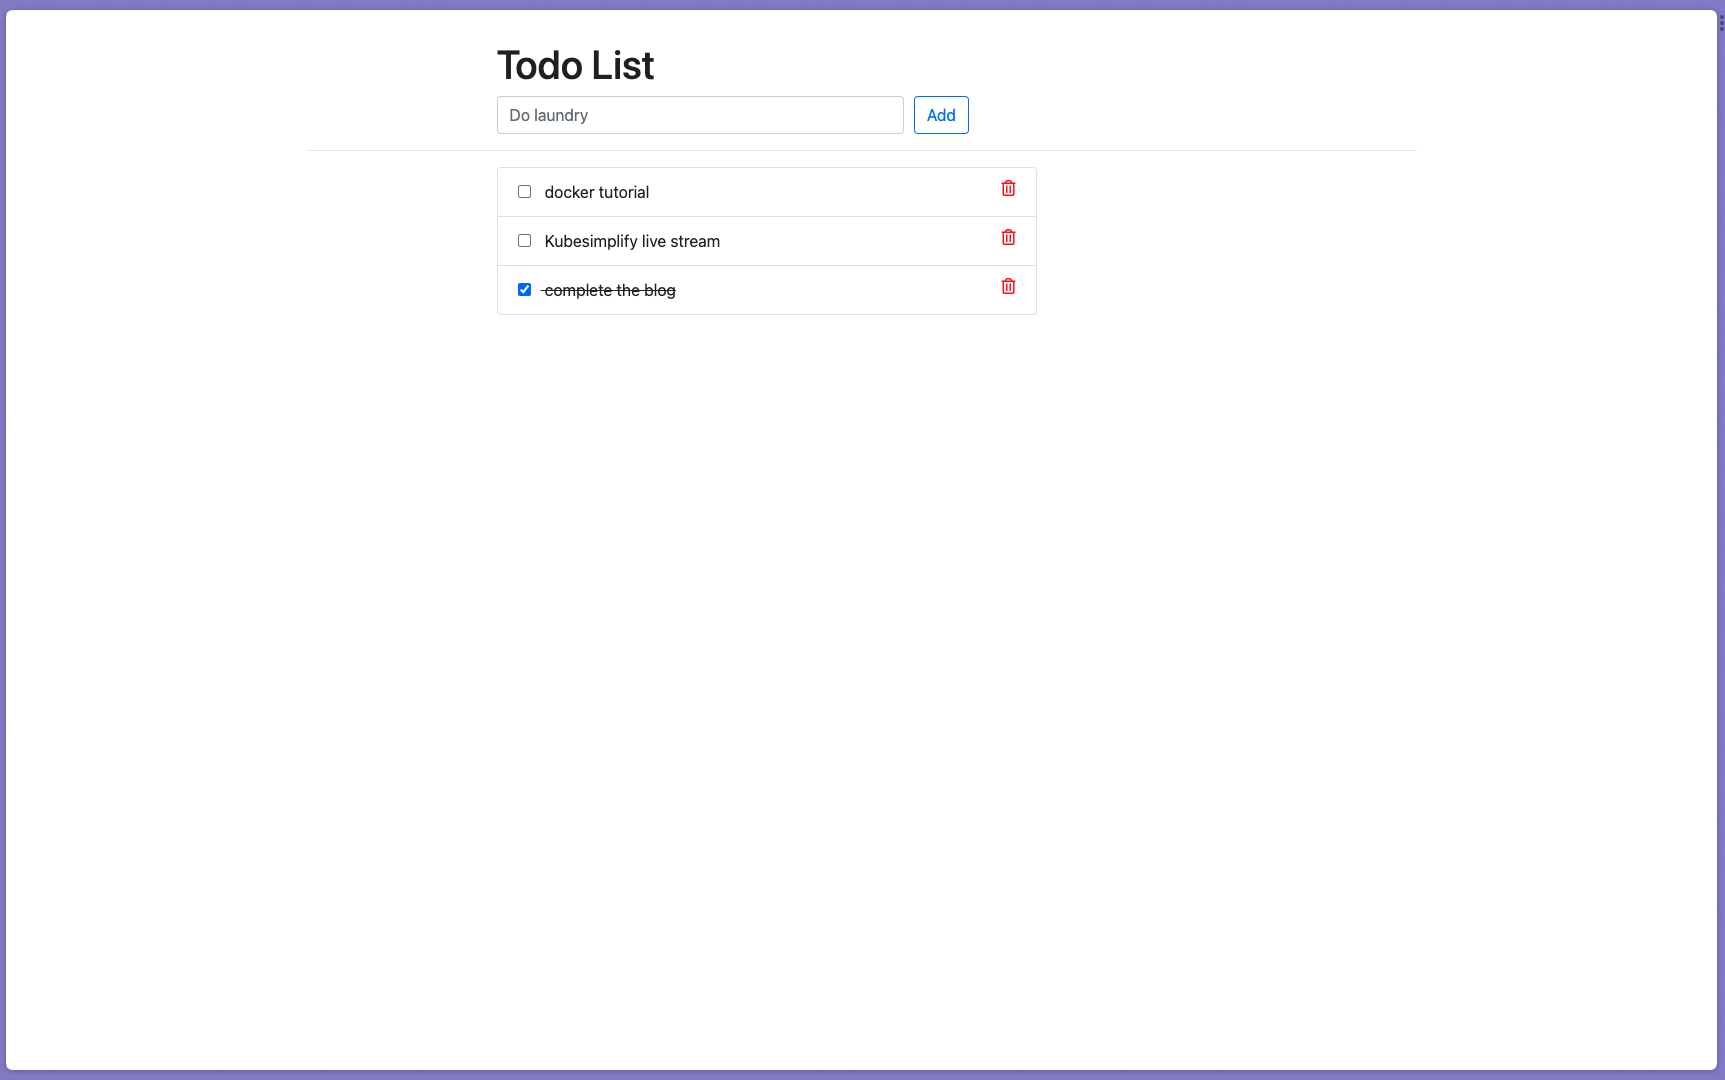
In this tutorial, we are using a simple Django todo list application that relies on a bunch of AWS services:
IAM - We created a new IAM user to grant necessary permissions to our AWS account.
EC2 Instance - The application container is hosted in an Ubuntu-based remote server.
VPC - In this demo, we are using the default VPC for our AWS region.
Elastic Load Balancer - To manage the incoming traffic to our Django app.
The entire AWS infrastructure is provisioned and managed using Terraform (an Infrastructure as Code tool) and Ansible (a configuration management tool).
And finally, we deploy and authenticate Komiser to monitor the cloud resources associated with our Django application.
Sounds interesting, right? I hope this gave you a gist of what we'll be building together and let's move on to the prerequisitessection.
I always recommend first running and testing the application locally, before any further integrations or provisioning of the actual cloud infrastructure.
Follow the detailed steps mentioned in the documentation to first clone and quickly test the Django Todo list application.
To easily run our Django application on the remote EC2 instance, we’ll be containerizing the application.
Create a new Dockerfile and use the following code to create a new docker image:
# pull the official base imageFROM python:3.8.3-alpine# set work directoryWORKDIR /app# set environment variablesENV PYTHONDONTWRITEBYTECODE 1ENV PYTHONUNBUFFERED 1# install dependenciesRUN pip install --upgrade pip COPY ./requirements.txt /appRUN pip install -r requirements.txt# copy projectCOPY . /app# expose port 8000EXPOSE 8000
In this case, we are also using docker-compose to further simplify the process of running our container. Create a docker-compose.yaml file with the following code snippet:
In this particular section, we’ll first be provisioning our cloud infrastructure on AWS using Terraform and then automating the deployment process for our Django application container on the remote EC2 instance, using the Ansible playbook.
Let us first provision our AWS infrastructure and get that up and running!
It is always recommended to create a new IAM user associated with your AWS account and attach granular permissions according to the use case.
Use the following code snippet to define a new IAM user named komiser-aws-user:
resource "aws_iam_user" "komiser_iam" { name = "komiser-aws-user" tags = { Name = "komiser-django-app" }}# resource for UI loginresource "aws_iam_user_login_profile" "komiser_iam_login" { user = aws_iam_user.komiser_iam.name}# for access key & secret access key:resource "aws_iam_access_key" "komiser_iam" { user = aws_iam_user.komiser_iam.name}# Output the IAM user access id, secret id and password:output "id"{ value = aws_iam_access_key.komiser_iam.id}output "secret"{ value = aws_iam_access_key.komiser_iam.secret sensitive = true}output "iam_password" { value = aws_iam_user_login_profile.komiser_iam_login.password sensitive = true}
Explanation:
aws_iam_user - To create a new IAM user named: komiser-aws-user.
aws_iam_user_login_profile - To enable AWS Management console login for the new user.
aws_iam_access_key - To create access and secret access keys for the new user.
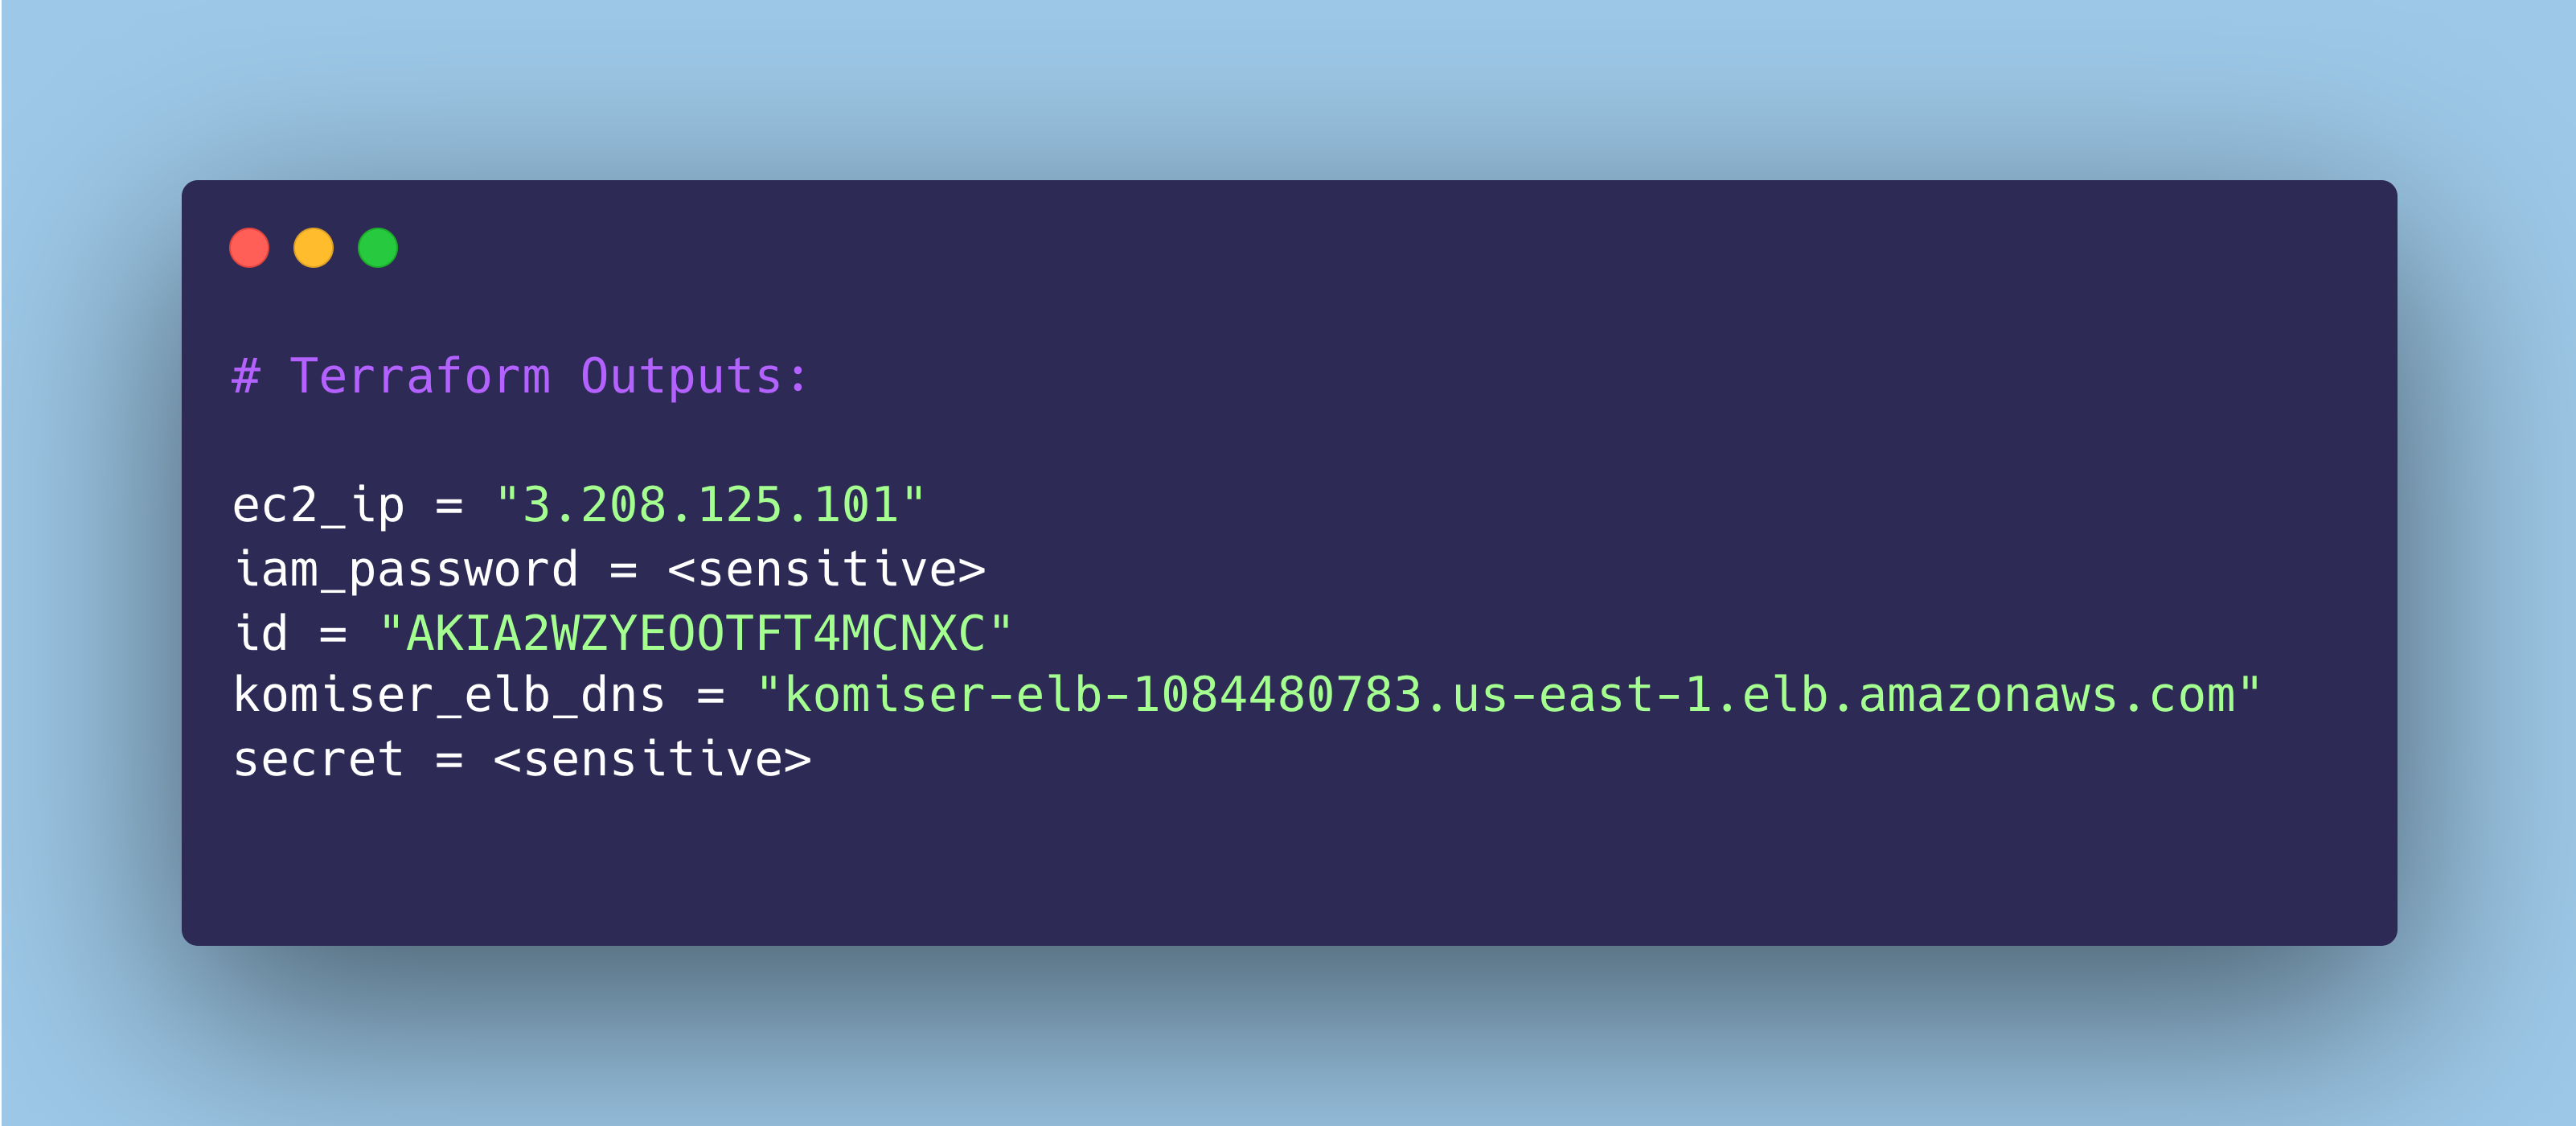
After the user has been created, there are three output values defined:
Access ID
Secret Access ID
Login password for AWS Management console
The second part of creating an IAM user is attaching an appropriate policy for granting it the necessary permissions to access AWS resources.
Use the following policy.json file that defines the permissions we’ll give to our new IAM user:
You can certainly define more granular permissions here, within each resource group. Refer to the Komiser policy to learn more.
Let us create a new IAM policy using the definition above and attach that to the user:
resource "aws_iam_policy" "komiser_policy" { name = "komiser_iam_policy" description = "This is the policy for komiser user" policy = file("policy.json") tags = { Name = "komiser-django-app" }}# Policy Attachment with the user:resource "aws_iam_user_policy_attachment" "komiser_policy_attachment" { user = aws_iam_user.komiser_iam.name policy_arn = aws_iam_policy.komiser_policy.arn}
Explanation:
aws_iam_policy - creates a new IAM policy named komiser_iam_policy.
aws_iam_user_policy_attachment - attaches the komiser_iam_policy with our IAM user i.e. komiser-aws-user.
As we are provisioning our infrastructure using Terraform, there are a few different parts we need to define to successfully provision an EC2 instance.
Let us have a look at each of them, in detail.
Defining the Terraform EC2 resource
Use the following code to define a new Ubuntu EC2 instance of type t2.micro:
The AMI ID specified above is specific to the AWS region chosen. In my case, the default region is us-east-1.
Be sure to change the AMI ID value according to the region you choose to provision the resources in!
To install the necessary dependencies on our remote instance after being provisioned, we are using Terraform’s user_data type to attach the bash script given below:
Use the following code to create a new SSH key pair in AWS called komiser_ssh_key, that we can use to securely connect with our remote instance:
resource "aws_key_pair" "ssh_key" { key_name = "komiser_ssh_key" public_key = file("~/.ssh/komiser-aws.pub") # location of public SSH key tags = { Name = "komiser-django-app" }}
Note:
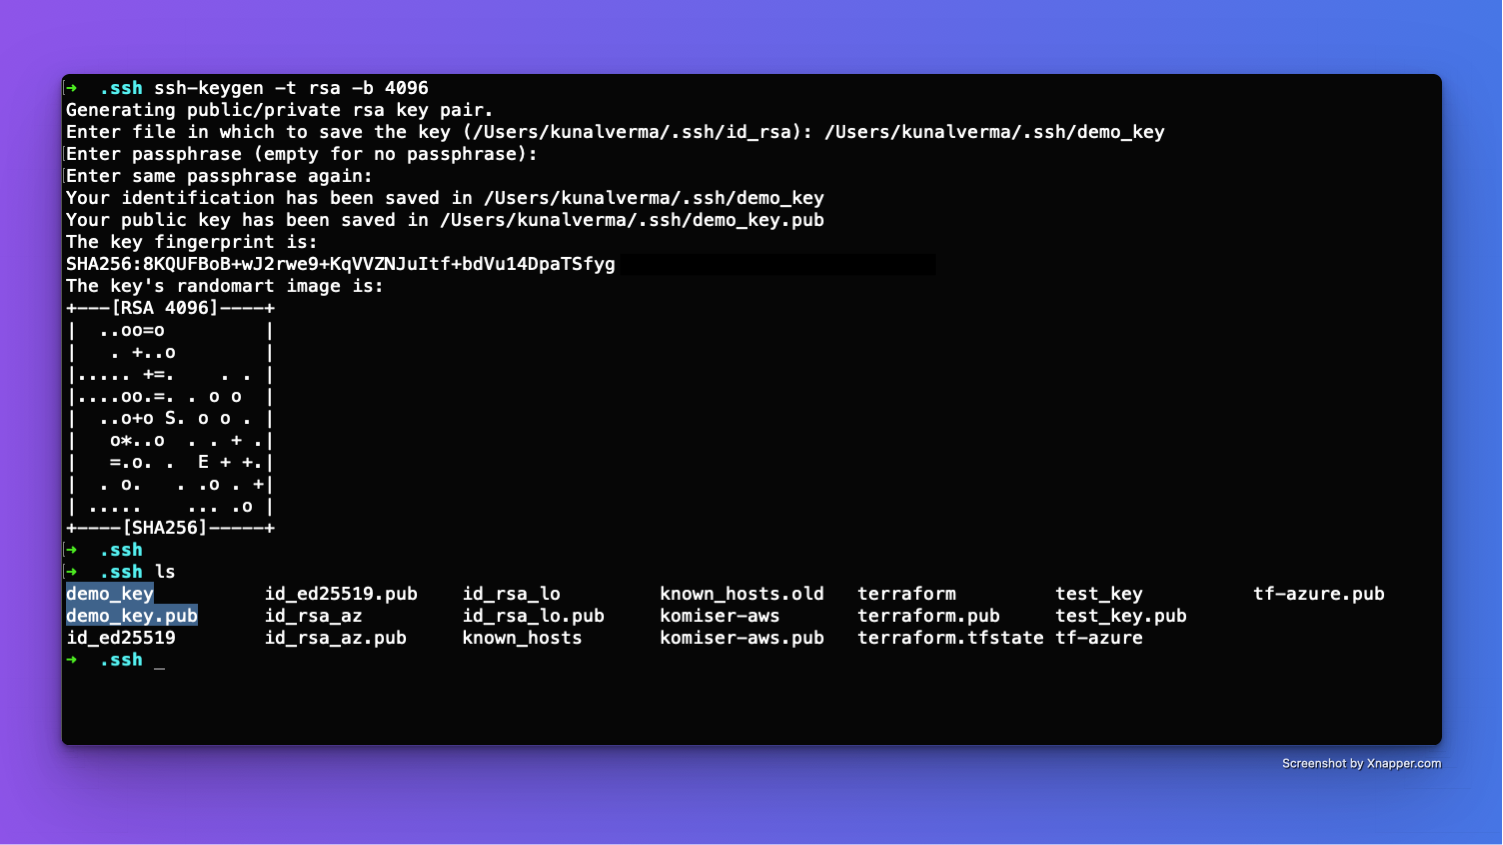
You will need to create a new SSH key pair for this purpose. Use the following command to generate a new SSH key pair on your local machine:
ssh-keygen -t rsa -b 4096
An example SSH key pair creation process has been shown below:
Creating an Elastic IP for our Instance
By default, the IP address assigned to an EC2 instance changes on reboot and this may sometimes complicate things. To avoid this, I recommend creating an Elastic IP address (which remains constant) and associating that with the instance.
Use the following Terraform resource types to create and associate an Elastic IP with our instance:
# Elastic IP resourceresource "aws_eip" "koimser_instance_ip" { instance = aws_instance.komiser_instance.id depends_on = [aws_instance.komiser_instance] tags = { Name = "komiser-django-app" }}# Elastic IP association:resource "aws_eip_association" "eip_association" { instance_id = "${aws_instance.komiser_instance.id}" allocation_id = "${aws_eip.koimser_instance_ip.id}"}# Output the instance IP:output "ec2_ip" { value = aws_eip.koimser_instance_ip.public_ip}
Overall, the entire configuration for provisioning our EC2 instance would look like this:
Ingress Rules: This security group allows incoming traffic on port 80 via the TCP protocol from any IP address (0.0.0.0/0), essentially enabling access to the port 80.
Egress Rules: Egress rules allow all outbound traffic (0.0.0.0/0 for IPv4 and ::/0 for IPv6).
Terraform ELB resource
Use the following code to create a new Elastic Load Balancer:
instances - specifying the EC2 instance ID to which this ELB will be associated with.
access_logs - storing the ELB logs in an S3 bucket named as komiser-elb-logs (this bucket has to be first created separately on AWS)
listener - defines a listener that maps incoming requests on port 80 (configured in our ELB security group) to the Django application container, which will be running on port 8000 in our EC2 instance.
Before applying the above changes and provisioning the infrastructure, make sure to define the terraform AWS provider and specify the correct AWS profile to use:
Finally, you can now use the following commands to provision the entire infrastructure on AWS:
terraform initterrafor apply
Congratulations 🎉 we have successfully provisioned our cloud resources on AWS using Terraform!
Step 3: Deploying our App Using Ansible Playbook #
Giving a little bit of background, the Ansible playbook is used for automating tasks and managing server configurations, making it easier to maintain and deploy applications on multiple remote servers.
And that’s exactly our use case today!
In this particular section, we’ll be using an Ansible playbook to first connect to our remote EC2 instance and then automate the process of deploying our Django Todo application container.
Talking about configuring the application deployment process using Ansible, there are mainly two parts we need to cater to here.
Essentially, an Ansible inventory file is a simple list of hostnames or IP addresses that Ansible uses to manage and execute tasks on the remote server. In this case, our target remote server is the EC2 instance we provisioned earlier.
Create a new inventory.yaml file in your working directory and use the following configuration:
Make sure to replace INSTANCE_IP_ADDRESS with the Elastic IP address of the EC2 instance and PRIVATE_SSH_KEY with the location of the private SSH key file in your local system.
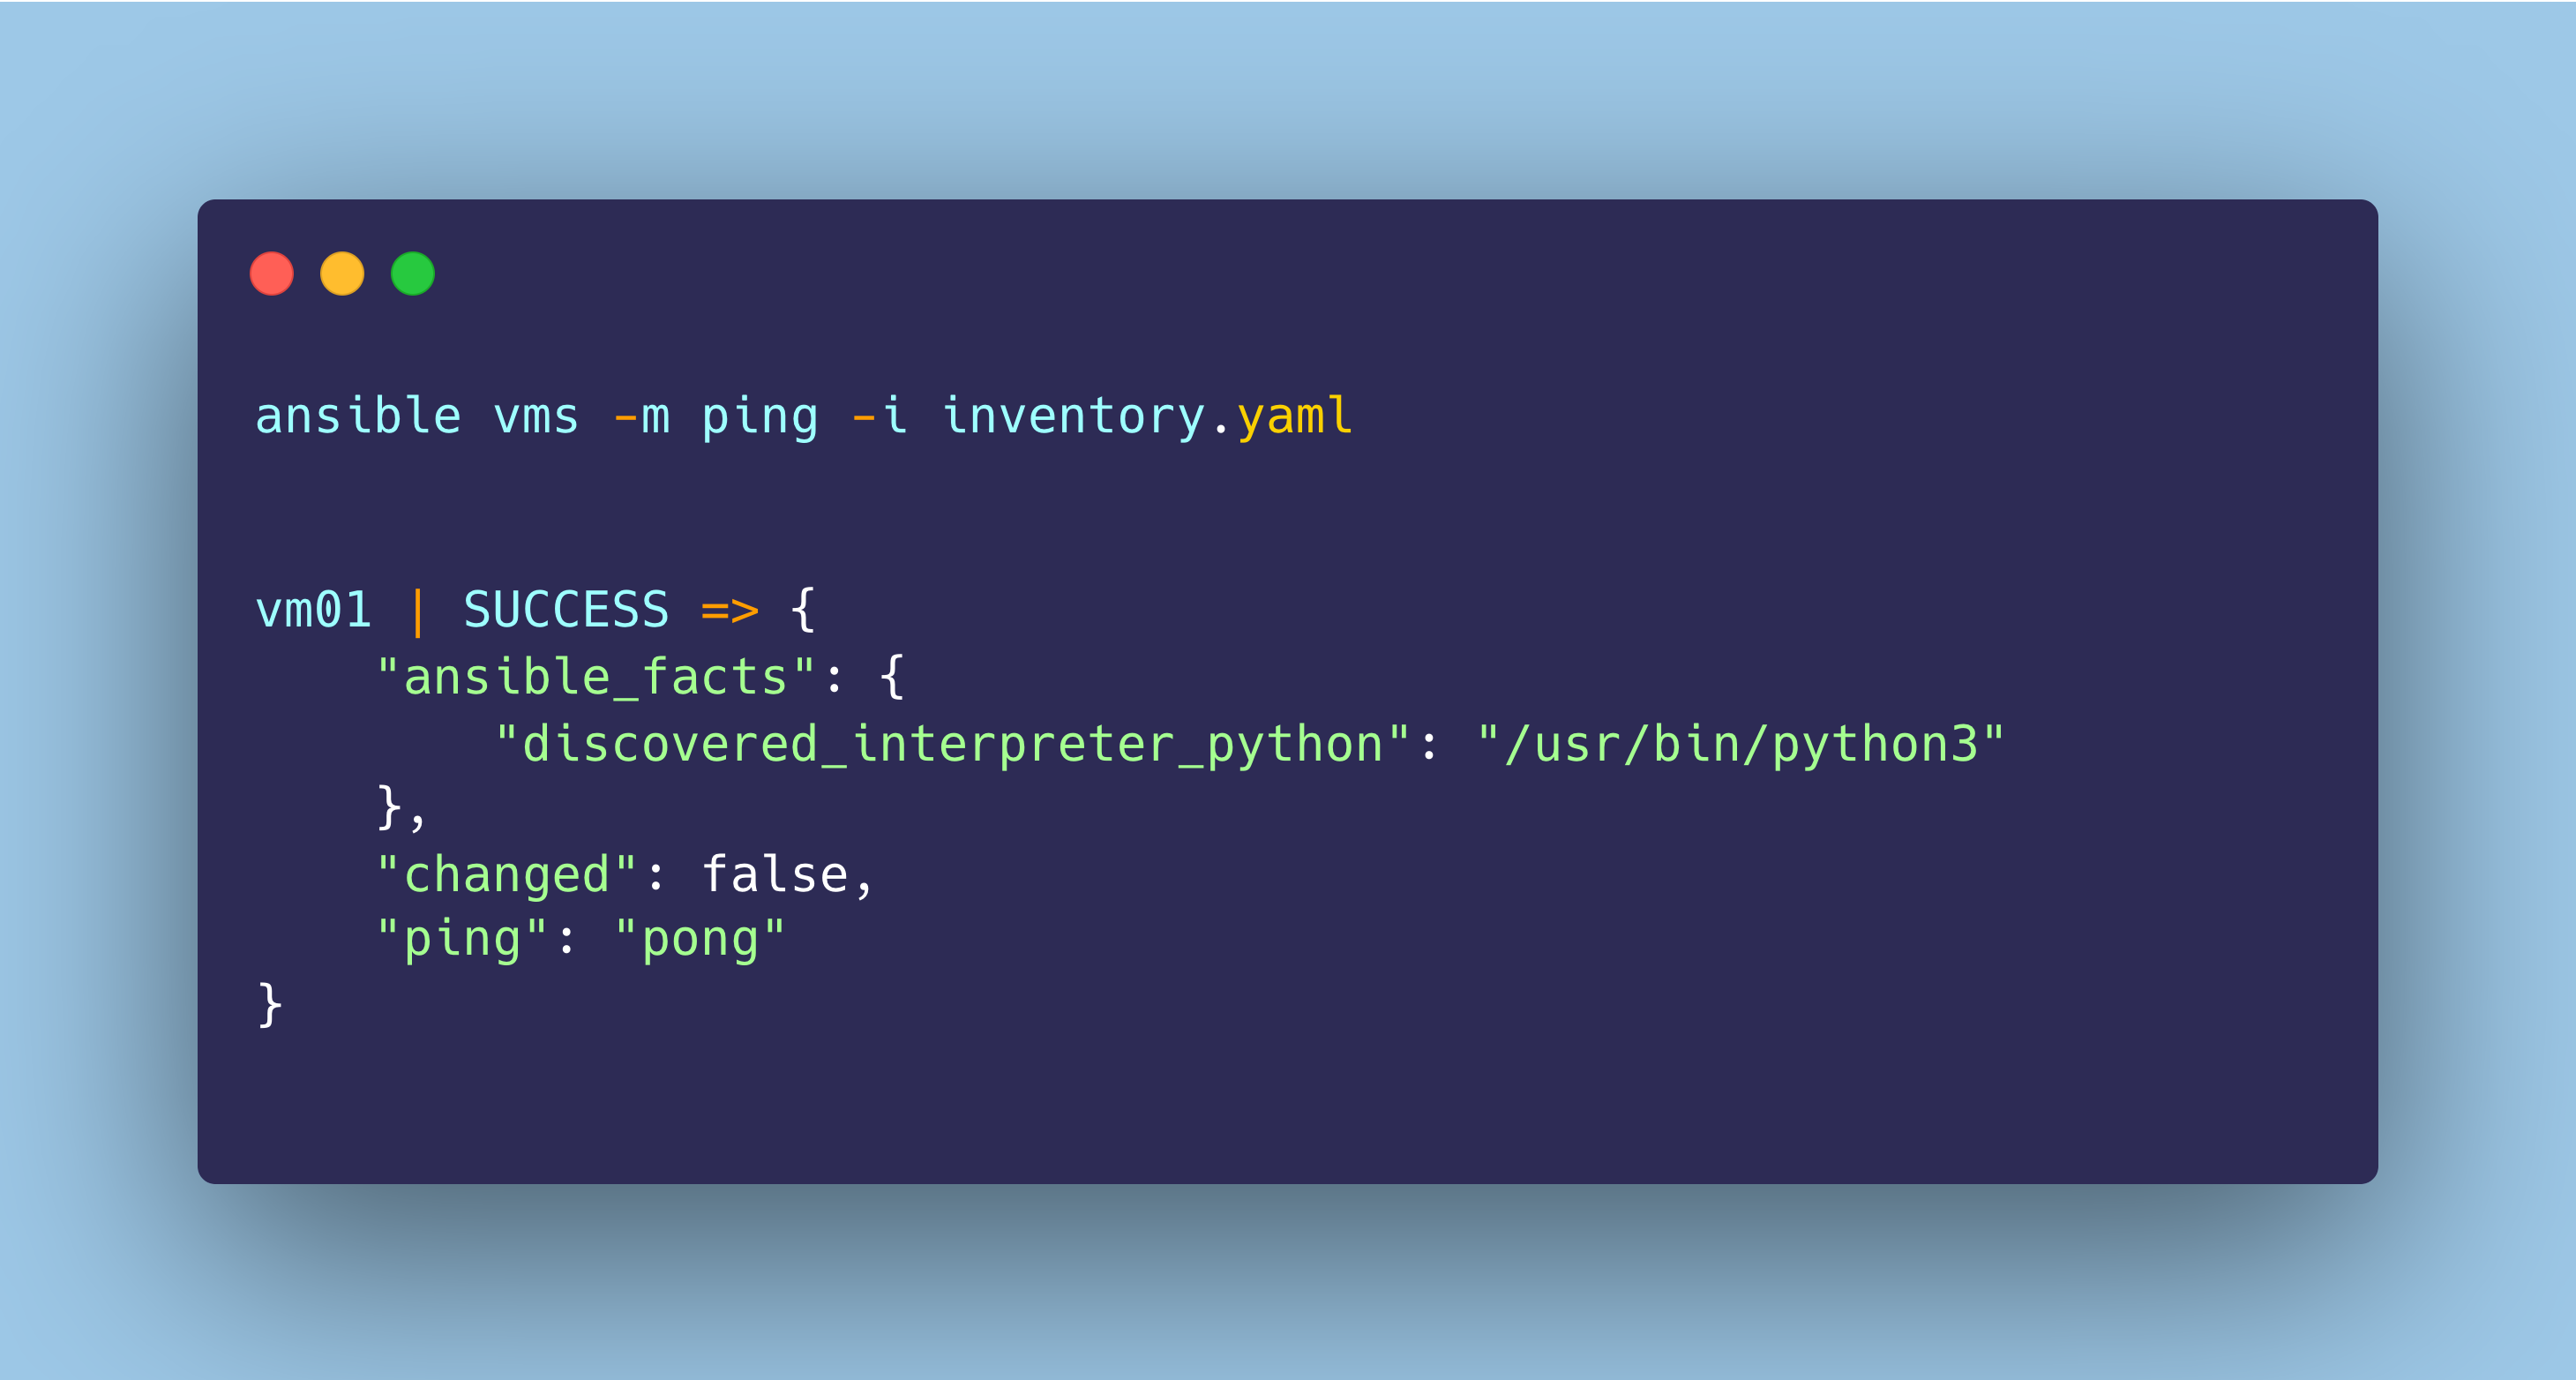
To test the connection, use the following command to ping the EC2 instance:
ansible virtualmachines -m ping -i inventory.yaml
If the connection is successful, you’ll receive the following output:
Now that we successfully established a secure connection between Ansible and our EC2 instance, let us define the tasks we need Ansible to perform on our remote server.
Create a new playbook.yaml file and use the following code to create a playbook:
- name: AWS <> Komiser Playbook
  hosts: vm01
  tasks:
  - name: Check if Docker is running
    ansible.builtin.systemd:
      name: docker.service
      state: started
      enabled: true
  - name: Run Docker Compose
    ansible.builtin.command:
    args:
      # change the current dir
      chdir: /cloudnative-lab/projects/ep-cloud-cost-monitoring/project_files
      # run docker compose
      cmd: sudo docker compose -f docker-compose.yml up -d
Explanation:
hosts: vm01 - the name of the target host server where the tasks will be executed (defined above).
There are two main tasks defined to be executed on our instance:
Checking if the Docker engine is running on the EC2 instance.
Here, we are using Ansible’s built-in systemd module - ansible.builtin.systemd which will essentially execute the following command in the background to check the status of the docker engine:
systemctl status docker.service
Running Docker Compose to start the application container.
Here, we are executing some shell commands using the built-in ansible.builtin.command module:
Changing the current directory to where the Dockerfile and docker-compose.yaml are located.
Executing the following command to start our Django app container:
sudo docker compose -f docker-compose.yml up -d
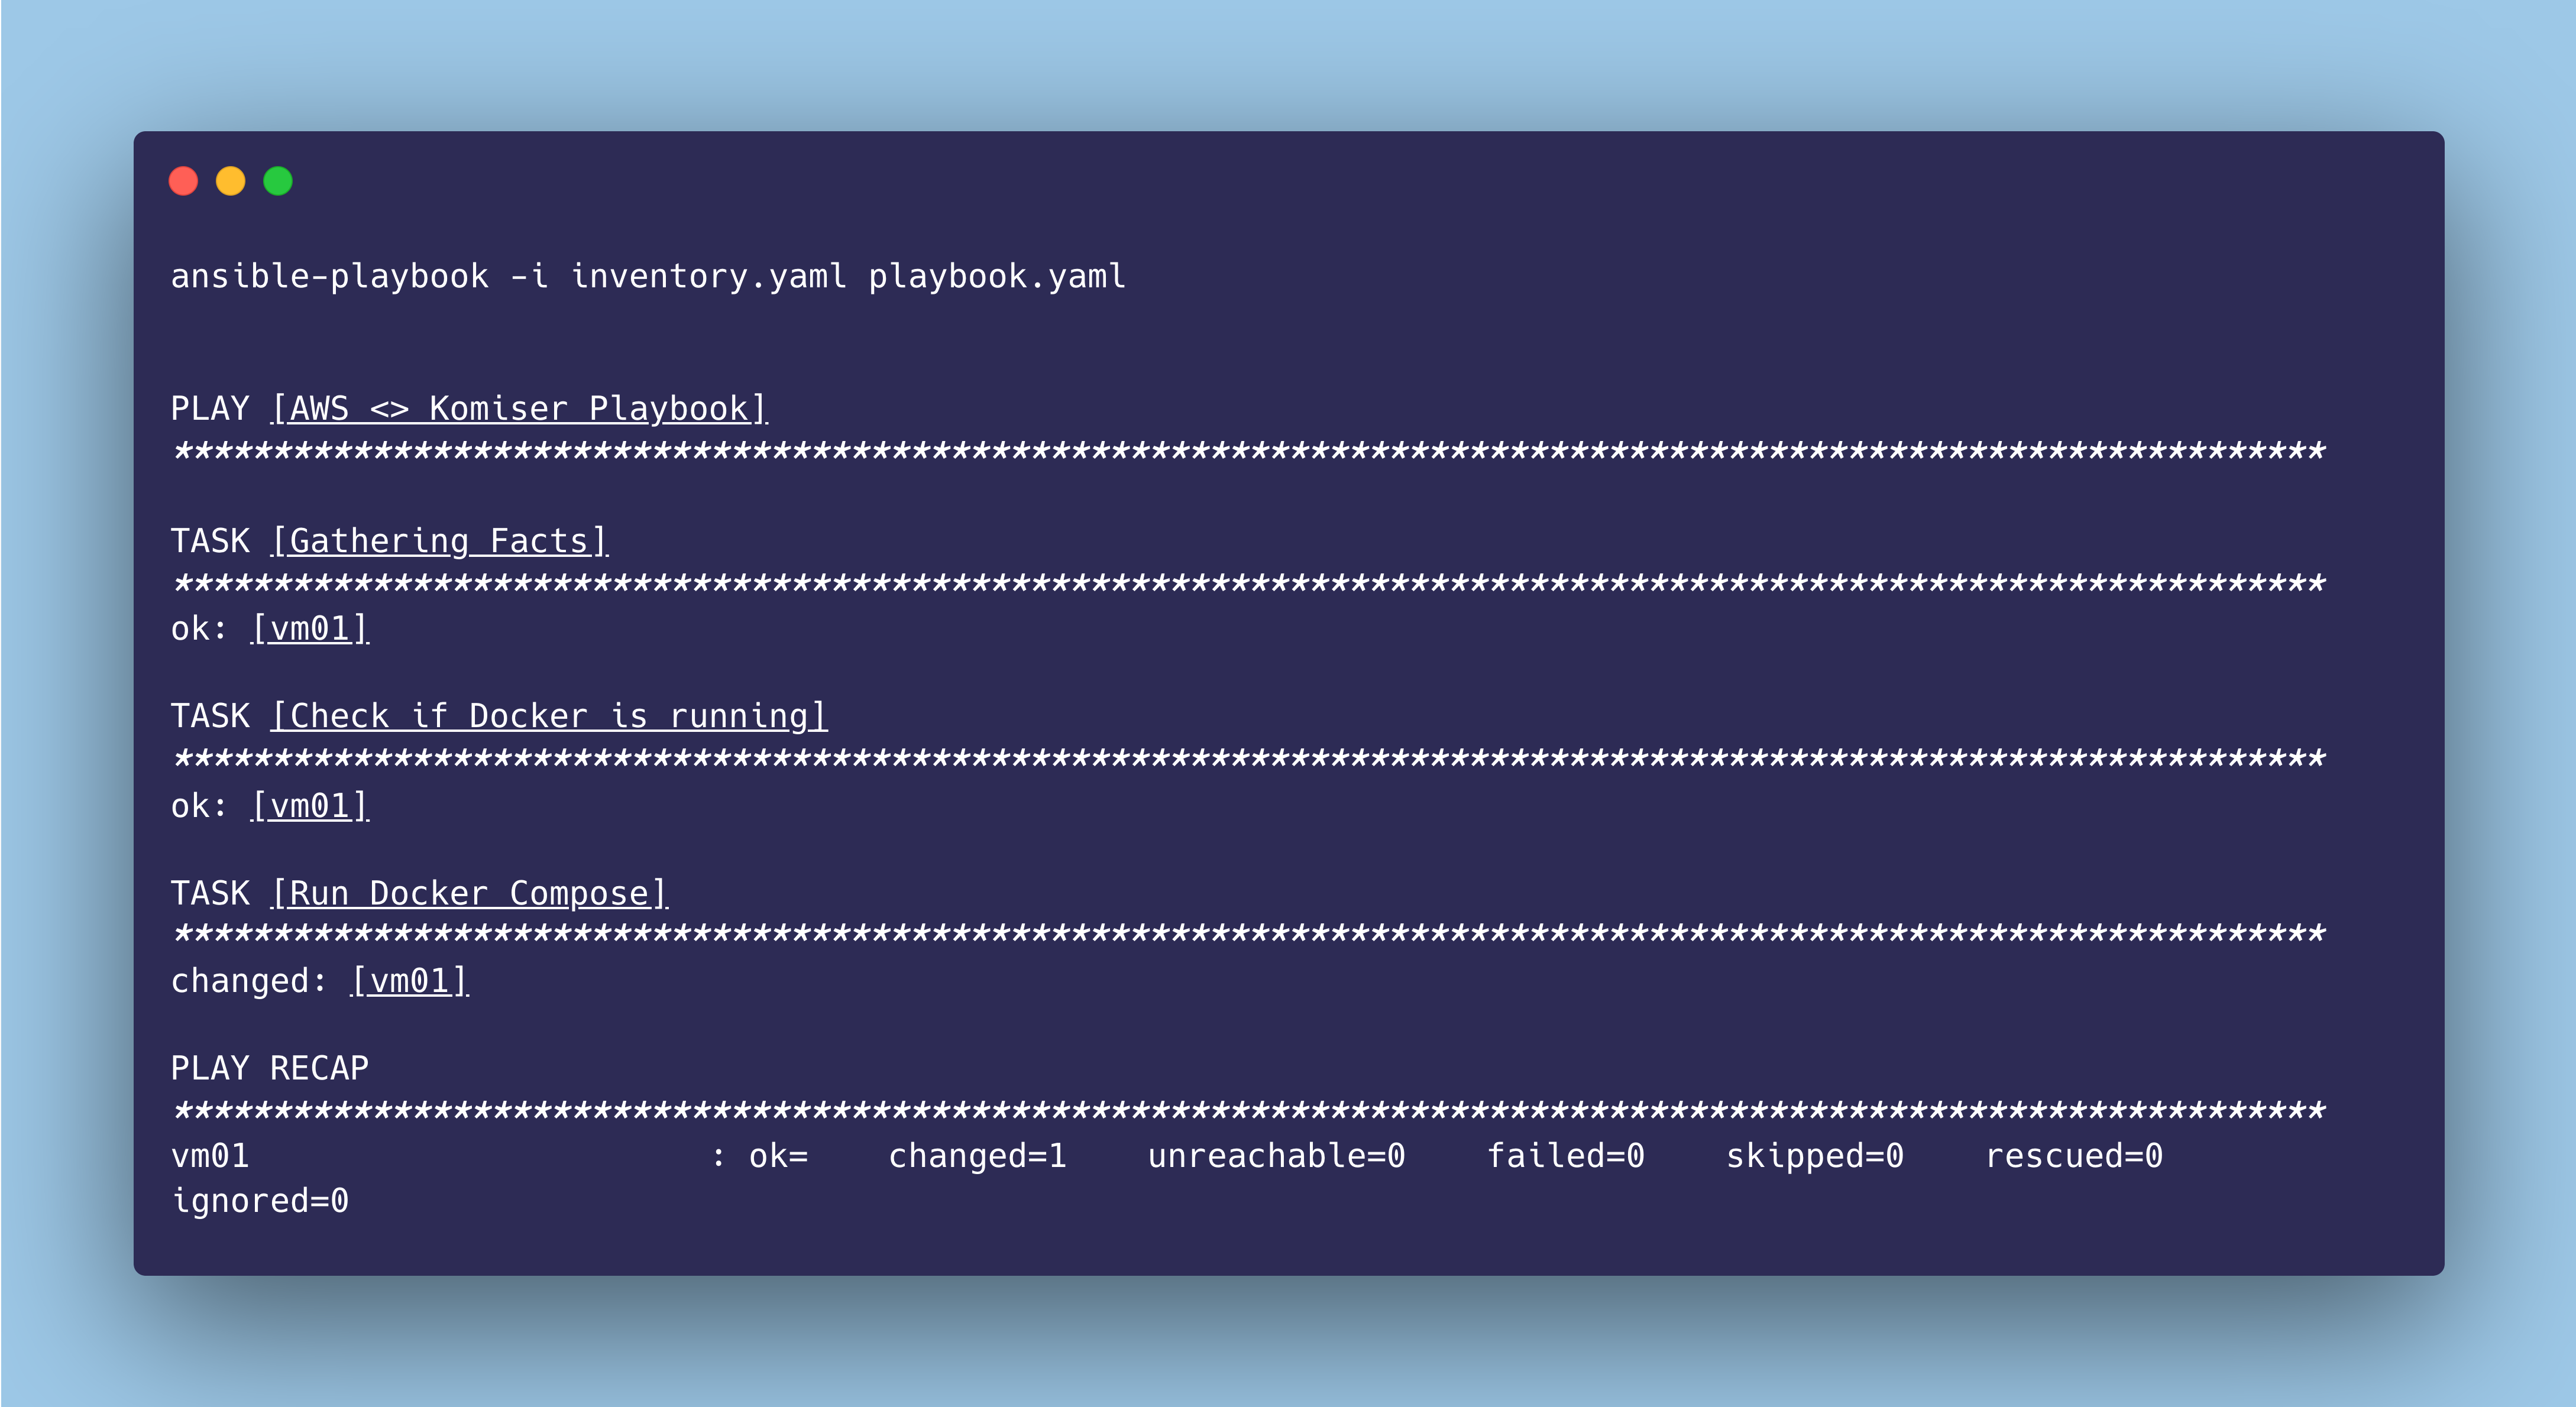
Now, you can use the following command to execute the playbook:
ansible-playbook -i inventory.yaml playbook.yaml
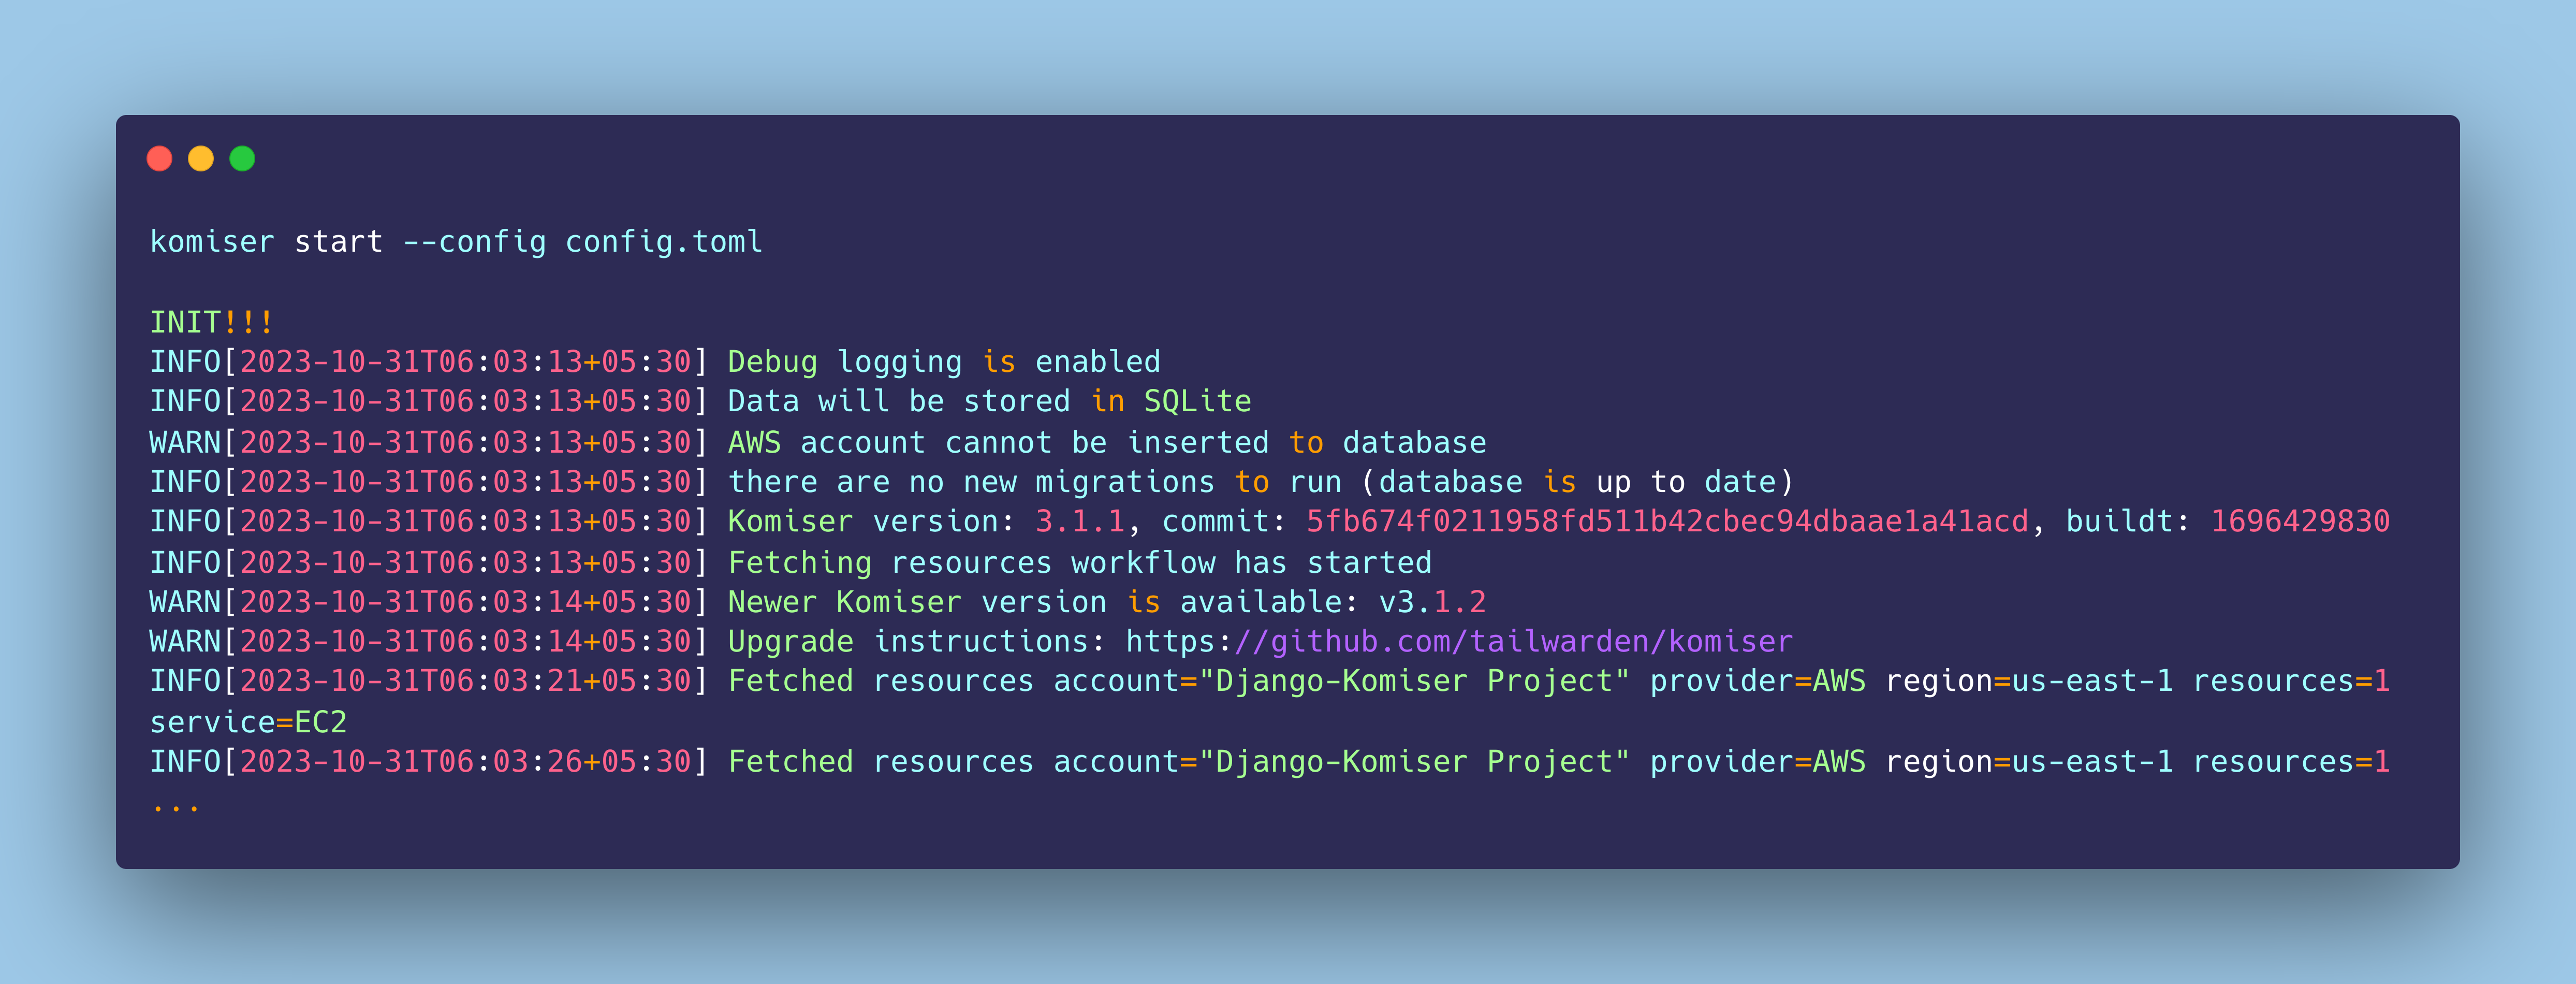
As the tasks are being executed, you can view the terminal output which may look something like the below:
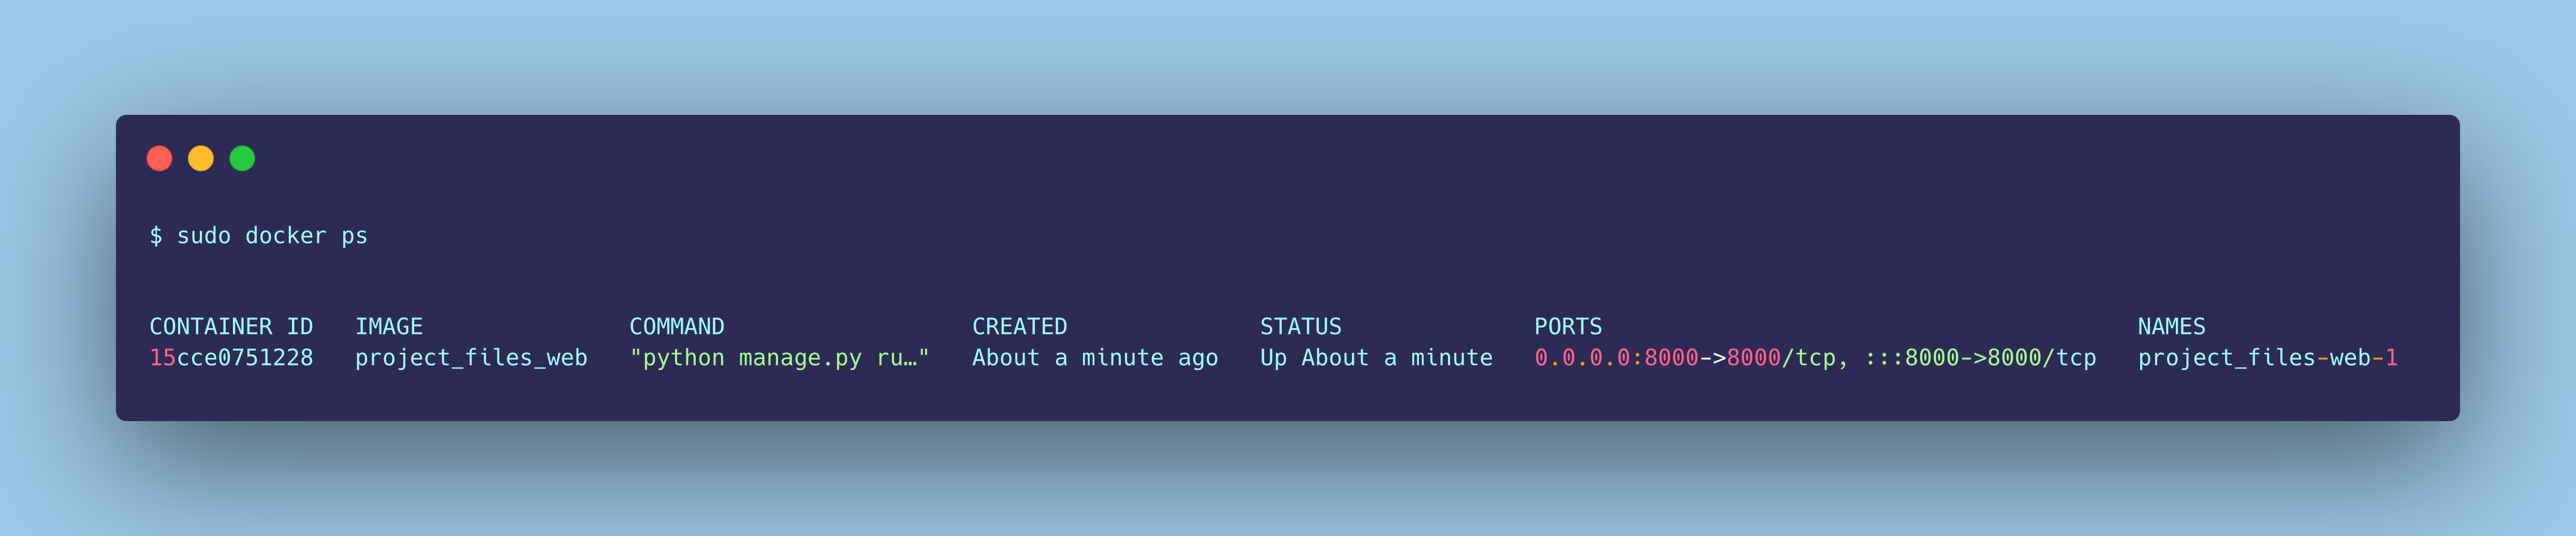
If everything goes well as planned, our application has been deployed on our EC2 instance and you’ll be able to access the web browser using either of these two methods:
Komiser is an open-source cloud-agnostic resource manager, that integrates with multiple cloud providers (including AWS, Azure, GCP, Civo, Digital Ocean, Kubernetes, OCI, Linode, Tencent and Scaleway), builds a cloud asset inventory, and helps you break down your cost at the resource level.
In simple terms, it's a tool that keeps an eagle eye on your cloud resources, helping you understand and optimize your overall cloud costs.
Komiser brings a set of powerful features to the table:
Multi-Cloud Support: It works seamlessly with various cloud providers like AWS, Azure, Google Cloud and more. You can manage your resources across different clouds from a single place.
Comprehensive Resource Data: Komiser collects detailed information about your cloud resources. You can track everything from virtual machines and databases to storage and networking.
Cost Transparency: It provides deep insights into resource consumption and expenditure. You'll know exactly where your money is going and where you can save.
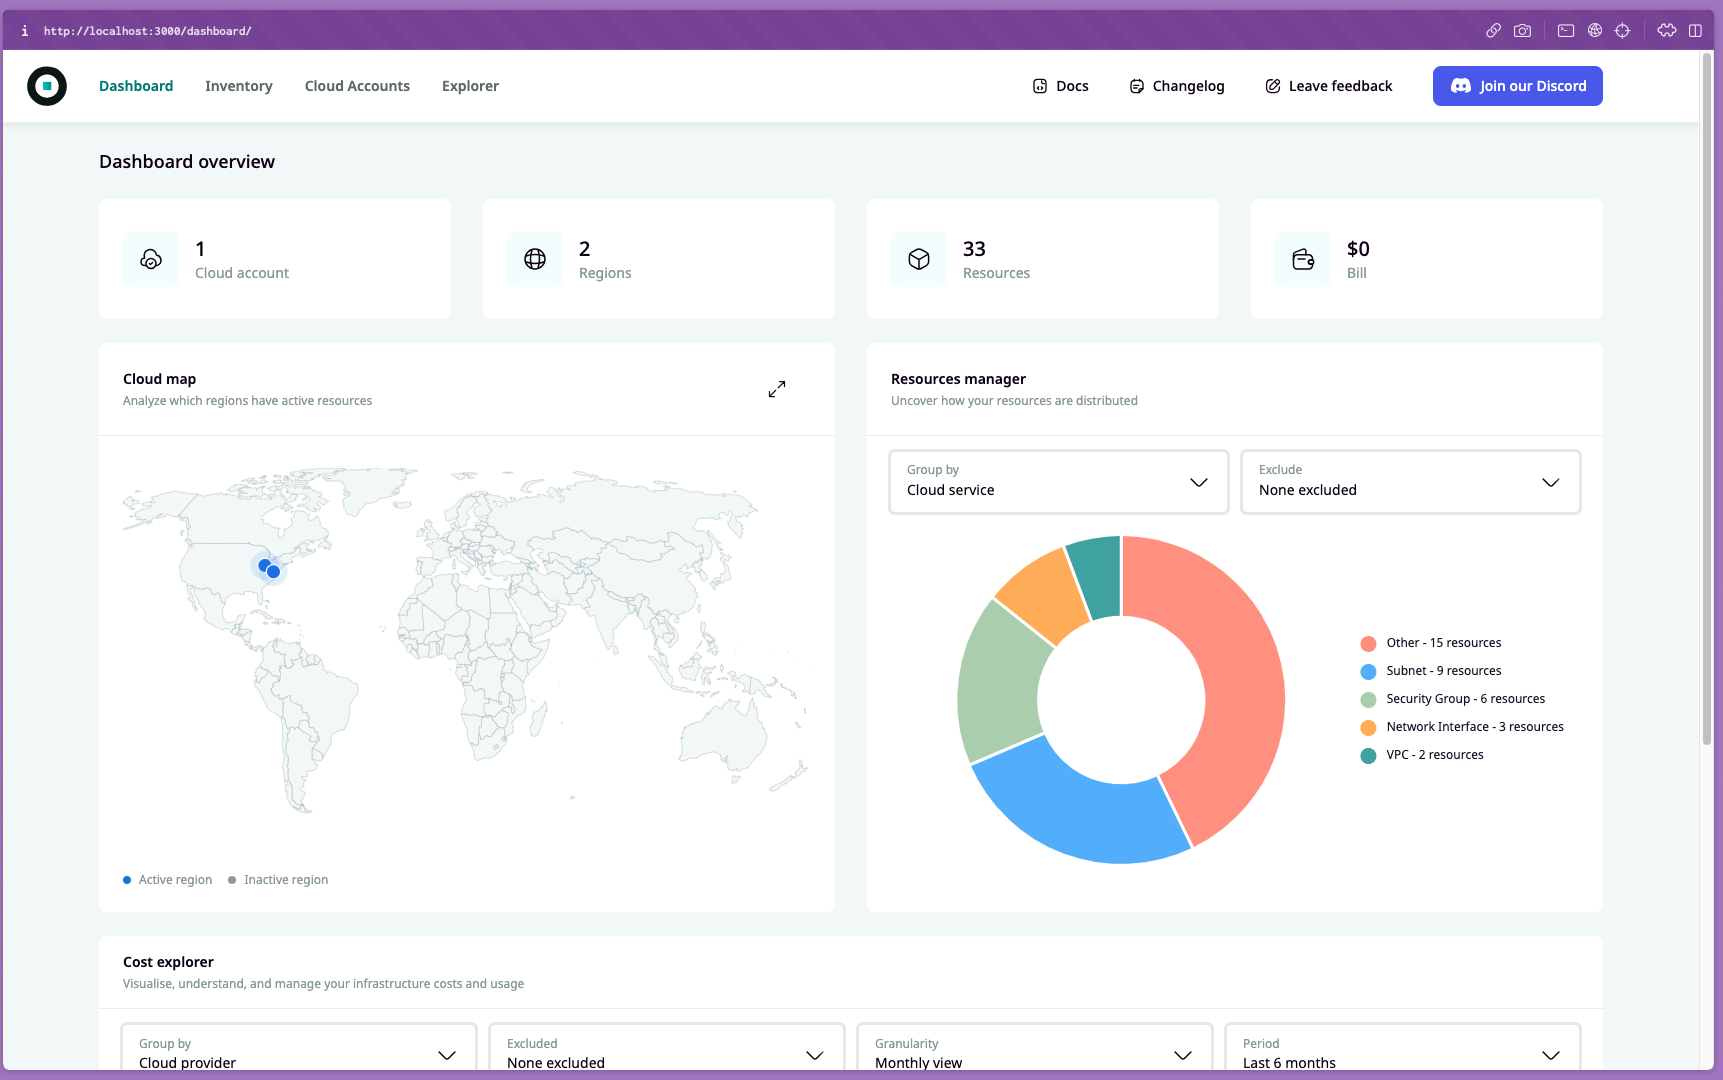
Customizable Dashboards: One of my favorites is the fact that Komiser offers a customizable dashboard, so you can tailor the information you want to see. It's like having your own “cloud financial control center”!
Komiser will help you monitor and manage your cloud resources efficiently. Whether you're running a small application (such as a Django ToDo list in our case) or a complex infrastructure, Komiser will simplify the process of controlling your cloud spending.
It's not just about cost-cutting, but about being cost-intelligent. By understanding your cloud costs better, you can make smarter decisions to maximize your cloud investment!
Now that we have an idea of what is Komiser, let us see how we can implement this to monitor our cloud resources, provisioned on AWS.
It is not recommended to add your AWS Access and Secret Access keys in the credentials file when working in a production environment. The most secure way of authentication is by using temporary credentials through IAM roles.
Congratulations 🎉 you have successfully configured and authenticated Komiser to monitor the resources in your AWS account!
Step 5: Fine-Tuning Resource Monitoring with Tags #
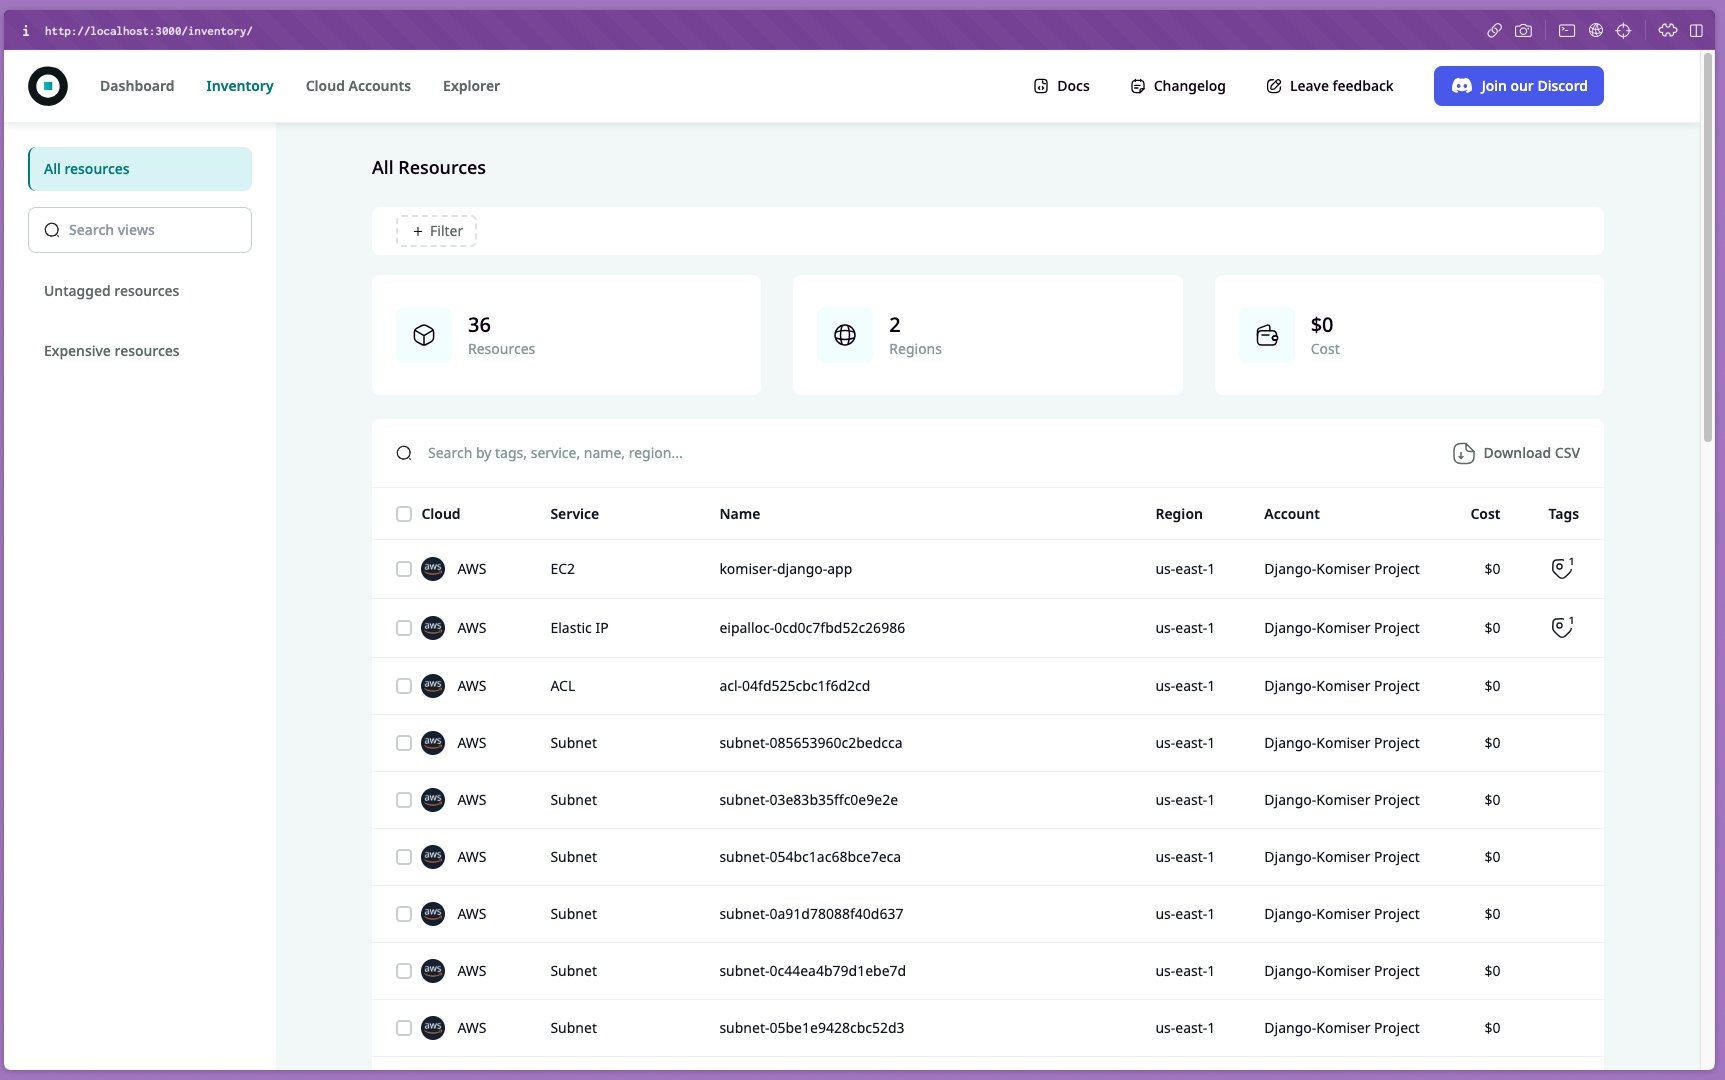
You can now have a detailed view of all the active AWS resources in your account by heading over to the Inventory section, as shown below:
This is where things get a little bit more interesting!
While provisioning the cloud infrastructure using Terraform, we tagged all the resources associated with our Django application as shown below:
tags = {
    Name = "komiser-django-app"
  }
Now, we can filter out the specific cloud resources/services associated with our Django application using this tag name in Komiser 😮
Go ahead and add a new filter in the Inventory section using the following configuration:
Key name - Name
Key value - komiser-django-app
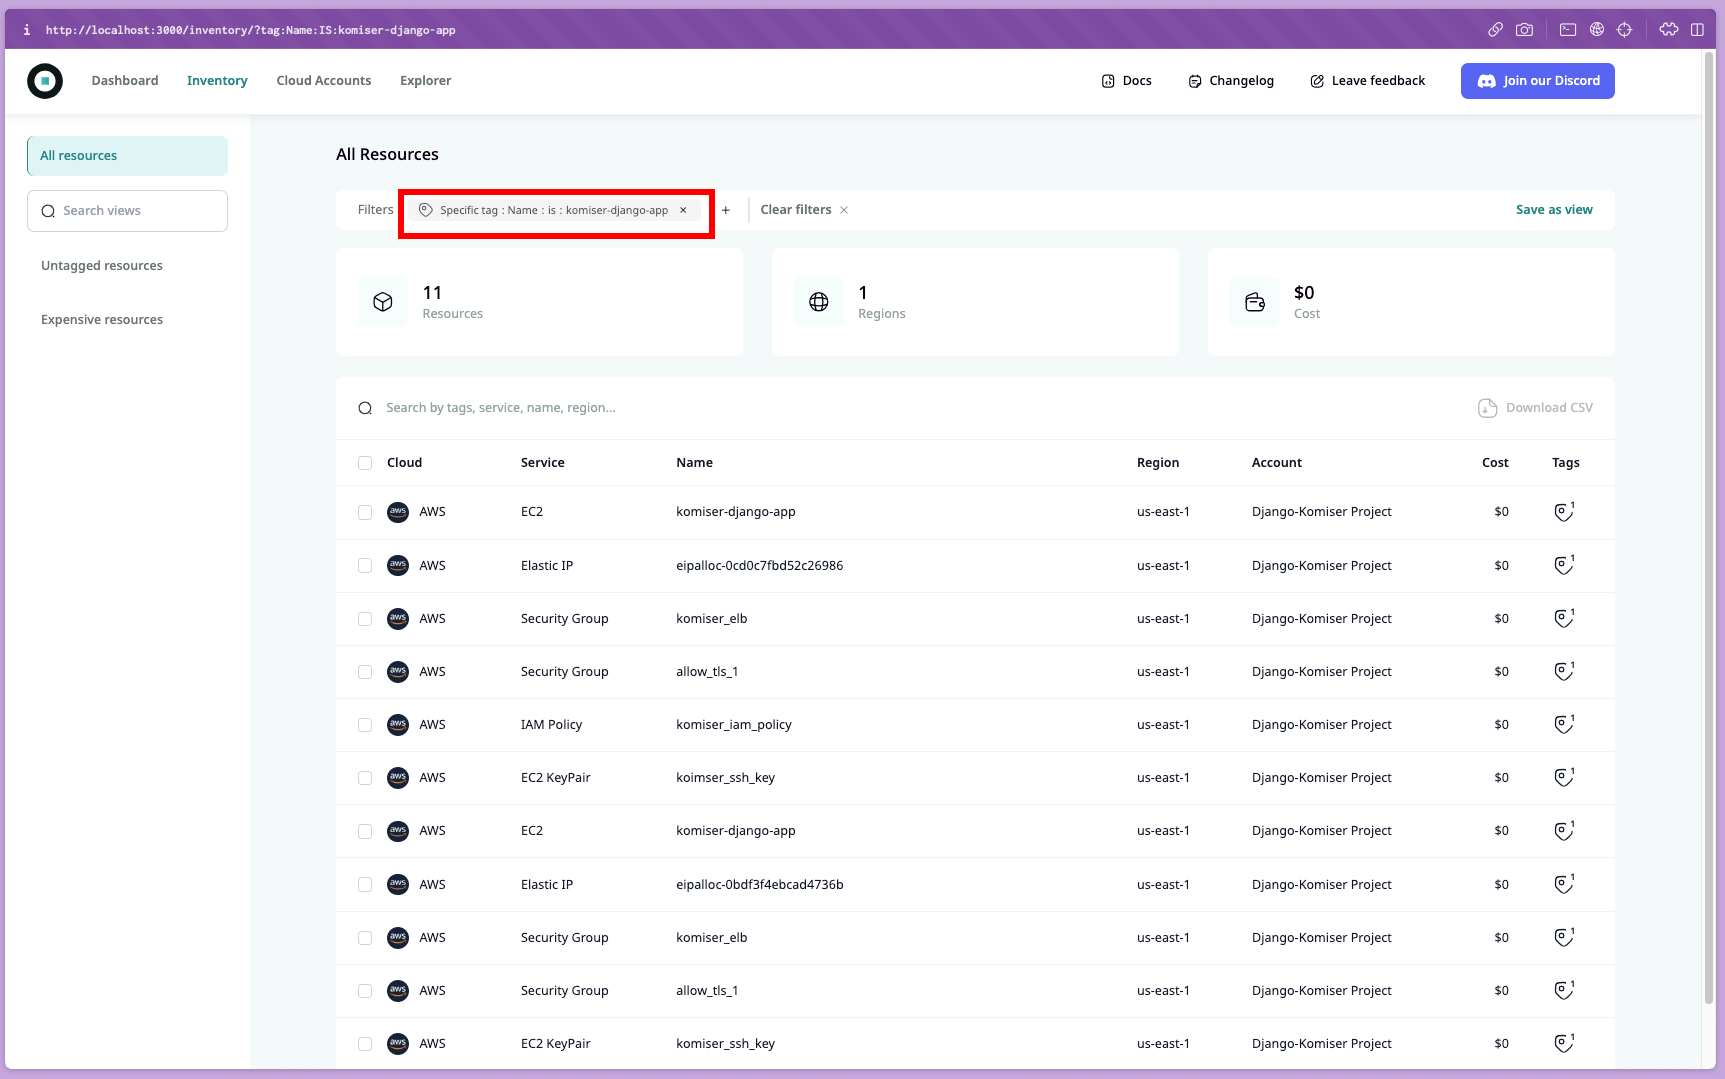
When applied, this will filter out and display only the cloud resources associated with our Django application, as shown below:
So, now we know the exact number of cloud resources our Django application depends upon which is 11 in this case and the cloud costs for each resource are being constantly monitored by Komiser!
With this, we have successfully built a Cloud Cost Monitoring system for our simple Django ToDo list application using Komiser. Congratulations on making it this far 🎉
In this article, we embarked on a journey to explore the realm of cloud cost management with Komiser.
We began by laying the foundation, understanding project architecture, and covering essential prerequisites. Configuring our simple Django ToDo list application from testing to containerization, we dove into provisioning our cloud infrastructure using Terraform and then, remotely deploying our application with the Ansible playbook.
As we shed some light on Komiser, we learned about its unique features and how it effectively addresses the cloud cost challenges. At last, we configured Komiser to continuously monitor our AWS resources, associated with our application.
This tutorial equips you with the knowledge and tools to make informed decisions while driving cost savings in your cloud infrastructure.
Remember, Komiser is your trusted companion in maintaining cost efficiency across your cloud environment. The possibilities are endless, and the savings are real – thanks to the power of Komiser.
Kunal is a DevOps and Cloud Native Advocate with a passion for Open Source. He's been involved in the DevOps and open-source ecosystem for 1.5+ years and has a strong experience in public speaking, community management, content creation etc. He has experience working on and contributing to some of the major projects in the CNCF, including Kubernetes, Layer5 and others. He always strives to empower others with my experiences and believes in growing with the community!