Understanding the ins & outs of Git using GitHub
Using the git push command we can take these changes from our local machine to the remote server to preserve it. And the great part is, that we can work and


On this page (20)
- How does Git work?
- Installing Git
- Learn Git the right way
- Verify Installation
- Configure git
- Initialising Git Repository
- Git Add
- Commits
- Amend commit messages
- GitHub
- Create a GitHub repo
- SSH keys SetUp
- Git Pull
- Understanding Branches
- Merging and Pull Requests
- The General Workflow
- Conflicts
- Merging Conflicts
- Rebase
- Git Rebase
How does Git work? #
Let's understand how Git works.
Usually, while writing software we have our working directory where we have a bunch of files depending on the application we're building. Now, we can host the git project on a remote server.
The most popular git providers are the GitHub by Microsoft, Gitbucket, GitLab, AWS CodeCommit.
Using the git push command we can take these changes from our local machine to the remote server to preserve it. And the great part is, that we can work and collaborate on the project from people all around the world.
This is why Git is really powerful.
In Git, we have the Staging area and Commit History ->
We could have a bunch of commits and all these actions are happening in our local machine. Before the file to commit, it is send to the staging area with the command git add <filename> and then using git commit, it is sent to the commit history.

Installing Git #
Installation process is really simple :
Git Installation for Mac and Windows users
[Install GitBash for Windows Users](https://gitforwindows.org/ or https://cmder.net/)
For Mac Users : The best way to install is using "Homebrew" using command - brew install git.
On Windows, I suggest you to install "Git Bash" or "cmder" is also a great tool.
Learn Git the right way #
Here we are not going to use Graphical User Interface (GUI) client to interact with git.
We will be using the black screen, the terminal or the command line to work on Windows because it is much quicker.
Verify Installation #
Let's proceed with the installation.
- Search for terminal or iterm in Mac and command line or Git Bash in Windows.
- Open the terminal or command line.
- Check whether git has been installed.
git --version
The version of git installed appears. So, git is successfully installed.
You can type :
git --help
It gives a bunch of commands.
To clear the screen :
ctrl + l
Configure git #
The first thing we need to do is to configure git to have the right information about ourselves.
Type :
git config --global user.name "your_username"
git config --global user.email "your_email"
Next type :
git config --global color.ui auto
This enables command line coloring outlook.
On typing :
git config
We can see a couple of options.
Now, on typing :
git config -l
We can see the configuration entered of username, email and color.
Initialising Git Repository #
Repositories in Git contains a collection of files of different versions of a project.
Let's start :
cd Desktop "cd" stands for change directory
ls lists the content of the current directory
mkdir learning-git creates a folder named "learning-git"
ls displays "learning-git"
cd learning-git the current directory is "learning-git"
ls shows as empty right now
Now, how do we tell that the working directory is a git repository ?
We need to initialise our directory using git init . -> Initializes empty Git repository. It is hidden to prevent accidental deletion or modification of the folder.
We can start issuing git commands on our local machines from here on.
-
ls -acommand displays the hidden files -
rm -rf <folder_name>is used to delete a folder
NOTE : git init is used for creating new projects. We do not issue "git init" while working on an existing project.
Git Add #
Now, we will create a couple of files inside the "learning-git" folder we created.
touch <filename>creates a file
touch index.html
touch index.js
touch main.css
mkdir test
cd test
touch test.js
These files are now added to the staging area so that they can commit.
git status gives the status of the changes been made. These are the untracked files now as no commits are added.
As we are inside of test directory, git add -A is used to add every single file.
Now, all the four files have been staged.
git add .adds all the files from the current directory.git rm --cached <filename>is used to remove the file mentioned in .git rm --cached .is used to remove all the files.
Commits #
Commits can be thought of as snapshots or milestones along the timeline of a Git project. Commits are created with the git commit command to capture the state of a project at that point in time.
It can be considered as a safe point before we start implementing an another feature while working in a project. We can have as many commits as we want.
Remember, we had added all four files in the staging area.
Also, we are in the test folder and to go to the root use cd ..
Here, we'll create one commit for all : git commit -m "bootstrap project"
Now on typing git status it says nothing to commit.
To modify any file, we use the 'vim editor' using vi command.
Let's modify index file using vi index.js command. Press 'i' to Insert and then start typing, say console.log("hello git"); Finally press Esc & type :wq to save and exit out.
cat index.js displays " console.log("hello git"); "
git add . is used to add the modified file
git status shows the modified index.js file
The index.js file is now staged.
Then perform git commit -m "added console.log"
Here, the message should represent the actual changes made.
- To see the changes made, use
git log[ NOTE : Each commit is identified with a hash '#' number ] git log --onelinedisplays the output as one commit per line.- To discard the changes, use
git restore index.js git diffgives the difference between what we have in the current working directory and what has been committed.
Amend commit messages #
We can change the most recent commit message using the git commit --amend command.
It will open our editor, allowing us to change the commit message of the most recent commit.
Let's modify "main.css" file we created :
Use vi main.css command and type " body {} " in the editor.
Then,
git add .
git commit -m "File modified"
To amend the changes in main.css :
git commit --amend -m "added body{} in main.css"
- We can check the changes using
git logcommand.
GitHub #
If our computer gets corrupted or breaks, we loose the project. So, we have to store the project on the remote server.
We can host git projects on the remote server using git push command. A copy from the local machine is then stored on the remote server.
In a nutshell, GitHub is a platform for hosting code and collaborating on Git repositories.
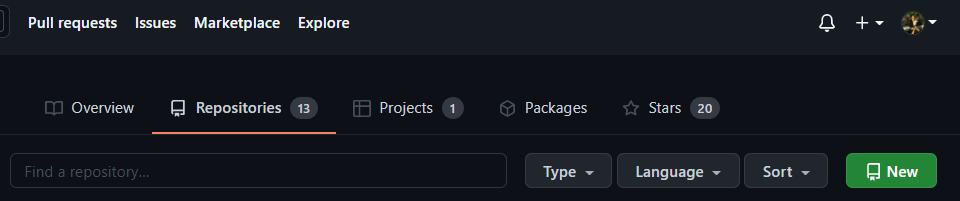
Create a GitHub repo #
On your GitHub account, click on New under the Repositories section and enter the Repository name -> Create repository
Let's follow the below steps for Git Push :
- Copy the path under the CODE section of your repository as shown -
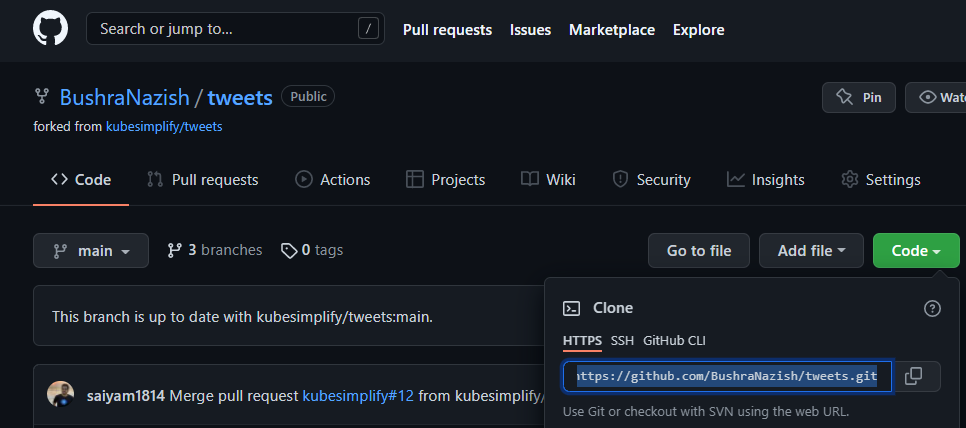
- Type the below code on the Terminal
git remote add origin <path_url>
git branch -M main
git push -u origin main
If it fails and got denied then we need to configure our GitHub Account.
SSH keys SetUp #
With SSH keys, we can connect to GitHub without supplying our username and personal access token at each visit. Here, we will see the simple procedure of setting up a SSH key on GitHub.
Follow the below steps to configure your GitHub account to push your local repository to remote repository.
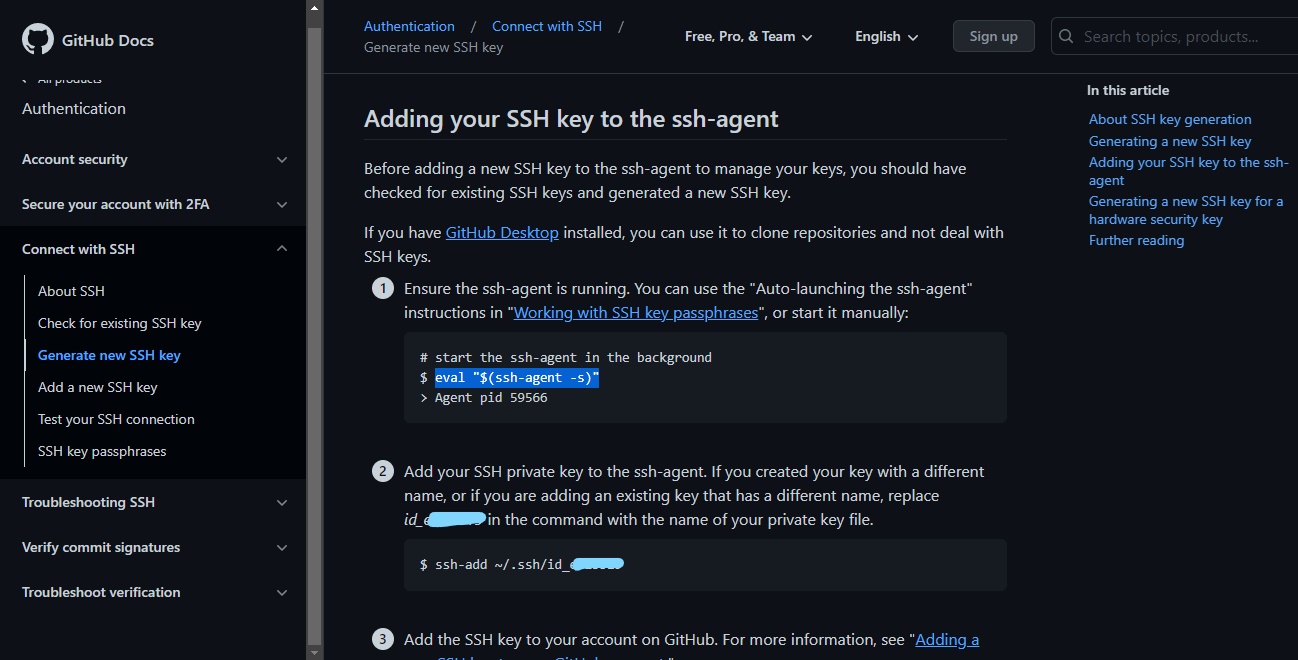
- Click on your profile icon -> Settings -> Select SSH and GPG keys -> Click on "generating SSH keys" -> "Generating a new SSH key and adding it to the ssh-agent" as shown below :
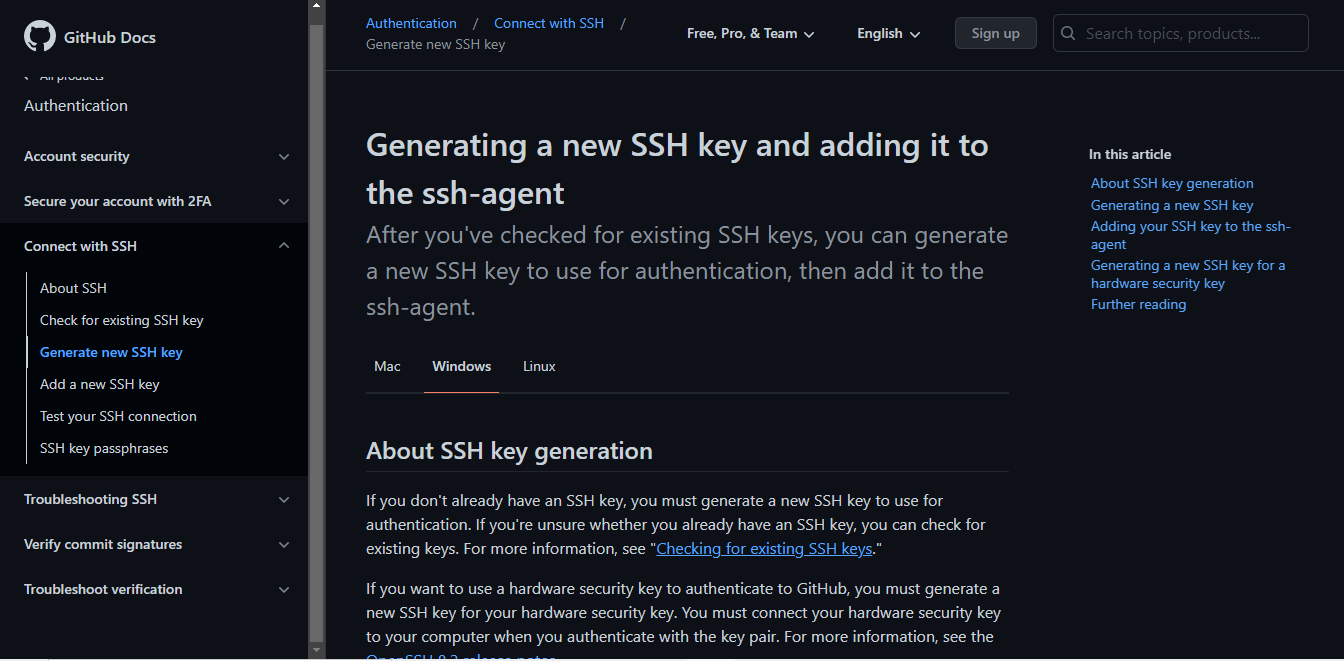
This page has installation processes for Mac, Windows as well as Linux. Perform the mentioned procedures step-by-step.
Press Enter to skip entering passphrase in the Terminal.
- Then move on to "Adding your SSH key to the ssh-agent" and follow the steps mentioned.
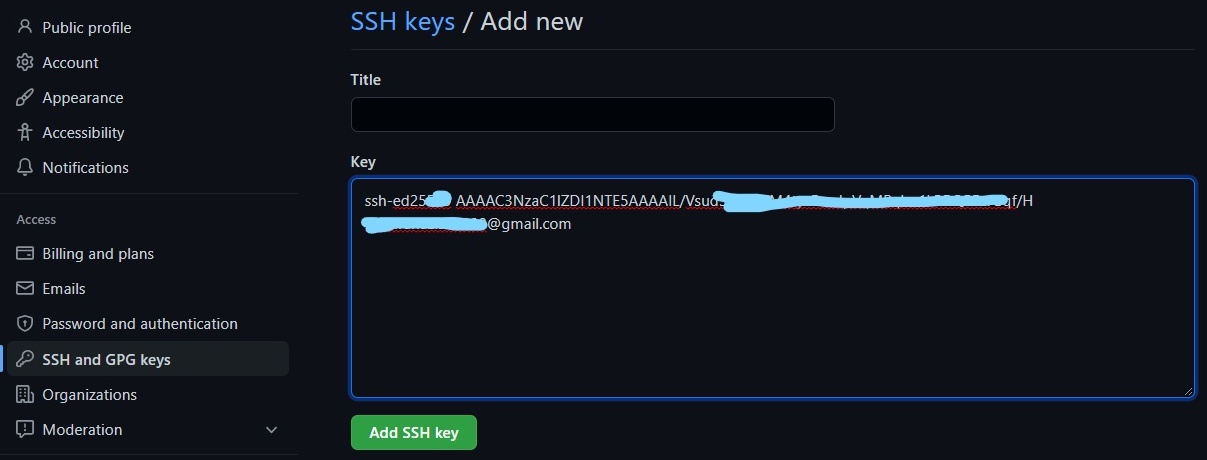
- Next select "Adding a new SSH key to your GitHub account" -> Gives the "key" that we need to upload -> Paste in the "Add SSH key" section under your GitHub account SSH key.
- At last, you are prompted to add the GitHub account password and the SSH key is set as displayed below :
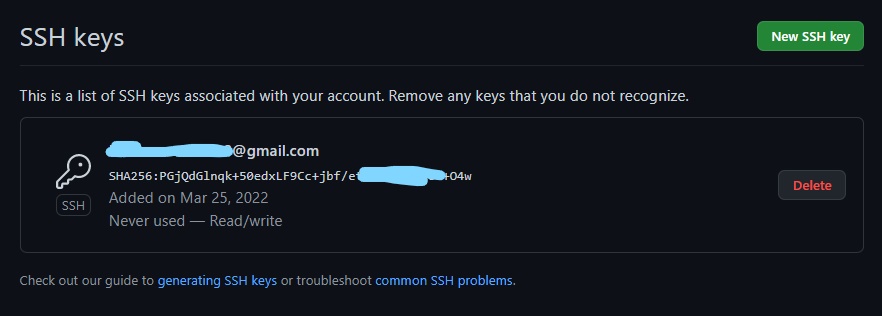
Now, git push -u origin main works & all the files created are displayed in the "learning-git" repository on your GitHub account.
Git Pull #
Here, we will learn to take files from GitHub and pull the changes to our local machine.
For example, we can add something and Commit on the README file of learning-git on GitHub.
We can pull these changes using git pull command on our local machine.
Understanding Branches #
A branch represents an independent line of development. On our Terminal, by default we are on main branch.
main and master branches are the default branches and basically are same. GitHub recently changed the name of master branch to main branch.
Always try to make separate branches for each task and make Pull Request (PR) using those branch that is, one branch can only open one PR.
When we create a branch, we are taking a copy of the existing branch and can make any changes on our branch without affecting the main branch.
Once done with the implementation, we can merge our branch back into the main branch.

Few important commands related to branch are :
-
git branch <branch_name>creates a new branch -
git branchis used to know which branch we are currently on. -
git branch -rtells the list of branches in the remote server [ 'r' stands for remote]. -
git branch -achecks all the branches on GitHub . -
git checkout <branch_name>switches to the named branch -
git checkout -switches to the previous branch. -
git checkout -b <branch_name>switches to a new branch -
git branch -d <branch_name>deletes the branch
Let's see an example to create and commit a branch.
git branch feature-a
git checkout feature-a
vi utils.js
git add .
git commit -m "utils.js file updated"
git push -u origin feature-a
Merging and Pull Requests #
The best practice for merging branches is to do it through Pull Request. Here, we will see how to merge the changes from feature-a branch into the main branch.
We can do this by using the git merge feature-a command.
But by using Pull Requests :-
We can see an option of Compare & pull request on our GitHub repository. Good practice is to add the comment and then click on "Create a Pull Request". The Reviewers review and merge Pull Requests by clicking on "Merge pull request" and "Confirm Merge" if the changes are approved.
We can then delete the feature-a branch and it can always be undone.
The General Workflow #
Let me walk through the workflow when it comes to working with Git.
The first thing to do is, while working on a feature, pull the latest changes from the master (remote repository) down to your local machine. From that point, you create a new branch using git checkout -b <branch-name> and perform the commits,etc.
It is advisable to rebase your changes against the master branch as then you may not have conflicts.
If you have n commits, then you have to resolve the conflict for each commit. So, you should squash all your local commits first, then in your branch you have one single commit, then stash your commit (push it aside), then bring all the changes from the master to the main (rebase master) and then bring your stashed commit back top of it. Having one single commit means you have to resolve the conflicts once and you're good to go.
Then, you can push it to remote server and raise a Pull Request. If the changes are approved then your changes are merged into the main branch.
Conflicts #
A conflict arises when two separate branches have made edits to the same line in a file, or when a file has been deleted in one branch but edited in the other.
We will illustrate this by an example.
Let's create a new branch and then edit index.html file :
git checkout -b feature-xyz
vi index.html
We'll type the below html code in index.html file -
<!DOCTYPE html>
<html>
<head>
<title>Page Title</title>
</head>
<body>
</body>
</html>
Then,
git add .
git commit -m "add some html"
git push --set-upstream origin feature-xyz
Now, we will go to the GitHub and edit index.html file of the "feature-xyz" branch and then perform 'commit changes' :
<!DOCTYPE html>
<html>
<head>
<title>Page Title</title>
</head>
<body>
    <h1>This is a heading</h1>
    <p>This is a paragraph</p>
</body>
</html>
In my remote branch, it's not aware what is happening and edit this file as :
<!DOCTYPE html>
<html>
<head>
<title>Page Title</title>
</head>
<body>
    <p>This is an another paragraph</p>
</body>
</html>
Now, we will see some conflicts :
git add .
git commit -m "added another p tag"
git push
The reason behind the ERROR is that the changes made on GitHub is not pulled to the local computer.
Merging Conflicts #
So, we need to pull before we push our changes : git pull -> It fails and asks to "first fix conflicts and then commit the result". The changes can be found in vi index.html when the editor opens. Now, here we can fix the changes and then commit :
<!DOCTYPE html>
<html>
<head>
<title>Page Title</title>
</head>
<body>
    <h1>This is a heading</h1>
    <p>This is a paragraph</p>
    <p>This is an another paragraph</p>
</body>
</html>- TIP : VS Code Editor helps in resolving the conflicts much faster.
Now, we have to bring the changes to the staging area and then commit -
git add .
git commit -m "resolved conflict"
git push
This time it works ! So, this how we merge conflicts.
Rebase #
Rebase is a process to apply a sequence of commits from distinct branches into a final commit.
While working on a branch, when we say git checkout we should really be checking out from the main branch.
In case of multiple commits, the main branch moves out and we don't have the commits from the main/ master branch. So, rebase brings all the commits from the main branch into our branch and then apply our changes (from the branch) on top of it.
Git Rebase #
We are going to demonstrate the rebase functionality with the git.
Remember we created feature-xyz branch. But the changes do not reflect in the main branch on GitHub because we haven't merged our branch. The "compare and Pull Request" option is still present in the pull request section.
- TIP : We should not commit to main branch directly.
Here, for demonstration purpose, we will edit index.html file in main branch on GitHub as :
<!DOCTYPE html>
<html>
<head>
<title>Page Title</title>
</head>
<body>
    <p>First paragraph</p>
</body>
</html>
Now, we want to take the latest changes from the main branch and then add our changes on top of it - this is what rebase allows us to do.
On our terminal we type git pull -r origin main -> gives ERROR of merged conflicts
We can edit changes using VS Code Editor by omitting the last code and keeping the latest one in index.html file.
Now,
git add .
git rebase --continue
Unable to do as we have encountered the second commit. On opening VS Code, we will edit the changes found.
Again,
git add .
git rebase --continue
This is the last commit.
We will fix all the conflicts using VS Code and perform :
git add .
git rebase --continue
Now, successfully rebased and updated.
Usinggit push -f command, we will push these changes because we have rebased [ Here, f stands for forced push ]. Now all the changes from main have been brought to the feature-xyz branch on GitHub.
Finally, we click on 'Compare and pull request' in Pull requests section.
So, we had to resolve a couple of commits to rebase properly.
There is an alternative to this :
While merging to the main branch, if you have n commits on your pull request, you squash all those commits into one commit and then merge it to the main branch.
There is an option of "Squash and merge" under Merge pull request.
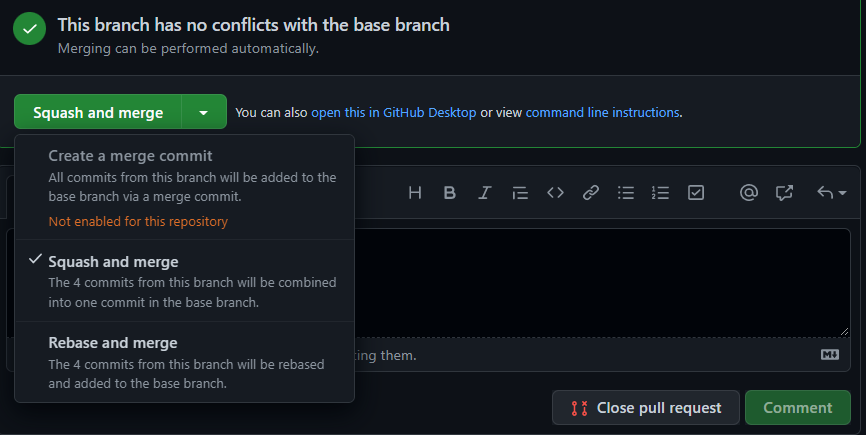
This way we have to resolve only once as it is much easier than fixing all the commits one by one.
Congratulations !! You are now all set to start with Git and GitHub.
Practice, explore and learn by doing.
If you found this article helpful, give me some claps 👏
Connect with me over here
Do Follow KUBESIMPLIFY for more such amazing blogs !!
Get new posts in your inbox.
Spotted a typo or want to improve this post? Edit on GitHub →