Automate the creation of Kubernetes self-managed HA cluster
This tutorial will walk you step by step creation of a HA Kubernetes cluster on Compute nodes with external ETCD cluster and HA Proxy for Loadbalancing.


On this page (24)
- Introduction
- Assumptions & Prerequisites
- Network Map
- Step 1: Install tools according to the role of the VM
- Run this on all Etcd VMs
- Run this on all Control-plane and worker VMs
- Step 2: Configure Loadbalancer VM
- Step 3: Generate the self-signed certificate for client-server Etcd connection
- Generation of certificates
- Manual way
- Automated way
- Move the certificates to Etcd VMs
- Move the certificates Control plane VMs
- Step 4: Configure Etcd VMs
- Etcd-0
- Etcd-1
- Etcd-2
- Step 5: Run the Kubeadm init command on the control plane node
- Control-plane-0
- Control-plane-(N)
- Step 6: Run the join command on all the worker nodes
- Step 7: Install CNI
- Step 8: Nginx Test
- Testing the High availability
Introduction #
[WARN] you should know about kubernetes!
here are some suggested reads and Kubernetes workshop that you can watch to get upto speed with Kubernetes
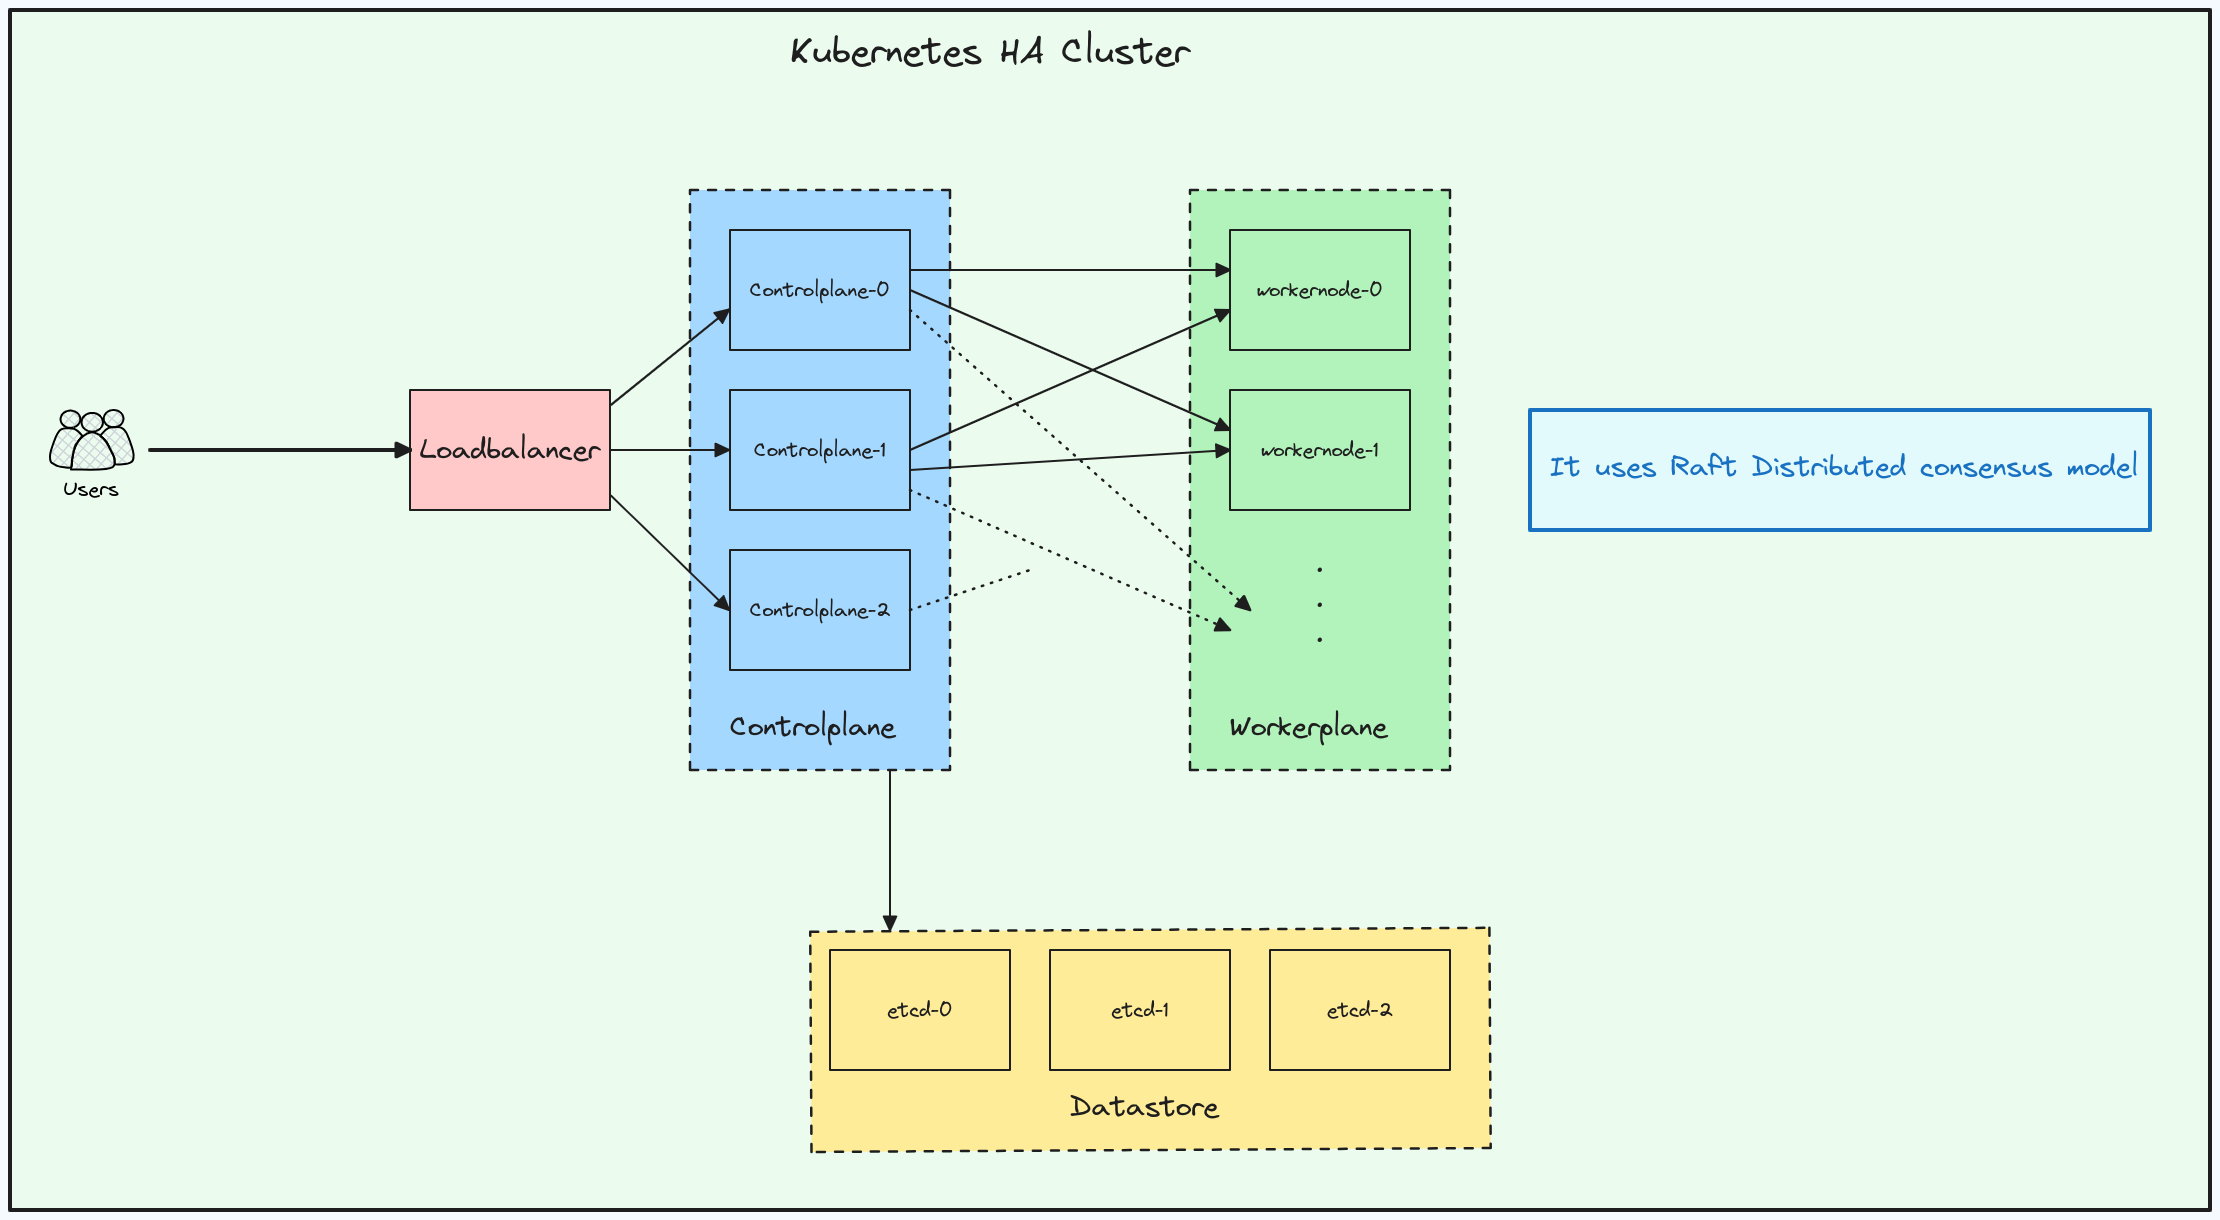
With the rise of managed Kuberentes, most companies opt for it but yet there are cases when you would need complete control of your Kubernetes cluster, managing the control plane, handling the backups when you are deploying at edge or in your own data center or otherwise. In such cases you have to go for a self managed Kubernetes cluster on the nodes which are wither VM's in the cloud or bare metal instances. In this post, we will dive intro creation of a complete self managed HA Kubernetes cluster with different configurations.
Let's try to understand from the design prospective, when we talk about a highly available Kubernetes clusters, it means that it can withstand failures even when the control plan goes down or etcd goes down. In the below design architecture can see that for a HA Kubernetes cluster there are
-
3 Controlplane nodes
-
3 etcd nodes that are outside of the cluster
-
HA Proxy for loadbalancing the traffic going to the controlplane nodes
Let's start rolling....
Assumptions & Prerequisites #
For the steps to be done in this blog, you need to provision the infrastructure and you can choose any cloud provider for doing that. To perform all the next steps you would need to provision a total of 9 Virtual machines(3 for controlplane, 3 for etcd, 1 for Ha Proxy and 2 worker nodes).
Ksctl is a cloud agnostic infrastructure management tool and currently the POC for HA cluster in in progress.
https://github.com/ksctl/enhancements/tree/main/poc/etcd#readme
Note we will be doing Etcd TLS configuration
client connection is self-signed tls certificate
peer connection is auto-tls certificate
(If you want this as well with self-managed tls you can generate it, for this blog will go with auto-tls for peer conn)
Make Sure you are a Root User when executing script
Network Map #
| Hostname | Role | Private IP | public IP |
|---|---|---|---|
| lb-0 | LoadBalancer | 192.168.1.8 | 74.220.22.92 |
| - | - | - | - |
| db-0 | Etcd-0 | 192.168.1.2 | - |
| db-1 | Etcd-1 | 192.168.1.3 | - |
| db-2 | Etcd-2 | 192.168.1.4 | - |
| - | - | - | - |
| cp-0 | Control-Plane-0 | 192.168.1.9 | - |
| cp-1 | Control-Plane-1 | 192.168.1.10 | - |
| cp-2 | Control-Plane-2 | 192.168.1.11 | - |
| - | - | - | - |
| wp-0 | Worker-Plane-0 | 192.168.1.12 | - |
| wp-1 | Worker-Plane-1 | 192.168.1.13 | - |
Above are the set of VM's we have provisioned.
Step 1: Install tools according to the role of the VM #
Run this on all Etcd VMs #
#!/bin/bash
set -xe
ETCD_VER=v3.5.10

# choose either URL
GOOGLE_URL=https://storage.googleapis.com/etcd
GITHUB_URL=https://github.com/etcd-io/etcd/releases/download
DOWNLOAD_URL=${GOOGLE_URL}

rm -f /tmp/etcd-${ETCD_VER}-linux-amd64.tar.gz
rm -rf /tmp/etcd-download-test && mkdir -p /tmp/etcd-download-test

curl -L ${DOWNLOAD_URL}/${ETCD_VER}/etcd-${ETCD_VER}-linux-amd64.tar.gz -o /tmp/etcd-${ETCD_VER}-linux-amd64.tar.gz
tar xzvf /tmp/etcd-${ETCD_VER}-linux-amd64.tar.gz -C /tmp/etcd-download-test --strip-components=1

rm -f /tmp/etcd-${ETCD_VER}-linux-amd64.tar.gz

mv -v /tmp/etcd-download-test/etcd /usr/local/bin
mv -v /tmp/etcd-download-test/etcdctl /usr/local/bin
mv -v /tmp/etcd-download-test/etcdutl /usr/local/bin

rm -rf /tmp/etcd-download-test

etcd --version
etcdctl version
etcdutl version
Creating the directory to hold Etcd certificates.
mkdir -p /var/lib/etcdReference
Run this on all Control-plane and worker VMs #
Below is the installation of the tools required for bootstrapping a Kubernetes cluster including kubelet, kubeadm and kubectl.
Note: In releases older than Debian 12 and Ubuntu 22.04, folder /etc/apt/keyrings does not exist by default, and it should be created before the curl command.
Reference
#!/bin/bash

set -xe
############# NOTE: script for K8s v1.28 #############
echo "memory swapoff"
sudo sed -i '/ swap / s/^\(.*\)$/#\1/g' /etc/fstab
sudo swapoff -a

cat <<EOF | sudo tee /etc/modules-load.d/k8s.conf
overlay
br_netfilter
EOF

sudo modprobe overlay
sudo modprobe br_netfilter

# sysctl params required by setup, params persist across reboots
cat <<EOF | sudo tee /etc/sysctl.d/k8s.conf
net.bridge.bridge-nf-call-iptables  = 1
net.bridge.bridge-nf-call-ip6tables = 1
net.ipv4.ip_forward                 = 1
EOF

# Apply sysctl params without reboot
sudo sysctl --system

# Status check
lsmod | grep br_netfilter
lsmod | grep overlay
sysctl net.bridge.bridge-nf-call-iptables net.bridge.bridge-nf-call-ip6tables net.ipv4.ip_forward

######### CONTAINER-D ###########
sudo apt-get update
sudo apt-get install ca-certificates curl gnupg

sudo install -m 0755 -d /etc/apt/keyrings
curl -fsSL https://download.docker.com/linux/ubuntu/gpg | sudo gpg --dearmor -o /etc/apt/keyrings/docker.gpg
sudo chmod a+r /etc/apt/keyrings/docker.gpg

echo \
  "deb [arch="$(dpkg --print-architecture)" signed-by=/etc/apt/keyrings/docker.gpg] https://download.docker.com/linux/ubuntu \
  "$(. /etc/os-release && echo "$VERSION_CODENAME")" stable" | \
  sudo tee /etc/apt/sources.list.d/docker.list > /dev/null

sudo apt-get update
sudo apt-get install containerd.io -y

mkdir -p /etc/containerd
containerd config default > /etc/containerd/config.toml
sudo systemctl restart containerd
sudo systemctl enable containerd
sudo sed -i 's/SystemdCgroup \= false/SystemdCgroup \= true/g' /etc/containerd/config.toml
sudo systemctl restart containerd

################# Kubernetes Install #################
sudo apt-get update -y

sudo apt-get install -y apt-transport-https ca-certificates curl gpg

curl -fsSL https://pkgs.k8s.io/core:/stable:/v1.28/deb/Release.key | sudo gpg --dearmor -o /etc/apt/keyrings/kubernetes-apt-keyring.gpg

echo 'deb [signed-by=/etc/apt/keyrings/kubernetes-apt-keyring.gpg] https://pkgs.k8s.io/core:/stable:/v1.28/deb/ /' | sudo tee /etc/apt/sources.list.d/kubernetes.list

sudo apt-get update
sudo apt-get install -y kubelet kubeadm kubectl
sudo apt-mark hold kubelet kubeadm kubectl

sudo systemctl enable kubelet
Next up creating of directory to hold Etcd certificates.
mkdir -vp /etcd/kubernetes/pki/etcd/Step 2: Configure Loadbalancer VM #
Below is the general Script where you can replace the IP's according to your infrastructure setup.
#!/bin/bash
set -xe

sudo apt update
sudo apt install haproxy -y
sleep 2s
sudo systemctl start haproxy && sudo systemctl enable haproxy

cat <<EOF > haproxy.cfg
frontend kubernetes-frontend
  bind *:6443
  mode tcp
  option tcplog
  timeout client 10s
  default_backend kubernetes-backend

backend kubernetes-backend
  timeout connect 10s
  timeout server 10s
  mode tcp
  option tcp-check
  balance roundrobin

  server k3sserver-0 ${Controlplane_Private_IP_0}:6443 check
  server k3sserver-1 ${Controlplane_Private_IP_1}:6443 check
  server k3sserver-2 ${Controlplane_Private_IP_2}:6443 check

frontend nodeport-frontend
  bind *:30000-35000
  mode tcp
  option tcplog
  timeout client 10s
  default_backend nodeport-backend

backend nodeport-backend
  mode tcp
  timeout connect 10s
  timeout server 10s
  balance roundrobin

  server nodeport-0 ${Controlplane_Private_IP_0}
  server nodeport-1 ${Controlplane_Private_IP_1}
  server nodeport-2 ${Controlplane_Private_IP_2}

EOF

sudo mv haproxy.cfg /etc/haproxy/haproxy.cfg
sudo systemctl restart haproxy
You can validate your haproxy configuration using below command.
haproxy -f /etc/haproxy/haproxy.cfg -cScript according to our list of VM's:
#!/bin/bash
set -xe

sudo apt update
sudo apt install haproxy -y
sleep 2s
sudo systemctl start haproxy && sudo systemctl enable haproxy

cat <<EOF > haproxy.cfg
frontend kubernetes-frontend
  bind *:6443
  mode tcp
  option tcplog
  timeout client 10s
  default_backend kubernetes-backend

backend kubernetes-backend
  timeout connect 10s
  timeout server 10s
  mode tcp
  option tcp-check
  balance roundrobin

  server k3sserver-0 192.168.1.9:6443 check
  server k3sserver-1 192.168.1.10:6443 check
  server k3sserver-2 192.168.1.11:6443 check


frontend nodeport-frontend
  bind *:30000-35000
  mode tcp
  option tcplog
  timeout client 10s
  default_backend nodeport-backend

backend nodeport-backend
  mode tcp
  timeout connect 10s
  timeout server 10s
  balance roundrobin

  server nodeport-0 192.168.1.9
  server nodeport-1 192.168.1.10
  server nodeport-2 192.168.1.11

EOF

sudo mv haproxy.cfg /etc/haproxy/haproxy.cfg
sudo systemctl restart haproxy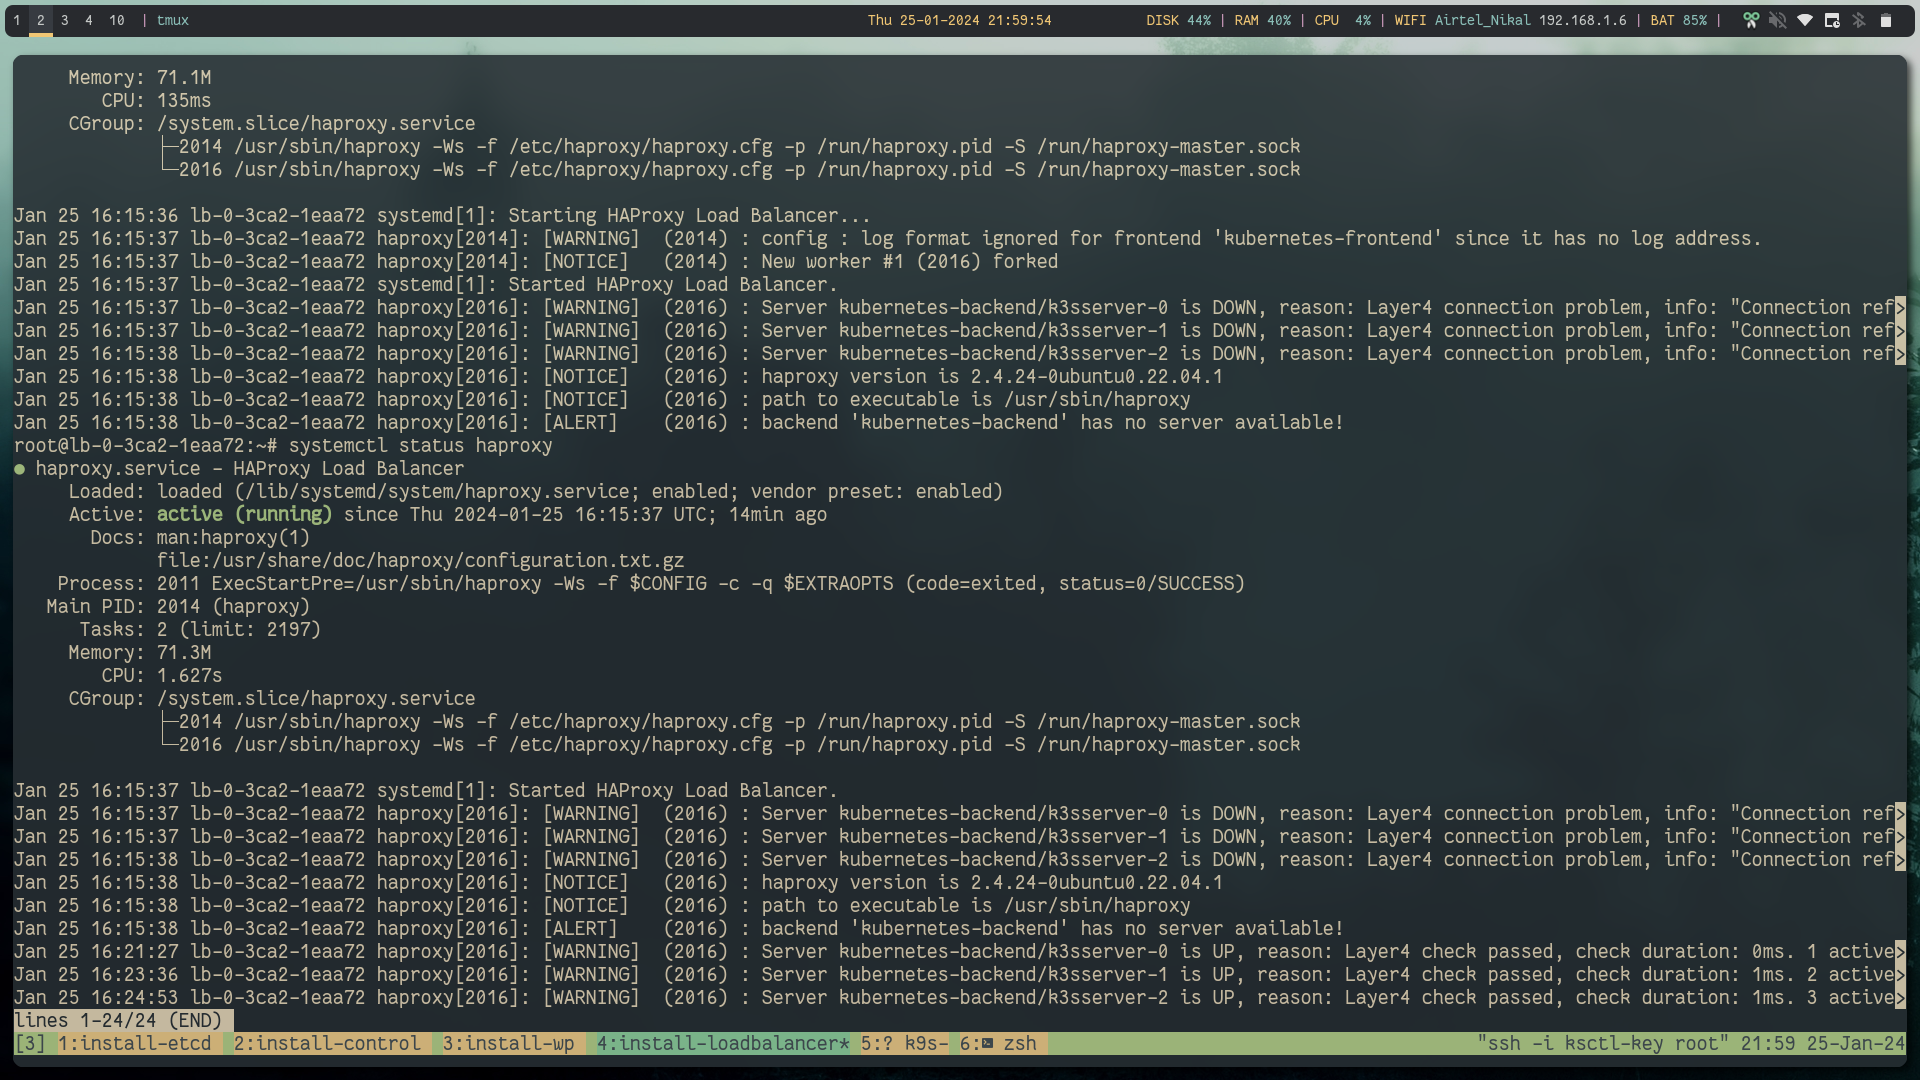
Step 3: Generate the self-signed certificate for client-server Etcd connection #
Generation of certificates #
the below steps generate
etcd-key.pem -> Client key
etcd.pem -> Client certificate
ca.pem -> CA certificate
There are 2 methods you can create them:
Manual way #
Run this on your local system (MANUAL STEP TO GENERATE TLS CERTS)
cd openssl
openssl genrsa -out ca-key.pem 2048
openssl req -new -key ca-key.pem -out ca-csr.pem -subj "/CN=etcd cluster"
openssl x509 -req -in ca-csr.pem -out ca.pem -days 3650 -signkey ca-key.pem -sha256
openssl genrsa -out etcd-key.pem 2048
openssl req -new -key etcd-key.pem -out etcd-csr.pem -subj "/CN=etcd"

echo subjectAltName = DNS:localhost,IP:192.168.1.2,IP:192.168.1.3,IP:192.168.1.4,IP:127.0.0.1 > extfile.cnf
openssl x509 -req -in etcd-csr.pem -CA ca.pem -CAkey ca-key.pem -CAcreateserial -days 3650 -out etcd.pem -sha256 -extfile extfile.cnf
Automated way #
Here is the gist to do the certificates in an automated way.
https://gist.github.com/dipankardas011/e425e4d1573a6f5f1f73dcaf53226ed7
You can copy the code and modify it according to your configuration.
It creates a ca.pem root certificate which will be used to sign other certificates, and then create etcd.pem client certificate and etcd-key.pem key which is signed by this root certificate
go run . 192.168.1.2 192.168.1.3 192.168.1.4 # provide the private IP of the etcd VMs to make ca only valid for SAN on themnow you need to move these files to all etcd and controlplane VMs and the below steps will help
Move the certificates to Etcd VMs #
Note make sure the directory already exists before copying the certificates in our case we have already created
/var/lib/etcd
Generic command:
scp -i ${ssh-private-key} ca.pem etcd.pem etcd-key.pem ${username-vm}@${public-ip-etcd or via using baston host}:/var/lib/etcdOur script:
scp -i ksctl-key ca.pem etcd.pem etcd-key.pem root@74.220.16.178:/var/lib/etcd
scp -i ksctl-key ca.pem etcd.pem etcd-key.pem root@74.220.19.12:/var/lib/etcd
scp -i ksctl-key ca.pem etcd.pem etcd-key.pem root@74.220.21.101:/var/lib/etcd
Move the certificates Control plane VMs #
Note make sure the directory already exists before copying the certificate in my case I have already created
/etcd/kubernetes/pki/etcd/
Generic command:
scp -i ${ssh-private-key} ca.pem etcd.pem etcd-key.pem ${username-vm}@${public-ip-controlplane-vm or via using baston host}:/etcd/kubernetes/pki/etcd/Our script:
scp -i ksctl-key ca.pem etcd.pem etcd-key.pem root@74.220.23.131:/etcd/kubernetes/pki/etcd/
scp -i ksctl-key ca.pem etcd.pem etcd-key.pem root@74.220.19.191:/etcd/kubernetes/pki/etcd/
scp -i ksctl-key ca.pem etcd.pem etcd-key.pem root@74.220.22.42:/etcd/kubernetes/pki/etcd/
Step 4: Configure Etcd VMs #
Now it's time to do some cool stuff:
Generic template that you can modify according to your configuration.
#!/bin/bash
set -xe

cat <<EOF > /etc/systemd/system/etcd.service
[Unit]
Description=etcd

[Service]
ExecStart=/usr/local/bin/etcd \\
  --name infra0 \\
  --initial-advertise-peer-urls https://${current-vm-private-ip}:2380 \
  --listen-peer-urls https://${current-vm-private-ip}:2380 \\
  --listen-client-urls https://${current-vm-private-ip}:2379,https://127.0.0.1:2379 \\
  --advertise-client-urls https://${current-vm-private-ip}:2379 \\
  --initial-cluster-token etcd-cluster-1 \\
  --initial-cluster infra0=https://${current-vm-private-ip}:2380,infra1=https://${other-vms-private-ip}:2380,infra2=https://${other-vms-private-ip}:2380 \\
  --log-outputs=/var/lib/etcd/etcd.log \\
  --initial-cluster-state new \\
  --peer-auto-tls \\
  --snapshot-count '10000' \\
  --wal-dir=/var/lib/etcd/wal \\
  --client-cert-auth \\
  --trusted-ca-file=/var/lib/etcd/ca.pem \\
  --cert-file=/var/lib/etcd/etcd.pem \\
  --key-file=/var/lib/etcd/etcd-key.pem \\
  --data-dir=/var/lib/etcd/data
Restart=on-failure
RestartSec=5

[Install]
WantedBy=multi-user.target
EOF

sudo systemctl daemon-reload
sudo systemctl enable etcd
Lets discuss about various configuration settings
General:
ExecStart=/usr/local/bin/etcd: Specifies the executable path to start the etcd process.
Restart=on-failure: Instructs the system to automatically restart etcd if it fails.
RestartSec=5: Sets a 5-second delay before attempting a restart.
Cluster Configuration:
--name infra0: Assigns the name "infra0" to this member of the etcd cluster.
--initial-advertise-peer-urls: Advertises this member's peer URL to other members for cluster communication.
--listen-peer-urls: Listens for peer connections on this URL.
--initial-cluster-token etcd-cluster-1: Defines a shared token ensuring all members belong to the same cluster.
--initial-cluster: Lists initial cluster members and their peer URLs.
--initial-cluster-state new: Instructs etcd to create a new cluster, not join an existing one.
Client Communication:
--listen-client-urls: Listens for client connections on these URLs.
--advertise-client-urls: Advertises the client URL for this member to other members.
Logging and Data Storage:
--log-outputs=/var/lib/etcd/etcd.log: Logs etcd output to this file.
--data-dir=/var/lib/etcd/data: Stores etcd data in this directory.
--wal-dir=/var/lib/etcd/wal: Stores the write-ahead log (WAL) in this directory for data durability.
Security:
--peer-auto-tls: Automatically generates and manages TLS certificates for peer communication.
--client-cert-auth: Requires clients to authenticate with TLS certificates.
--trusted-ca-file=/var/lib/etcd/ca.pem: Specifies the trusted certificate authority (CA) file for client certificates.
--cert-file=/var/lib/etcd/etcd.pem: Specifies the certificate file for this etcd member.
--key-file=/var/lib/etcd/etcd-key.pem: Specifies the private key file for this etcd member.
Snapshots:
- --snapshot-count '10000': Triggers a snapshot of the data every 10,000 transactions for backup and recovery.
Etcd-0 #
#!/bin/bash
set -xe
cat <<EOF > /etc/systemd/system/etcd.service
[Unit]
Description=etcd

[Service]
ExecStart=/usr/local/bin/etcd \\
  --name infra0 \\
  --initial-advertise-peer-urls https://192.168.1.2:2380 \
  --listen-peer-urls https://192.168.1.2:2380 \\
  --listen-client-urls https://192.168.1.2:2379,https://127.0.0.1:2379 \\
  --advertise-client-urls https://192.168.1.2:2379 \\
  --initial-cluster-token etcd-cluster-1 \\
  --initial-cluster infra0=https://192.168.1.2:2380,infra1=https://192.168.1.3:2380,infra2=https://192.168.1.4:2380 \\
  --log-outputs=/var/lib/etcd/etcd.log \\
  --initial-cluster-state new \\
  --peer-auto-tls \\
  --snapshot-count '10000' \\
  --wal-dir=/var/lib/etcd/wal \\
  --client-cert-auth \\
  --trusted-ca-file=/var/lib/etcd/ca.pem \\
  --cert-file=/var/lib/etcd/etcd.pem \\
  --key-file=/var/lib/etcd/etcd-key.pem \\
  --data-dir=/var/lib/etcd/data
Restart=on-failure
RestartSec=5

[Install]
WantedBy=multi-user.target
EOF

sudo systemctl daemon-reload
sudo systemctl enable etcd
Etcd-1 #
#!/bin/bash
set -xe
cat <<EOF > /etc/systemd/system/etcd.service
[Unit]
Description=etcd

[Service]
ExecStart=/usr/local/bin/etcd \\
  --name infra1 \\
  --initial-advertise-peer-urls https://192.168.1.3:2380 \
  --listen-peer-urls https://192.168.1.3:2380 \\
  --listen-client-urls https://192.168.1.3:2379,https://127.0.0.1:2379 \\
  --advertise-client-urls https://192.168.1.3:2379 \\
  --initial-cluster-token etcd-cluster-1 \\
  --initial-cluster infra0=https://192.168.1.2:2380,infra1=https://192.168.1.3:2380,infra2=https://192.168.1.4:2380 \\
  --log-outputs=/var/lib/etcd/etcd.log \\
  --initial-cluster-state new \\
  --peer-auto-tls \\
  --wal-dir=/var/lib/etcd/wal \\
  --client-cert-auth \\
  --trusted-ca-file=/var/lib/etcd/ca.pem \\
  --cert-file=/var/lib/etcd/etcd.pem \\
  --key-file=/var/lib/etcd/etcd-key.pem \\
  --snapshot-count '10000' \\
  --data-dir=/var/lib/etcd/data
Restart=on-failure
RestartSec=5

[Install]
WantedBy=multi-user.target
EOF

sudo systemctl daemon-reload
sudo systemctl enable etcd
Etcd-2 #
#!/bin/bash
set -xe
cat <<EOF > /etc/systemd/system/etcd.service
[Unit]
Description=etcd

[Service]
ExecStart=/usr/local/bin/etcd \\
  --name infra2 \\
  --initial-advertise-peer-urls https://192.168.1.4:2380 \
  --listen-peer-urls https://192.168.1.4:2380 \\
  --listen-client-urls https://192.168.1.4:2379,https://127.0.0.1:2379 \\
  --advertise-client-urls https://192.168.1.4:2379 \\
  --initial-cluster-token etcd-cluster-1 \\
  --initial-cluster infra0=https://192.168.1.2:2380,infra1=https://192.168.1.3:2380,infra2=https://192.168.1.4:2380 \\
  --log-outputs=/var/lib/etcd/etcd.log \\
  --initial-cluster-state new \\
  --peer-auto-tls \\
  --snapshot-count '10000' \\
  --client-cert-auth \\
  --trusted-ca-file=/var/lib/etcd/ca.pem \\
  --cert-file=/var/lib/etcd/etcd.pem \\
  --key-file=/var/lib/etcd/etcd-key.pem \\
  --wal-dir=/var/lib/etcd/wal \\
  --data-dir=/var/lib/etcd/data
Restart=on-failure
RestartSec=5

[Install]
WantedBy=multi-user.target
EOF

sudo systemctl daemon-reload
sudo systemctl enable etcd
For all Etcd VMs
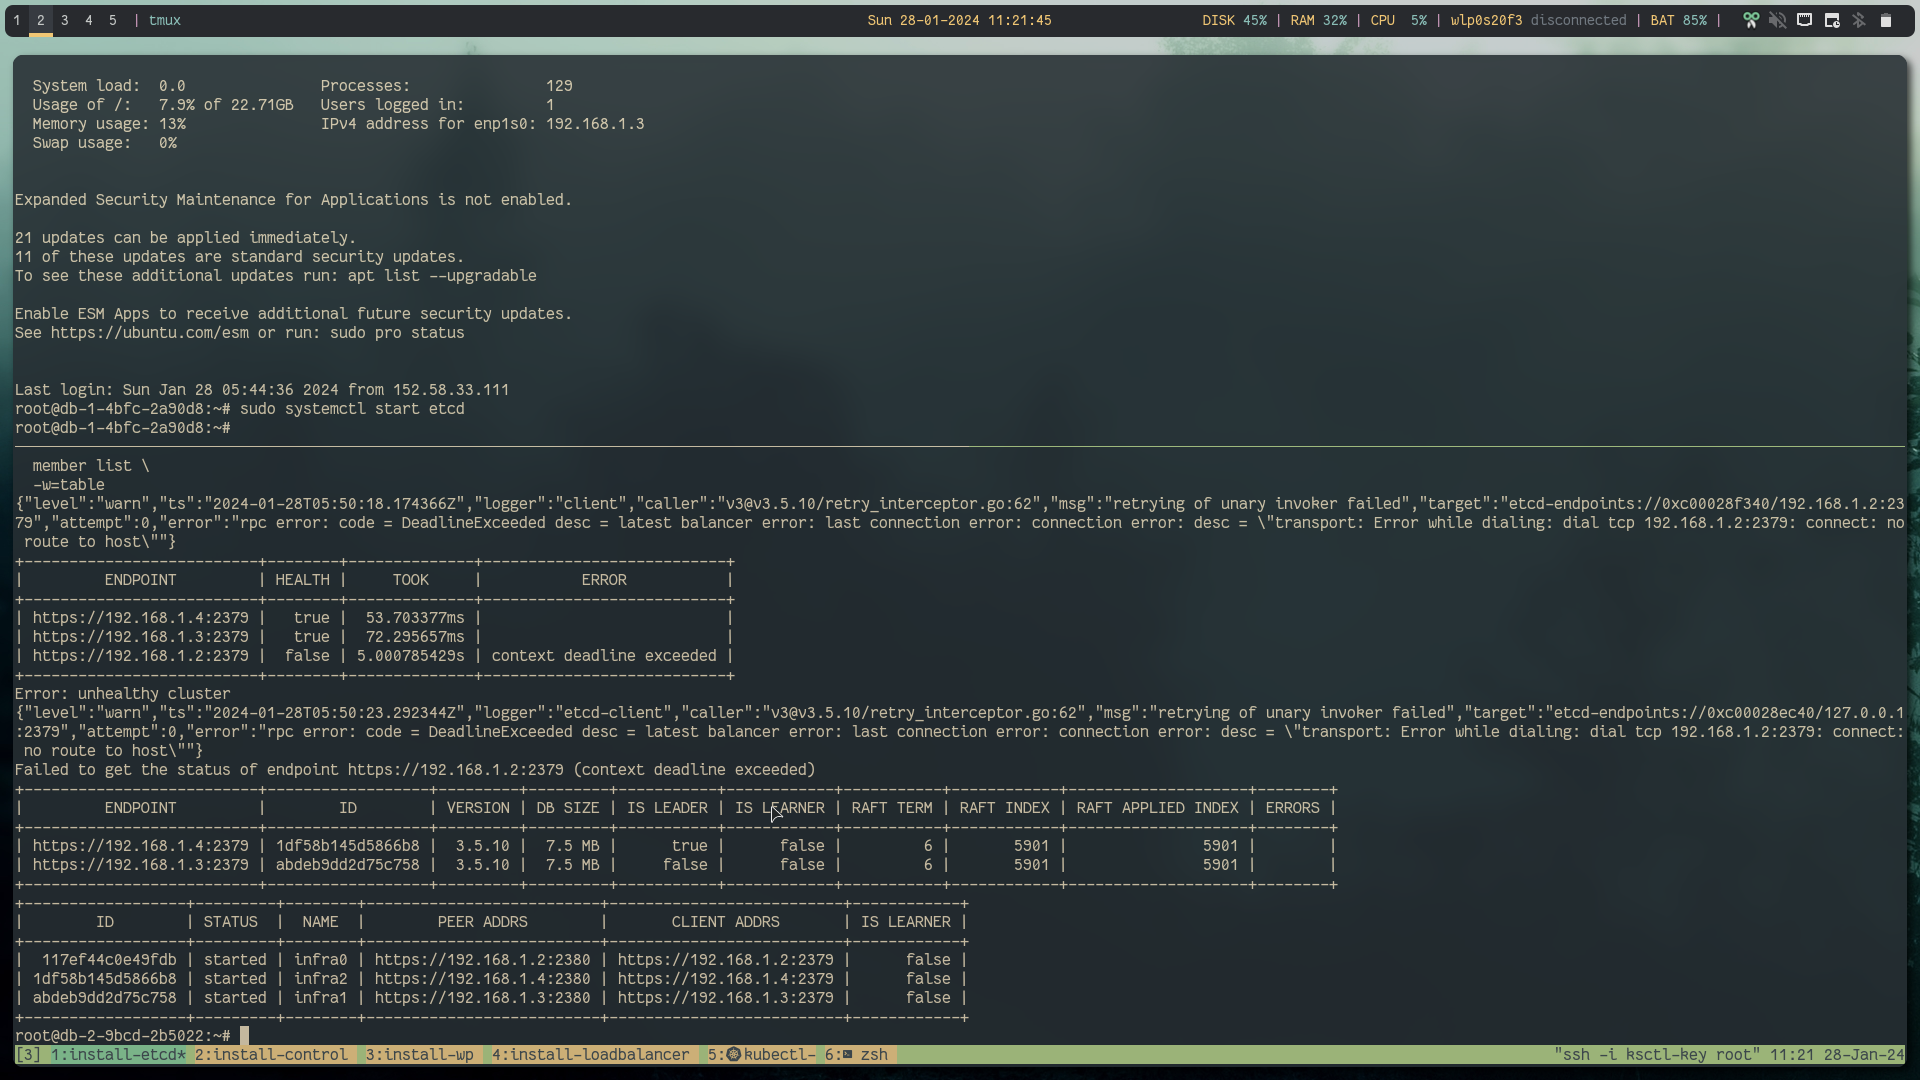
sudo systemctl start etcdto test whether you can access etcd server via the etcdctl
below are some example commands to test whether all the etcd members are working as expected
etcdctl \
  --cacert=/var/lib/etcd/ca.pem \
  --cert=/var/lib/etcd/etcd.pem \
  --key=/var/lib/etcd/etcd-key.pem \
  endpoint health \
  -w=table \
  --cluster

etcdctl \
  --cacert=/var/lib/etcd/ca.pem \
  --cert=/var/lib/etcd/etcd.pem \
  --key=/var/lib/etcd/etcd-key.pem \
  endpoint status \
  -w=table \
  --cluster

etcdctl \
  --cacert=/var/lib/etcd/ca.pem \
  --cert=/var/lib/etcd/etcd.pem \
  --key=/var/lib/etcd/etcd-key.pem \
  member list \
  -w=table

etcdctl \
  --cacert=/var/lib/etcd/ca.pem \
  --cert=/var/lib/etcd/etcd.pem \
  --key=/var/lib/etcd/etcd-key.pem \
  get / --prefix --keys-only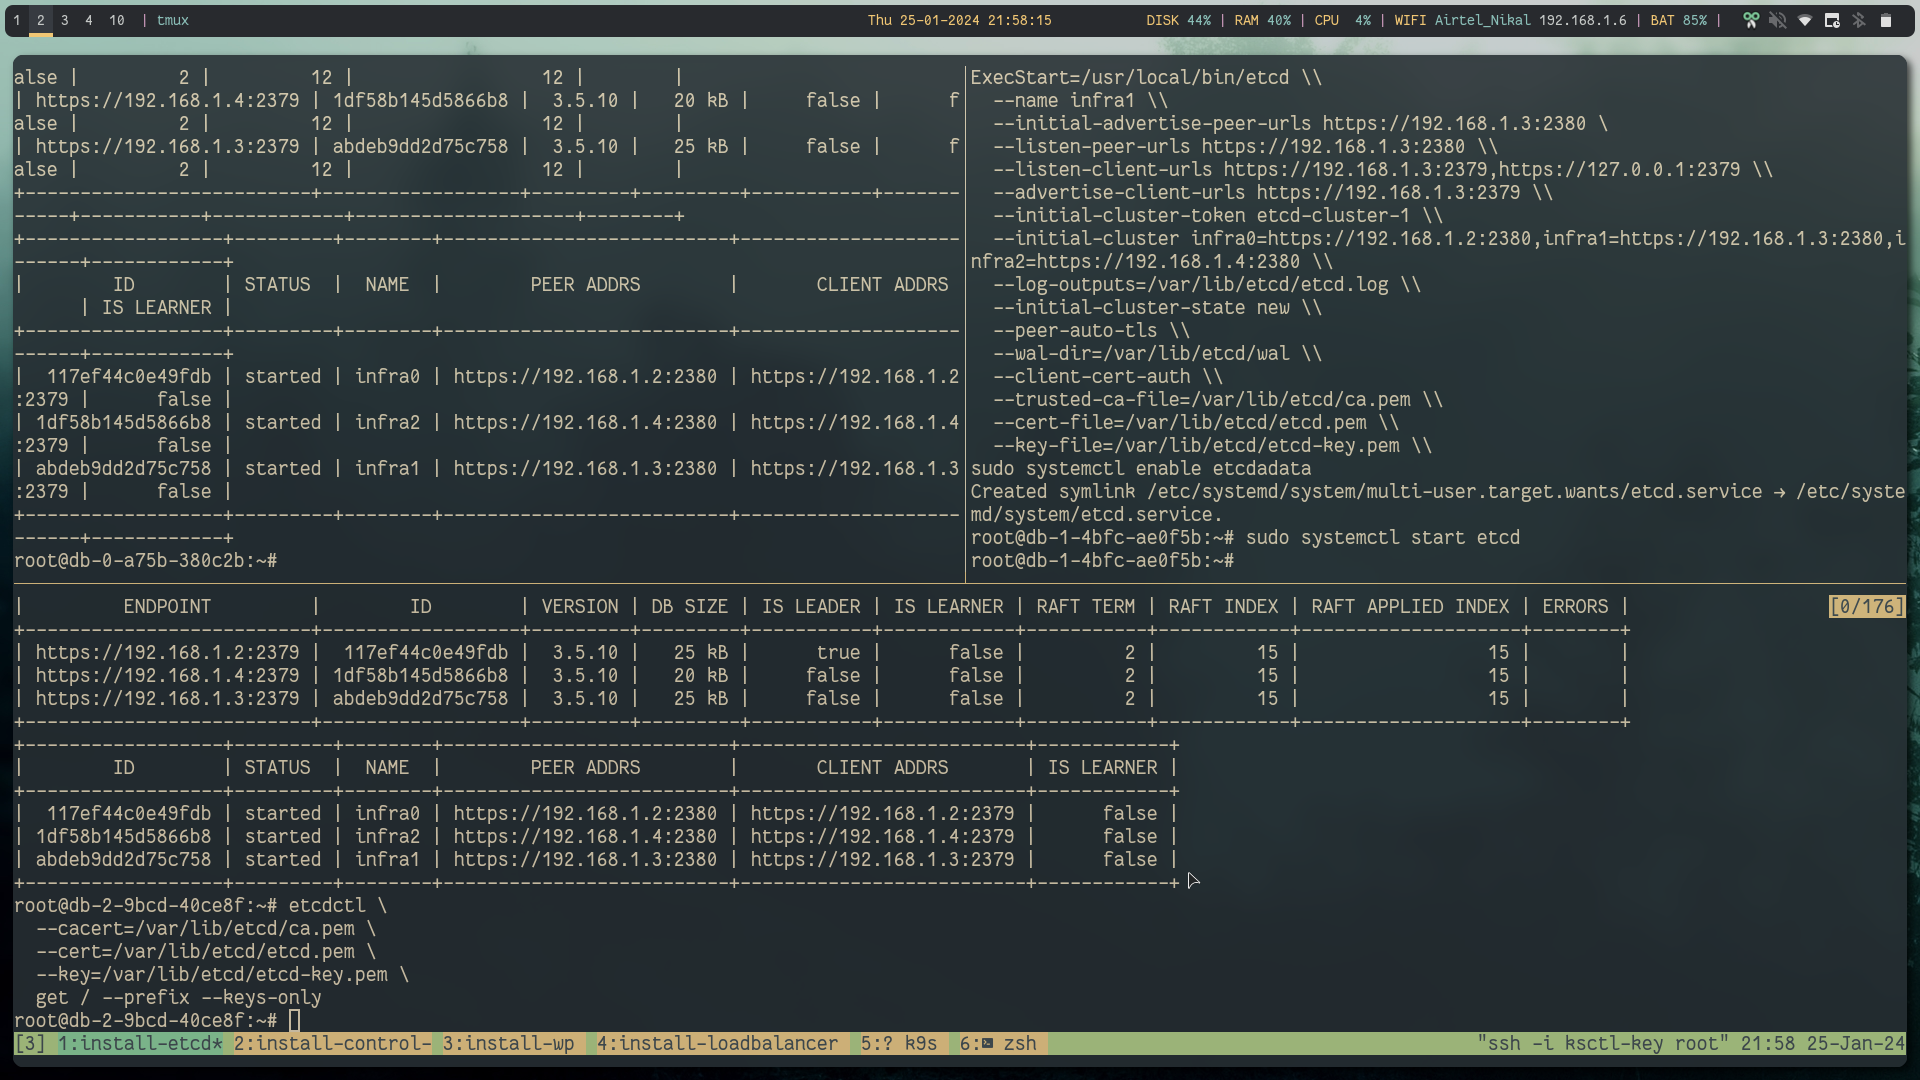
Step 5: Run the Kubeadm init command on the control plane node #
In a High Availability (HA) cluster setup, where you have multiple control plane nodes, the localAPIEndpoint in the InitConfiguration is typically not used. The localAPIEndpoint specifies the endpoint that the control plane components advertise to other nodes in the cluster. In a HA setup, the API server is typically load-balanced, and each control plane node advertises itself at the load balancer's address.
Single Control Plane Node Setup: In a single control plane node setup, you might specify the IP address and port of the single control plane node in localAPIEndpoint.
High Availability (HA) Control Plane Setup: In an HA setup, you generally set up a load balancer in front of multiple control plane nodes. The load balancer has a single IP address and distributes incoming requests among the control plane nodes. Each control plane node does not advertise itself directly; instead, they are behind the load balancer. The controlPlaneEndpoint in the ClusterConfiguration is typically used to specify the address and port of the load balancer. In summary, for HA setups, you often configure the controlPlaneEndpoint in the ClusterConfiguration to point to the load balancer's address, and you may not need to explicitly configure localAPIEndpoint in the InitConfiguration. The load balancer handles directing traffic to the active control plane node.
generate certificate key (CERT_KEY)
kubeadm certs certificate-key # copy the output IMPORTANTIn our case, below is the output:
8b80729b738b2eef8dc2dbec17e927aa2fd03d43b7f0f4925c7e47bf9ae1e561now let's create the kubeadm init configuration
Generic configuration that you can edit based on your requirements.
cat <<EOF > kubeadm-config.yml
apiVersion: kubeadm.k8s.io/v1beta3
kind: InitConfiguration
bootstrapTokens:
- groups:
  - system:bootstrappers:kubeadm:default-node-token
  token: ${some random string}  # important thing to set as it will be used when joining nodes to the k8s cluster.
  ttl: 24h0m0s
  usages:
  - signing
  - authentication

certificateKey: ${get it from the output of kubeadm certs certificate-key command}
nodeRegistration:
  criSocket: unix:///var/run/containerd/containerd.sock
  imagePullPolicy: IfNotPresent
  taints: null
---
apiVersion: kubeadm.k8s.io/v1beta3
kind: ClusterConfiguration
apiServer:
  timeoutForControlPlane: 4m0s
  certSANs:
    - "${public ip of loadbalancer}" # <pub ip of lb>
    - "127.0.0.1"
certificatesDir: /etc/kubernetes/pki
clusterName: kubernetes
controllerManager: {}
dns: {}
etcd:
  external:
    endpoints:
    - "https://${private ip of the etcd 0}:2379"
    - "https://${private ip of the etcd 1}:2379"
    - "https://${private ip of the etcd 2}:2379"
    caFile: "/etcd/kubernetes/pki/etcd/ca.pem"
    certFile: "/etcd/kubernetes/pki/etcd/etcd.pem"
    keyFile: "/etcd/kubernetes/pki/etcd/etcd-key.pem"
imageRepository: registry.k8s.io
kubernetesVersion: 1.28.0
controlPlaneEndpoint: "${public ip of loadbalancer}:6443"
networking:
  dnsDomain: cluster.local
  serviceSubnet: 10.96.0.0/12
scheduler: {}

EOF
Our script
cat <<EOF > kubeadm-config.yml
apiVersion: kubeadm.k8s.io/v1beta3
kind: InitConfiguration
bootstrapTokens:
- groups:
  - system:bootstrappers:kubeadm:default-node-token
  token: abcdef.0123456789abcdef  # important thing to set as it will be used when joining nodes to the k8s cluster. any random string is allowed for more info can refer to the docs
  ttl: 24h0m0s
  usages:
  - signing
  - authentication

certificateKey: 8b80729b738b2eef8dc2dbec17e927aa2fd03d43b7f0f4925c7e47bf9ae1e561 # get it from the output of kubeadm certs certificate-key command
nodeRegistration:
  criSocket: unix:///var/run/containerd/containerd.sock
  imagePullPolicy: IfNotPresent
  taints: null
---
apiVersion: kubeadm.k8s.io/v1beta3
kind: ClusterConfiguration
apiServer:
  timeoutForControlPlane: 4m0s
  certSANs:
    - "74.220.22.92" # <pub ip of lb>
    - "127.0.0.1"
certificatesDir: /etc/kubernetes/pki
clusterName: kubernetes
controllerManager: {}
dns: {}
etcd:
  external:
    endpoints:
    - "https://192.168.1.2:2379"
    - "https://192.168.1.3:2379"
    - "https://192.168.1.4:2379"
    caFile: "/etcd/kubernetes/pki/etcd/ca.pem"
    certFile: "/etcd/kubernetes/pki/etcd/etcd.pem"
    keyFile: "/etcd/kubernetes/pki/etcd/etcd-key.pem"
imageRepository: registry.k8s.io
kubernetesVersion: 1.28.0
controlPlaneEndpoint: "74.220.22.92:6443"
networking:
  dnsDomain: cluster.local
  serviceSubnet: 10.96.0.0/12
scheduler: {}

EOF
Control-plane-0 #
Generic command where you can provide your config file:
kubeadm init --config ${cluster-config-file-defined-above} --upload-certsOur command to create the HA Kubernetes cluster:
kubeadm init --config kubeadm-config.yml --upload-certsthe output will generate join commands
You can now join any number of the control-plane node running the following command on each as root:

  kubeadm join 74.220.22.92:6443 --token abcdef.0123456789abcdef \
        --discovery-token-ca-cert-hash sha256:a633923134ac00a1e938dde1a28033d2a7d5bc3fb325e7280d000148fef854e2 \
        --control-plane --certificate-key 8b80729b738b2eef8dc2dbec17e927aa2fd03d43b7f0f4925c7e47bf9ae1e561

Please note that the certificate-key gives access to cluster sensitive data, keep it secret!
As a safeguard, uploaded-certs will be deleted in two hours; If necessary, you can use
"kubeadm init phase upload-certs --upload-certs" to reload certs afterward.

Then you can join any number of worker nodes by running the following on each as root:

kubeadm join 74.220.22.92:6443 --token abcdef.0123456789abcdef \
        --discovery-token-ca-cert-hash sha256:a633923134ac00a1e938dde1a28033d2a7d5bc3fb325e7280d000148fef854e2
When you do kubeadm init, you will get the join command in the output
If you carefully see it has the token and discovery-tokn-ca-cert-hash.
token: we defined in the configuration file already so we know the value.
discovery-token-ca-cert-hash: copy from below command
openssl x509 -in /etc/kubernetes/pki/ca.crt -noout -pubkey | openssl rsa -pubin -outform DER 2>/dev/null | sha256sum | cut -d' ' -f1The output from this command can be used for automation purposes.
a633923134ac00a1e938dde1a28033d2a7d5bc3fb325e7280d000148fef854e2
token is already available from the clusterConfiguration
abcdef.0123456789abcdef(TOKEN)
Let's see how to automate the generation of these scripts
So Here is one automation hack
As you got the
(TOKEN),(CA_CERT_HASH),(CERT_KEY)you can construct the both the join commands so you dont have to rely on the output
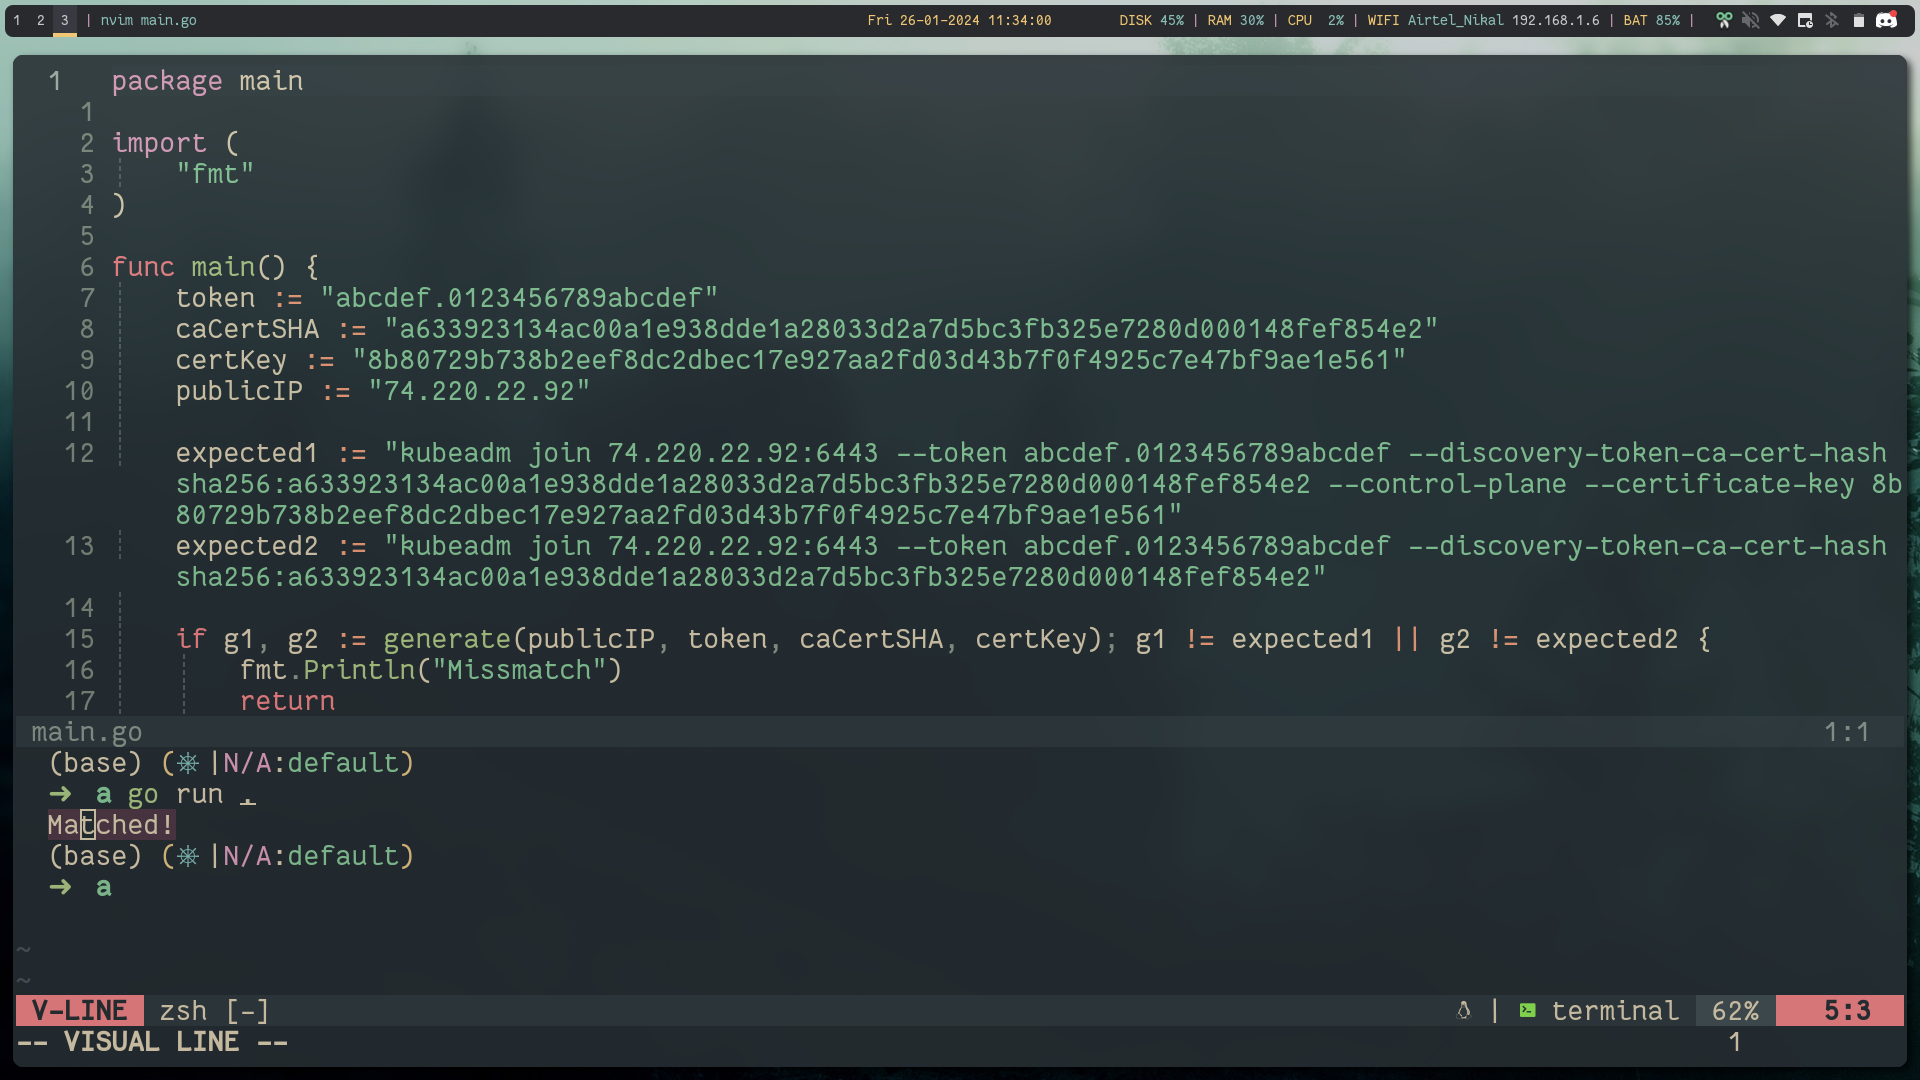
package main

import (
	"fmt"
)

func main() {
	token := "abcdef.0123456789abcdef"
	caCertSHA := "a633923134ac00a1e938dde1a28033d2a7d5bc3fb325e7280d000148fef854e2"
	certKey := "8b80729b738b2eef8dc2dbec17e927aa2fd03d43b7f0f4925c7e47bf9ae1e561"
	publicIP := "74.220.22.92"

	expected1 := "kubeadm join 74.220.22.92:6443 --token abcdef.0123456789abcdef --discovery-token-ca-cert-hash sha256:a633923134ac00a1e938dde1a28033d2a7d5bc3fb325e7280d000148fef854e2 --control-plane --certificate-key 8b80729b738b2eef8dc2dbec17e927aa2fd03d43b7f0f4925c7e47bf9ae1e561"
	expected2 := "kubeadm join 74.220.22.92:6443 --token abcdef.0123456789abcdef --discovery-token-ca-cert-hash sha256:a633923134ac00a1e938dde1a28033d2a7d5bc3fb325e7280d000148fef854e2"

	if g1, g2 := generate(publicIP, token, caCertSHA, certKey); g1 != expected1 || g2 != expected2 {
		fmt.Println("Missmatch")
		return
	}

	fmt.Println("Matched!")
}

func generate(pubIPLb, token, cacertSHA, certKey string) (string, string) {
	controlplane := fmt.Sprintf(`kubeadm join %s:6443 --token %s --discovery-token-ca-cert-hash sha256:%s --control-plane --certificate-key %s`, pubIPLb, token, cacertSHA, certKey)
	workernodes := fmt.Sprintf(`kubeadm join %s:6443 --token %s --discovery-token-ca-cert-hash sha256:%s`, pubIPLb, token, cacertSHA)
	return controlplane, workernodes
}
below is the output:
Control-plane-(N) #
Run the controlplane join command on remaining controlplane nodes:
# Template
kubeadm join ${Loadbalancer_Public_IP}:6443 --token ${TOKEN} --discovery-token-ca-cert-hash sha256:${CA_CERT_HASH} --control-plane --certificate-key ${CERT_KEY}
# my code
kubeadm join 74.220.22.92:6443 --token abcdef.0123456789abcdef --discovery-token-ca-cert-hash sha256:a633923134ac00a1e938dde1a28033d2a7d5bc3fb325e7280d000148fef854e2 --control-plane --certificate-key 8b80729b738b2eef8dc2dbec17e927aa2fd03d43b7f0f4925c7e47bf9ae1e561mkdir -p $HOME/.kube
sudo cp -i /etc/kubernetes/admin.conf $HOME/.kube/config
sudo chown $(id -u):$(id -g) $HOME/.kube/configStep 6: Run the join command on all the worker nodes #
kubeadm join ${Loadbalancer_Public_IP}:6443 --token ${TOKEN} --discovery-token-ca-cert-hash sha256:${CA_CERT_HASH}kubeadm join 74.220.22.92:6443 --token abcdef.0123456789abcdef --discovery-token-ca-cert-hash sha256:a633923134ac00a1e938dde1a28033d2a7d5bc3fb325e7280d000148fef854e2Let's copy the kubeconfig from the controlplane-0 to our host system
# copied the kubeconfig from the known location
# make sure you have moved the kubeconfig in the controlplane node to this location the steps are shown in the kubeadm init output
scp -i ksctl-key root@${public ip of the controlplane}:/root/.kube/config kubeconfig
Once you have the Kubeconfig file you can export the KUBECONFIG variable to interact with the cluster.
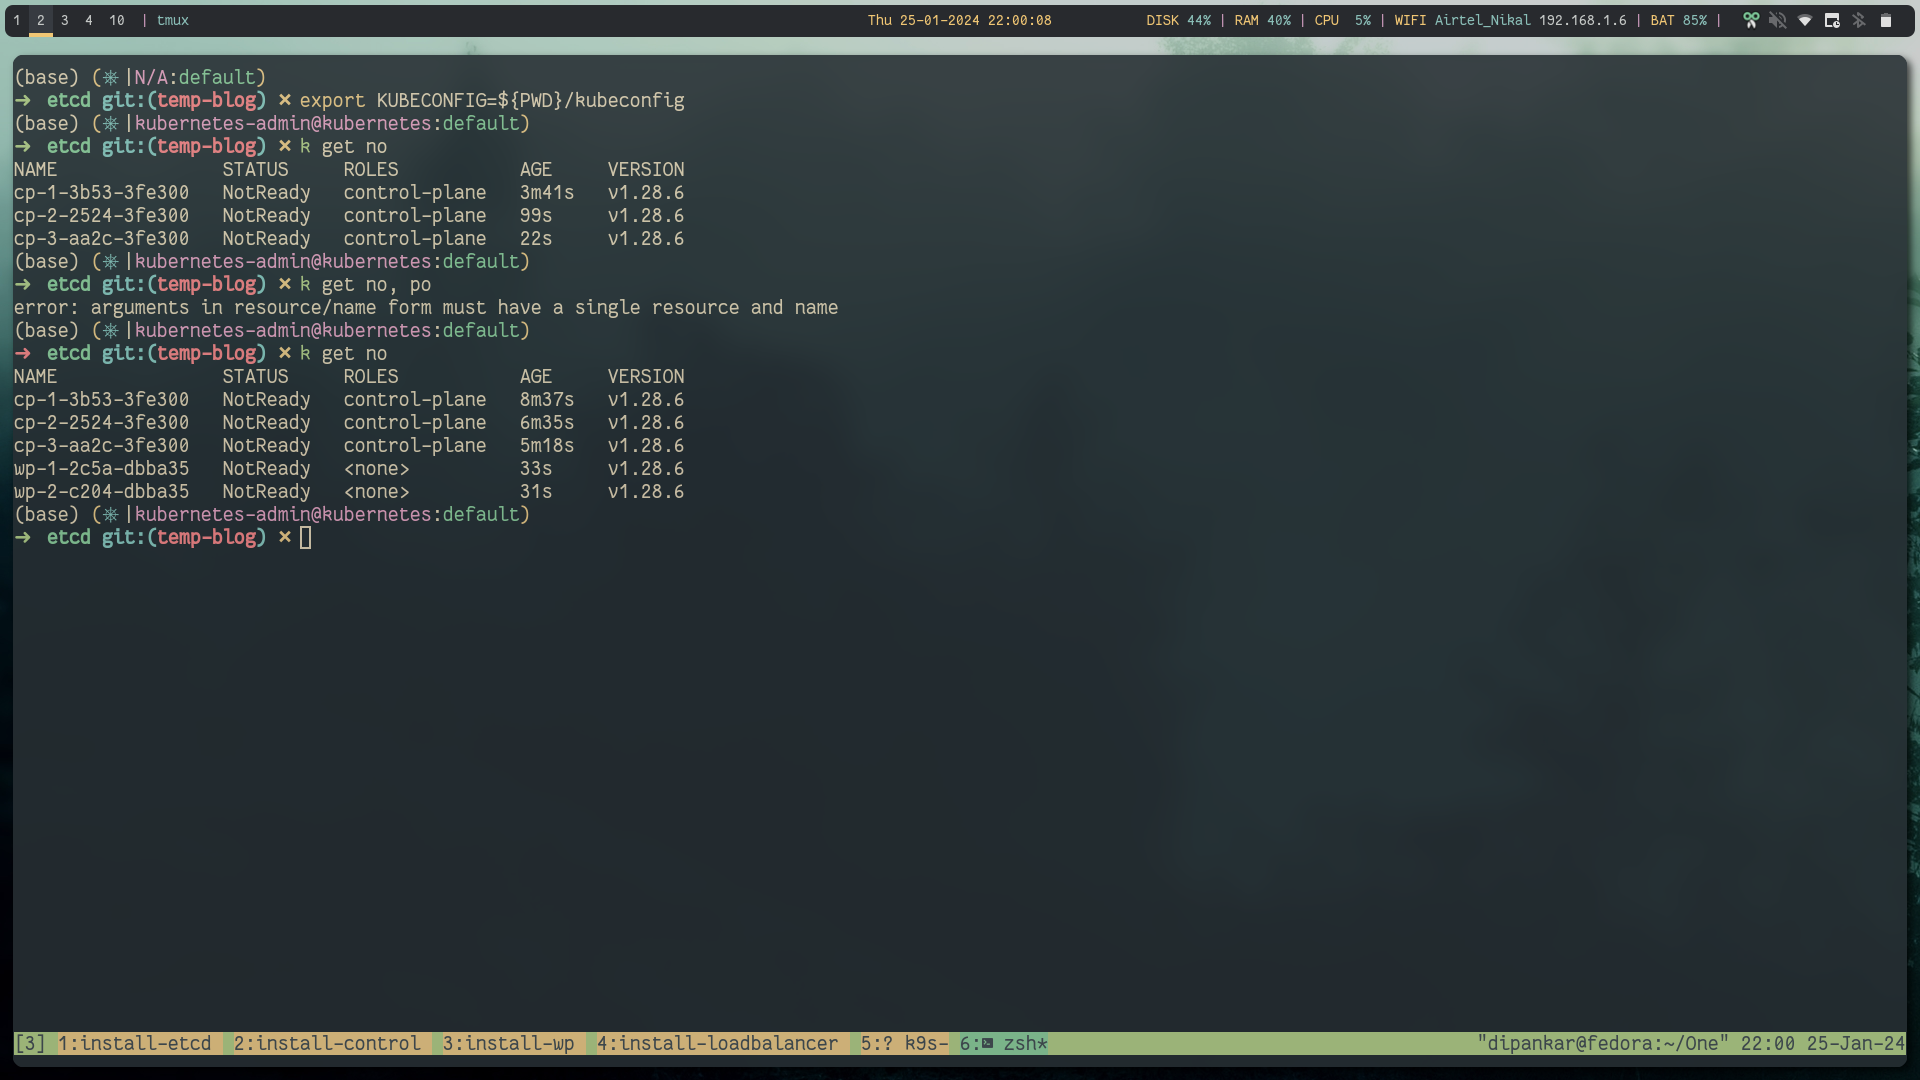
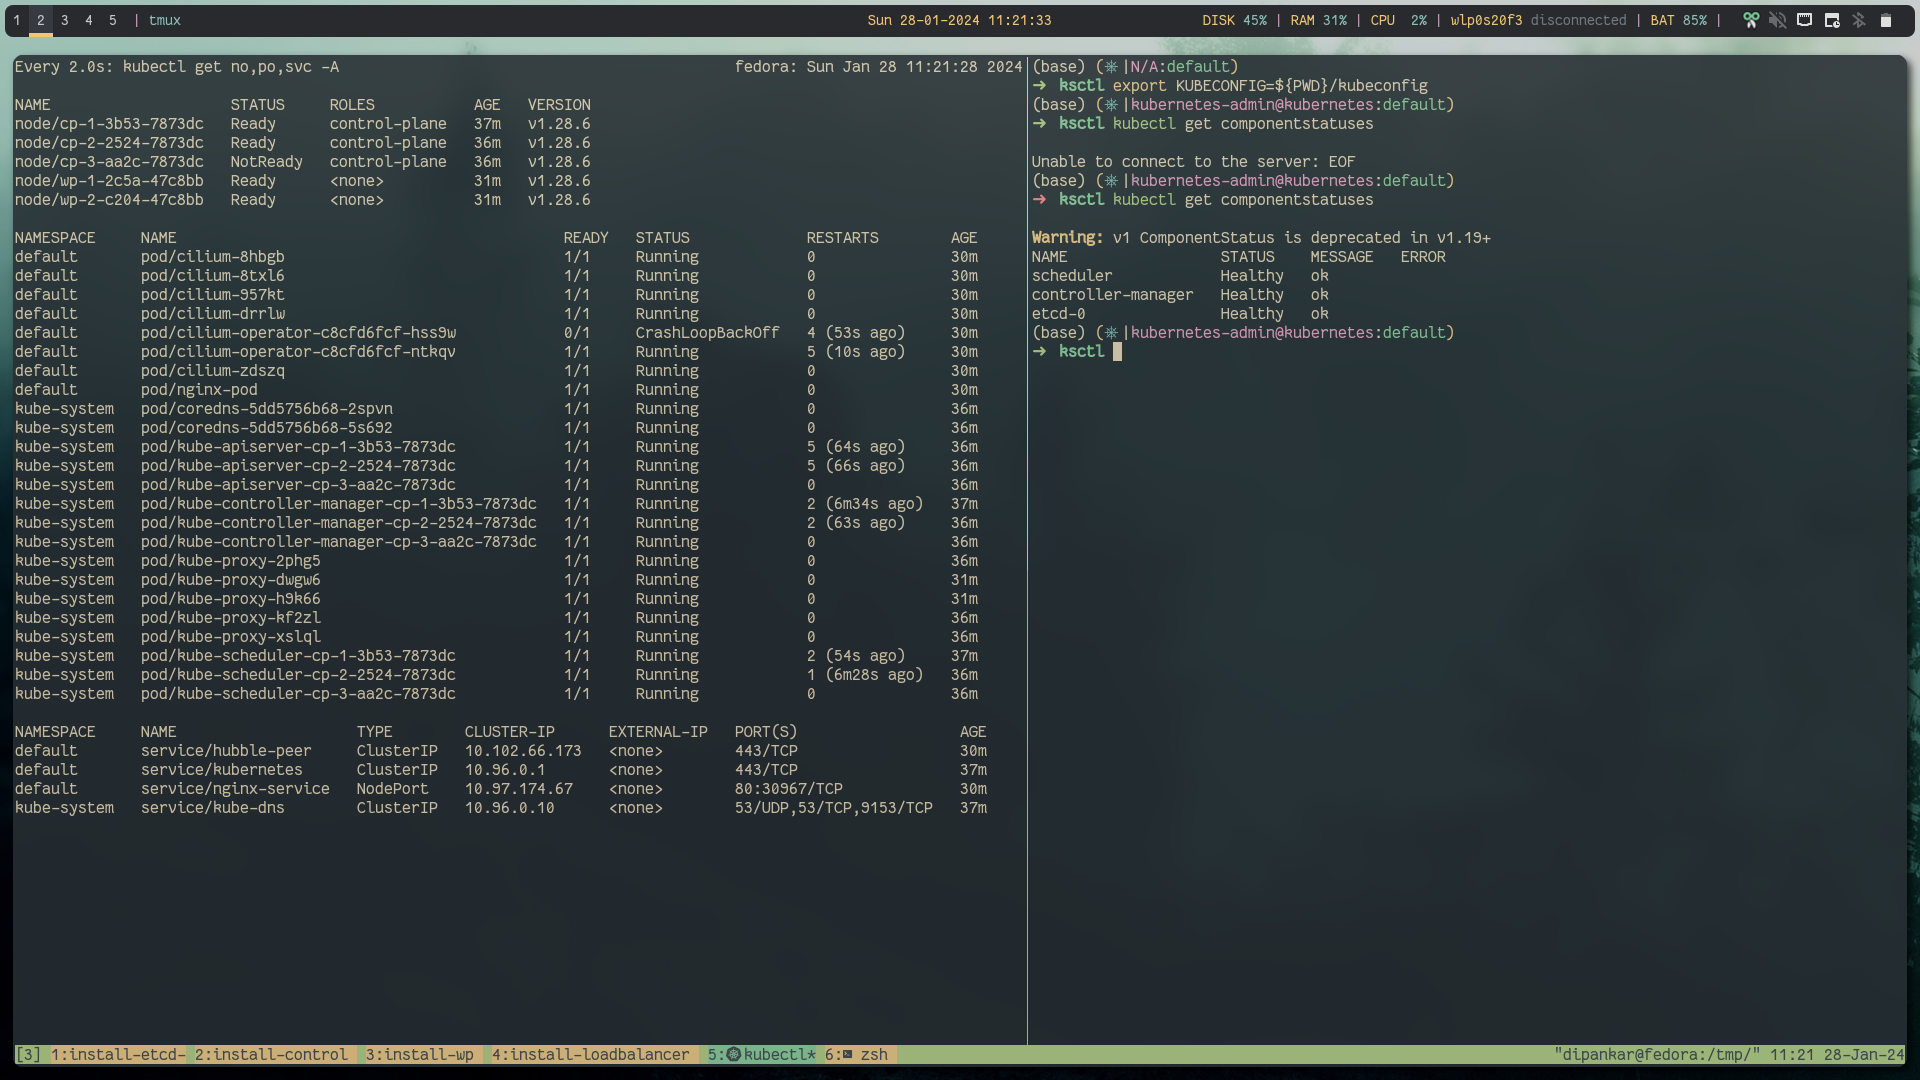
export KUBECONFIG=kubeconfigNow you can run the cluster and you will see all the nodes in the NotReady state, this is becasue kubeadm doesn't provide CNI installed.
Step 7: Install CNI #
We will use Cilium which is a CNCF graduated project for our CNI layer.
helm repo add cilium https://helm.cilium.io/
helm repo update
helm install cilium cilium/cilium --version 1.14.6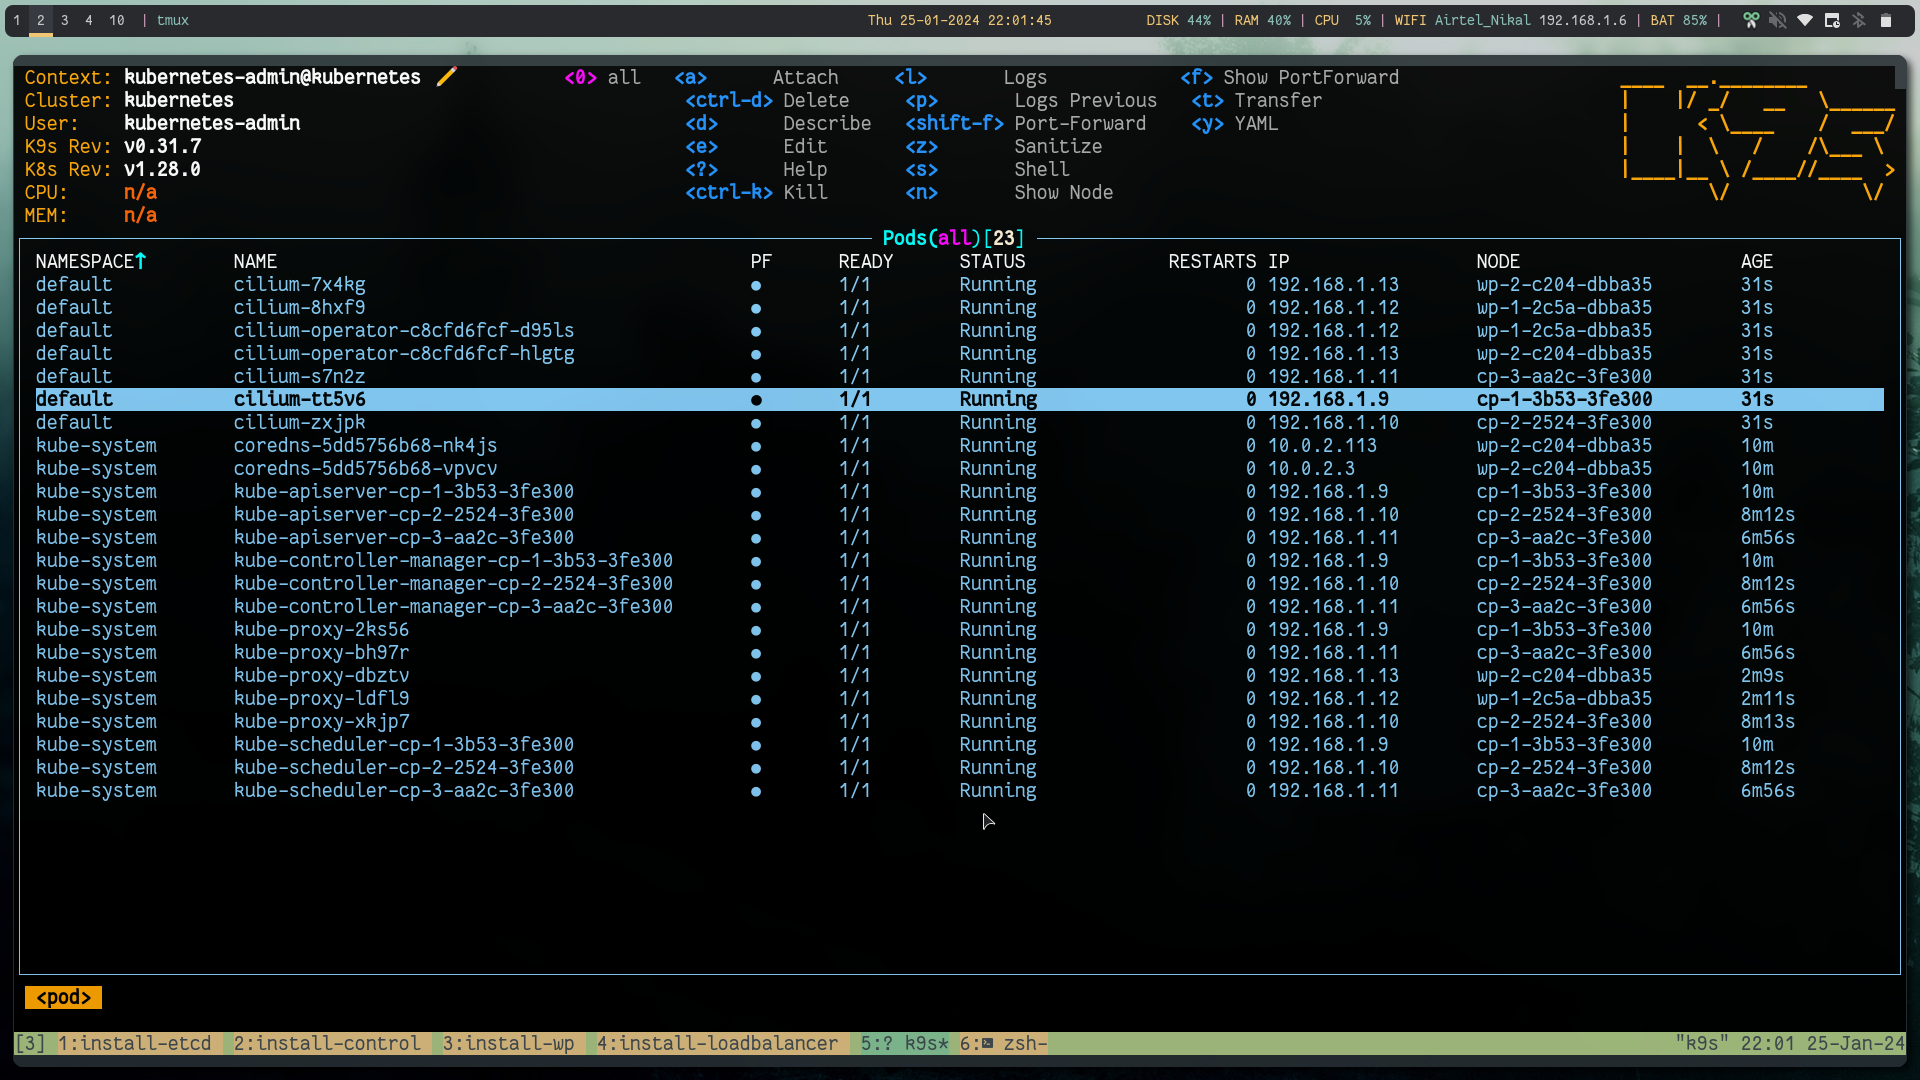
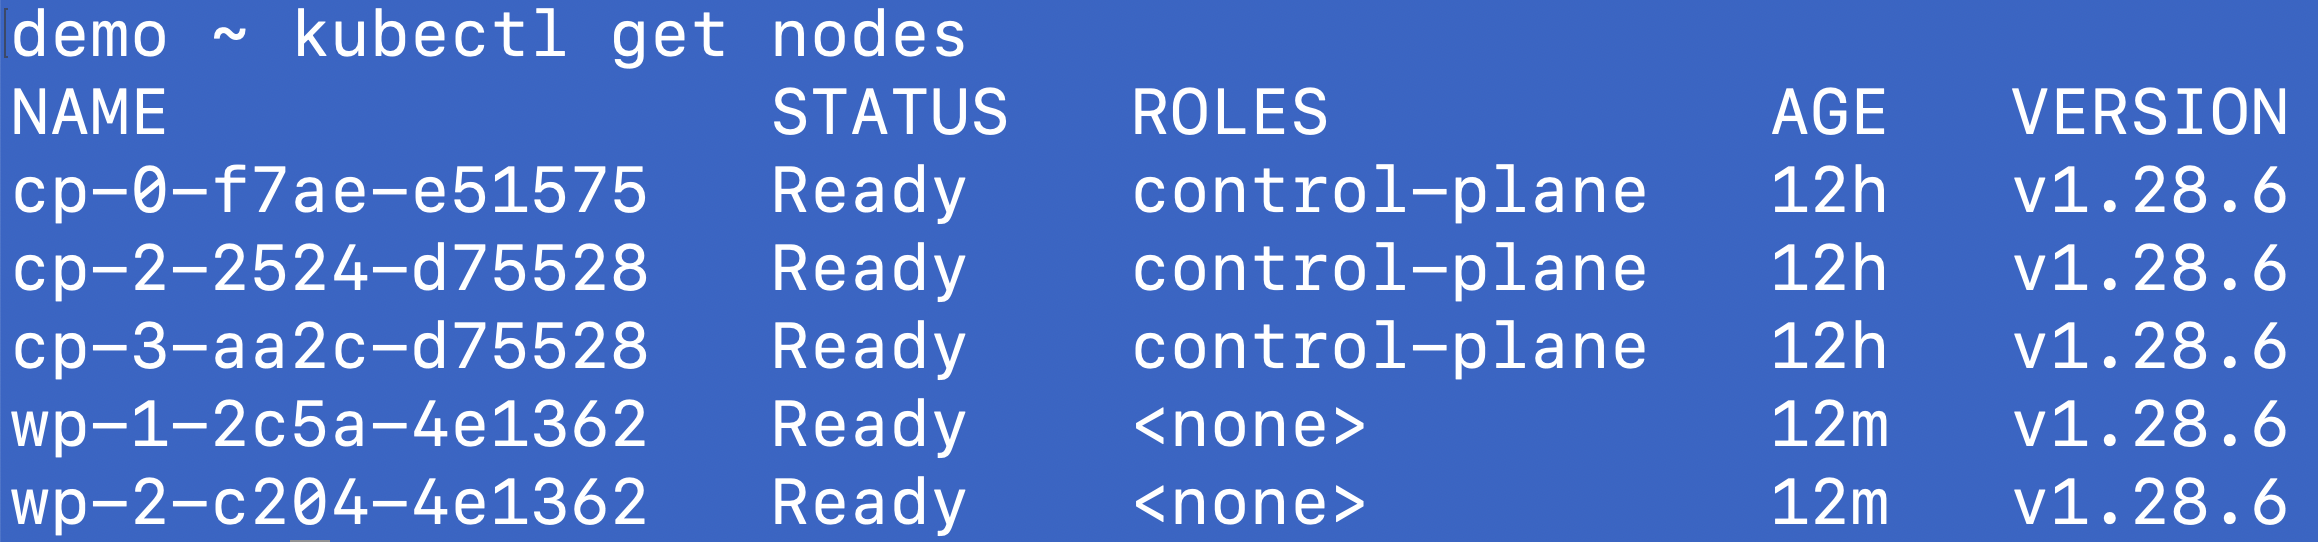
Now when you test, you will see all the nodes in Ready state.
Step 8: Nginx Test #
kubectl run nginx-pod --image=nginx
kubectl expose pod nginx-pod --port=80 --name=nginx-service --type=NodePort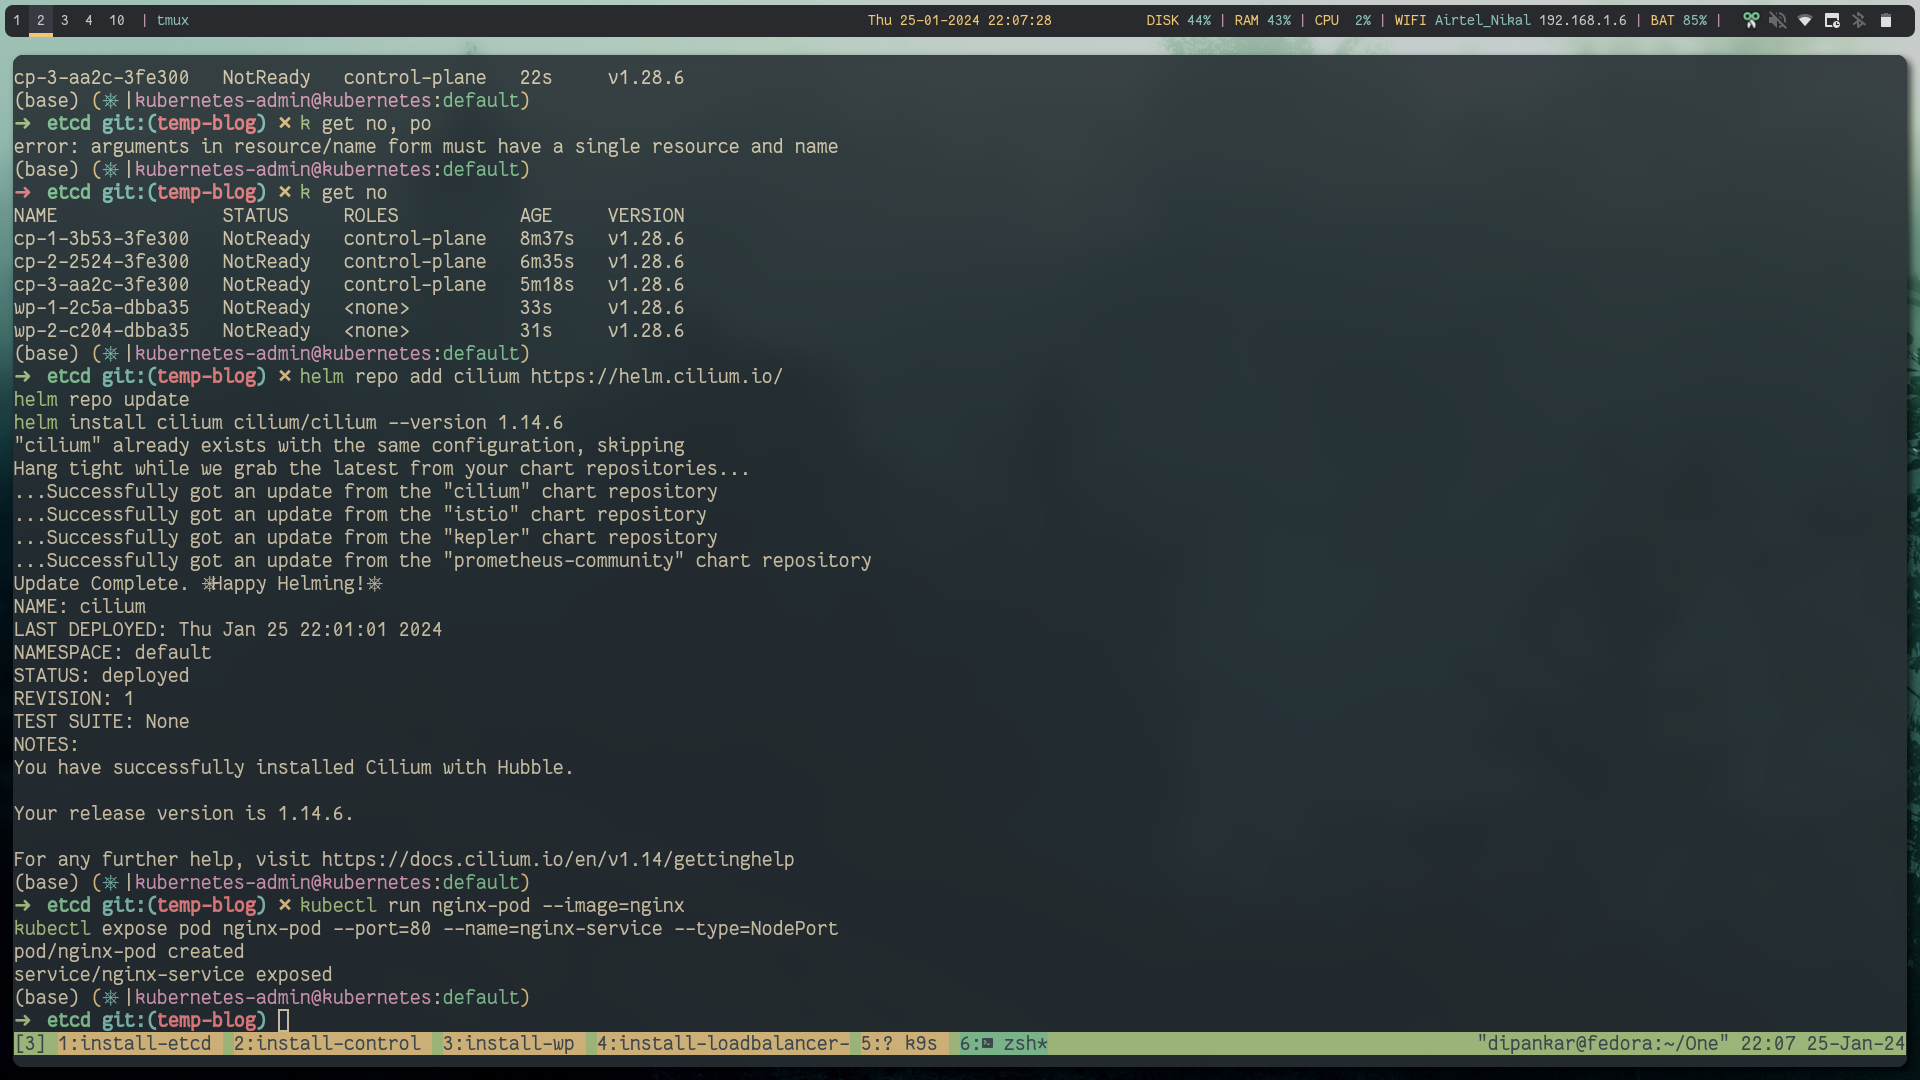
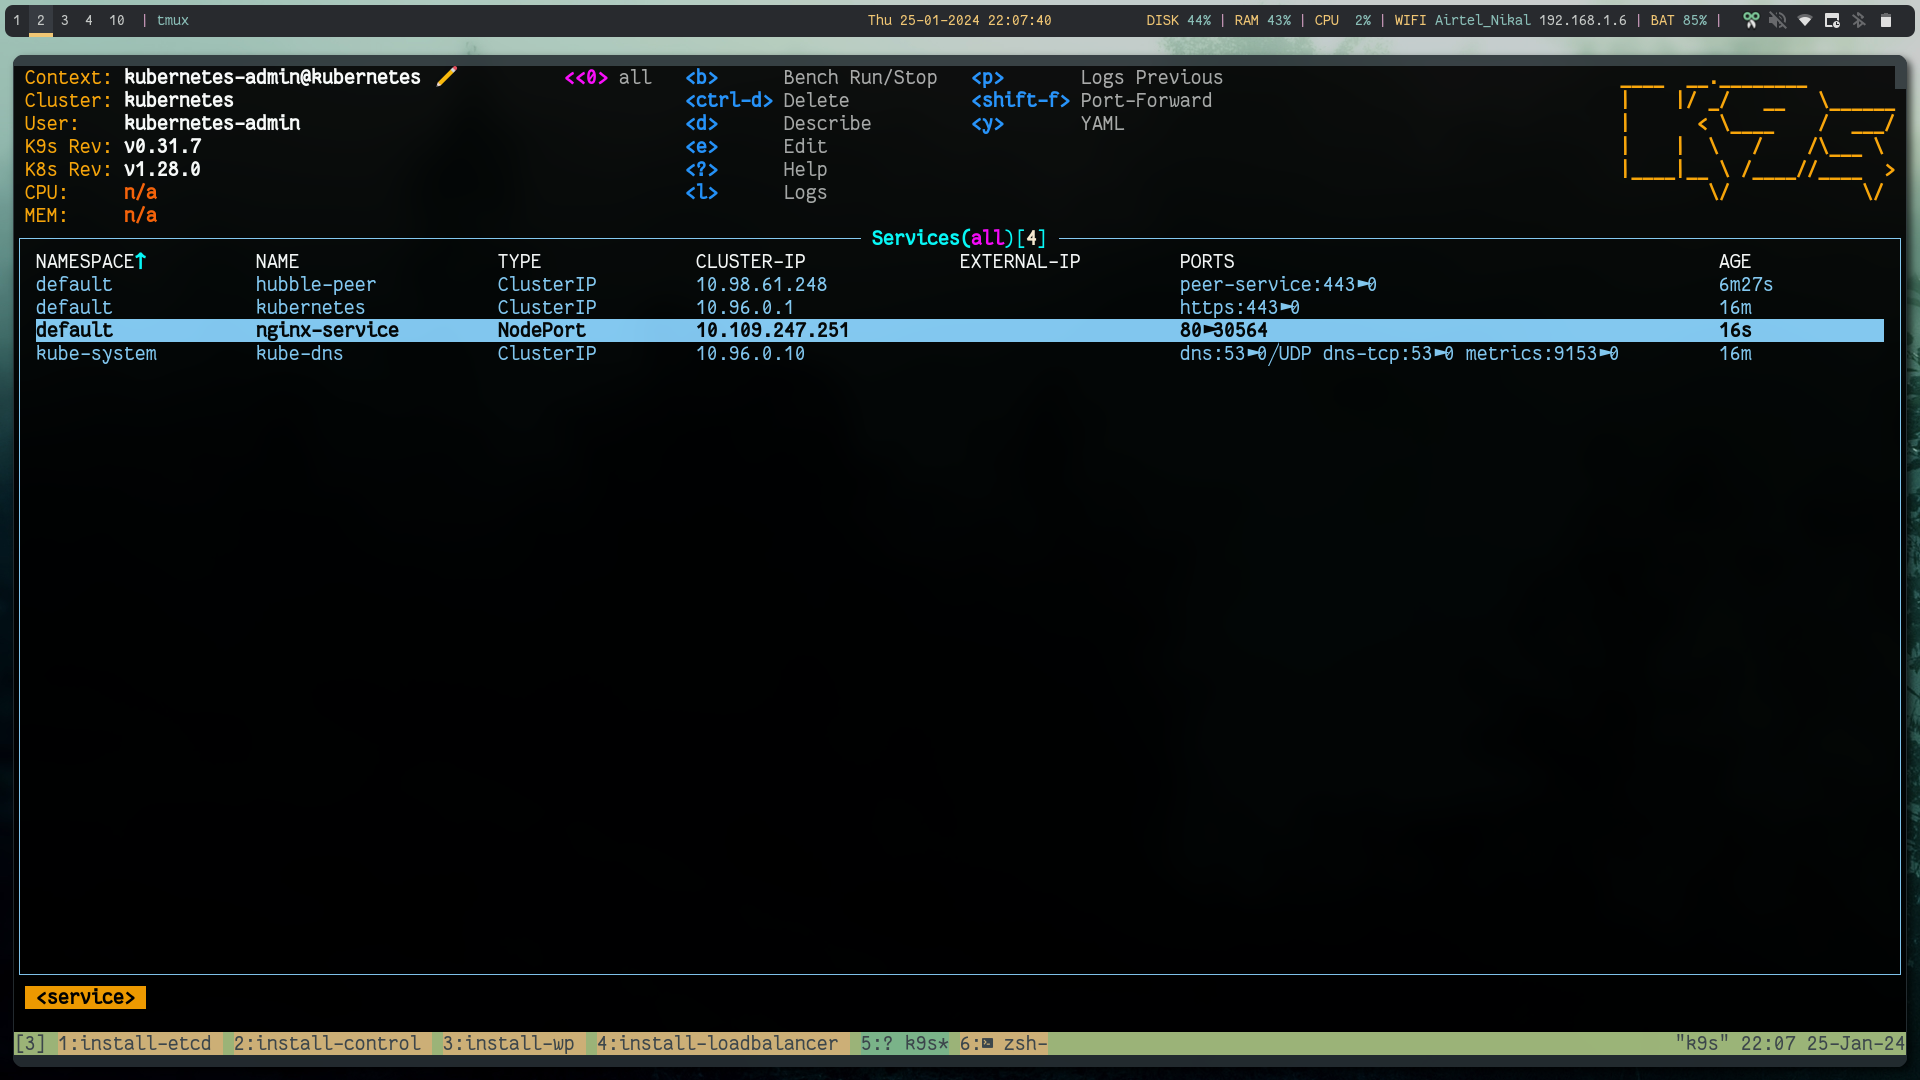
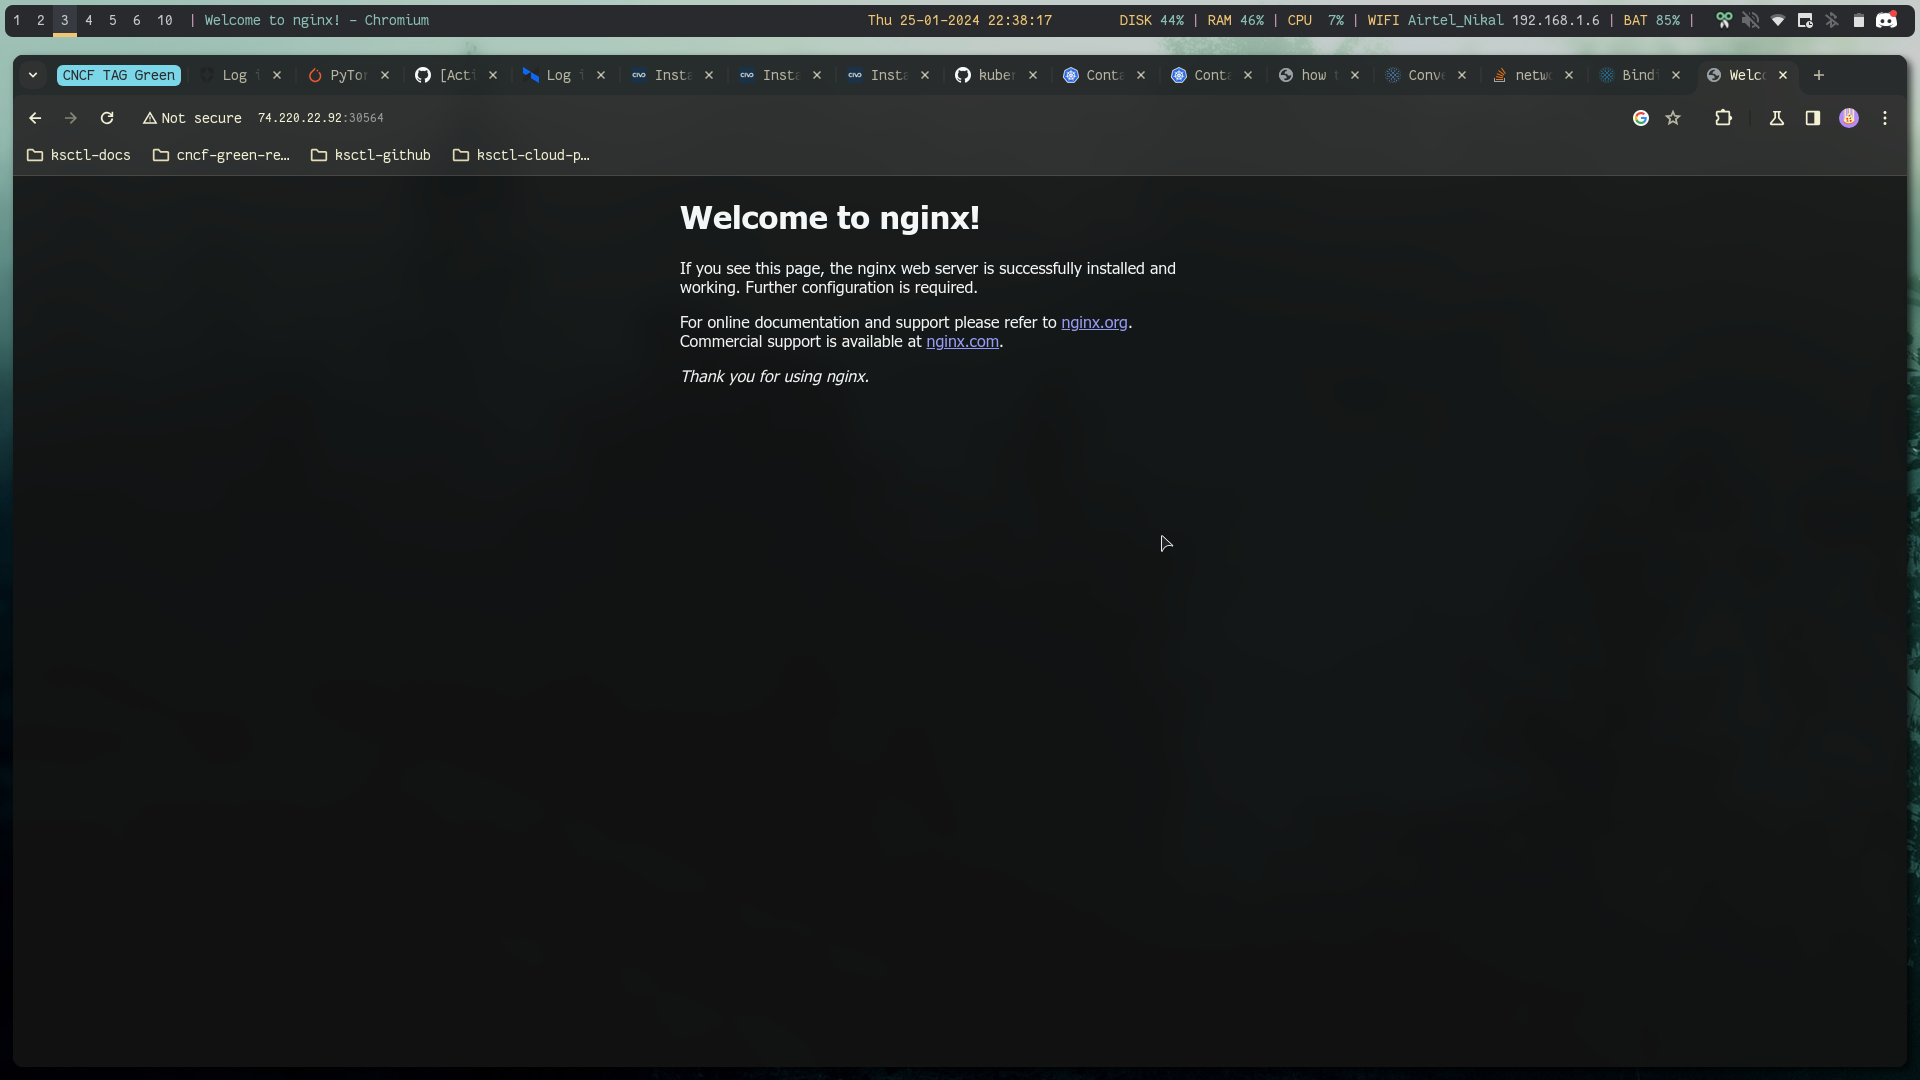
Using load balancer public IP:NodePort we can reach the app
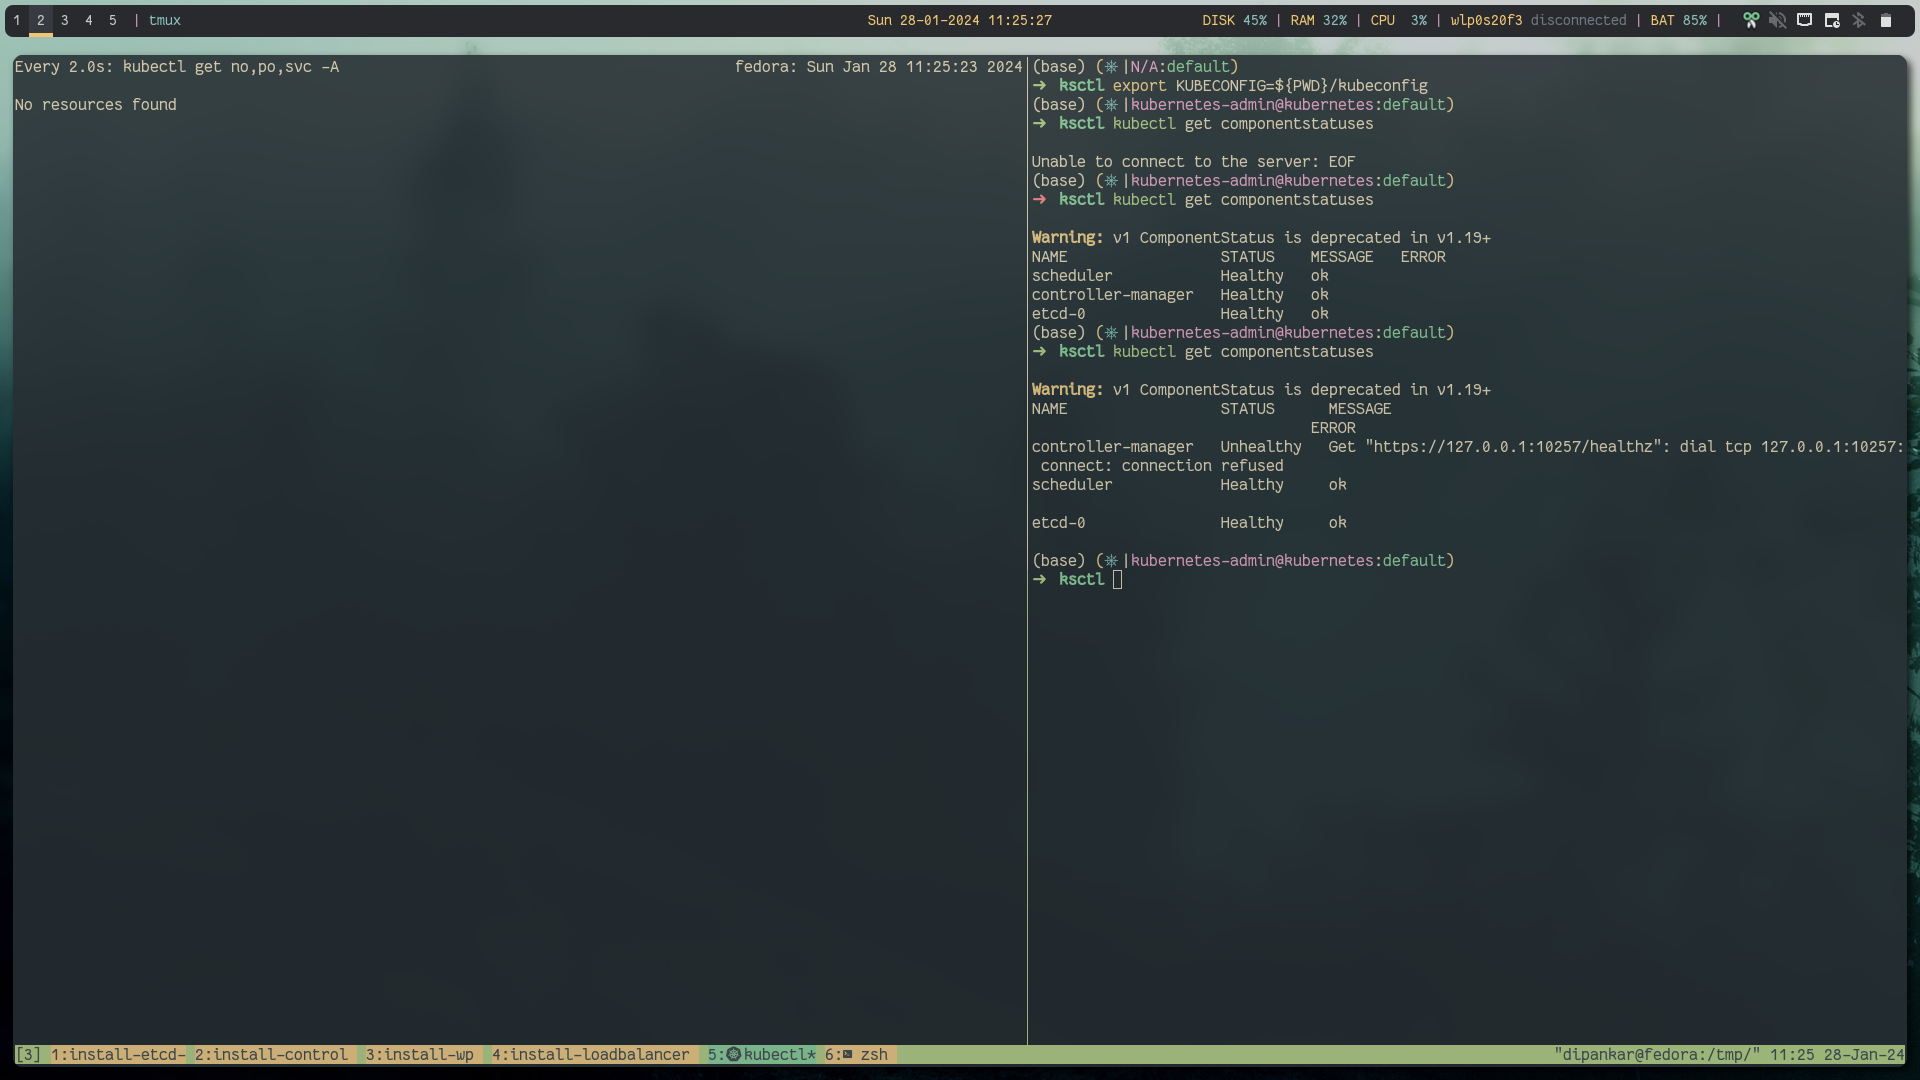
Testing the High availability #
Let's try the High availability, on one screen we will do kubectl get nodes -w and in other tab we will shutdown one controlplane node so that it becomes not ready and then we will try to again create nginx pod and test if that is working.
Below is everything before creating that chaos:
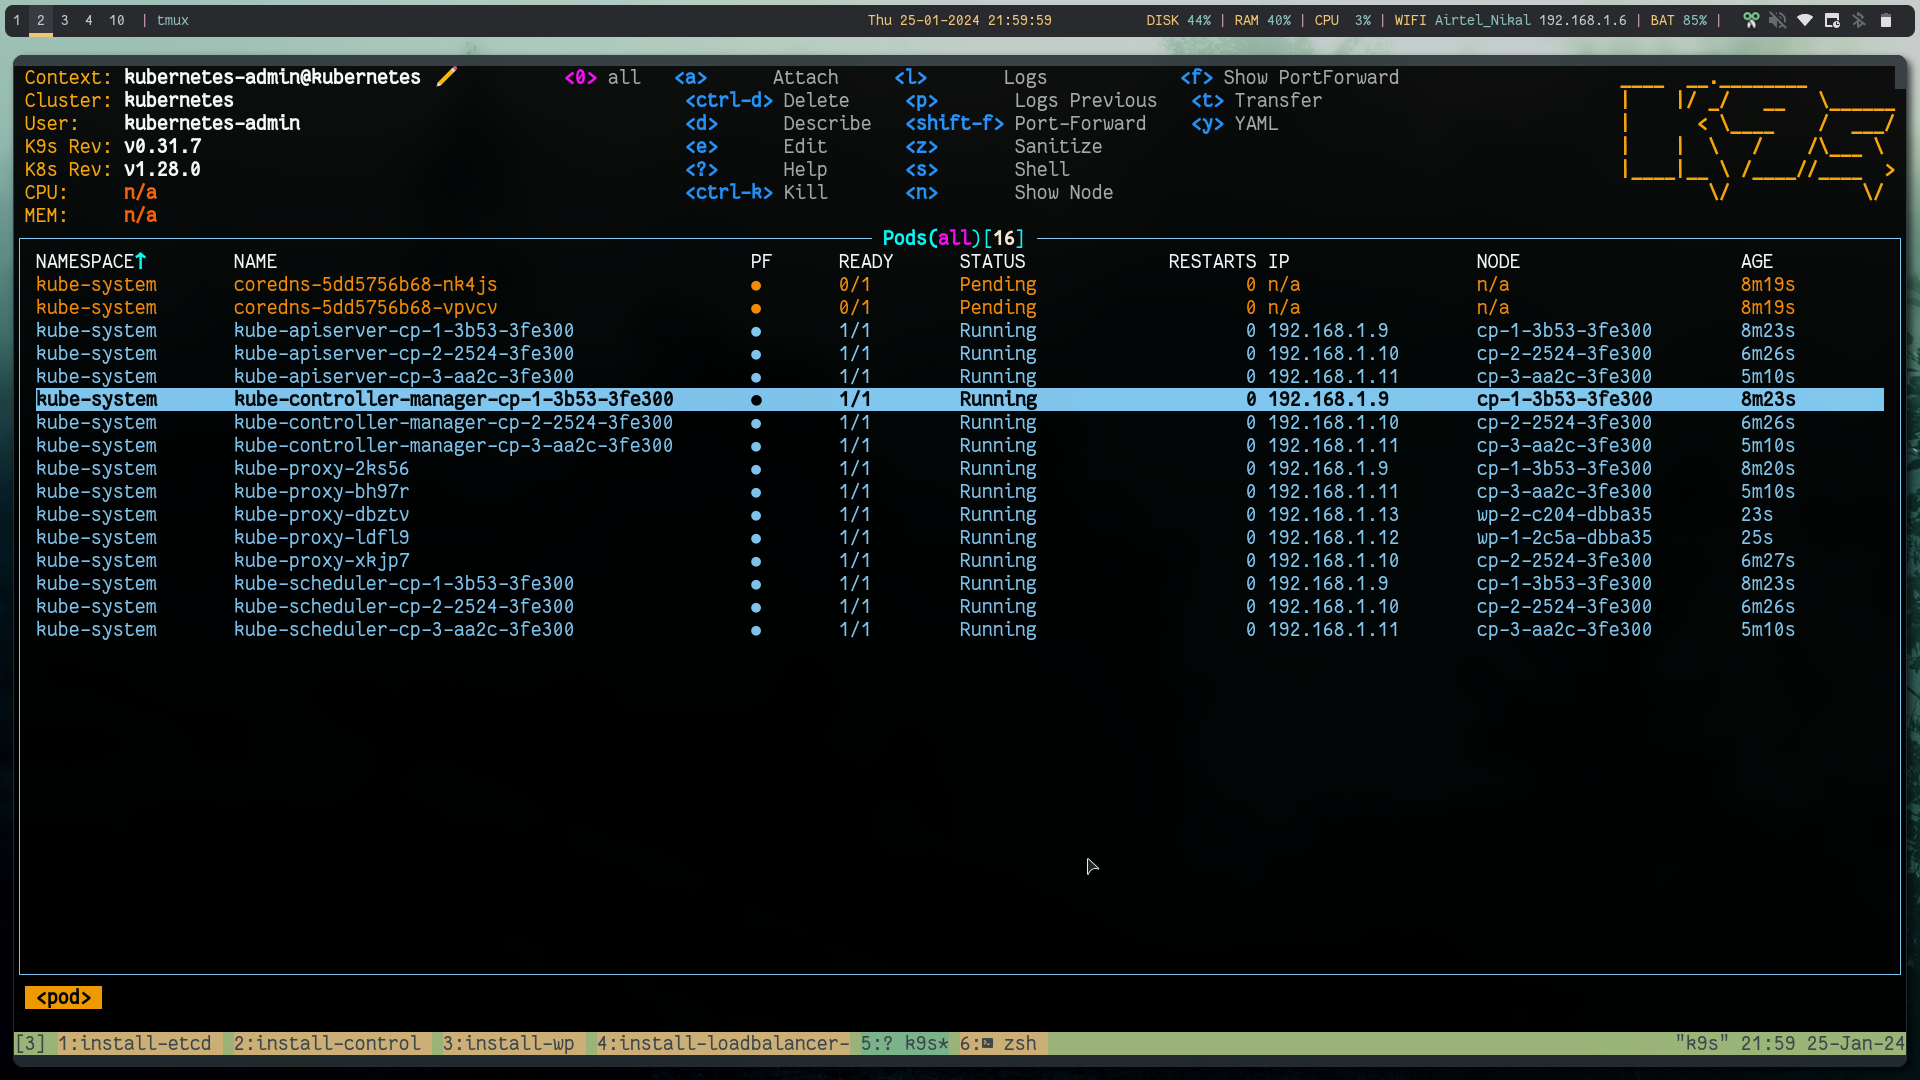
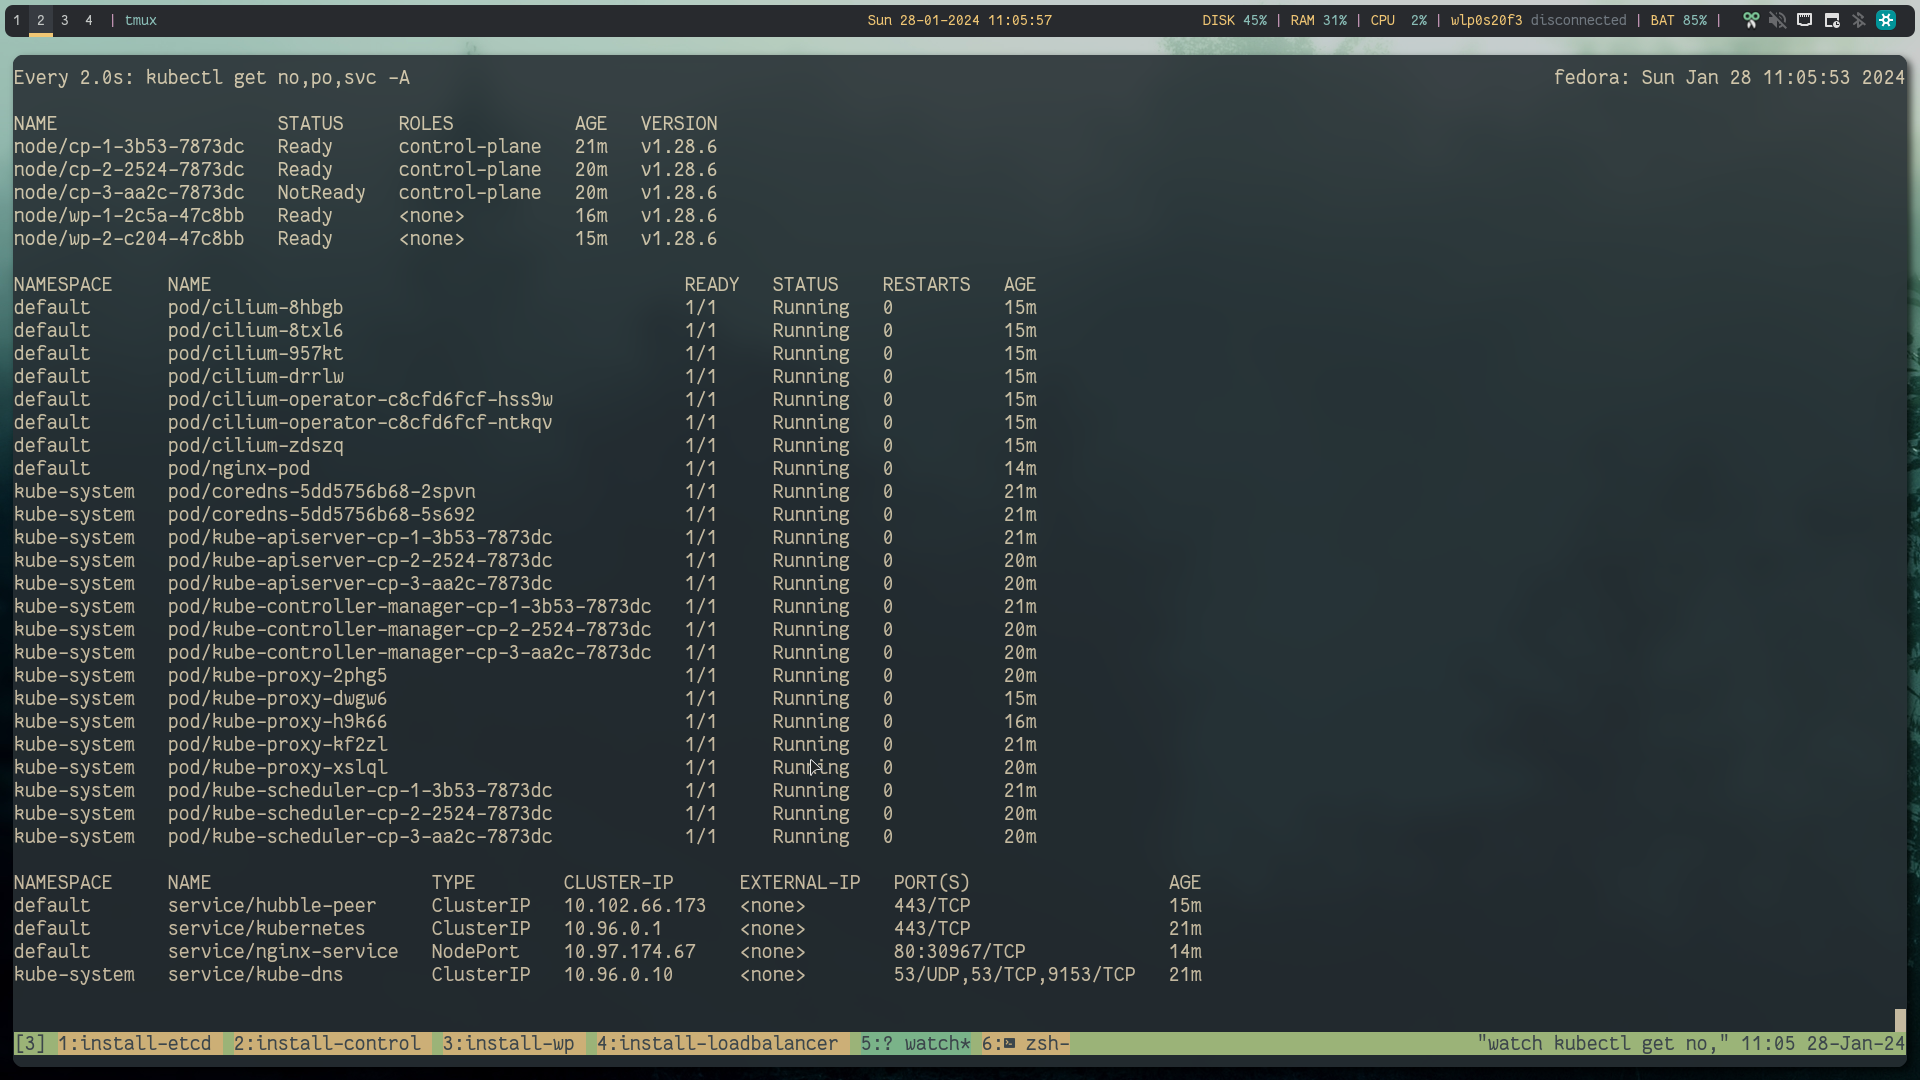
kubectl get no,po,svc -A
# looks like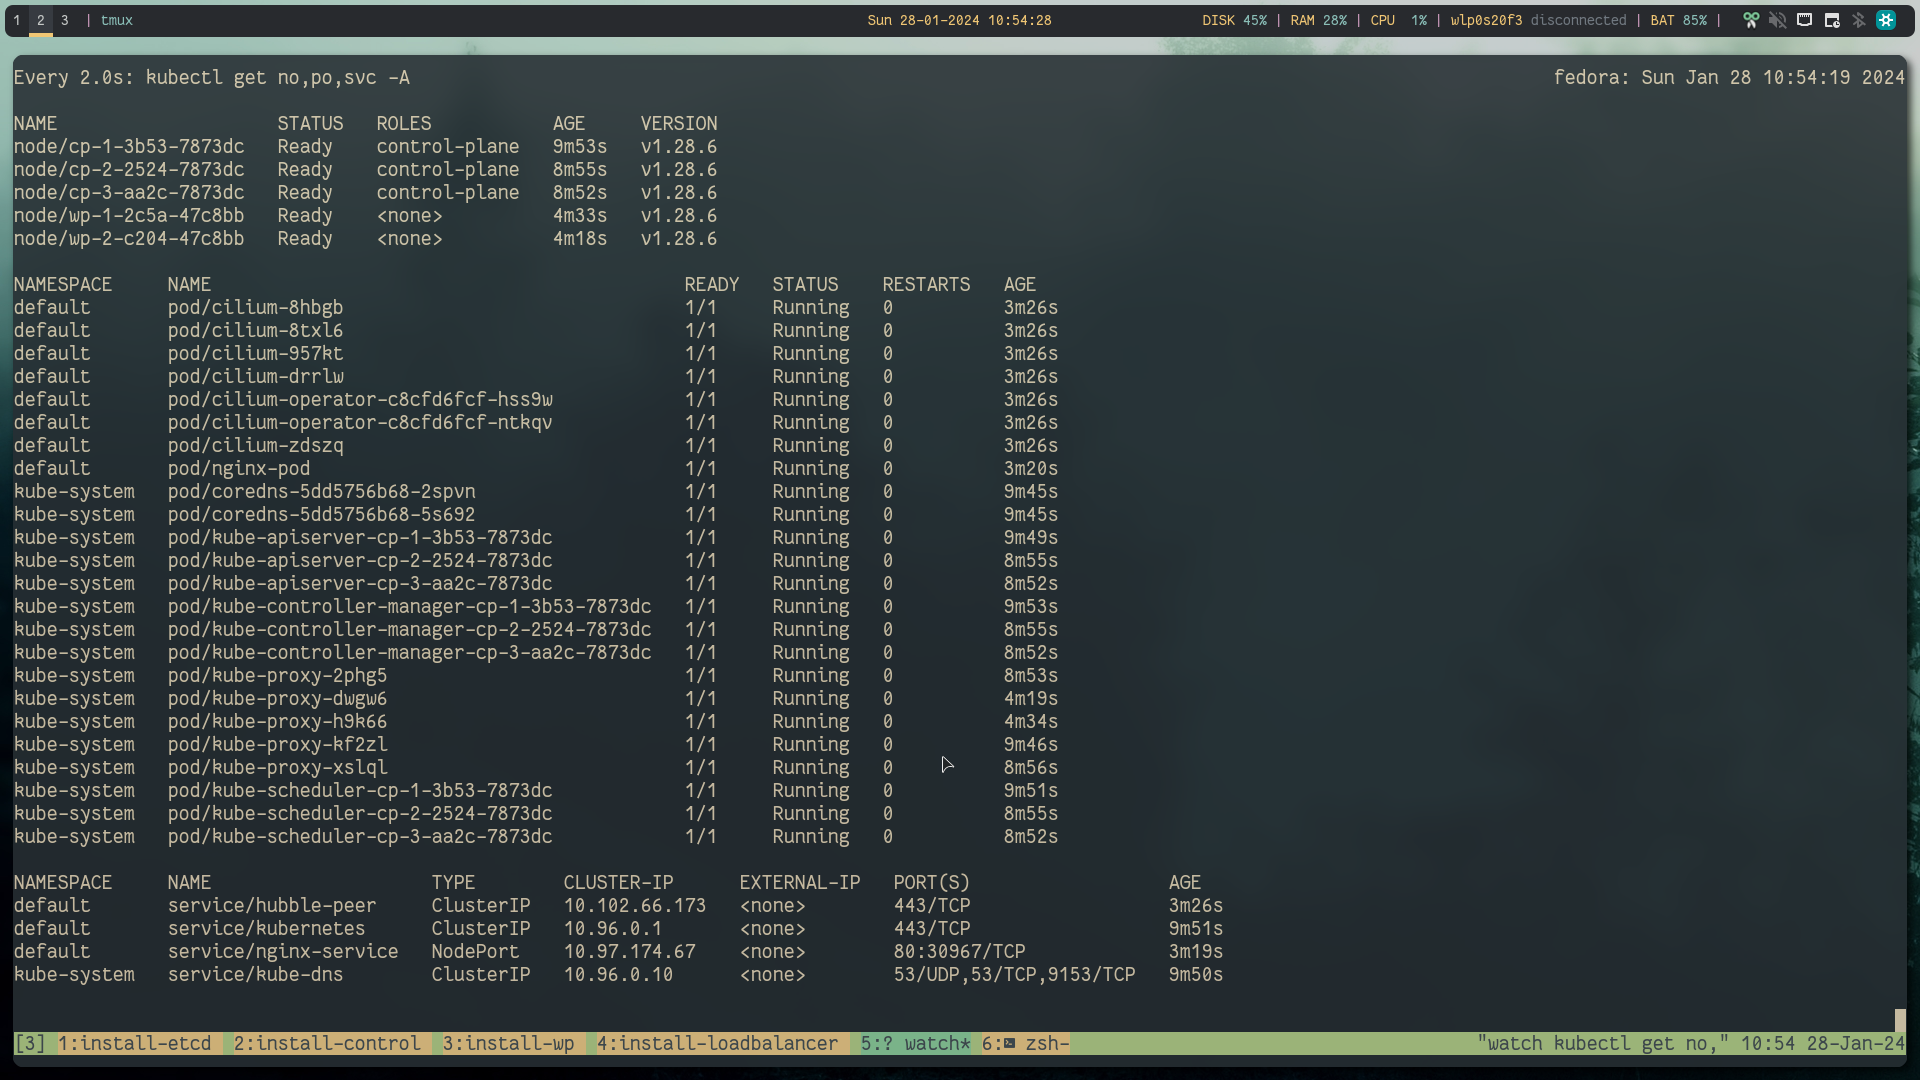
Now, according to raft consensus distributed model FaultTolerant=(n−1)/2 are needed for majority vote if the available nodes become less than this, the system will be unreachable.
In our case we are dealing with 3 controlplane and 3 etcd nodes. So at minimum 2 cp and 2 etcd as it can handle only 1 node failure so ideally you will choose 5 which gives us some room for one node down for maintenance and another failure scenarios.
Shutdown the controlplane and after a few minutes when the node heartbeats are unreachable by k8s it will mark the node as not ready.

But you can see that the nginx workload is still running.
Success: still able to reach the kube-api server and the workload is still running
Let's delete one of the etcd node
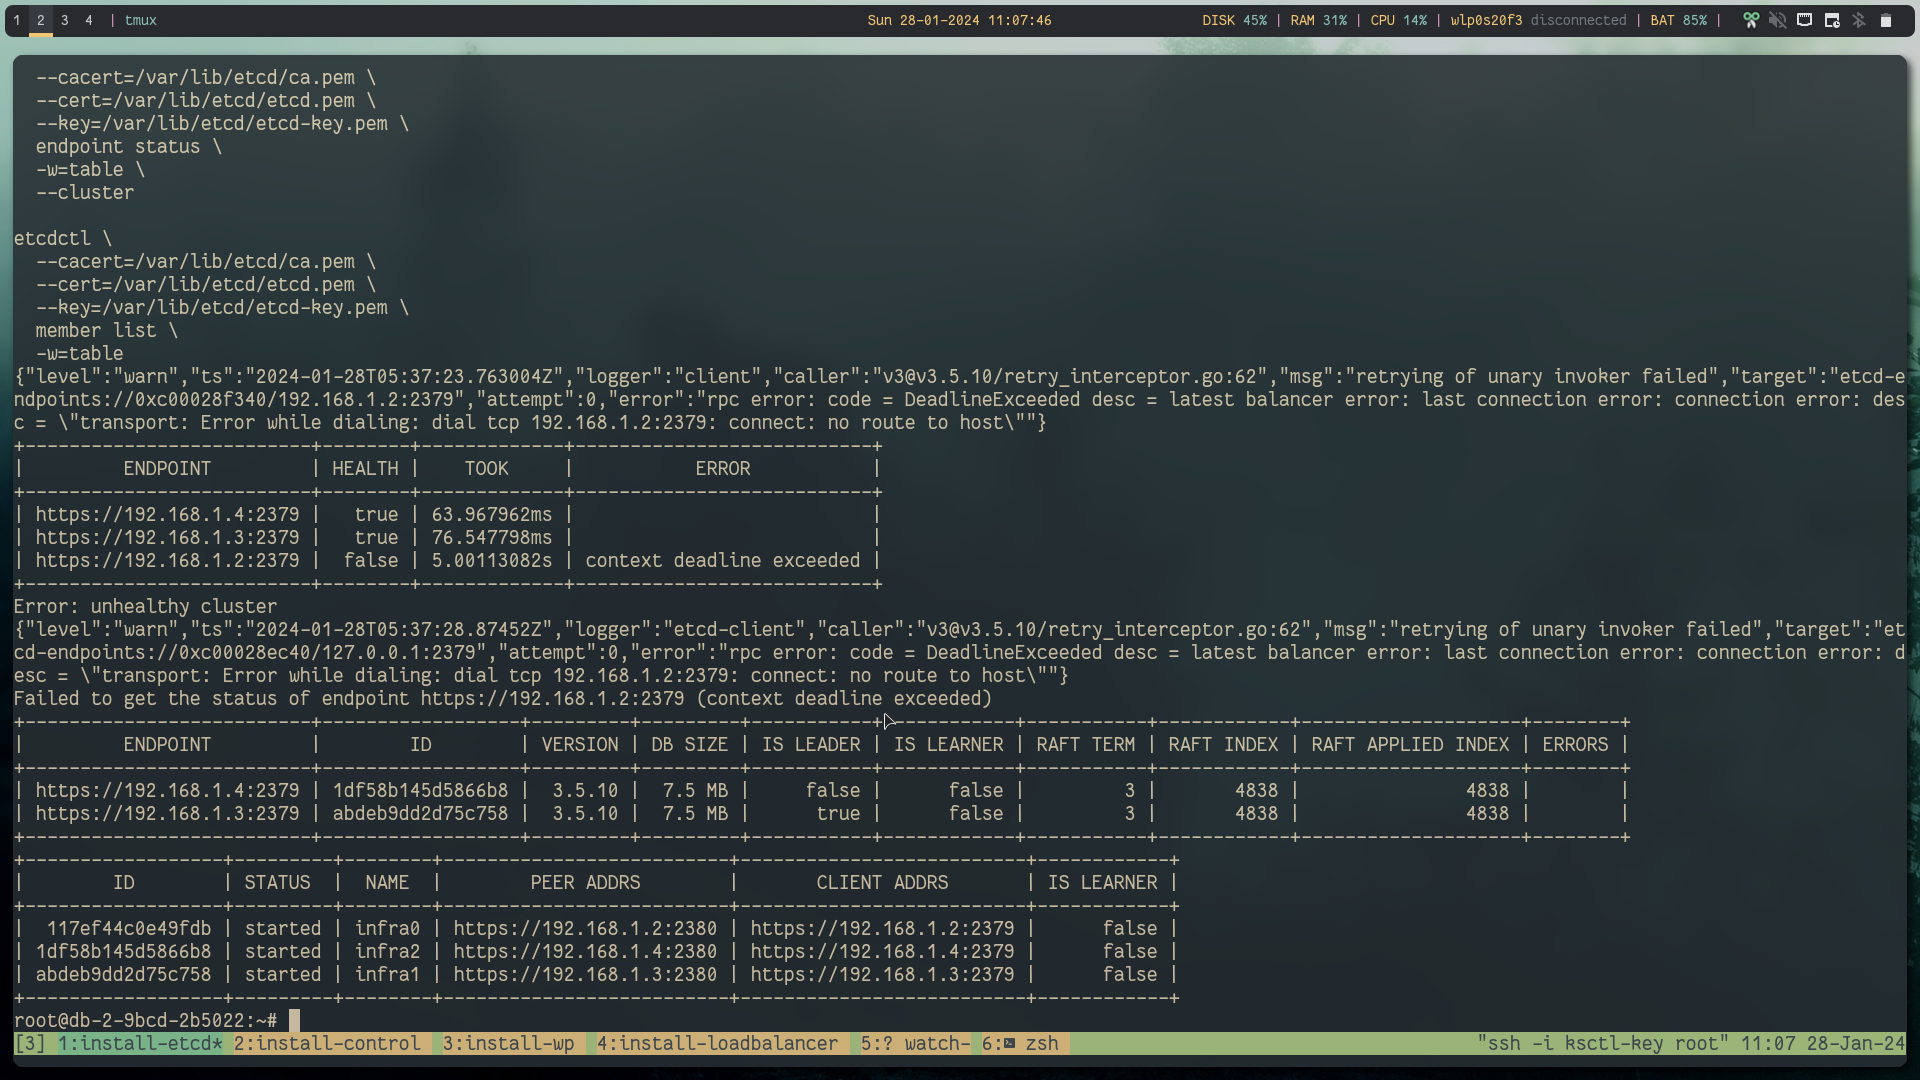
Success: still able to reach the kube-api server and the workload is still running
Let's stop one etcd service and again restart it
Success: workload is running
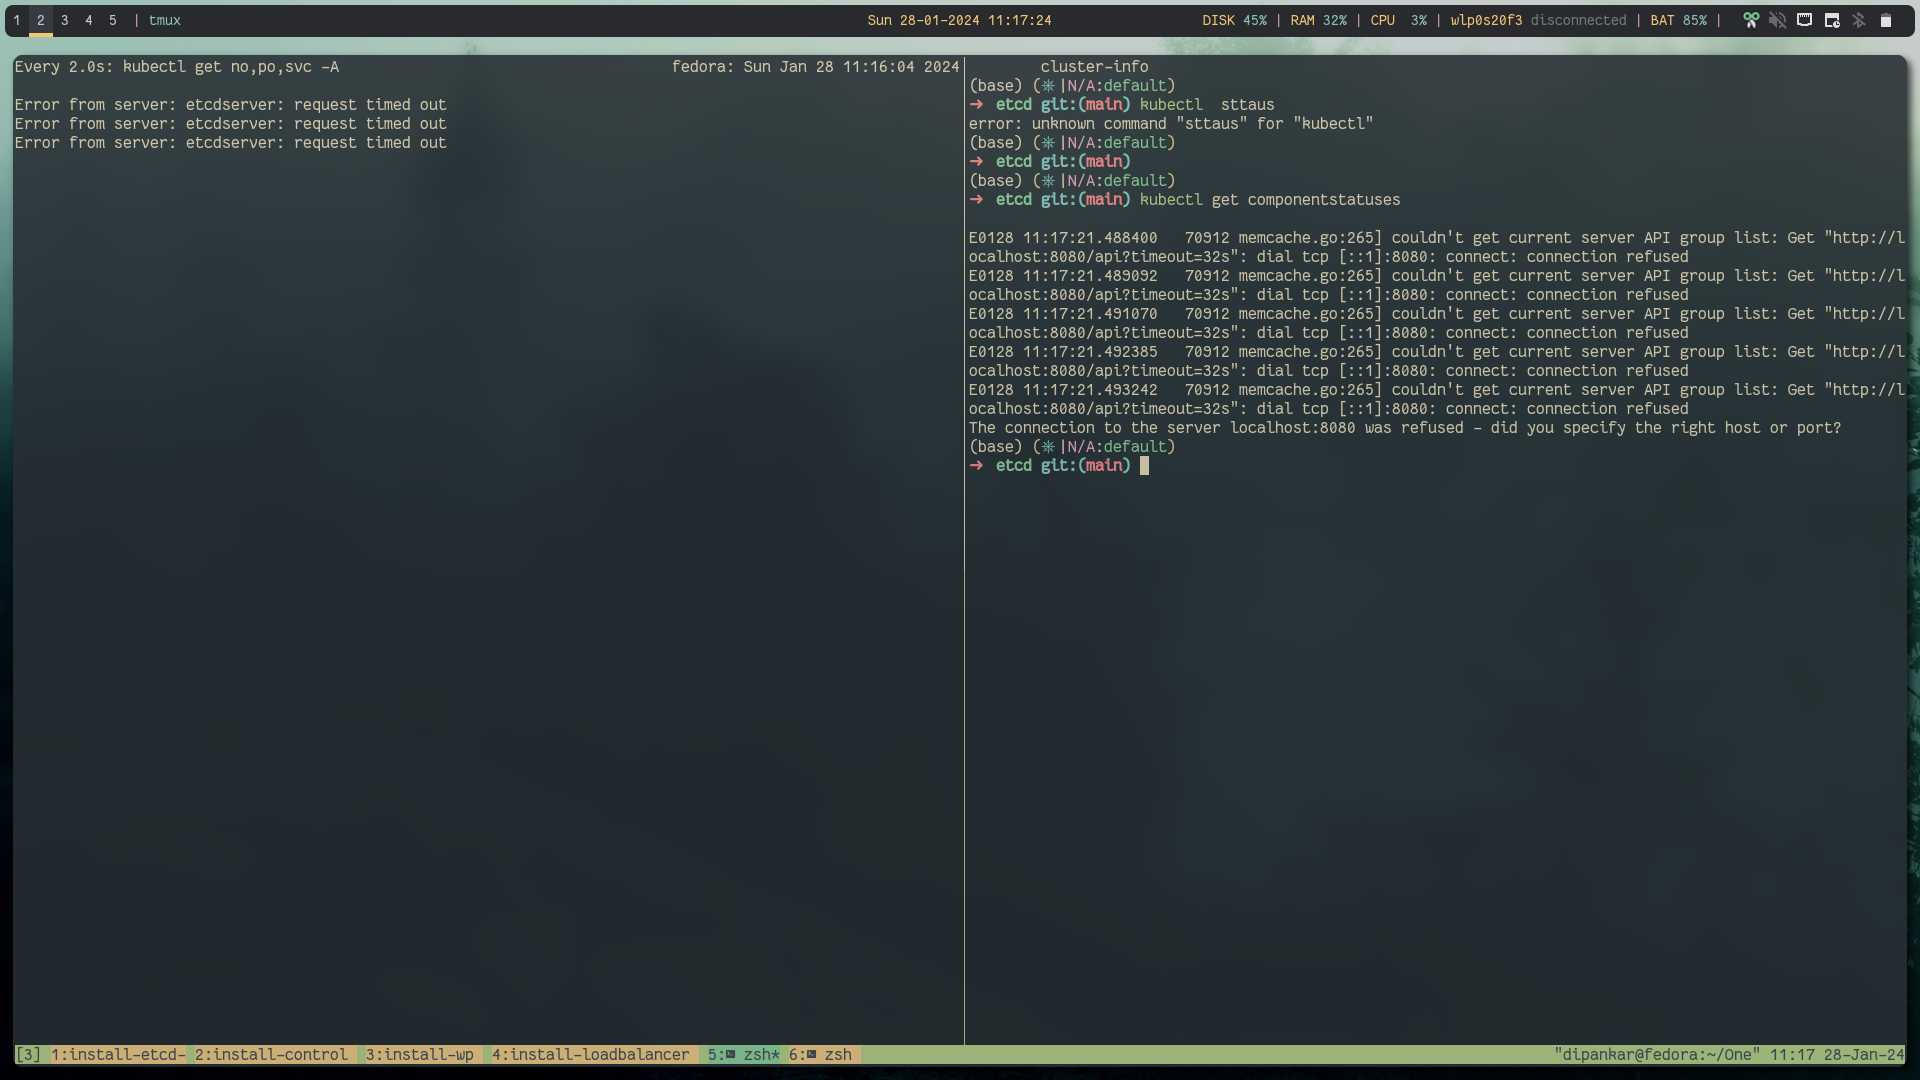
Failure: unable to reach the kube-api server
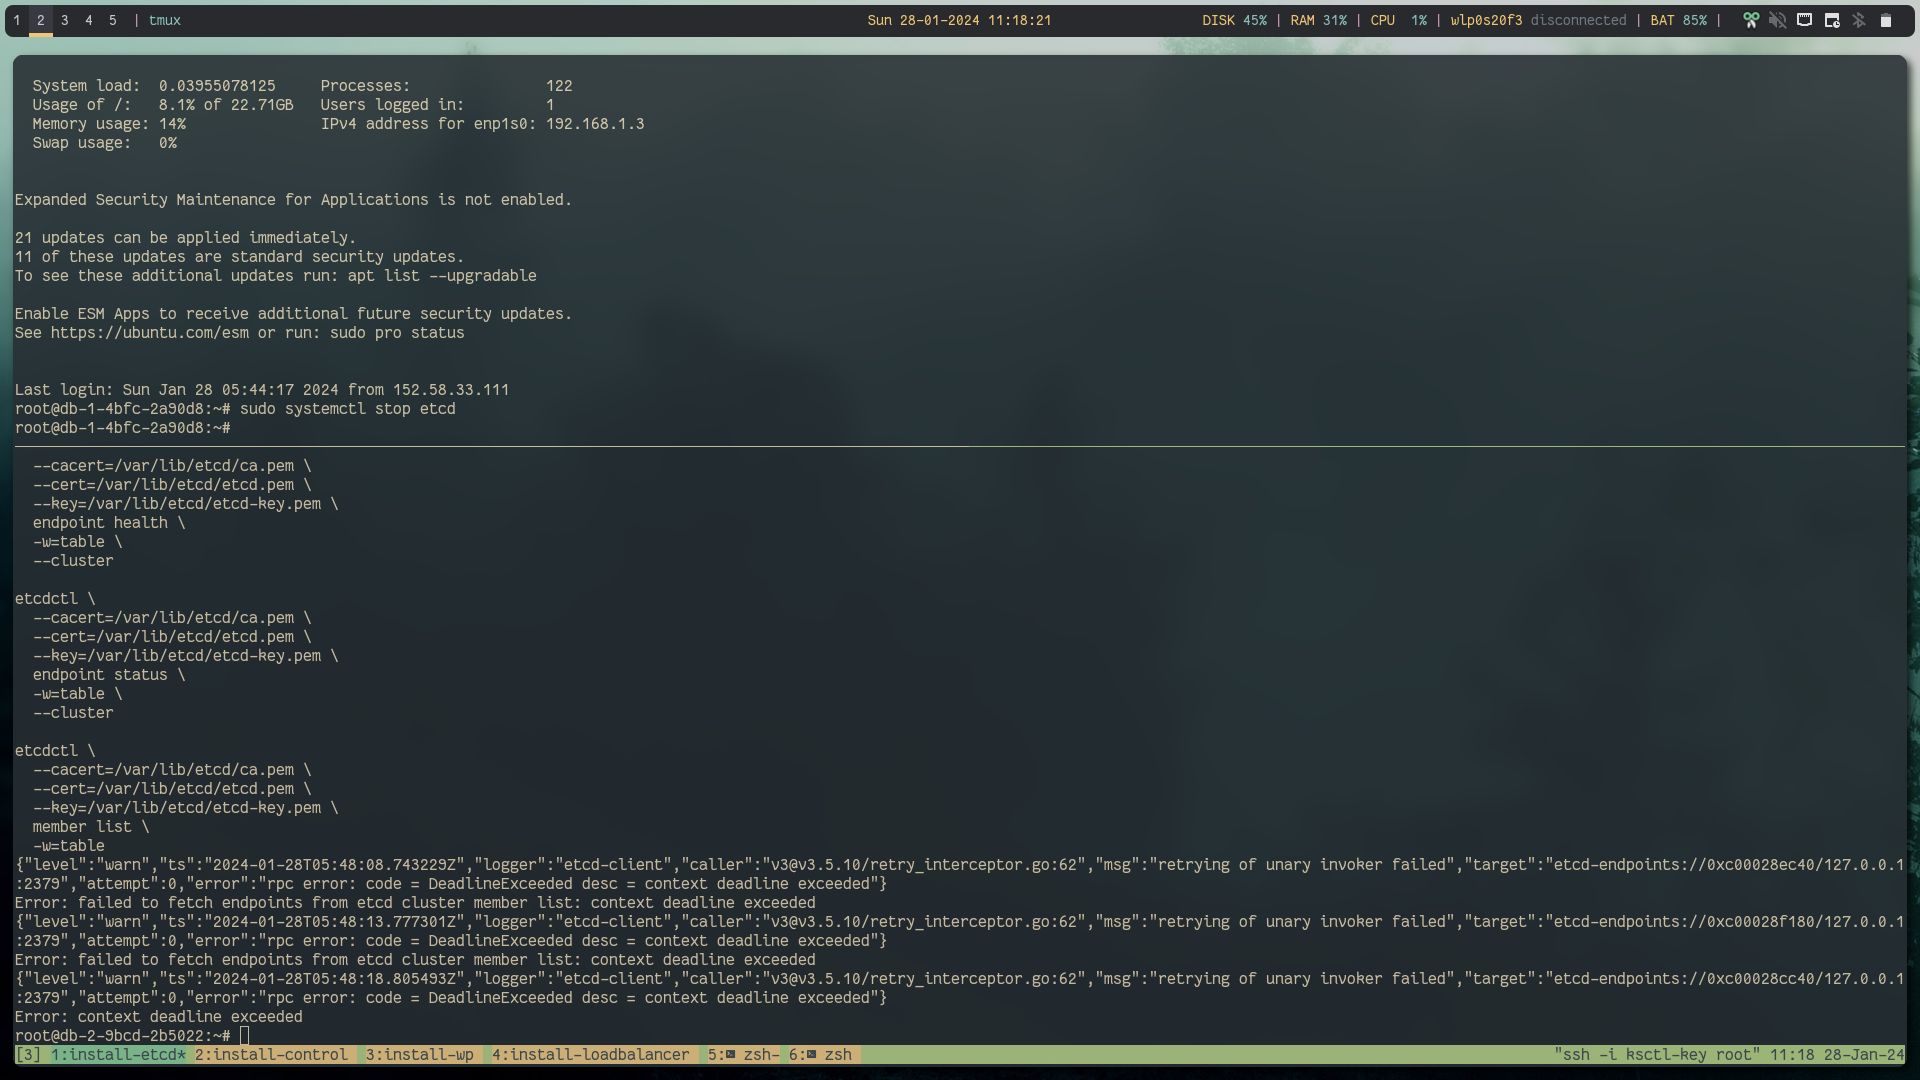
Lets restart the etcd service
Success: Recovered the kube-api server
Also the same would happen if one more controlplane node gets down
Finally lets remove all data in etcd server and see what happens to the cluster
etcdctl \
  --cacert=/var/lib/etcd/ca.pem \
  --cert=/var/lib/etcd/etcd.pem \
  --key=/var/lib/etcd/etcd-key.pem \
  get / --prefix --keys-only | wc -l

etcdctl \
  --cacert=/var/lib/etcd/ca.pem \
  --cert=/var/lib/etcd/etcd.pem \
  --key=/var/lib/etcd/etcd-key.pem \
  del / --prefix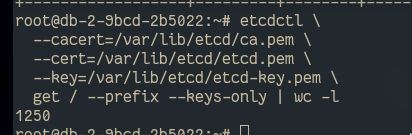

cluster is completely dead: as all cluster data is gone
thats why its important to backup the etcd data!!!! 💀 (Let's talk about Backup and recover some other time).
Conclusion #
Meticulously configuring your etcd cluster establishes a fault-tolerant foundation for Kubernetes, ensuring uninterrupted application uptime in various scenarios. This robust setup, suitable for microservices or containerized workloads, is scalable and reliable. While we covered core etcd configuration, consult Kubernetes and etcd documentation for customization and troubleshooting. Implement monitoring tools for cluster health and performance awareness.
Finally, this blog post is possible just because of ksctl project. As you can see these are quite a lot of manual steps so ksctl helps you overcome these challenges with more customizability options with multiple cloud providers. Do try out the ksctl project and leave a star if you like the project.
https://github.com/kubesimplify/ksctl
Also, there is a good blog post on ksctl introduction
https://blog.kubesimplify.com/ksctl-making-kubernetes-easy-across-clouds
References #
Follow Kubesimplify on Hashnode,Twitter and LinkedInJoin our Discord server to learn with us.
Check out our Recent course on WebAssembly
DevOps, Development and CLoud related stuff Kubesimplify ambassador and a OSS contributor to various CNCF projects
Get new posts in your inbox.
Spotted a typo or want to improve this post? Edit on GitHub →