In a previous article, we learned that Kubernetes essentially is an API under-the-hood and every action you take within a Kubernetes cluster, be it the creation of pods or the monitoring of services, boils down to interactions with its API.
Now, in this article we’ll be taking that concept to a next level and focus on accessing the Kubernetes API programmatically i.e via client libraries.
The aim here is to provide you a step-by-step guide on performing basic CRUD operations (create, read, update and delete) on a Kubernetes resource, using Go as the programming language.
Throughout the guide, we'll use various terminologies associated with the core Kubernetes API concepts, which were, very conveniently covered in the previous blog(and that too, in-depth). If you haven't already, I highly recommend checking that out before moving on with this one.
One may ask this question - Why make things more complicated? Why not just stick to the basic HTTP requests instead of using a client library?
Thats a valid question to consider and and there are several reasons to why learning and using a client library is essential:
Abstraction of Complexity - Client libraries abstract away the complexities of direct HTTP communication, offering a simpler way to interact with API.
Error Handling - These libraries typically come with built-in error handling mechanisms. Thus, simplifying the process of dealing with errors and failures when interacting with API (which is certainly important, right?).
Efficiency - These libraries often provide optimized methods for common tasks, reducing the amount of code needed and improving overall efficiency. (we’ll get a better idea of this in the upcoming sections)
Community Support - Popular client libraries have a strong community of users who contribute to documentation, provide support, and share best practices - which in turn makes it easier to learn and troubleshoot any issues that may arise during application development.
As mentioned previously, we’ll be using the Go programming language to perform basic CRUD operations on a Kubernetes resource via the client library.
Now, the official Go client library used for interacting with Kubernetes clusters is called client-go. It provides a set of functions and structures needed to interact with Kubernetes API programmatically, allowing developers to manage resources such as pods, services, deployments, and much more.
The purpose is simple - to simplify the development of Kubernetes-related applications. It does this by abstracting away the complexities of working directly with Kubernetes API, providing a more user-friendly interface for Go developers.
One may ask this question here - “So, we don’t interact with the API when usingclient-go?”
That’s partially correct! When using client-go, we don't interact “directly” with the Kubernetes API endpoints. Instead, client-go provides a layer of abstraction between the us (the developers) and the low-level details of making HTTP requests to those endpoints.
It provides all the necessary set of functions and data structures that developers can use to perform actions on Kubernetes resources (like pods, services, deployments, etc.) without needing to handle the HTTP communication themselves.
Here, we’ll use minikube to bootstrap a single node Kubernetes cluster using the following command:
$ minikube start😄 minikube v1.32.0 on Darwin 14.4 (arm64)✨ Using the docker driver based on existing profile👍 Starting control plane node minikube in cluster minikube🚜 Pulling base image ...🔥 Creating docker container (CPUs=2, Memory=7792MB) ...🐳 Preparing Kubernetes v1.28.3 on Docker 24.0.7 ...🔗 Configuring bridge CNI (Container Networking Interface) ...🔎 Verifying Kubernetes components... ▪ Using image gcr.io/k8s-minikube/storage-provisioner:v5🌟 Enabled addons: storage-provisioner, default-storageclass...
As the cluster creation process finishes, use the following command to check the cluster information:
$ kubectl cluster-infoKubernetes control plane is running at https://127.0.0.1:52016CoreDNS is running at https://127.0.0.1:52016/api/v1/namespaces/kube-system/services/kube-dns:dns/proxy
In this step, we’ll be doing the following things:
Set up the Go project environment
Install the k8s.io/client-go module
Let us start by creating a new directory for our project and initializing a new Go module (go.mod):
$ mkdir k8s-crud-demo$ cd k8s-crud-demo$ go mod init github.com/USERNAME/k8s-crud
Now, we can install the k8s.io/client-go module using the following command:
go get k8s.io/client-go@latest
This will install the latest version of the k8s.io/client-go module, which includes all the necessary packages needed to interact with the Kubernetes API.
Before we perform any operations on an existing Kubernetes cluster, we first need to create a new client.
Even if we are using a client library in this scenario, it all boils down to the basic client-server communication and we understood in the previous blog post that, only an authenticated client can make requests to the Kubernetes API.
Therefore, regardless of whether we’re using a client library like client-go or not, we need to establish an authenticated connection with the Kubernetes API server.
Thankfully, the process here is much simpler than what we did while making HTTP requests, as we’ll directly be using the existing kubeconfig file to get the cluster info and create a new client from that.
Get the location of the kubeconfig file from the system and store that in a variable:
Next, we’ll use the BuildConfigFromFlags() method from the k8s.io/client-go/tools/clientcmd package to create a new client configuration based on the provided kubeconfig file:
Let us start with the most basic operation - reading and listing down all the current running pods in our Kubernetes cluster.
📍 Note
Before building the logic for this operation, make sure you already have a few pods running in your newly created cluster to see some output in the end.
You can use kubectl in this case to do so:
$ kubectl run demo --image=nginxpod/demo created
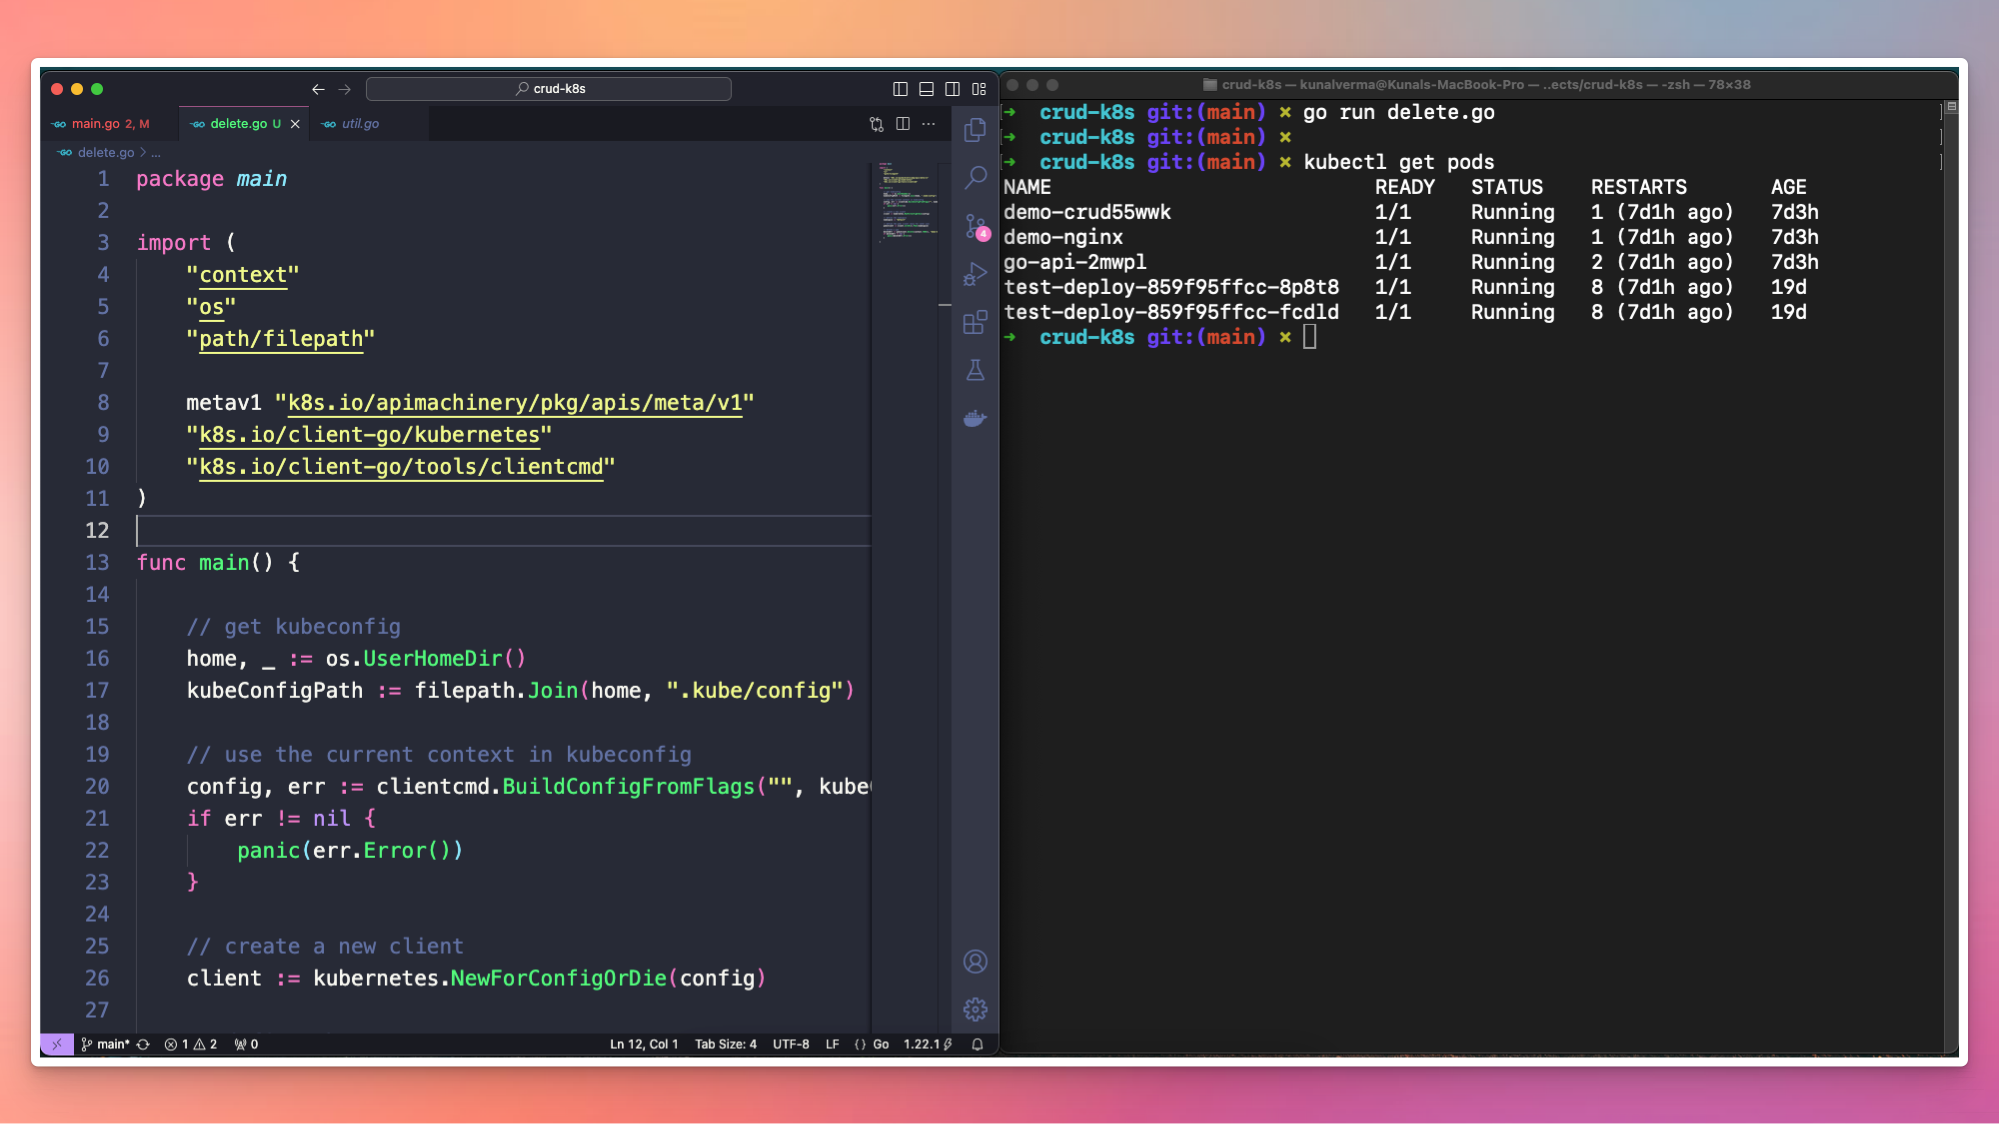
In this scenario, I have the following pods running in my cluster:
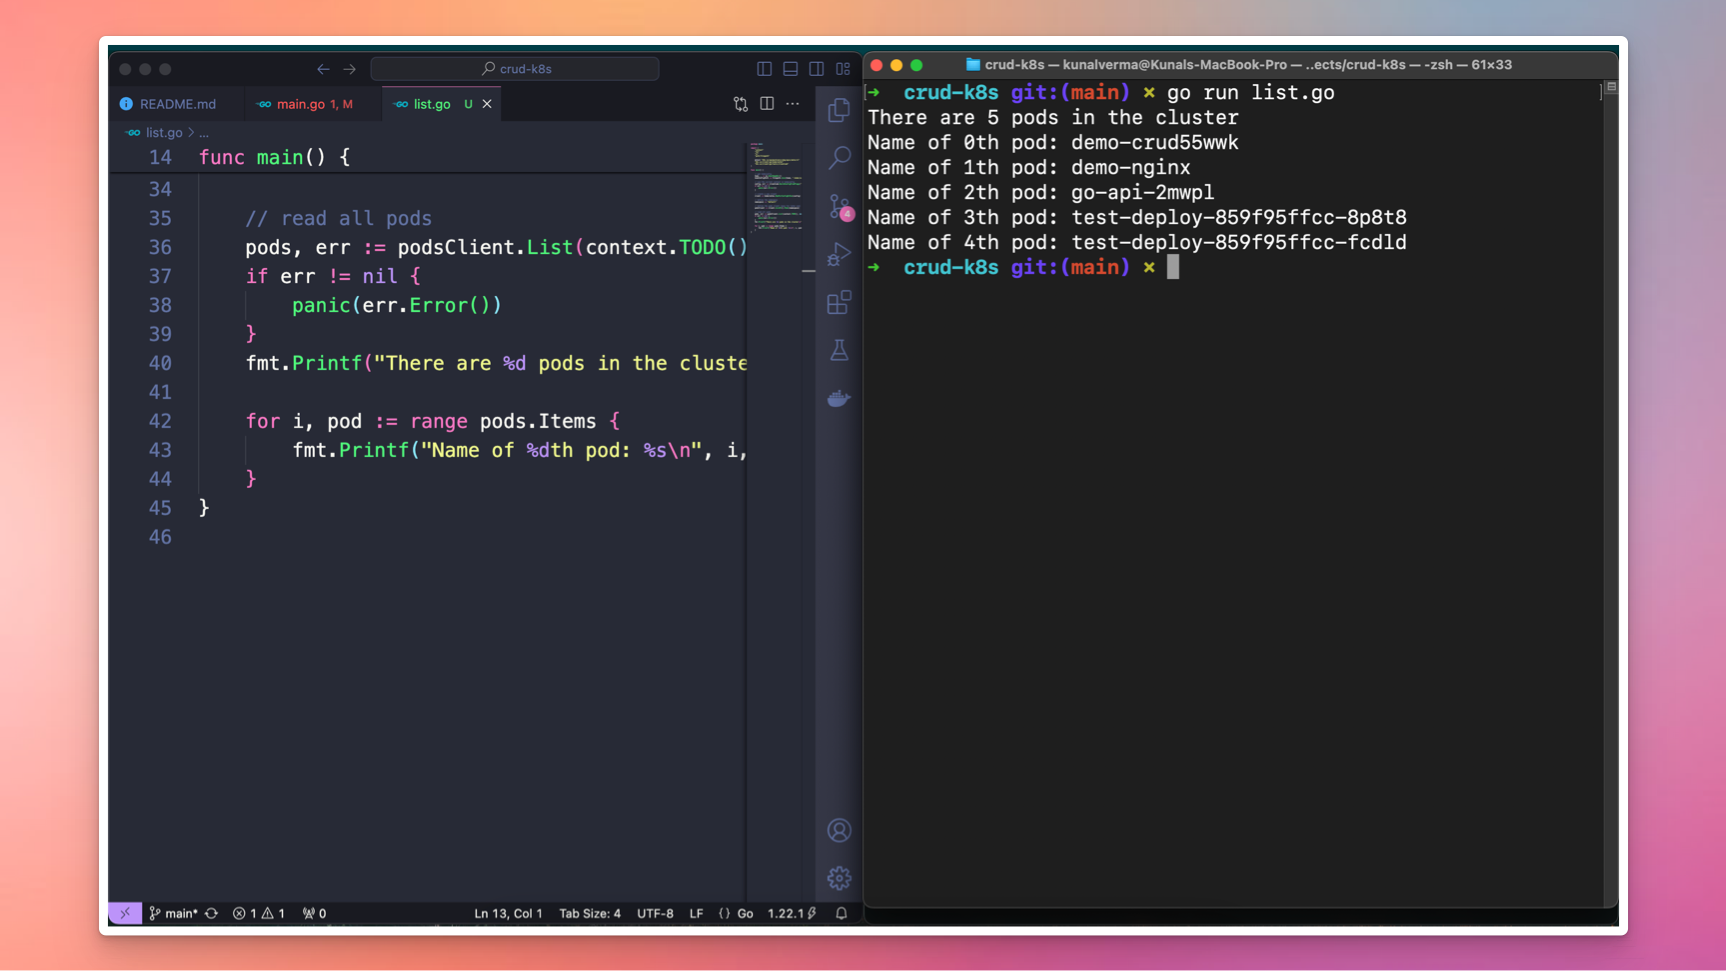
For the logic of retrieving all the running pods in a cluster, paste the following code snippet in your main.go file:
// define the namespacenamespace := "default"// get the Pod interface (easy for later use)podsClient := client.CoreV1().Pods(namespace)// read all podspods, err := podsClient.List(context.TODO(), metav1.ListOptions{})if err != nil { panic(err.Error())}fmt.Printf("There are %d pods in the cluster\n", len(pods.Items))// loop through pod list to get namesfor i, pod := range pods.Items { fmt.Printf("Name of %dth pod: %s\n", i, pod.Name)}
A breakdown of the core logic being used is as follows:
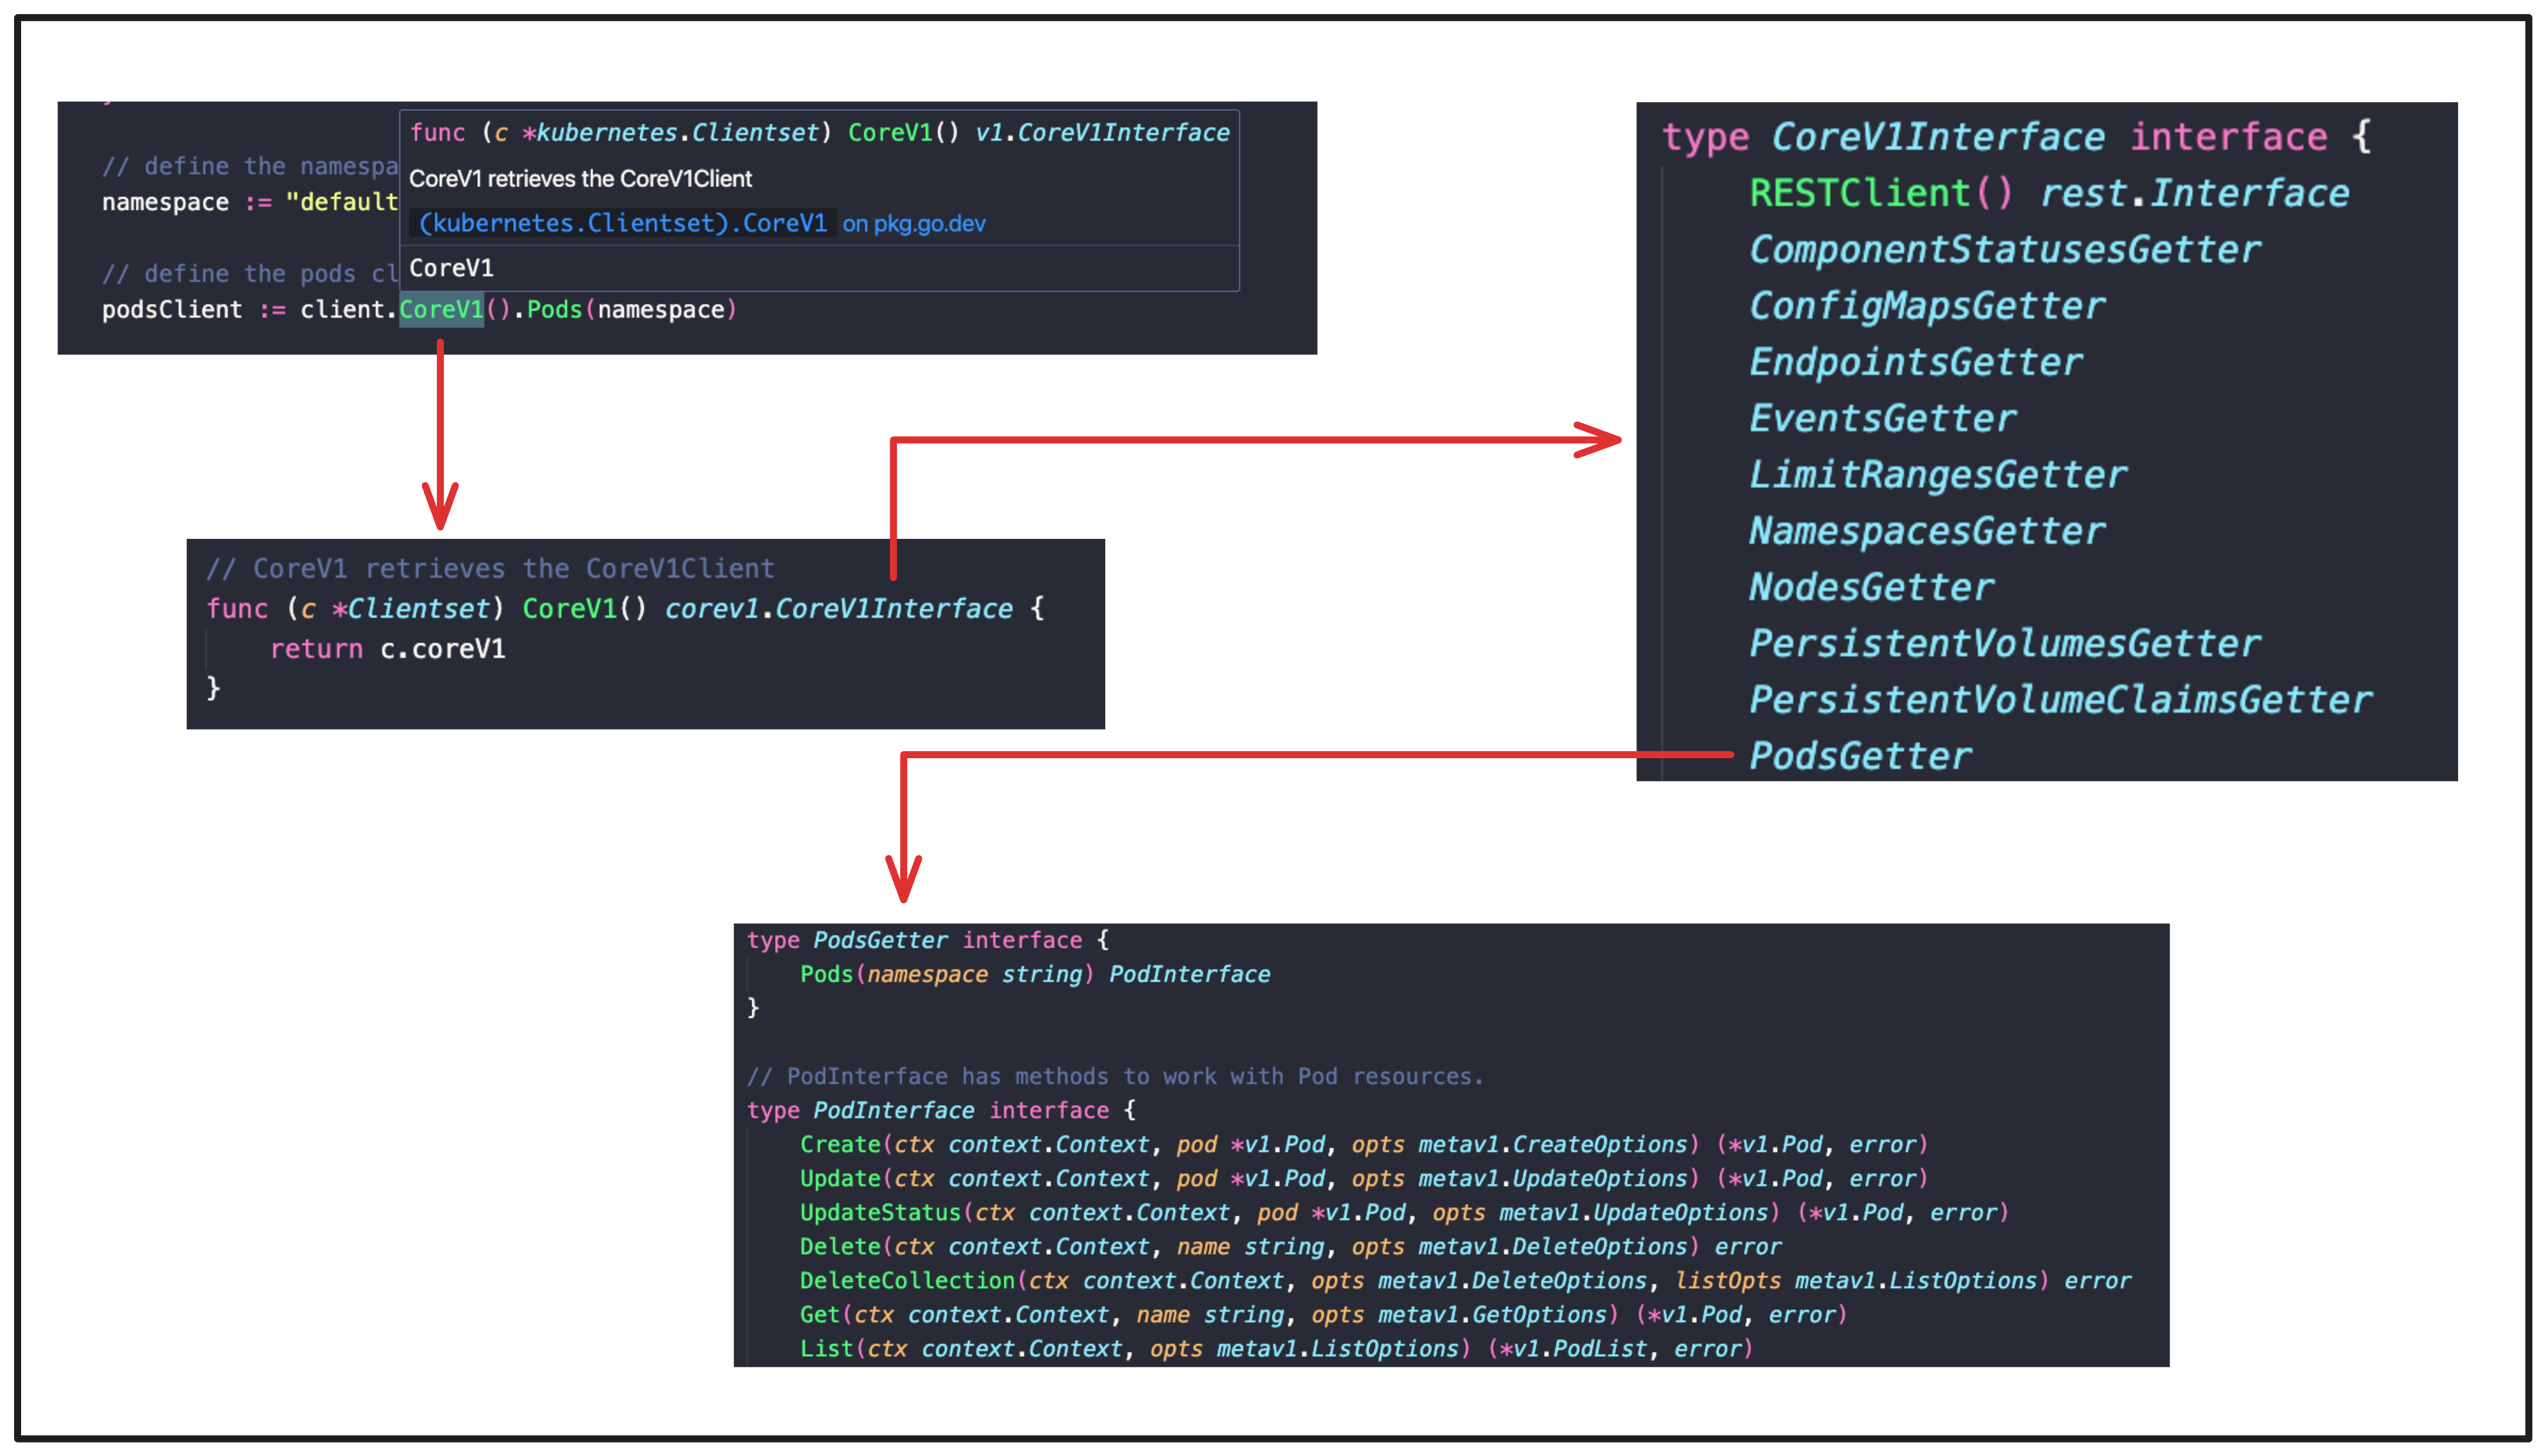
So, in this line we are first calling the CoreV1() function from the k8s.io/client-go/kubernetes package which returns a CoreV1Interface interface, which is a collection of some embedded interfaces of all the Kubernetes resources that fall under the core v1 API group:
From here, we are then using the Pods() method included in the PodsGetter interface, which in turn returns the PodInterface interface, which is a collection of methods to work with the Pod resource:
type PodInterface interface { Create(ctx context.Context, pod *v1.Pod, opts metav1.CreateOptions) (*v1.Pod, error) Update(ctx context.Context, pod *v1.Pod, opts metav1.UpdateOptions) (*v1.Pod, error) UpdateStatus(ctx context.Context, pod *v1.Pod, opts metav1.UpdateOptions) (*v1.Pod, error) Delete(ctx context.Context, name string, opts metav1.DeleteOptions) error DeleteCollection(ctx context.Context, opts metav1.DeleteOptions, listOpts metav1.ListOptions) error Get(ctx context.Context, name string, opts metav1.GetOptions) (*v1.Pod, error) ...}
📍 Note
Going forward, we’ll be using the methods listed in the PodInterface interface to perform all the CRUD operations.
podsClient.List(…) - This one’s simple to understand! Here, we use the List() method defined under the PodInterface interface, which returns a PodList struct. The PodList struct represents a list of Kubernetes pods.
type PodList struct { metav1.TypeMeta `json:",inline"` // Standard list metadata. // More info: https://git.k8s.io/community/contributors/devel/sig-architecture/api-conventions.md#types-kinds // +optional metav1.ListMeta `json:"metadata,omitempty" protobuf:"bytes,1,opt,name=metadata"` // List of pods. // More info: https://git.k8s.io/community/contributors/devel/sig-architecture/api-conventions.md Items []Pod `json:"items" protobuf:"bytes,2,rep,name=items"`}
The Items field represents a slice of Pod objects and that is what we accessed using pods.Items in the next set of lines.
Here’s the complete code for the read operation, along with the output after execution:
package mainimport ( "context" "fmt" "os" "path/filepath" metav1 "k8s.io/apimachinery/pkg/apis/meta/v1" "k8s.io/client-go/kubernetes" "k8s.io/client-go/tools/clientcmd")func main() { // get kubeconfig home, _ := os.UserHomeDir() kubeConfigPath := filepath.Join(home, ".kube/config") // use the current context in kubeconfig config, err := clientcmd.BuildConfigFromFlags("", kubeConfigPath) if err != nil { panic(err.Error()) } // create a new client client := kubernetes.NewForConfigOrDie(config) // define the namespace namespace := "default" // define the pods client (easy for later use) podsClient := client.CoreV1().Pods(namespace) // read all pods pods, err := podsClient.List(context.TODO(), metav1.ListOptions{}) if err != nil { panic(err.Error()) } fmt.Printf("There are %d pods in the cluster\n", len(pods.Items)) for i, pod := range pods.Items { fmt.Printf("Name of %dth pod: %s\n", i, pod.Name) }}
💡 If you’re a beginner in the Go programming language, one thing you certainly might have noticed is, a lot of the parts of the client-go library that we’ll be using, are interconnected in some way.
Interfaces contains some other interfaces, which may contain some different types or structs, which may contain some methods and so on.
A nice hack to see the interface/struct/method signatures in order to understand their connections, is to use cmd + click or win + click feature in editors like VSCode, which leads you to that specific interface/struct/method and then, you can understand how its all connected.
A breakdown of the core logic being used is as follows:
&v1.Pod{} - here, we are accessing the Pod struct which is from the k8s.io/api/core/v1 package. The signature of the struct looks like this:
type Pod struct { metav1.TypeMeta `json:",inline"` // Standard object's metadata. // More info: https://git.k8s.io/community/contributors/devel/sig-architecture/api-conventions.md#metadata // +optional metav1.ObjectMeta `json:"metadata,omitempty" protobuf:"bytes,1,opt,name=metadata"` // Specification of the desired behavior of the pod. // More info: https://git.k8s.io/community/contributors/devel/sig-architecture/api-conventions.md#spec-and-status // +optional Spec PodSpec `json:"spec,omitempty" protobuf:"bytes,2,opt,name=spec"` // Most recently observed status of the pod. // This data may not be up to date. // Populated by the system. // Read-only. // More info: https://git.k8s.io/community/contributors/devel/sig-architecture/api-conventions.md#spec-and-status // +optional Status PodStatus `json:"status,omitempty" protobuf:"bytes,3,opt,name=status"`}
Its important to note that, the fields mentioned in this struct are themselves structs, which have their own fields and those are the ones which we are actually using.
For instance, the ObjectMeta struct from the metav1 package contains the following fields, which we have used in our implementation:
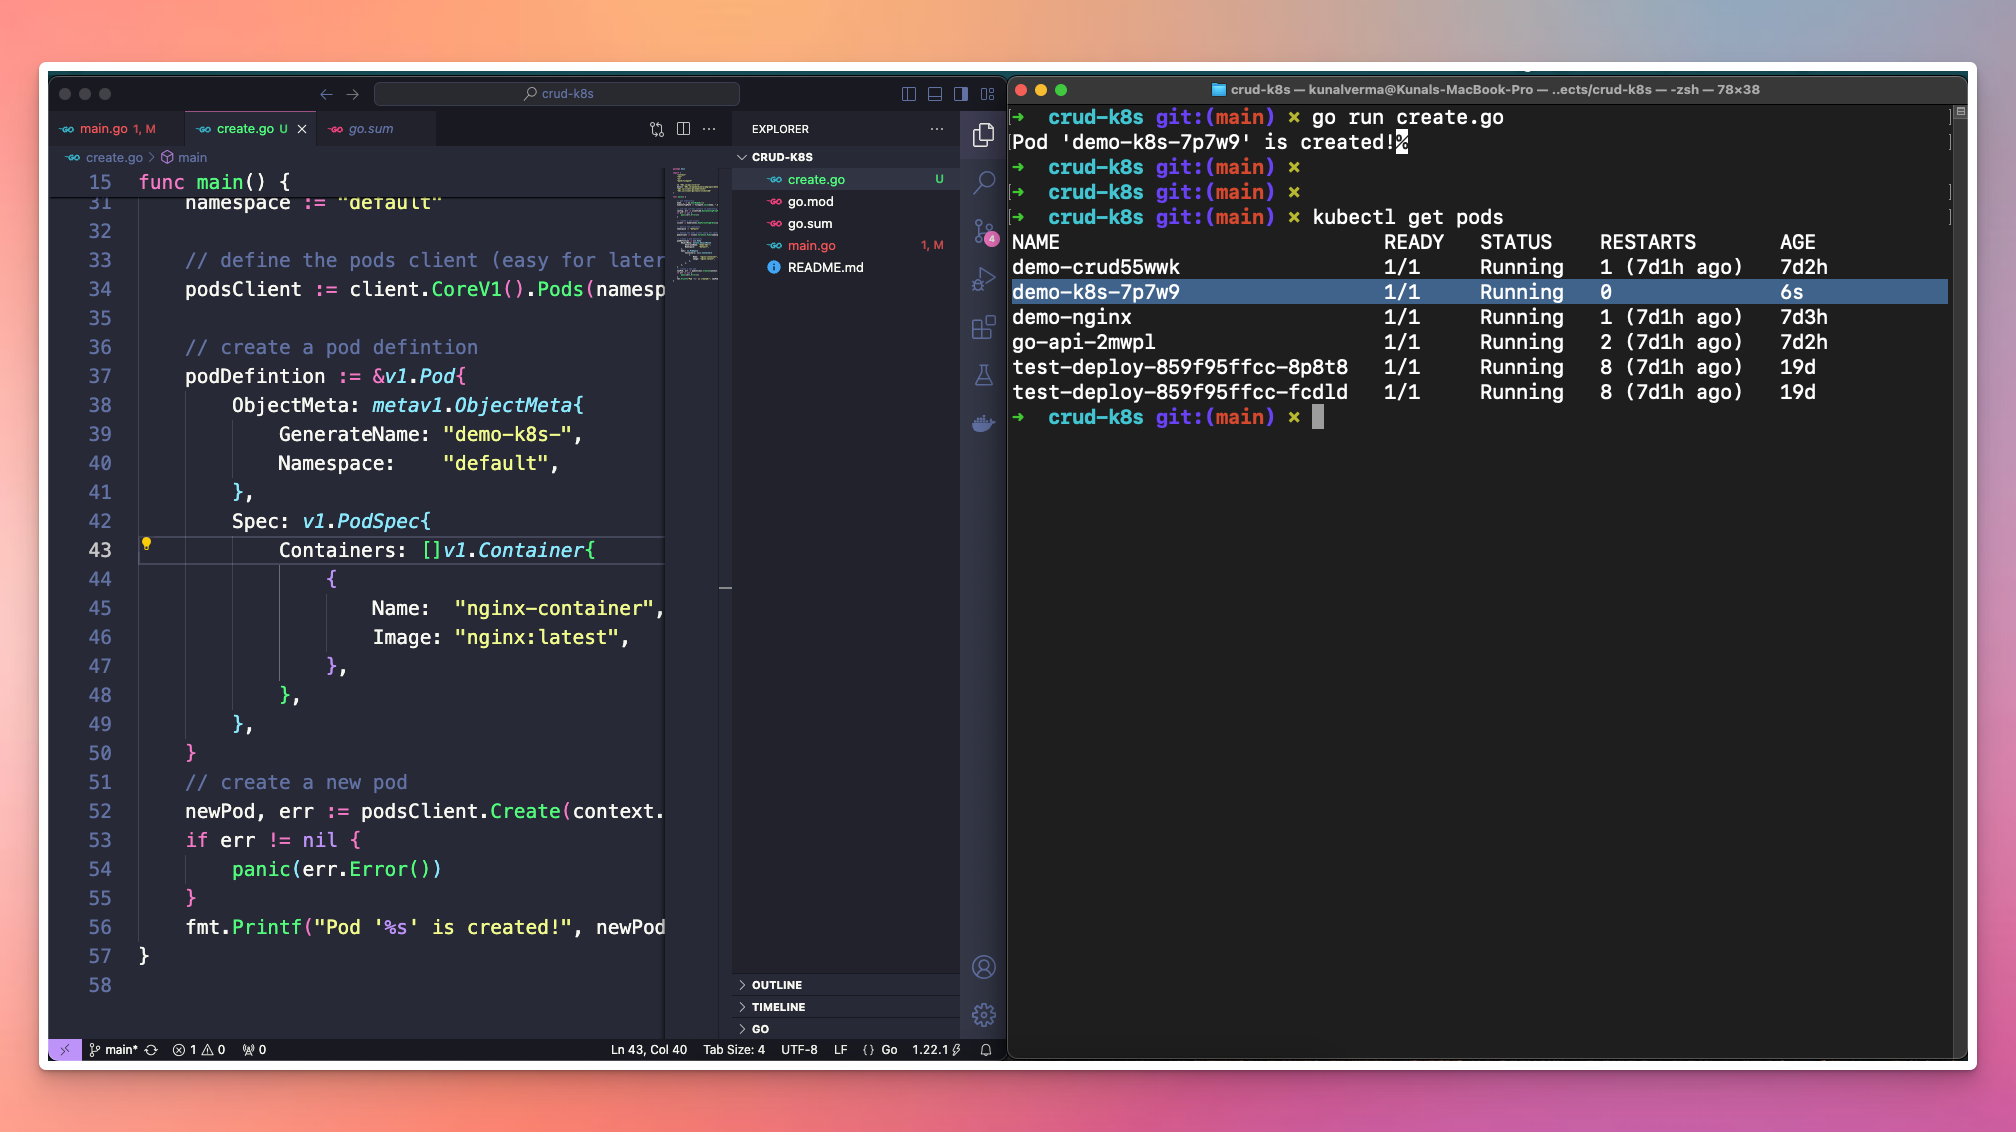
After defining the pod definition, we’ll use the Create() method (from the PodInterface - learned above) to create a new Pod, based on the pod definition:
A breakdown of the core logic being used is as follows:
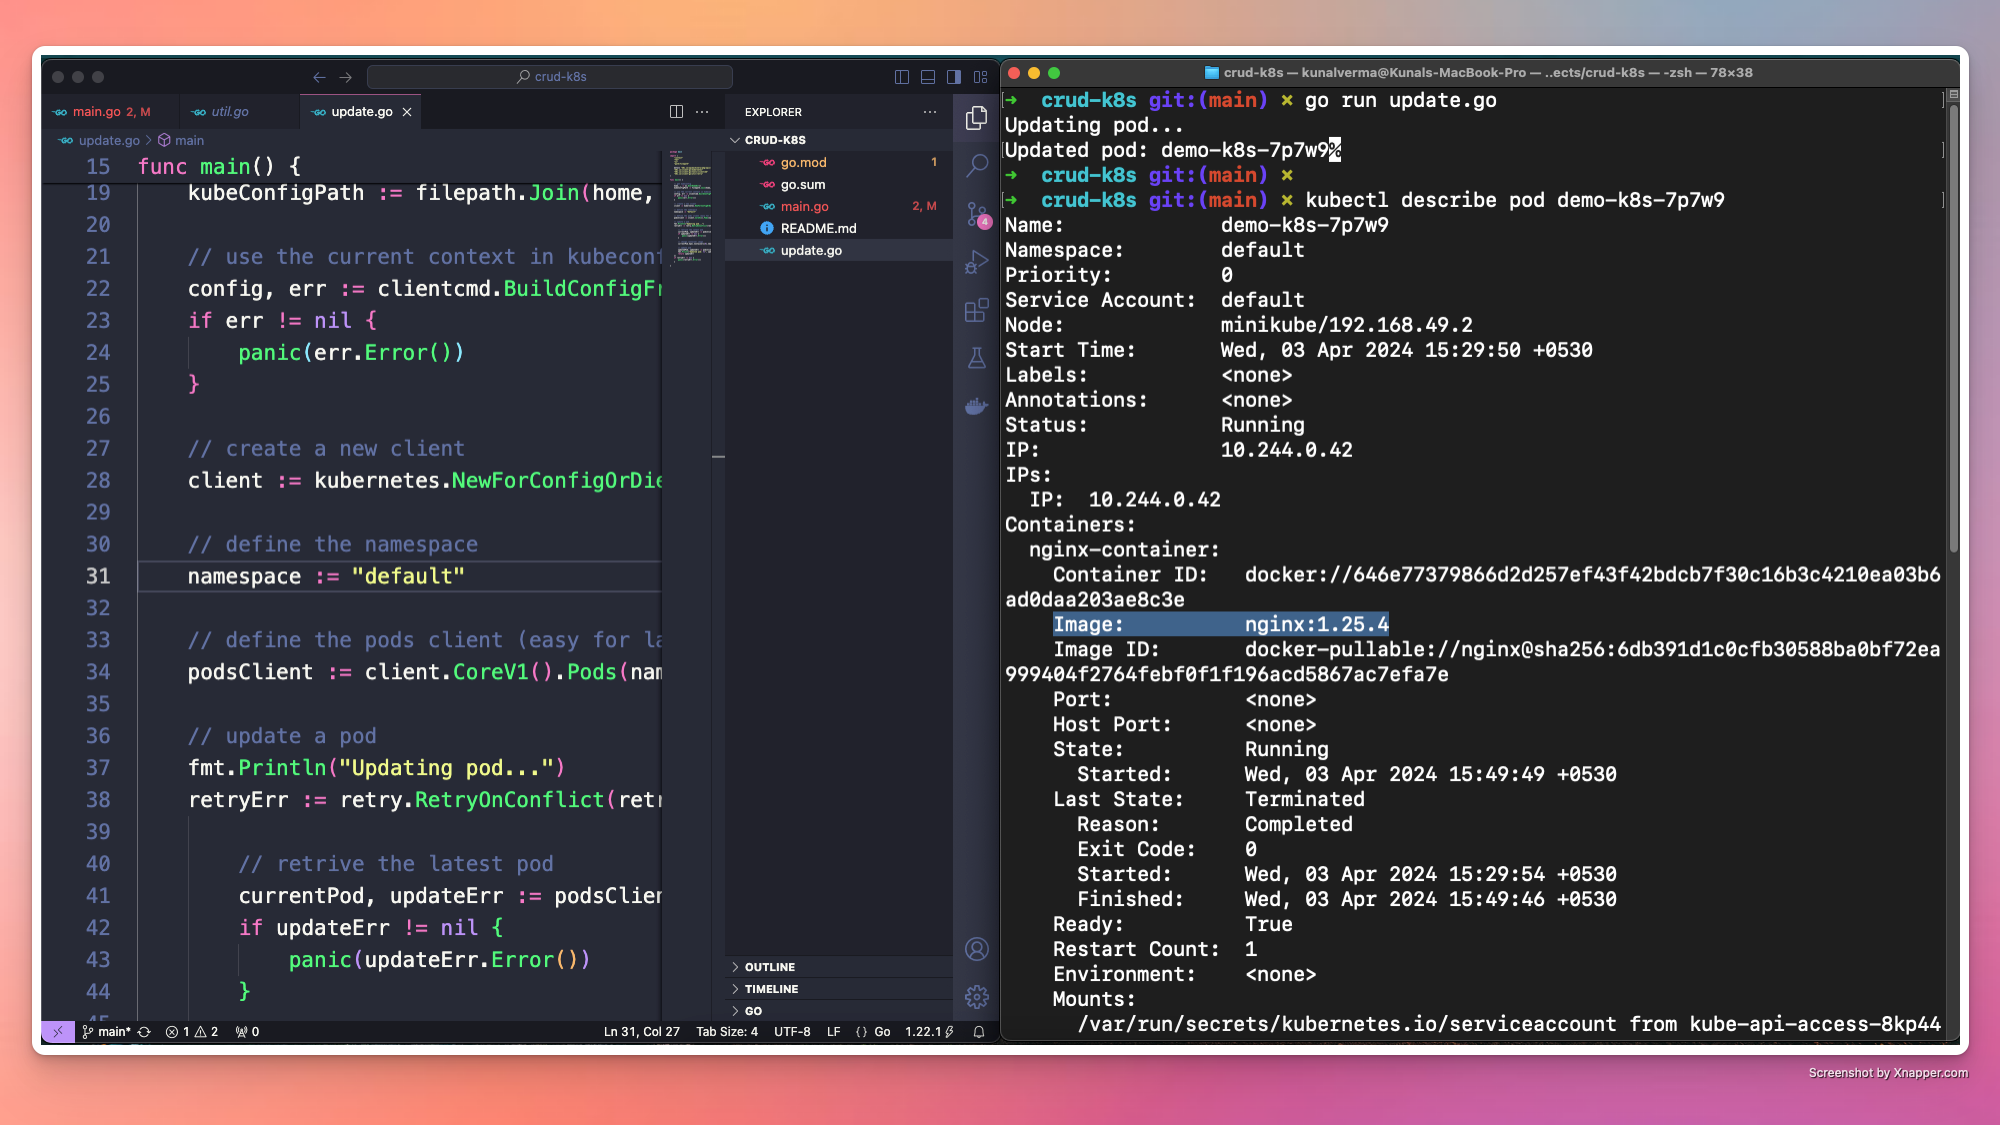
Here, we are mainly using the Get() and the Update() method from the PodInterface interface to first get the information about that specific pod, and then update the container image field with a new image version - in this case, from nginx:latest to nginx:1.25.4.
retry.RetryOnConflict() - This one’s interesting, because we are enclosing the entire update operation inside this.
Here, we are using the RetryOnConflict() method from the k8s.io/client-go/util/retry package, which is designed to handle conflicts that may occur when attempting to update a Kubernetes resource.
In a distributed system like Kubernetes, conflicts can arise when multiple clients attempt to modify the same resource simultaneously. In that case, the RetryOnConflict() function implements a retry mechanism that retries the provided operation (in this case, the pod update operation) if a conflict error occurs.
You can find more details about the retry package in the documentation.
Here’s the complete code for the update operation, along with the output after execution:
package mainimport ( "context" "fmt" "os" "path/filepath" metav1 "k8s.io/apimachinery/pkg/apis/meta/v1" "k8s.io/client-go/kubernetes" "k8s.io/client-go/tools/clientcmd" "k8s.io/client-go/util/retry")func main() { // get kubeconfig home, _ := os.UserHomeDir() kubeConfigPath := filepath.Join(home, ".kube/config") // use the current context in kubeconfig config, err := clientcmd.BuildConfigFromFlags("", kubeConfigPath) if err != nil { panic(err.Error()) } // create a new client client := kubernetes.NewForConfigOrDie(config) // define the namespace namespace := "default" // define the pods client (easy for later use) podsClient := client.CoreV1().Pods(namespace) // update a pod fmt.Println("Updating pod...") retryErr := retry.RetryOnConflict(retry.DefaultRetry, func() error { // retrive the latest pod currentPod, updateErr := podsClient.Get(context.TODO(), "demo-k8s-7p7w9", metav1.GetOptions{}) if updateErr != nil { panic(updateErr.Error()) } // change container image currentPod.Spec.Containers[0].Image = "nginx:1.25.4" // update pod updatedPod, updateErr := podsClient.Update(context.TODO(), currentPod, metav1.UpdateOptions{}) fmt.Printf("Updated pod: %s", updatedPod.Name) return updateErr }) if retryErr != nil { panic(retryErr.Error()) }}
In the initial step, we set the kubeconfig file location be the default location which is in - ${HOME}/.kube/config.
There’s an alternate way of configuring this step, wherein we can use the flag —-kubeconfig, to set a custom location for the kubeconfig file to be used.
Below is the code snippet to set the —-kubeconfig flag:
var kubeconfig *stringif home := homedir.HomeDir(); home != "" { kubeconfig = flag.String("kubeconfig", filepath.Join(home, ".kube", "config"), "(optional) absolute path to the kubeconfig file")} else { kubeconfig = flag.String("kubeconfig", "", "absolute path to the kubeconfig file")}flag.Parse()config, err := clientcmd.BuildConfigFromFlags("", *kubeconfig)if err != nil { panic(err)}
A breakdown of the important concepts is as follows:
homedir.HomeDir() - Here, we are using the HomeDir() method from the k8s.io/client-go/util/homedir package to fetch the user’s home location.
We are using the flag package to define a new flag kubeconfig, that takes in a string input.
Now, if you wish to give a custom location of the kubeconfig file to use, it can be set as follows:
$ go run read.go --kubeconfig="/Users/kunalverma/Desktop/config"There are 5 pods in the clusterName of 0th pod: demo-crud55wwkName of 1th pod: demo-nginxName of 2th pod: go-api-2mwplName of 3th pod: test-deploy-859f95ffcc-8p8t8Name of 4th pod: test-deploy-859f95ffcc-fcdld
When it comes to the creating a new client using the config, the client-go module offers two ways to do so:
Using kubernetes.NewForConfigOrDie(config) - This is what we have used in the demo above.
Using kubernetes.NewForConfig(config)
The major difference between these two approaches is the way these handle errors.
NewForConfigOrDie() automatically takes care of any errors by panicking if there is an error in the config. Whereas, in NewForConfig() we need to handle the error explicitly, as shown below:
client, err := kubernetes.NewForConfig(config)if err != nil{ errors.New("Error in Config")}
In this practical guide, we covered the essentials of Kubernetes development using client-go in Go. From setting up our environment to performing CRUD operations on Pod, we've certainly gained some valuable insights.
These fundamentals set the right stage for you to navigate Kubernetes development with confidence and build robust applications with ease.
We’ll certainly be building some cool projects using the client libraries in the near future, so be sure to follow Kubesimplify for more such content.
Kunal is a DevOps and Cloud Native Advocate with a passion for Open Source. He's been involved in the DevOps and open-source ecosystem for 1.5+ years and has a strong experience in public speaking, community management, content creation etc. He has experience working on and contributing to some of the major projects in the CNCF, including Kubernetes, Layer5 and others. He always strives to empower others with my experiences and believes in growing with the community!