Day 4: Breaking Isolation on Purpose - Volumes, Networks, and the Real World
7 Days of Docker in 2026 — When Containers Need to Talk and Remember On Day 3, you built production-ready images with Dockerfiles, optimized layers, and…


On this page (30)
- Table of Contents
- 1\. Data Dies With Containers
- 2\. Volumes: Breaking Filesystem Isolation
- Named Volumes - Let Docker Manage It
- Bind Mounts - Map Host Directories Directly
- tmpfs Mounts - Memory Only, Never Touches Disk
- The Decision Matrix
- 3\. Networks: Breaking Network Isolation
- The Default Bridge Trap
- Custom Bridge Networks - DNS for Free
- The Full Isolation Spectrum
- 4\. Port Mapping: Breaking Host Isolation
- Port Mapping Syntax
- 5\. Putting It Together: Redis Service Discovery
- Set Up the Network and Volume
- Launch Redis with a Named Volume
- Connect an App Container by Name
- Cleanup
- 6\. What Nobody Tells You
- Bind Mounts With :rw Can Destroy Your Code
- The Default Bridge Has No DNS, And This Will Bite You
- Volume Data Outlives Everything
- Port Mapping Bypasses Your Firewall
- 7\. Quick Reference
- Volume Commands
- Network Commands
- Running Containers With Storage and Networks
- Common Database Volume Paths
- Key Takeaways
- What's Next: Day 5
7 Days of Docker in 2026 — When Containers Need to Talk and Remember
On Day 3, you built production-ready images with Dockerfiles, optimized layers, and mastered multi-stage builds. Every container you have launched so far has been a tiny, sealed universe - isolated filesystem, isolated network, isolated process tree. That isolation is the entire point of containers.
But here is the thing nobody tells you on day one: useful applications break isolation constantly. A database container that cannot remember data after a restart is useless. A web frontend that cannot reach its API backend is useless. A Redis cache that no service can connect to is useless.
Today, you learn to break isolation on purpose - with volumes (persistent storage), custom networks (container-to-container communication), and port mapping (exposing services to your host). These are the three controlled breaches that turn toy containers into real systems.
Table of Contents #
1. Data Dies With Containers #
Before I show you the fix, I need you to feel the problem.
Write a file inside a running container:
docker run --name d4-writer alpine sh -c 'echo "Important!" > /data.txt && cat /data.txt'Important!The file exists. Now remove that container and try to read from a fresh one:
docker rm d4-writer

docker run --name d4-reader alpine sh -c 'cat /data.txt'
cat: can't open '/data.txt': No such file or directoryData is GONE!
docker rm d4-readerEach container gets its own copy-on-write layer (Day 2). When the container dies, that layer is garbage-collected. Every file, every database row, every log entry - deleted. This is not a bug. This is exactly how containers are supposed to work.
But it means you need a deliberate strategy for any data that outlives a single container. That is where volumes come in.
2. Volumes: Breaking Filesystem Isolation #
Docker gives you three ways to punch a hole through the filesystem wall. Each one trades some isolation for some capability.

Named Volumes - Let Docker Manage It #
Named volumes are Docker-managed storage areas that live outside any container's lifecycle. You create them by name, mount them into containers, and Docker handles everything else - location on disk, permissions, and cleanup.
$ docker volume create d4-datad4-dataWrite data from one container:
docker run --rm -v d4-data:/data alpine sh -c \
  'echo "Persisted on Wed Apr 22" > /data/message.txt && cat /data/message.txt'
Persisted on Wed Apr 27That container is already gone (thanks to --rm). Now read from a completely new container - different ID, different writable layer, different process:
docker run --rm -v d4-data:/data alpine cat /data/message.txtPersisted on Wed Apr 27The data survived. The volume exists independently of any container that mounts it.
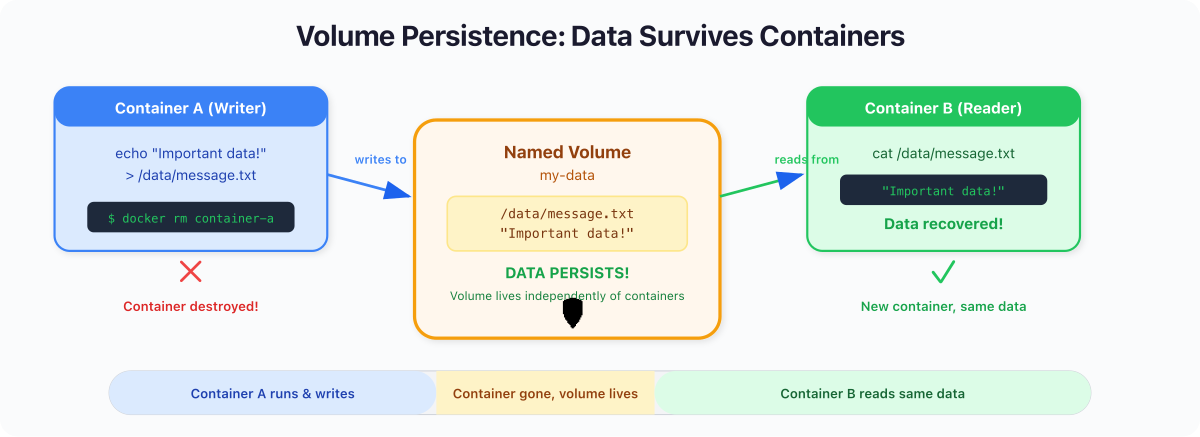
Best for: Databases, application state, anything that must survive container replacement. This is your default choice for production.
Bind Mounts - Map Host Directories Directly #
A bind mount maps a specific path on your host machine into the container. The container sees your host files in real time — edit on the host, and the container picks it up instantly.
mkdir -p /tmp/d4-site

cat > /tmp/d4-site/index.html << 'EOF'
<h1>Hello from a bind mount!</h1>
EOF

docker run -d --name d4-web -p 8084:80 \
  -v /tmp/d4-site:/usr/share/nginx/html:ro nginx:alpine
The :ro flag means read-only - the container can read your files, but cannot modify them. This matters. More on that in section 6.
curl -s http://localhost:8084 | grep '<h1>'<h1>Hello from a bind mount!</h1>Now edit the file on your host and hit it again - no rebuild, no restart:
echo '<h1>Updated LIVE!</h1>' > /tmp/d4-site/index.html

curl -s http://localhost:8084 | grep '<h1>'<h1>Updated LIVE!</h1>Best for: Local development with hot reload. Never use bind mounts in production — they create host dependency and break portability.
docker stop d4-web && docker rm d4-webtmpfs Mounts - Memory Only, Never Touches Disk #
docker run --rm --tmpfs /app/scratch alpine sh -c \
'echo "secret" > /app/scratch/token.txt && cat /app/scratch/token.txt'secretThe data lives in RAM. It is never written to disk and vanishes when the container stops. Best for: Secrets, API tokens, or scratch space that must never be persisted.
The Decision Matrix #
| Feature | Named Volumes | Bind Mounts | tmpfs |
|---|---|---|---|
| Managed by Docker | Yes | No | No |
| Survives container removal | Yes | Yes (on host) | No |
| Pre-populated with image data | Yes | No | No |
| Performance | Near-native | Native | Fastest |
| Use in production | Yes | No | Rarely |
Captain's Rule: When in doubt, use a named volume. Bind mounts are for development. tmpfs is for secrets. Named volumes are for everything else.
3. Networks: Breaking Network Isolation #
You can persist data now. But a container that stores data and talks to nobody is just an expensive text file. Real applications are systems of services that need to find each other.
Docker networking has one massive gotcha, and I guarantee most tutorials will bury it three paragraphs too deep.
The Default Bridge Trap #
Every container you have created so far lands on the default bridge network. Containers on the default bridge can reach each other by IP address — but not by name.
That means no DNS. No service discovery. Just raw IPs that change every time a container restarts. This is fine for throwaway experiments. It is terrible for anything real.
Custom Bridge Networks - DNS for Free #
Create a custom bridge network, and Docker gives you an embedded DNS server. Every container on that network is registered by its --name, and any other container can resolve that name to the correct IP.
docker network create d4-netLaunch two containers on that network:
docker run -d --name d4-web --network d4-net nginx:alpine

docker run -d --name d4-api --network d4-net nginx:alpine
Now ping by container name - not IP:
docker exec d4-api ping -c 2 d4-webPING d4-web (172.22.0.2): 56 data bytes
64 bytes from 172.22.0.2: seq=0 ttl=64 time=0.721 ms
64 bytes from 172.22.0.2: seq=1 ttl=64 time=0.234 ms
--- d4-web ping statistics ---
2 packets transmitted, 2 packets received, 0% packet loss
round-trip min/avg/max = 0.234/0.477/0.721 ms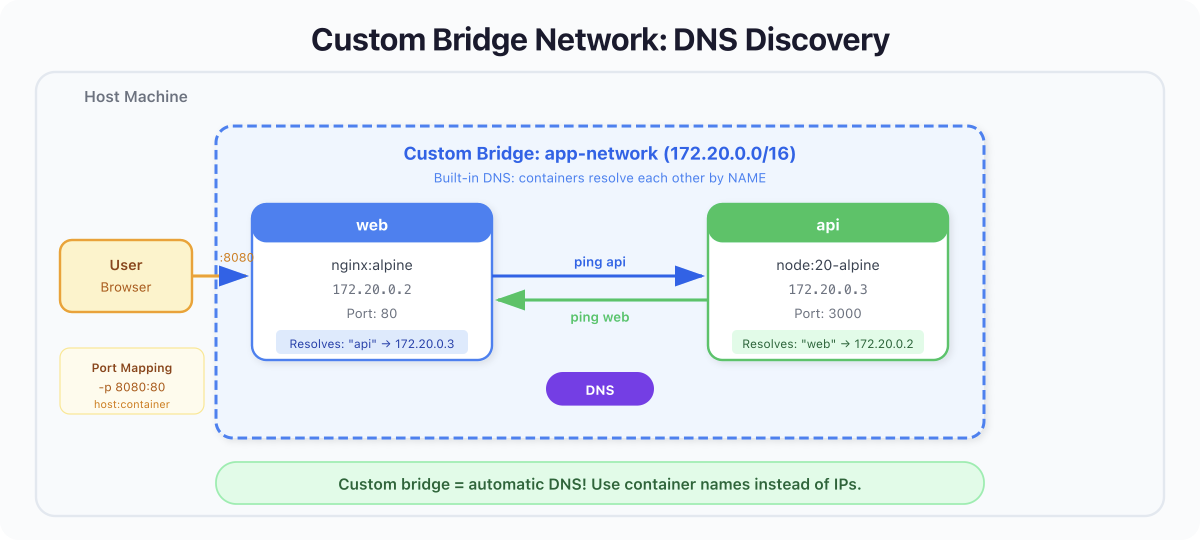
That 172.22.0.2 could change tomorrow if you recreate the container. But d4-web as a DNS name will always resolve to whatever IP the d4-web container currently holds. This is the same pattern Kubernetes uses with its internal DNS — Docker just gives it to you for free on custom networks.
Key Concept: Default bridge = no DNS, hardcoded IPs, fragile. Custom bridge = automatic DNS, service discovery by name, resilient. Always create a custom bridge for multi-container applications.
docker stop d4-web d4-api && docker rm d4-web d4-apiThe Full Isolation Spectrum #
Bridge networks are what you will use most days, but they are only two points on a wider spectrum. Docker ships several network modes, each sitting at a different level of isolation. Knowing they exist saves you from reaching for the wrong tool.
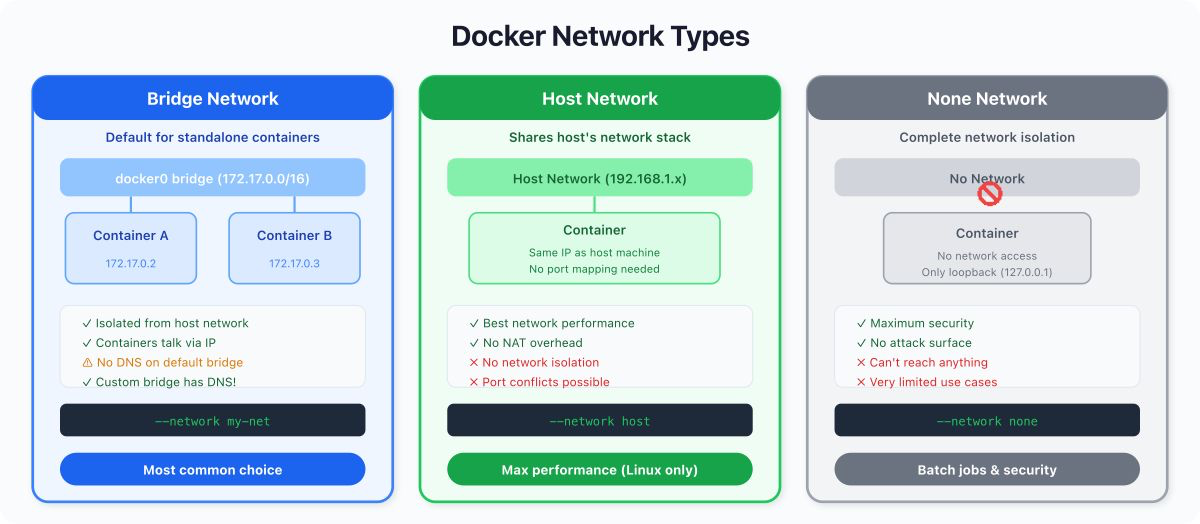
| Network mode | Isolation level | When to reach for it |
|---|---|---|
none | Maximum: no networking at all | Batch jobs that should never touch the network. Forensic analysis. Testing graceful network-failure paths. |
| Custom bridge | Strong: project-scoped DNS, isolated from default bridge | 99% of multi-container apps on a single host (the section above). |
| Default bridge | Weak: IP routing, no DNS | One-off experiments. Legacy quirks. |
host | None: container shares the host's network namespace | Performance-critical apps where bridge NAT is the bottleneck. Low-level networking tools that must see every interface on the host. |
overlay | Multi-host: one logical network spanning several Docker hosts | Swarm clusters. Multi-machine setups. Preview for the days when one laptop is not enough. |
--network host drops the network wall entirely. Your container shares the host's network stack, sees every interface, binds ports directly without NAT. Fastest possible networking, zero translation. The cost: no port mapping is needed because there is no isolation, two containers cannot bind the same port, and you lose service-name DNS. Use it for monitoring agents, packet-capture tools, or latency-sensitive workloads on Linux.
$ docker run --rm --network host alpine ip addr show | head -10You will see the same interfaces as ip addr show on your host. That is the point: there is no separate network namespace.
--network none removes networking completely. The container has only a loopback interface. No outbound connections, no inbound traffic, no DNS. This is the right choice for jobs that should never reach the network, or for proving that your application degrades gracefully when networking is unavailable.
$ docker run --rm --network none alpine ping -c 2 google.comping: bad address 'google.com'No DNS, no route. Exactly as expected.
overlay networks stretch a single logical network across multiple Docker hosts. They are how Swarm wires services together across a cluster of machines. You will not use overlay on a single laptop, but it is worth knowing the name for the day you graduate from one host to many.
Captain's Rule: Custom bridge for almost everything.
hostwhen bridge NAT is the bottleneck.nonewhen the container should be airtight.overlaywhen you outgrow a single machine.
4. Port Mapping: Breaking Host Isolation #
Volumes break filesystem isolation. Networks break container-to-container isolation. Port mapping breaks the final wall: host isolation.
By default, no traffic from your host machine can reach a container's internal ports. You explicitly map a host port to a container port with -p:
docker run -d --name d4-nginx -p 8080:80 nginx:alpineThis means: "Traffic hitting localhost:8080 on my host gets forwarded to port 80 inside the container."
curl -s http://localhost:8080 | head -5<!DOCTYPE html>
<html>
<head>
<title>Welcome to nginx!</title>
</head>Without -p 8080:80, that nginx process would be running and listening — but completely unreachable from your browser or curl.
Port Mapping Syntax #
| Syntax | Meaning |
|---|---|
-p 8080:80 | Host 8080 → Container 80 |
-p 127.0.0.1:8080:80 | Only bind to localhost (not exposed to network) |
-p 8080:80/udp | UDP instead of TCP |
-p 80 | Map container port 80 to a random host port |
Captain's Rule: In production, always bind to
127.0.0.1unless you explicitly want external traffic. A bare-p 8080:80binds to0.0.0.0— every network interface on your host, including public-facing ones.
docker stop d4-nginx && docker rm d4-nginx5. Putting It Together: Redis Service Discovery #
Time to combine everything. We will run a Redis container and an Alpine client on a custom network, use DNS-based service discovery to connect by name, and persist Redis data with a named volume.
Set Up the Network and Volume #
docker volume create d4-redis-data

docker network create d4-app-net
Launch Redis with a Named Volume #
docker run -d \
--name d4-redis \
--network d4-app-net \
-v d4-redis-data:/data \
redis:7-alpine redis-server --appendonly yes
The --appendonly yes flag tells Redis to persist data to disk (inside /data, which is backed by our volume). Without it, Redis keeps everything in memory and loses it all on restart.
Connect an App Container by Name #
docker run --rm -it \
--name d4-client \
--network d4-app-net \
redis:7-alpine redis-cli -h d4-redis
Notice -h d4-redis we connect using the container name, not an IP. Docker's embedded DNS resolves it automatically.
d4-redis:6379> SET greeting "Hello Day 4!"
OK
d4-redis:6379> GET greeting
"Hello Day 4!"
d4-redis:6379> exit
The value is set. Now kill the Redis container, start a fresh one with the same volume and network, and prove the data survived:
docker rm -f d4-redis

docker run -d \
--name d4-redis \
--network d4-app-net \
-v d4-redis-data:/data \
redis:7-alpine redis-server --appendonly yes
docker run --rm \
--network d4-app-net \
redis:7-alpine redis-cli -h d4-redis GET greeting"Hello Day 4!"The container was destroyed and replaced. The data persisted (volume). The new client found it by name (custom network DNS). This is the pattern behind every microservice architecture - disposable compute, durable storage, DNS-based discovery.
Cleanup #
docker rm -f d4-redis
docker network rm d4-app-net
docker volume rm d4-redis-data d4-data
6. What Nobody Tells You #
Here is the section I wish someone had written for me when I was learning Docker.
Bind Mounts With :rw Can Destroy Your Code #
By default, bind mounts are :rw (read-write). That means the container has full write access to your host directory. A misconfigured build step, a buggy script, or a careless rm -rf inside the container, will modify or delete your actual source code on the host.
# This is dangerous:
docker run -v $(pwd):/app some-image npm run build
# If the build writes to /app, it's writing to YOUR filesystem.
Always use :ro for bind mounts unless the container genuinely needs to write back to the host. And when it does need to write, mount only the specific subdirectory it needs — never your entire project root with write access.
The Default Bridge Has No DNS, And This Will Bite You #
I cannot stress this enough. The default bridge network does not provide DNS resolution. If you run two containers without --network and try to connect by name, it will fail silently or hang. I have seen teams waste hours debugging "connection refused" errors that were really just missing DNS because nobody created a custom network.
Volume Data Outlives Everything #
Named volumes are not removed when you run docker rm, docker system prune, or even docker system prune -a. The only commands that touch volumes are docker volume rm and docker volume prune. This is by design, but it means orphaned volumes accumulate silently. Run docker system df monthly. You will be surprised.
Port Mapping Bypasses Your Firewall #
On Linux, Docker's port mapping manipulates iptables directly. This means -p 8080:80 can expose a service to the public internet even if your host firewall blocks port 8080. Docker inserts its rules before the firewall's. This is a well-known footgun and has led to real production incidents. Always bind to 127.0.0.1 explicitly if you only need local access.
7. Quick Reference #
Volume Commands #
docker volume create my-data          # Create a named volume
docker volume ls                       # List all volumes
docker volume inspect my-data          # Show volume details
docker volume rm my-data               # Delete a volume
docker volume prune                    # Remove unused anonymous volumes
docker volume prune -a                 # Remove ALL unused volumes (careful!)
Network Commands #
docker network create my-net           # Create a custom bridge
docker network ls                      # List all networks
docker network inspect my-net          # Show network details and connected containers
docker network rm my-net               # Delete a network
docker network connect my-net my-ctr   # Attach a running container to a network
docker network disconnect my-net my-ctr # Detach a running container
Running Containers With Storage and Networks #
# Named volume
docker run -v my-data:/app/data myimage

# Bind mount (read-only)
docker run -v /host/path:/container/path:ro myimage

# tmpfs
docker run --tmpfs /app/temp myimage

# Custom network with port mapping
docker run -d --name web --network my-net -p 8080:80 nginx:alpine

# The full combo: volume + network + port
docker run -d --name db \
  --network my-net \
  -v db-data:/var/lib/postgresql/data \
  -p 5432:5432 \
  postgres:17-alpine
Common Database Volume Paths #
| Image | Mount Path |
|---|---|
postgres | /var/lib/postgresql/data |
mysql | /var/lib/mysql |
mongo | /data/db |
redis | /data |
Key Takeaways #
-
Containers are isolated by design. Breaking that isolation is not a failure — it is the entire point of building real applications with Docker.
-
Volumes break filesystem isolation. Named volumes (Docker-managed, portable) for production. Bind mounts (host-mapped, live reload) for development. tmpfs (memory-only) for secrets.
-
Custom bridge networks break network isolation. The default bridge has no DNS. A custom bridge gives you free service discovery by container name. Always create one.
-
Port mapping breaks host isolation.
-p 8080:80lets your host reach the container. Bind to127.0.0.1in production unless you intend public exposure. -
Volumes outlive containers. We proved it: killed Redis, started a fresh container with the same volume, and
GET greetingstill returned"Hello Day 4!". -
DNS-based discovery is the pattern. Connect by container name, not IP. IPs change. Names do not. This is how Kubernetes works, too - learn the pattern now.
-
Bind mounts with
:rwcan modify your host filesystem. Default to:ro. Mount only what you need. Never give a container write access to your entire project directory unless you understand the risk.
What's Next: Day 5 #
You can now persist data, connect containers by name, and expose services to your host. But you typed a lot of docker run commands today, each with a growing list of flags. Imagine managing ten services this way.
In Day 5: Docker Compose - Defining Multi-Container Applications, you will learn to describe your entire application stack in a single YAML file and bring it all up with one command. The volume mounts, networks, and port mappings you learned today will become simple declarations in a Compose file.
See you tomorrow.
Get new posts in your inbox.
Spotted a typo or want to improve this post? Edit on GitHub →