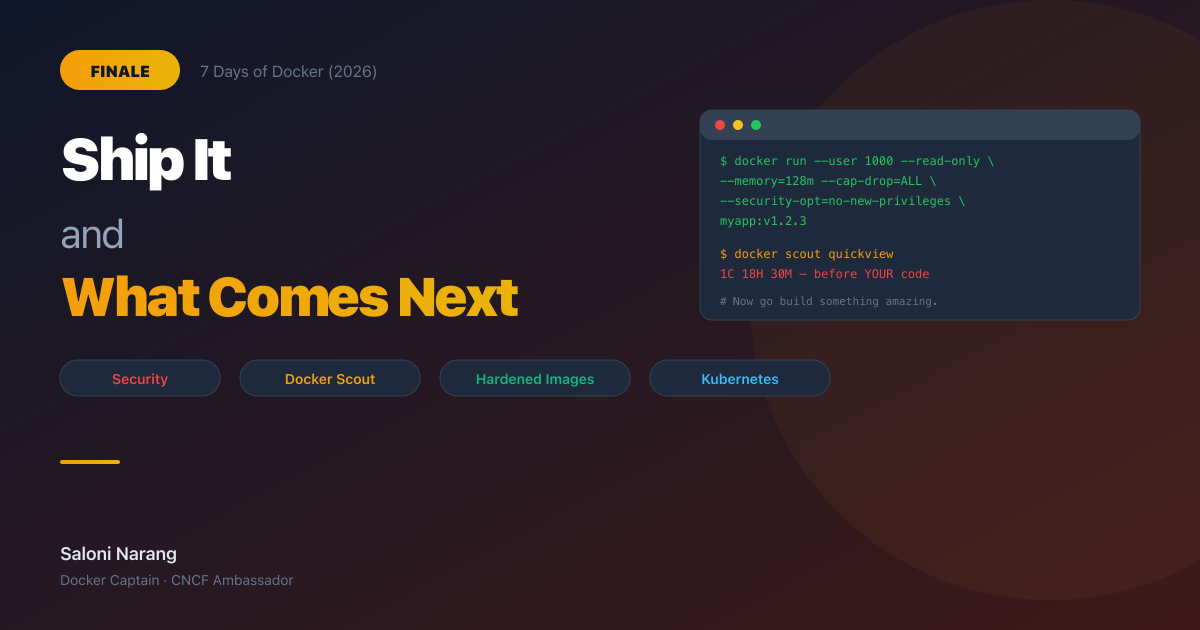
Day 7: Ship It - and What Comes Next
Your container runs as root and has 18 CVEs. A Docker Captain's guide to hardening, Scout policies, DHI, Sandboxes, and what comes after Docker.

On this page (14)
- Your Container Runs as Root. That's a Problem.
- Read-Only Filesystem: If They Can't Write, They Can't Attack
- Resource Limits: Because Runaway Containers Kill Hosts
- No New Privileges and Capability Dropping
- The Production Run Template
- Docker Scout as a CI Gate
- 2026's Supply Chain Wake-Up Call
- Docker Hardened Images: Fewer CVEs by Default
- Scout Policies and Attestations
- Docker Sandboxes: Isolating AI Agents
- Your 7-Day Journey
- Where Docker Ends
- The Production Checklist
- Now Go Build Something
7 Days of Docker (2026) - The Finale. A Docker Captain's guide. Not your average tutorial.
Your container is probably not safe to ship.
I know that sounds harsh after six days of building. You have images, Dockerfiles, multi-stage builds, Compose stacks - real skills. But here is the uncomfortable truth: everything we built in Days 1 through 6 was optimized for working. Today we optimize for not getting breached.
This is the part of Docker that separates side projects from production systems. The part most tutorials skip entirely. The part I wish someone had drilled into me before I shipped my first container to a real cluster.
Let's fix every container you have ever built.
Your Container Runs as Root. That's a Problem. #
By default, every Docker container runs as root. Not "sort of root." Not "sandboxed root." Root. UID 0. The same identity that owns every file on a Linux system.
Why does this matter? Because container isolation is not perfect. Kernel exploits exist. Misconfigurations happen. If an attacker escapes a container running as root, they land on the host as root. Game over. Your entire machine - every other container, every secret, every volume - is theirs.
The fix is embarrassingly simple:
$ docker run --rm --user 1000:1000 alpine id
uid=1000 gid=1000 groups=1000
That is it. One flag. The process now runs as an unprivileged user. In production Dockerfiles, you bake this in permanently:
FROM node:20-alpine
RUN addgroup -S appgroup && adduser -S appuser -G appgroup
USER appuser
CMD ["node", "server.js"]
After USER appuser, every subsequent instruction and the runtime process itself run as that user. No root. No exceptions.
What Nobody Tells You: "But my app needs to bind to port 80!" No, it does not. Bind to port 3000 or 8080 inside the container, then map it to whatever port you want on the host with
-p 80:3000. Needing port 80 inside the container is not a reason to run as root - it is a sign your architecture needs rethinking.
Read-Only Filesystem: If They Can't Write, They Can't Attack #
A writable filesystem inside a container means an attacker can drop malware, modify binaries, or plant a reverse shell. A read-only filesystem shuts all of that down:
$ docker run --rm --read-only alpine sh -c "echo test > /file"
sh: can't create /file: Read-only file system
The write was blocked by the kernel. Nothing gets through. But your app probably needs to write somewhere - temp files, logs, PID files. The answer is --tmpfs, which mounts a writable in-memory filesystem at a specific path:
docker run --rm --read-only --tmpfs /tmp alpine sh -c "echo test > /tmp/file && echo 'OK'"The root filesystem stays immutable. /tmp is writable but exists only in RAM and vanishes when the container stops. Attackers cannot persist anything.
Resource Limits: Because Runaway Containers Kill Hosts #
Without limits, a single container with a memory leak or a fork bomb can starve every other process on the machine - including your other containers. Docker uses Linux cgroups to enforce hard boundaries:
$ docker run --rm --memory=128m alpine cat /sys/fs/cgroup/memory.max
134217728
That is exactly 128 MB (128 x 1024 x 1024 = 134,217,728 bytes). If the process exceeds this, the kernel OOM-kills it. Not "warns it." Kills it. That is the correct behavior - a container that violates its resource contract should die, not drag down the host.
| Flag | What It Enforces |
|---|---|
--memory=128m | Hard memory ceiling. OOM-kill on breach. |
--cpus=0.5 | CPU throttling. Container gets half a core. |
--pids-limit=50 | Max process count. Prevents fork bombs. |
No New Privileges and Capability Dropping #
Two more flags that should be on every production container:
--security-opt=no-new-privileges prevents any process inside the container from gaining additional privileges through setuid/setgid binaries. Even if an attacker finds a SUID binary, they cannot escalate.
--cap-drop=ALL strips every Linux capability. By default, Docker grants containers a broad set - enough to do things like change file ownership, bind to privileged ports, and manipulate network interfaces. Drop them all, then add back only what you need:
docker run --rm \
  --cap-drop=ALL \
  --cap-add=NET_BIND_SERVICE \
  --security-opt=no-new-privileges \
  myapp
This container can bind to privileged ports and nothing else. No changing file ownership. No raw network access. No kernel module loading. The attack surface shrinks dramatically.
The Production Run Template #
Putting it all together, here is what a hardened docker run looks like:
docker run -d --name myapp \
--user 1000:1000 \
--read-only \
--tmpfs /tmp \
--memory=128m \
--cpus=0.5 \
--pids-limit=50 \
--cap-drop=ALL \
--security-opt=no-new-privileges \
--restart=unless-stopped \
-p 8080:3000 \
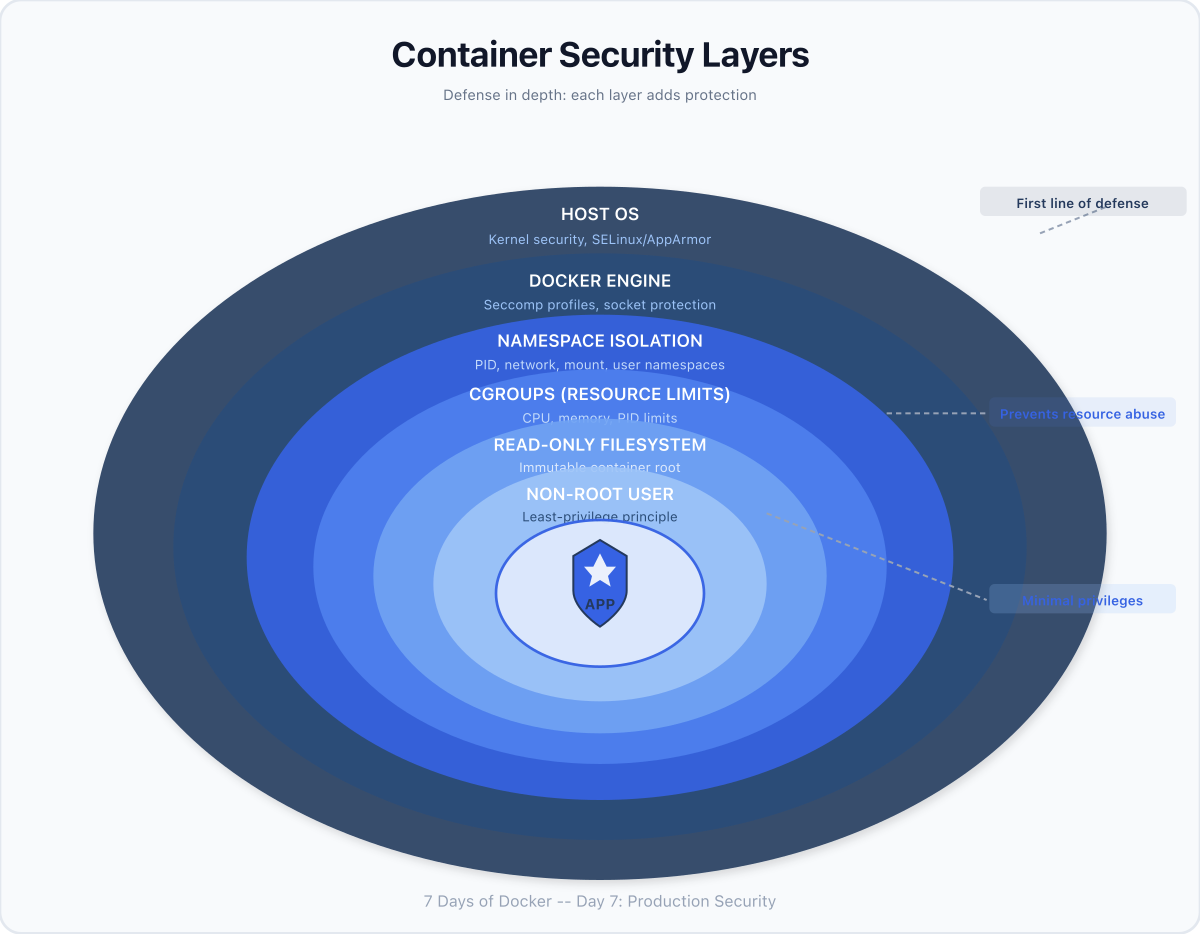
myapp:v1.2.3Every flag is a security layer. Remove any one of them and you open a hole. This is defense in depth - the principle that no single control is enough, but all of them together make a breach extremely difficult.

Docker Scout as a CI Gate #
Security hardening at runtime is half the battle. The other half is knowing what vulnerabilities are baked into your image before you ship it. Docker Scout scans your images for known CVEs and gives you a blunt summary:
$ docker scout quickview nginx:alpine
 Target             │  nginx:alpine            │    0C     2H     10M     2L     1?
   digest           │  7f7dcd27f920            │
 Base image         │  nginx:1-alpine-slim     │    0C     0H     1M     0L
 Updated base image │  nginx:1.30-alpine-slim  │    0C     0H     1M     0L
Read that output. A freshly-pulled nginx:alpine - patched days ago - still has 2 high and 10 medium vulnerabilities. That is before you add a single line of your own code. Now imagine an image you haven't updated in 3 months. Or 6. The numbers explode.
The image you pick matters more than most of the code you write on top of it.
In CI/CD, Scout becomes a gate. If the scan finds critical or high vulnerabilities, the pipeline fails and the image never reaches production:
# GitHub Actions - scan before push
- name: Scan for vulnerabilities
  run: |
    docker scout cves myapp:${{ github.sha }} \
      --exit-code \
      --only-severity critical,high
The --exit-code flag makes Scout return a non-zero exit code when vulnerabilities are found. Your pipeline stops. No humans required.
2026's Supply Chain Wake-Up Call #
In March 2026, attackers compromised Aqua Security's CI/CD pipeline and pushed backdoored Trivy scanner images to Docker Hub. The tool meant to FIND vulnerabilities became the attack vector. Thousands of CI/CD pipelines had secrets stolen.
Then in April 2026, it happened again. Attackers used stolen Checkmarx publisher credentials to push malicious images to checkmarx/kics on Docker Hub. Docker caught and quarantined it, but the pattern was clear: a stolen credential, a push through the normal publishing flow, and the attacker is inside the supply chain of every organization that pulls that tag.
This is not hypothetical. This is happening now. And it changes how you should think about every docker pull and every FROM line in your Dockerfiles.
Docker Hardened Images: Fewer CVEs by Default #
Docker recognized that the base image problem is systemic. If every nginx, node, and python image ships with dozens of known vulnerabilities, every developer inherits those vulnerabilities whether they know it or not.
The answer is Docker Hardened Images - curated, continuously patched base images with up to 95% fewer CVEs than their standard counterparts. They are free, licensed under Apache 2.0, and available on Docker Hub. Same functionality, dramatically smaller attack surface.
Instead of pulling nginx:alpine with its 58 known vulnerabilities and hoping for the best, you pull the hardened equivalent and start from a clean baseline. Docker maintains these images with rapid CVE patching - when a vulnerability is disclosed, the hardened image is rebuilt and pushed within hours, not weeks.
Docker Hardened Images (DHI) are not just "fewer CVEs." They are architecturally different:
-
Built from source by Docker with verified provenance
-
Signed releases produced through a hardened build pipeline
-
Rootless - no root user, ever
-
Distroless runtime - stripped of shells, package managers, everything an attacker needs
-
VEX attestations - machine-readable statements about which CVEs actually affect the image at runtime
-
7-day fix guarantee - new CVE disclosed? Patched image pushed within 7 days
-
Free and open source under Apache 2.0. 1,000+ images available.
Here's why DHI matters for the Trivy/KICS attack pattern: those attacks worked because a valid publisher credential could push any tag. With DHI, images are built by Docker from source - the provenance and signatures must match the upstream source, or the image doesn't ship. The attack pattern structurally can't work against DHI.
What Nobody Tells You: Most Docker tutorials teach you to pick a base image by size. "Use Alpine, it's small!" Size matters, but CVE count matters more. A 5 MB image with 3 critical vulnerabilities is worse than a 50 MB image with zero. Check
docker scout quickviewbefore you write your FROM line. Every time.
Scout Policies and Attestations #
Docker Scout isn't just quickview anymore. In 2026, it has a full policy engine:
-
Configurable policies - set severity thresholds, define what "compliant" means for your org
-
Supply chain attestations policy - flags images that lack SBOM or provenance attestations
-
CI gate - fail pipelines when policies are violated, not just when CVEs exist
-
SBOM generation - CycloneDX and SPDX formats, attached as attestations to your images
# GitHub Actions - policy-based gate, not just CVE count
- name: Check Scout policies
  run: |
    docker scout policy myapp:${{ github.sha }} \
      --exit-code \
      --org my-org
This is a shift from "scan and hope" to "define policy, enforce automatically."
Docker Sandboxes: Isolating AI Agents #
If you're running AI coding agents (Claude Code, Codex, Copilot, Gemini CLI), Day 6's Model Runner gives them intelligence. But intelligence without guardrails is dangerous.
Docker Sandboxes run each agent session inside a dedicated MicroVM - not a container, an actual virtual machine with its own kernel and private Docker daemon. The agent can clone repos, run tests, build images, execute arbitrary code - all inside a disposable environment with no path back to your host.
brew install docker/tap/sbxThis is not "a container with extra flags." It's VM-grade isolation:
-
Each session gets its own kernel (hardware boundary, not just namespace boundary)
-
Private Docker daemon inside the MicroVM (no socket mounting, no host privileges)
-
File access, network policies, and secrets defined before the agent runs
-
Disposable by design - delete and start fresh in seconds
What Nobody Tells You: An LLM deciding its own security boundaries is not a security model. If your agent's system prompt says "don't delete files" - that's a suggestion, not enforcement. The bounding box has to come from infrastructure, not from a prompt. That's what Sandboxes provide.
Your 7-Day Journey #
Let's look back at how far you have come.
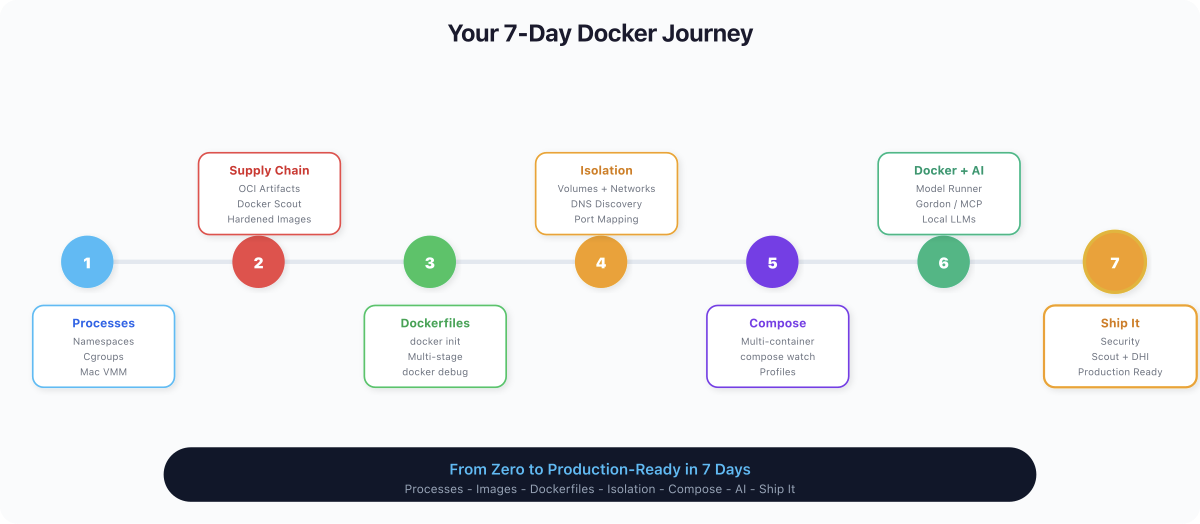
Day 1: Containers are processes. Not VMs. Not sandboxes. Linux processes restricted by namespaces (what they can see) and cgroups (what they can use). One kernel, many isolated process trees. This mental model underpins everything.
Day 2: Images are supply chain artifacts. Layers, manifests, content-addressed digests. Tags are mutable pointers; digests are immutable truth. Your image is a graph of filesystem snapshots, and every dependency in that graph is a potential attack vector.
Day 3: Dockerfiles, docker init, and multi-stage builds. You stopped writing Dockerfiles from scratch and started generating them. Multi-stage builds cut your image sizes by 10x by separating build dependencies from runtime.
Day 4: Breaking isolation on purpose. Volumes break filesystem isolation (data survives containers). Networks break network isolation (containers talk by name via DNS). Port mapping breaks host isolation (the outside world reaches in). One coherent story about carefully poking holes in container isolation.
Day 5: Docker Compose for real workflowsor real workflows**.** One YAML file, one command, an entire application stack. Services, networks, volumes, dependency ordering - all declarative, all version-controlled. Nobody types docker run with 15 flags in real life.
Day 6: Docker + AI.er + AI. You pulled an LLM from Docker Hub, ran it locally with Metal GPU acceleration, hit it with an OpenAI-compatible API, and built a real AI-powered Flask app with Compose. Docker Model Runner, Gordon, MCP Toolkit - Docker is now an AI development platform.
Day 7: Production security. Non-root users, read-only filesystems, resource limits, capability dropping, vulnerability scanning, hardened images. The difference between "it runs" and "it's safe to ship."
You went from docker run hello-world to hardened, scanned, resource-limited production containers in seven days. That is not trivial. That is a real foundation.
Where Docker Ends #
Docker builds containers. It does not run them at scale. And that is fine - it was never meant to.
Kubernetes is where containers go when they outgrow a single machine. Pod scheduling, auto-scaling, rolling deployments, service meshes, ingress controllers - that is K8s territory. Start with kind or minikube locally, then move to managed services (EKS, GKE, AKS). Everything you learned about images, Dockerfiles, and Compose translates directly. K8s runs the same OCI images you have been building all week.
For Kubernetes, it's easy, we have multiple courses
https://youtu.be/EV47Oxwet6Y?si=Hw69DkBc3MolinUy
Testcontainers is where Docker meets testing. Spin up real databases, message brokers, and services as throwaway containers inside your test suite. Your integration tests run against real infrastructure, not mocks. It uses Docker under the hood, so everything you know applies.
Apple Containers is Apple's take on container runtime - one lightweight VM per container instead of Docker's shared-VM model. Sub-second boot times, stronger isolation, written in Swift. It is interesting for macOS-native workflows, but Docker remains the standard for production and CI/CD.
What Nobody Tells You: Docker is not competing with Kubernetes. Docker builds. Kubernetes runs at scale. They are complementary tools, not alternatives. Every K8s cluster runs Docker-built images. Every CI/CD pipeline that feeds K8s uses Docker to build and scan. Learn both. In that order. Docker first - because you cannot orchestrate what you cannot build.
The Production Checklist #
Before you ship any container, run through this:
[ ] Non-root USER in Dockerfile
[ ] --read-only filesystem + --tmpfs where needed
[ ] --memory and --cpus limits set
[ ] --cap-drop=ALL + selective --cap-add
[ ] --security-opt=no-new-privileges
[ ] docker scout quickview - zero critical, zero high
[ ] Hardened base image or patched base image
[ ] HEALTHCHECK in Dockerfile
[ ] Log rotation configured (--log-opt max-size, max-file)
[ ] Image tagged with git SHA, not just :latest
[ ] Secrets in mounted files or external vault - never in ENV or layers
If you cannot check every box, you are not ready to ship. Go back and fix it. The checklist is not optional - it is the minimum.
Now Go Build Something #
Seven days ago, you did not know what a container was. Today, you can build one that is hardened enough to face the internet.
That is a real skill. Not a certificate. Not a badge. A skill - the kind that shows up when you push to production at 2 AM and everything works because you built it right the first time.
Docker is not the destination. It is the foundation. Everything that comes next - Kubernetes, service meshes, GitOps, platform engineering - is built on top of what you learned this week.
Now go build something amazing. And when you do, build it in a container.
This concludes the 7 Days of Docker (2026) series. If you enjoyed learning in a new way, then do follow me on X and connect with me on LinkedIn.
Do share the articles and pointers you loved the most on socials and tag me.
Get new posts in your inbox.
Spotted a typo or want to improve this post? Edit on GitHub →